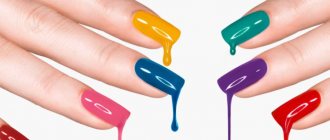
Manicure with gel polish confidently entered the lives of modern women several years ago. All this time, the formulas of the products and the technology for their use are constantly being improved. High-quality cosmetics, combined with proper application, provide a durable and reliable coating on the nails for up to four weeks. The secret of this result lies in the unique structure of the gel polish. It consists of special polymers and pigments that give it color. At the same time, it contains no solvents, so the product does not dry out on its own. It can only be converted into a solid state by polymerization in a UV/LED lamp.
As a result, a chemical reaction occurs - the molecular structure changes in a few seconds. The coating acquires the required strength and resistance to mechanical damage. It can be removed using cutters or softened with special solutions. This is how polymer-based varnish differs from regular varnish, which begins to “leave” from the nails after just 24 hours. In addition to the aesthetic one, it also plays a practical role, strengthening and protecting the plate. Even thin and brittle nails gain strength with it. However, many clients complain about premature detachments and chips of gel polish, which appear 5-7 days after visiting the master. And sometimes it even wrinkles and doesn’t dry in the lamp. We'll talk about how to avoid this outcome below.
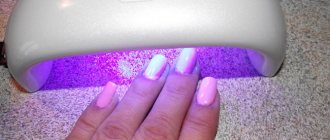
UV/LED lamp: benefits and harm
It would seem that the UV lamp has no drawbacks, because it copes 100% with its function - the polymerization of gel polish. But the use of the device is surrounded by speculation about its harm. Many girls still do not dare to have such a manicure due to mistrust and ignorance. First of all, they are frightened by the very phrase “ultraviolet radiation”. Various skin diseases, including oncology, are attributed to him. There is some truth in this - ultraviolet radiation actually does harm the body, but only in large doses. The degree of its exposure in such lamps is extremely low and does not affect health in any way. Modern manufacturers have made sure that the devices work not only efficiently, but also absolutely safely. Before use, read the instructions - the permissible duration of the procedure is always indicated there.
The main thing is to give preference to quality products. When choosing, be sure to pay attention to equipment certification. If there is none, it is better to refuse the purchase. Homemade lamps can harm the nail plate and skin of the hands, cause irritation or an allergic reaction. Certified products of European brands can be found in the Royal Gel online store. Gel polish cannot be used for clients with individual ultraviolet intolerance, although this happens extremely rarely. It is indicated by itching and redness of the skin after drying in a lamp. As a rule, people are aware of this feature of their body, because a similar reaction occurs in the sun.
Normally, the procedure should take place without discomfort or pain. Those with thin nail plates may feel a slight burning sensation in the nail area that goes away after a few seconds. It is caused by the release of heat during polymerization of the base. This side effect does not affect health in any way and does not bother all clients. To minimize it, apply the base in a thin layer. The thicker the layer, the more heat is generated and the greater the likelihood of discomfort. It is important to follow technology, and myths about the “disadvantages” of UV lamps will not affect you or your clients.
Instructions on the bottle
Let's look at a simple example. Reviews of American-made My Nail gel polishes are diametrically opposed. Some do not spare enthusiastic epithets, praising good wearability and excellent pigmentation, thanks to which even one layer of coverage is enough. And for some, this material seems simply disgusting, because it swells with bubbles and quickly moves away from the nail plate. What causes this difference?
The answer can be found on the label: My Nail polish requires drying in an LED lamp for at least 2 minutes. This is not a disadvantage, it’s just that a highly pigmented coating takes longer. The usual 30 seconds is not enough for him.
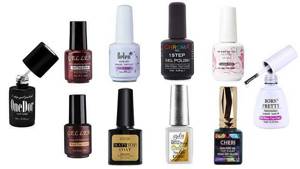
This is just one example. There are plenty of similar materials in a variety of price segments, from the budget Bluesky to the premium Luxio.
Trust the manufacturer. Read the instructions and follow them. Then the question of why gel polish takes so long to dry in a lamp will not worry you. You will simply know that this particular material requires longer drying.
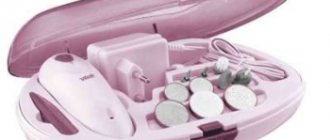
Rules for using the lamp
New generation devices have a simple interface and are as easy as possible to use. Some models are equipped with a digital display that displays a timer, as well as motion sensors. All UV lamps are subject to basic rules for handling electrical equipment. They should not be dropped, impacted, damaged or touched with wet hands. The inside of the lamp must be cleaned with a solvent - solid drops of gel polish can interfere with the normal operation of the device. With careful use, it will serve you for several years without breakdowns or repairs. Follow a number of simple recommendations.
- Please read the instructions first. It may differ from one manufacturer to another. Often it is written in a foreign language, and masters ignore it. It’s better to play it safe and translate it using an online translator or look for the Russian version on online shopping sites. This way you can avoid the most common usage mistakes. Before each use, cover the lamp with a clean cloth.
- Polymerization in modern devices takes from 30 to 60 seconds. If the client keeps his hands in the lamp for more than this time, it is advisable to moisturize them with a special cream with UV protection. This way you will 100% protect your delicate and sensitive skin from large doses of ultraviolet radiation.
- Do not exceed the recommended duration of the procedure. You can find out about its completion using a timer - if not a built-in one, then use your own. For example, before each drying, set the required number of seconds on your smartphone.
- Nothing lasts forever in the world of electrical equipment - especially when it comes to light bulbs in a UV device. With daily use, they need to be changed approximately every six months. If you are not a manicurist and use the lamp once every few weeks, the bulbs will last much longer - about two years.
- Not only the lamp, but also the rest of the equipment should be professional. Cleanliness in the workplace plays an important role - one of the most common causes of gel polish peeling is dust getting under the coating. You can get rid of tiny nail particles using a manicure vacuum cleaner. It will also provide comfort during the procedure and protect your lungs. To make your manicure durable and beautiful, you need to use high-quality tools at all stages - from cleaning to applying the product. Hardware manicure devices will help you clean the plate from cuticles and dry skin, as well as remove the old coating without harm. Choose your supplies carefully. Pay special attention to cosmetics - bases, bonders, primers, gel polishes and top coats.
What to remember
Let's summarize:
- It is no longer possible to imagine the modern nail industry without gel polish. The nail coating can be made more beautiful and durable with the help of a lamp and special materials.
- A lamp for drying gel polish is a very necessary device. Nowadays, not a single professional master can do without it. And it will also be useful at home - the cost of a lamp will be more than compensated by the time savings and quality of your manicure.
- There are four main types of lamps: ultraviolet, LED, gas light and hybrid. In any of them, gel polish dries many times faster than with lampless drying.
- Innovative products are appearing on the market that do not require curing in a lamp. But at the same time, they can also provide a beautiful and long-lasting manicure.
Girls, how do you prefer to dry gel polish? If you've ever dried a gel coat without a lamp, how long did this manicure take you? Share your experience in the comments!
See you again in the next article!
Why doesn't gel polish dry under a lamp?
In some cases, the client and the artist will receive an unpleasant surprise during the procedure, when strange reactions occur with the gel polish after drying. Instead of polymerizing, it rolls down, wrinkles and remains in liquid form on the nails. Normally, this should not be the case, of course. Let's look at the most common reasons.
- Violation of technology . Many masters begin to blame the lamp for everything, but you need to start by analyzing your own mistakes. Follow the instructions and expose your nails to UV rays for the prescribed amount of time. Do not interrupt the process in the middle to check the degree of polymerization. It is better to wait at least half a minute, and only then remove your hand. Do not remove the sticky layer between dryings - it is necessary for more reliable adhesion. It is necessary to apply the base, top and gel polish in thin layers - the thicker they are, the higher the risk of poor results. Be sure to use an acid-free or acid primer before using the base.
- Low power . Some craftsmen use equipment purchased 5-7 years ago. Such lamps are considered obsolete - primarily due to lack of power. Its indicator should be at least 20 W for LED and 36 W for UV lamps. Otherwise, the polymerization process does not take 120 seconds, and the coating remains semi-liquid.
- Worn out device . The lamp itself cannot simply fail, but, as mentioned earlier, it is necessary to change the light bulbs regularly. Visually they may look working, but the result speaks for itself. If the lamp lights up but the gel polish does not cure properly, try replacing the worn parts.
- Bad base or gel polish . The cosmetics market for nail services offers a variety of products for every taste. When choosing them, pay attention not to the design of the jar, but to the composition. Polymeric substances must be at the beginning. Please note that rubber bases take longer to dry than regular ones, as they have a denser texture. At the same time, they have a self-leveling effect and practically do not form streaks, so they are suitable for beginners. You only need to remove the sticky layer from the top coat - the remaining layers just need to dry.
- Bright, dark and white gel polishes . Don't expect them to dry instantly, even under a powerful new generation lamp. It's all about the concentration and type of pigments that slow down the polymerization process. Don't be alarmed if they don't dry completely the first time - place your nails in the lamp again and wait 30 seconds longer. This also applies to milky and neon shades.
Acrylic Powder
This material has a wide range of applications. Mix the powder with the base and get an excellent material for strengthening your nails. Gently fluff the powder over the nail covered with undried topcoat - and you will get a velvet surface. Sprinkle the monograms with powder to make them velor and play with the contrast of textures. Highlight certain parts of the design by adding powder to a sticky layer of top coat for a frosty effect... In the hands of a true enthusiast, powder can accomplish a huge number of practical and design tasks.
But don’t forget about the technological features. Why doesn't gel polish dry in a lamp if acrylic powder was used in the design? The answer is simple: this material always doubles the drying time. If you use it, increase the drying time to 2 minutes.
The same rule applies to other acrylic toppings. For example, granulated sugar.

Why does gel polish chip off at the ends?
Quite often, customers complain about chipping of the coating in the end zone. It looks sloppy and the manicure has to be redone from scratch. There may be several reasons. The main one is the individual characteristics of the plate. The material does not adhere well to soft and flexible nails - ideally, it will take a maximum of two weeks until it starts to chip. In this case, the best option is acrylic or gel extensions. Cracks can also form due to improper treatment of the nail plate at the stage of hygienic manicure. The master must remove all irregularities with a file and apply the base to the buffed surface. When applying the coating, be sure to seal the ends, and only then place your nails in the lamp.
Why doesn't the base or top coat dry?
The base and top coat may not dry if the technology of the preparatory stage is violated, because the base rests on the natural nail plate. The most important thing is to thoroughly degrease the surface so that the rays of ultraviolet lamps can penetrate the base layer and “glue” it to the nail with heat.
The top does not dry often when:
- use of low-quality materials;
- the use of LED lamps (the top dries only under ultraviolet light);
- the time the hand is in the lamp is too short.
Detachments at the cuticle and base
You can avoid unpleasant surprises by checking the expiration dates of products before using them. Gel polish loses its properties over time, especially if it is stored in improper conditions. You should be wary of the texture being too thick and the presence of lumps in the jar. Before use, the bottle with the product must be shaken - the pigments settle to the bottom over time. It is contraindicated to store gel polishes in direct sunlight, for example, on a windowsill. It is better to place them in a specially designated cabinet or box. The use of damaged materials is fraught with detachments at the base and cuticle.
But even the highest quality and freshest products do not guarantee an impeccable result if you do not remove the pterygium at the beginning of the procedure. This should be done even with a European unedged manicure. You can clean the cuticle area using softening compounds and an orange stick. The classic method is to use scissors and cuticle nippers, as well as cutters and equipment. Then the nail plate must be dried using a dehydrator and thoroughly degreased. Be sure to use a primer - without it it will not be possible to ensure reliable adhesion. Bonder can be applied over the primer - these two products complement each other well.
Causes of detachments at the side ridges
The material may come off in the area of the side rollers - this happens less frequently and is often due to insufficient elasticity. Chips and cracks largely depend on the shape and length of the nails - they form more often on a square and long plate. This can be avoided by using acrylic powder, created specifically for strengthening. It is applied to the wet composition, dried in a lamp, then the excess is removed with a brush and everything is covered with a base. The powder provides additional protection against chips and cracks.
It is also important to choose the right form - sometimes the best option may differ from the client’s wishes. The master’s task is to convince of the need for a shorter length or a rounded shape, which is more resistant to stress and mechanical damage. Practice and professionalism combined with quality materials guarantee a positive result.
What else can cause problems when applying artificial turf?
Have you tried all kinds of bases, but your nails still appear chipped and peeling? There are several explanations for this, for example:
What to do? Do you want to part with your long-lasting, flawless manicure forever?
Of course not! You can take the webinar “Complicated cases in base coating of nails” from the teacher of the ParisNail school Velmitina Zaitseva.
You will receive a detailed algorithm for applying and fixing the material, learn all the secrets of the teacher and be able to avoid material detachments!