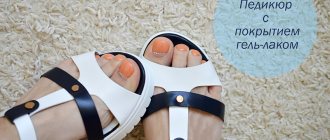
Gel polish on the legs is performed using a primer, liquid base, flower bed and top. But first, the nails are prepared for the procedure - excess length is removed and shaped, the cuticle is pushed back and adhered skin particles are removed from the base of the plates.
Unlike manicure, leveling with a base is not performed; other products are also applied as thinly as possible. But any design can be made, including with rhinestones, sparkles, kamifubuki, drawings, and foil. In the salon, a pedicure costs from 700 rubles. up to 5000 rub.
Features of gel polish on legs
Gel polish on the legs is done and worn a little differently than a manicure:
- nails cannot be long, they are cut and filed, if not to “zero”, then still quite short;
- decor is used more modestly than for hands, since there is a higher chance that it will get in the way and come off faster;
- leveling with a base is not done during pedicure;
- over-wearing the coating is even more dangerous than with a manicure, especially during the season of closed shoes;
- design can be varied;
- Finger separators should be used when applying the coating, otherwise it may smear.
Material advantages
A pedicure with a polymerizing coating has several advantages:
- the design can be made much more interesting than with regular varnish;
- it lasts longer, maintaining pristine freshness;
- it is not hampered by exposure to sea water or chlorine in the pool;
- feet look well-groomed for 2-3 weeks without additional effort.
How to do a pedicure with gel polish
Pedicure with gel polish is performed in a certain sequence:
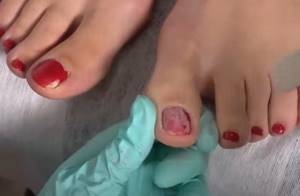
- Treat feet with antiseptic.
- Nails are prepared for coating.
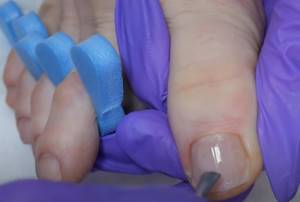
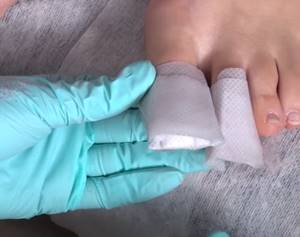
- Put on finger separators.
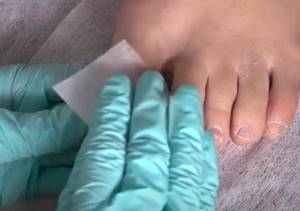
- Wipe the nail plates and the skin around them with a degreaser.
- Apply primer and let it air dry for a minute.
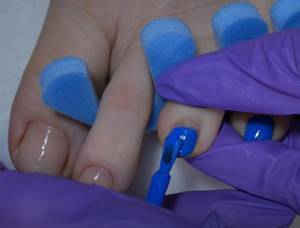
- Use a thin layer of liquid base for each nail.
- Dry it in a lamp, placing your foot there so that your toes are exposed to the radiation.
- Remove the sticky layer, if any.
- Apply gel polish of the selected shade, including coating the end parts with it.
- Dry the layer of the flower bed in a lamp, remove the stickiness.
- The finish is applied and polymerized.
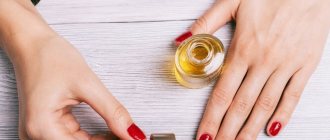
Preparation for coating
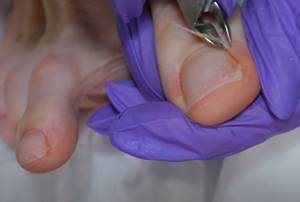
The coating will lie flat and will look aesthetically pleasing only on prepared nails:
- The cuticle is pushed back with a pusher.
- The pterygium is thoroughly cleaned.
- If the cuticle is wide, it is cut with special scissors or nippers or tweeters.
- The nails need to be shaped, but so that the corners are not too cut and then grow ingrown.
- The ends are processed with a file so that they become smooth, without burrs.
- The plates are wiped with a degreaser to remove dust and excess moisture.
Watch the video on how to properly do a pedicure and treat your feet:
At the preparation stage, attention should also be paid to the feet, since neatly painted nails look discordant with rough, unkempt heels. They can be steamed in water or treated with a keratolytic agent. The softened skin is polished with a hardware attachment to remove excess stratum corneum.
Peculiarities
Unlike a classic pedicure with regular varnish, which our mothers did, a pedicure with shellac or gel polish allows you to maintain color and shine, does not peel off or peel off (if applied correctly). This is a real lifesaver for a vacation where there is sea water and sand, for a swimming pool where the water is chlorine, and for many other cases.
Pedicure with gel polish
So, the result of the synthesis of polymers and conventional varnish in pedicure has the following undeniable advantages:
- Resistance to chips and scratches;
- Wear from 2 weeks;
- Shine thanks to a top that is resistant to external influences;
- Nails with shellac are stronger and less likely to break.
How long does a pedicure with gel polish last, and how often is correction needed?
A pedicure coated with gel polish should be worn for no more than 2-3 weeks, although toenails grow more slowly than fingernails.
But a longer absence of correction in this case is more dangerous. The slightly grown edge rests on the shoe. And this leads to increased stress on the nails. They may begin to peel, and your fingers may hurt. There is a danger of nails detaching from the bed, deformation, and onycholysis. Therefore, correction should be carried out every 2-3 weeks. It depends on the growth rate of the plates, everything is individual.
How long do you wear Shellac?
If we talk about how much Shellac was worn on the nails of their owners, then we may receive different reviews. Some proudly declared that the coating lasted three weeks like new, while for others, after two days it began to peel off and peel off like a film. In most cases, this depended both on the quality of the Shellac itself and on the method of its application.
It is worth noting that the French coat on the nails lasts somewhat less. This is due to its structure, which is heterogeneous and consists of two types of Shellac.
If you are planning to go to the sea, then it is worth remembering that while you are acquiring slender forms and a beautiful bronze skin tone, the bright sun and sea salt destroy the beauty at your fingertips. Therefore, while on vacation, sunbathing on the beach, remember: such a pastime is not the best choice for your manicure.
How safe is it for nails?
A nail pedicure is as safe as a manicure if certain conditions are met:
- coat only healthy plates;
- when preparing them, work carefully, do not press too hard with a cutter or hand tools, and do not go deep under the cuticle;
- use high-quality products - varnishes, bases, tops, etc.;
- sterilize instruments or buy disposable ones;
- Do not wear tight shoes, and if you have problem feet and nails, leave the design with gel polish until summer.
There is another important nuance - when performing a pedicure, they do not use a base for leveling. Otherwise, there will be too much material on the nail plates, which will lead to damage. Masters often use single-phase gel polishes for pedicures so that the layer on the nails is thinner. You should also not overload them with an abundance of other components - powder, gels, tops.
It is better to attach voluminous decor (rhinestones, modeling) closer to the base rather than to the ends. Otherwise it will quickly fall off. In the meantime, it will be worn and may cause discomfort.
How long does it last?
Judging by the numerous reviews of this pedicure, the coating lasts for three weeks. Basically, correction is required when the toenails grow and the appearance of the pedicure becomes a little untidy.
The main thing is to follow the rules for applying shellac so that the coating is applied and dried evenly. Also, do not forget that in a French pedicure, for example, overgrown nails are not so visible, but if you go with an overgrown nail plate, this can have negative consequences:
- Injuries to the nail and/or nails;
- Chips;
- Bundles;
- Infection in the split nail plate.
That's why it's so important to take care of your feet and get a shellac pedicure on time.
@pedicurchik
@manikyur_pushkino_
@nogotochkistar
Interesting designs with gel polish on legs
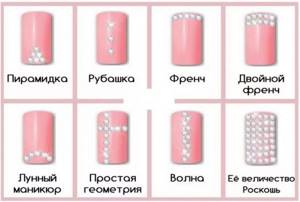
Fashionable design options for gel polish on legs are:
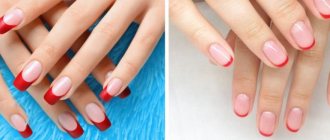
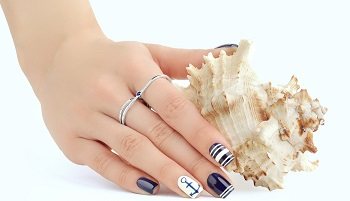
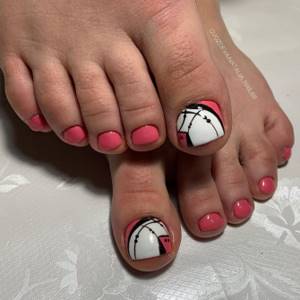
- French. The classic one with a white free edge is popular. But the main color is opaque pink. Basic blue gel polish and white for a “smile” are also in fashion when doing French.
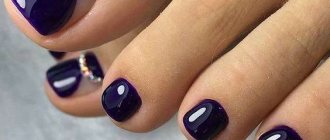
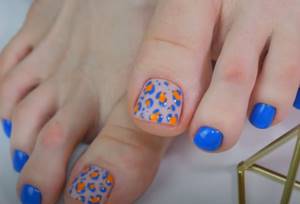
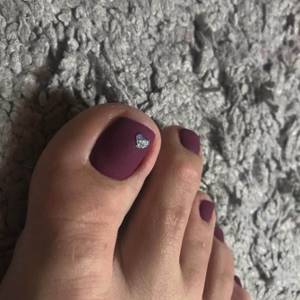
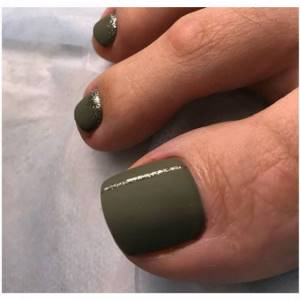
- Bright monochromatic. They use a matte or glossy finish, both of which look very beautiful. The rich color is complemented with rhinestones. But they are not glued to the most noticeable thumbnail, but to the one nearby, and along the cuticle.
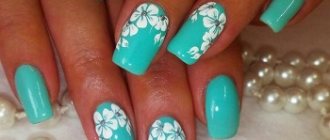
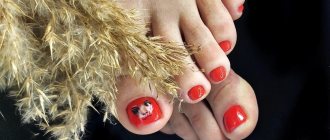
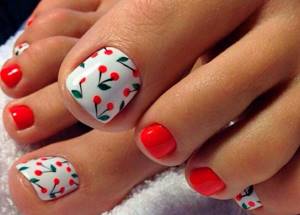
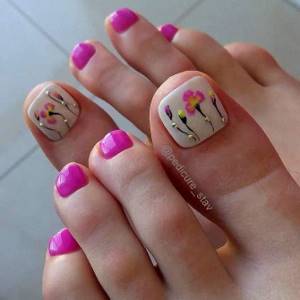
- With drawings. Hand painting is done on the largest nail. If it is a slider, it is glued there. The latest trend for summer is whole fruit or slices. Funny silhouettes are also in fashion - black foot prints or cat paw prints. You can make different designs on the right and left legs.
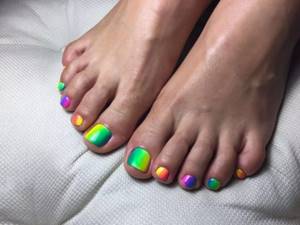
- Gradient. The classic vertical one is done on the thumb. And the rest of the nails are painted in the same colors, but entirely. For example, if lilac and yellow are used for the thumb, then on the next finger the plate is covered only with the first, then with the second, etc.
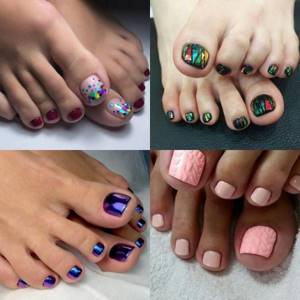
- With sparkles. They decorate the entire nail of the second finger. For the rest, use a bright color and a matte top. You can highlight the holes with sparkles.
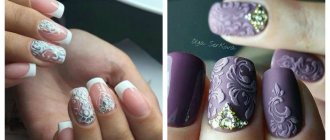
- A combination of three shades of gel polish, one of them is light. They cover the nail on the thumb. And the second and third colors are used to make the design - leaves, twigs, flowers, etc.
- Stripes. They are made of different lengths, vertical or horizontal and drawn on the thumb in three or four similar shades (pink, lemon, beige or red, fuchsia, burgundy). For the remaining nails, use one of the same colors, covering the plates completely.
- In white. They make a monochromatic manicure or an ornament from small details. In the second case, you can draw it not only on the thumb. Or they make drawings of insects (ladybugs, flies, multi-colored butterflies) on a snow-white background.
- With kamifubuki. For the thumb, you can take different sizes and shapes. For the rest - small stars and circles. The background can be made pastel or bright - as desired.
- With negative space. It can be played up in different ways - with silver sparkles and a cool shade of the base color, with foil stripes, with bright colors of gel polish.
Nail design
If you wish, you can turn your toenails into a whole work of art; all you need is a little imagination and a few colors of gel polish. There is also a pedicure, for which additional elements are used, for example, rhinestones. Pedicure, like manicure, can be performed in both classic and modern styles.
Abstraction
This type of design definitely cannot be called classic. But it is very variable and does not require special artistic skills. When performing abstraction, the design on the nails is applied in a chaotic manner or repeated on each nail, but without maintaining accuracy. If you have the appropriate skills, you can draw something.
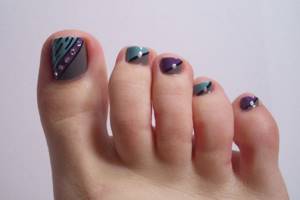
Abstract pedicure does not require precision in drawings and lines
Gradient
This type of pedicure involves color extraction. The direction does not matter; the gradient can be horizontal or vertical. Sometimes the color stretches from one nail to another. There are many options, and they are all popular. This type of coating may contain several colors or only two colors.
There are several technologies for performing gradients. This design can be done with a brush or sponge. In the first case, stripes of shades are applied to the nail, and the border between them is shaded with a brush. Using a sponge is much easier. You just need to apply the colors on it and stamp it on your nails.
Performing a gradient requires certain skills and dexterity. The design is good for summer.
Pedicure with rhinestones
Rhinestones make your nails look elegant, and designs using them are very easy to implement. It is enough just to place them on the nails along with the last layer of gel polish. The top coating is already applied to the rhinestones and allows them to last longer.
Using rhinestones you can create various designs
Pedicure in monochrome
Monochrome is the most conservative type of pedicure. It involves using only one shade of gel polish. But this does not mean that the pedicure will be boring, because the shade palette includes many bright and unusual colors.
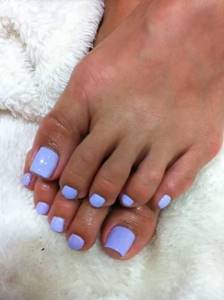
Monochrome pedicure can be made glossy or matte
Broken glass design
The nail pattern resembles fragments. This trend is relatively new and looks unusual, creating a 3-D effect. To perform such a pedicure, you will need holographic film or cellophane; you can also use foil. The material is cut into pieces, which then need to be applied to the last layer of gel polish before drying it in the lamp, so that they stick to the nails. The pedicure, as usual, ends with the application of a top coat.
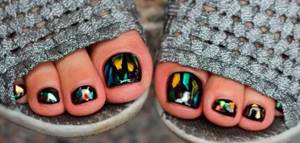
Holographic film for “broken glass” is cut in random order
Video: pedicure design ideas
Which gel polish lasts best on toenails?
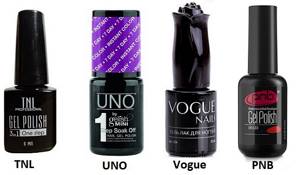
For toenails, nail technicians prefer CND gel polish. It applies thinly but does not smear. There are different colors, quite dense, the pigment in which is distributed evenly. Vogue, PNB, UNO, TNL products are also suitable for pedicure.
The pigmentation of gel polishes is a particularly important property when performing a pedicure. If the color is dense, you can apply it in one layer, which is a big plus for toenails. It’s good when the product is of medium thickness.
A texture that is too steep can cause the gel polish to apply thickly or unevenly. And it is physically difficult to apply it to small toenails. And too liquid gel polish spreads, and in one layer it can become bald.
Advantages and disadvantages
From the advantages, as described above, you can understand that shellac:
- does not require coating the nails with a primer (and this reduces the time for creating a pedicure and saves the budget);
- Removal procedures are much simpler and more convenient than gel polish;
- a large number of shades;
- possibility of nail modeling;
- strengthens nails that are prone to increased brittleness;
- practically hypoallergenic;
- long wearing time of the coating;
- non-fading shine;
- the ability to remove the coating yourself;
- used for nail extensions if part of the plate is damaged.
The disadvantages of shellac and gel polish are approximately the same. This:
- their price;
- exposure to UV lamps on skin and nails;
- noticeable regrowth of nails with colored coating;
- drying skin and nails after shellac remover.
Shellac has many more advantages than disadvantages, so it is still worth covering your nails with this composition, but do not forget that your nails need a break so that they have time to recover and take a break from colored varnishes.

@dilara_art_nails
@gvozdeva.natalia_nail68
@harmonia_beautyvld
What to consider when deciding to do it at home
It is better to do a pedicure at home without a device if you do not have clear knowledge and skills in working with it. In addition, using the device on yourself is physically difficult and inconvenient, so there is a high risk of injury. The cuticle should not be removed either. On the toes it is thin, barely visible, there is a danger of cutting off excess skin and getting hurt. It is enough to move it aside and remove the pterygium with an orange stick.
Gel polish will lie smoothly and beautifully if you remove streaks before polymerization. For this, toothpicks, orange sticks, degreaser or cleanser are useful. In addition to them, you should prepare the necessary tools and accessories in advance.
The coating is also removed without a device by soaking. Use gel polish remover, foil or silicone caps.
What material is needed
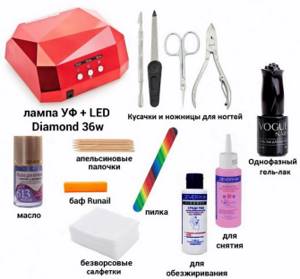
To perform a pedicure yourself, you should prepare the following tools and accessories:
- nail clippers or scissors, because on the legs they are denser and thicker than on the hands;
- metal pusher or tool with a silicone tip;
- several orange sticks;
- cuticle scissors;
- a nail file, maybe an inexpensive and simple metal one;
- lint-free wipes;
- degreaser;
- primer;
- liquid consistency base;
- gel polish;
- finishing agent;
- ultraviolet or LED lamp for polymerization of the coating.
This is a mandatory set of items, without which a quality pedicure is impossible. Lovers of intricate designs will also need decor.
Procedure
Pedicures at home are done almost the same way as in a salon, but they do without a device, and you don’t have to cut the cuticle. It’s not worth working with cutters without having learned how to do this with your toenails. Without knowledge and experience, it’s easy to get hurt, and instead of a pedicure, you end up with lameness until the wound heals. And physically performing a hardware pedicure on yourself is very inconvenient.
The same can be said about working with cuticles. It is enough to push it away with a pusher and clean the pterygium to make the coating smooth and aesthetic. In general, the procedure consists of the following steps:
- Nail preparation, which includes cutting off excess length, smoothing the edges with a file, pushing back the cuticles with a pusher and dry cleaning the pterygium with an orange stick.
- Treating the plates and skin with a lint-free cloth soaked in a degreaser to remove dust and moisture.
- Using a primer to improve the adhesion of the material to surfaces.
- Application of the base product and its polymerization in the lamp.
- Coating with gel polish, performing a complex design (this stage may consist of several intermediate steps, interspersed with drying in a lamp).
- Polymerize the flower bed and remove the sticky layer after a couple of minutes.
- Using the top, drying it in a lamp.
For the convenience of applying the base, flower bed and top, finger separators are put on, and in the absence of a device, cotton pads rolled into a tube are used. You can steam your heels in hot water or soften rough skin with a keratolytic. Then it is cleaned off with a foot grater. When the pedicure is completely ready, apply oil to the skin around the nails and cream to the heels.
How to remove
It is better to remove the coating at home by soaking:
- File off the top with a hard file.
- Apply gel polish remover to pieces of cotton pad.
- Attach them to each nail and put foil or silicone caps on top.
- Leave for 15-20 minutes.
- Remove the foil and cotton wool, and use an orange stick to clean off the sodden coating.
- Wipe your nails with gel polish remover again.
- Make a foot bath to wash away any remaining solvent.
Hygienic pedicure
A beautiful pedicure is not only a coating, but also well-groomed feet and toes. To keep your legs soft and smooth longer after going to the salon, you need to pay attention to them every day.
Make it a rule that you need to spend at least 5 minutes on your feet, 2 times a day - morning and evening.
To maintain a pedicure, the skin must:
- cleanse Any pollution, especially summer dust, provokes temptation, which can lead to cracks and unpleasant keratinization;
- exfoliate . Horny spots of varying degrees look untidy, cling to tights, and also interfere with the absorption of the cream;
- moisturize. Moisturizing determines how quickly the skin becomes rough after going to the salon.
Baths
Soak your feet in a bath 1-2 times a week. You can take regular warm water at 35-40 degrees or add herbs to it - chamomile, calendula, nettle.
You can also use essential oils as an additional component - 3-4 drops per liter of water. Tea tree and neroli are suitable - they have an antibacterial effect, mint for cooling, or any other favorite oil.
Keep your feet in the bath for no longer than 15 minutes. – the subsequent time will be harmful, as moisture will begin to leave the skin. After the bath, you can perform mechanical peeling, scrubbing, or immediately apply cream.
Foot bath recipes
Using the cream
Apply cream to your feet twice a day. Such prevention after a pedicure will moisturize the skin, prevent the formation of peeling and reduce the risk of cracks. For summer care, creams with a cooling effect are suitable - with mint or tea tree. They have a deodorizing effect and also eliminate any odors.
The Gehwol brand has a proven cream with a cooling effect. If you consider budget brands, then take a closer look at EcoLab or Planeta Organica.
Gehwol products for solving foot skin problems
In winter, the skin requires more nutrition, so use appropriate creams. For winter, products with oils containing shea, shea, lavender, coconut are suitable. Cream with Shea butter is presented by EcoLab and the Vesna brand.
After applying the cream in the morning, wait until the cream is completely absorbed, otherwise your foot will slip in the shoe. If you sweat excessively, you can sprinkle your feet with talcum powder. It is better to wear socks at night so that the cream does not remain on the bed linen and is absorbed into the skin as much as possible.
Types of foot care creams
Scrubbing

Regular scrubbing will help maintain the results of a salon pedicure. There is no need to do it every day - 1-2 times a week is enough. For scrubbing, you can use a special store-bought foot scrub or make it at home.
- Take 3-4 tablespoons of coffee cake and add 5-7 drops of any essential oil and 3 tbsp. l. Cosmetic - shea, lavender, grape seed. Stir the mixture until smooth.
- Try making a scrub with coarse salt. Mix 2-3 tablespoons of salt with cosmetic oil, olive oil, add essential oils, you can also try honey - 1 tsp. for 3 tablespoons of salt.
Apply the scrub, either homemade or store-bought, in a circular motion to your feet and gently massage. This procedure will remove small roughness and flaking, as well as improve blood flow and relieve fatigue. After scrubbing, apply moisturizer.
Instead of scrubbing, you can perform peeling - mechanical or acidic..
- Mechanical peeling is the removal of rough skin using a grater or pumice. The main thing is not to overdo it and not to rub until it hurts. Before mechanical peeling, do not forget to steam your feet in a bath for 10-15 minutes - this will facilitate the removal of dead skin and will not allow it to touch living tissue;
- acid. Peeling using special products based on fruit acids. Depending on the manufacturer, the compositions can be applied to the entire foot or only to problem areas. Local application is typical for professional products, for example, from the Kart company. For home use, you can choose a safer and cheaper option - a softener from Milv or PNB. The procedure for using acid peels depends on the specific product, so before use, be sure to read the instructions and follow the recommendations.
Review of foot peels for professional and home use
The right shoes

The right shoes are the ones that fit properly and are made from a material that can “breathe.” If at least one of these criteria is not met, then keratinization will form on the legs faster - at the site of rubbing the layer will be larger. If you notice that your skin is quickly becoming rough and corns are appearing, then it’s time to replace your shoes.
Maintaining Health

The skin can become rough, crack, and become very dry due to internal disorders. For example, with diabetes, the feet become very rough, and with a fungal infection, the skin between the toes may crack. Another common reason is a lack of vitamins, which is especially common in the autumn-winter period. Vitamin deficiency is accompanied by hair loss, deterioration in the quality of nails, and increased dryness of the skin, including on the feet.
Vitamins for the skin - which ones are necessary and how they affect
If the pedicure does not last long and the skin quickly returns to its original state, then listen to your body, perhaps it is giving other signals.
Good master
The reason why the skin becomes covered with new roughness just a week after the pedicure may lie in the technique of the master’s work.
There are two options here:
- Insufficient treatment of the feet . Immediately after the procedure, the legs seem soft and smooth, but the very next day small peelings and roughness have not been removed are visible;
- Overprocessing . If, when removing keratinization, the master also touches healthy skin, then the body will begin to work for regeneration and even more growths will appear on the damaged area than were originally there.
This usually doesn’t happen with qualified specialists, so think about changing the specialist if your skin becomes rougher over and over again, even if you follow all the recommendations.
Price for services in the salon
The cost of a pedicure in a salon ranges from 800-1000 rubles. up to 5000 rub. This depends on many factors:
- establishment level;
- the chosen design, the more complex it is, the higher the price;
- Is it necessary to remove the old coating from another master;
- Is there a need to correct the shape of the nails by extending the corners?
In any case, this is usually a more expensive procedure than a manicure, unless the latter is accompanied by complex actions (increasing length, strengthening with gel, etc.).
A pedicure adds completeness and well-groomedness to your look. And you don’t have to do it to match your manicure. On the contrary, on the legs the gel polish can be brighter and the design more explosive.