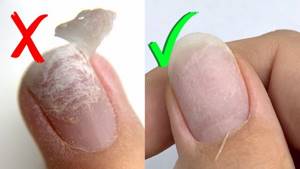
I want to become a manicurist. Where to begin?
Manicure, like any other occupation, requires constant improvement and training, dedication and discipline. Many girls living their dreams take courses and even open a beauty salon at home, which ceases to exist after a maximum of a year and this is in 90% of cases. It's time to take off your rose-colored glasses and make sure that you really want to become a master, working 10 hours a day, at least until you get the hang of it and acquire a large client base to maintain a stable financial condition of the studio.
Becoming a good manicurist is not as easy as you think. And becoming the best of the best is a feasible task, but it requires complete dedication. First of all, decide whether you really need this specialty. In order to put everything into perspective, ProstoNail has prepared a very informative list explaining who will definitely enjoy being a nail technician:
- you constantly scour the World Wide Web in search of inspiring ideas for home manicures, new public pages offering various nail decor options, and also subscribe to newsletters from the world of the nail industry and updates to the feed of fashion bloggers who post their bright manicures with enviable regularity;
- you are always ready to listen carefully and with participation to the stories of friends and acquaintances, admire gossip and skillfully understand women's intrigues. And so on a million times a day;
- you know how to be disciplined and organized, while skillfully managing your personal time and not overestimating your capabilities;
- you cannot live a day without drawing, but not on paper, but on tips, and you also regularly turn on an LED or UF lamp, because you think that its light has a calming effect on you;
- you are neat and pedantic, ready to work on a perfectly straight line of French manicure or draw a lunar design for as long as the perfect result requires;
- it won’t be difficult for you to get a manicure (and maybe even a pedicure) not only for yourself, but also for your beloved friend or mother;
- you are stress-resistant and friendly, quite motivated and not only financially.
If you think that at least 4 points out of 7 are your characteristics, then feel free to read the article further and find out what this mysterious profession of manicurist means. Naturally, the first and most important step you can take in this direction is to enroll in training courses that provide basic knowledge. And then try to apply them in reality, not forgetting about our useful tips, life hacks and announcements.
Is it profitable to do manicure at home?
Is it profitable to do a manicure at home? What is the difference between salon service and home beauty workshop?
Photo from YouTube
There are pros and cons to both options. Why do many clients choose a salon?
- They know for sure that their rights are protected.
- We are confident that the premises and all devices have been tested by the SES, and therefore comply with hygiene standards.
- They know that every employee is qualified and has undergone the necessary training.
Many people are even willing to overpay a little for this. But those who choose to visit a manicurist at home value the budget cost of the service more. And yet, the second category of people, who will become your client base, also want to be sure that their health is not in danger.
If many may not even look at your certification with an official diploma, paying attention only to practical skills and previous work, then you will have to comply with sanitary standards. In addition to all the necessary equipment directly for manicure, you will have to purchase a disinfectant and maintain sterile cleanliness in the work room and especially on the table. This is the only way your guests can trust you.
Be sure to devote time to sanitary cleaning of the work area - there should be no dust, used accessories or dirty files!
A detailed and extensive business plan for a manicure business will have to be written by those who open their own salon with hired workers - craftsmen, administrators and cleaners. And for those who will work for themselves, this point is much simpler.
Kinds
Milling cutters are usually divided into certain types depending on the material used for their manufacture. Based on this differential feature, the following types of cutters are distinguished:
- corundum;
- diamond;
- ceramic;
- carbide;
- pomegranate;
- silicon carbide;
- silicone;
- steel.
Corundum cutters are characterized by resistance to elevated temperatures and a variety of abrasive characteristics. In the process of polishing both nails and skin, you should use corundum tools that have soft to medium hardness.
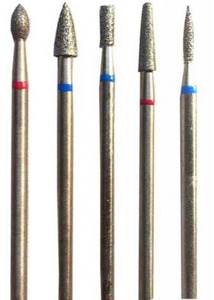
When performing hardware manicure, diamond attachments are traditionally used, which are distinguished by a wide variety of shapes, sizes and functions. Particularly popular are diamond attachments such as “flame” and “bullet”: they can effectively treat cuticles, rough areas of skin, the free edge of the nail plate, side ridges, and, if necessary, calluses. These diamond tips also work well with the correction of artificial nail coverings.
Ceramic attachments that are distinguished by their hardness effectively treat, along with side ridges, nail plates with cracks, and polish rough skin. Ceramic cutters are distinguished by their structural simplicity and safety. They also heat up less than metal ones.
When performing hardware manicure procedures, carbide cutters are also widely used, which differ in their special cut options. Small-diameter nozzles carefully process the cuticle; they are no less good in the process of adjusting gel, gel polish and acrylic coatings.
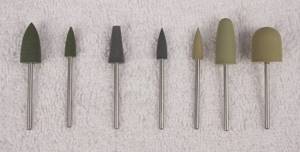
Silicone manicure attachments (also known as polishers) are primarily used when treating natural nails. At the same time, they are widely used when working with soft artificial turf. Based on their abrasiveness, silicone nozzles are divided into hard, medium-hard and finishing.
There is also a special, combined version of the nozzles: the material for their manufacture is silicone carbide. It is this that ensures the transformation of silicone polishers into more rigid attachments. At the same time, high-quality and fast polishing of nails is achieved through a combination of combined and silicone polishers of different hardness.
Garnet cutters are of high quality and are intended for a variety of manicure operations. Such types of attachments as “pomegranate flame”, “pomegranate ball”, “pomegranate drop” and others from this series are characterized by increased demand.
Silicon carbide tips are considered common: tips of this type are disposable caps with a rubber base. They are also convenient to use when performing some design work on your nails. Some attachments perform narrow functions. In particular, a tungsten cutter with titanium end coating is used when it is necessary to carry out upper or internal correction of an acrylic or gel coating.
How to choose the right machine for hardware manicure
Before purchasing a specific model, you need to determine the purpose of using the device. So, for working in a salon and regular use several times a day, you will need professional devices. For processing at home, low-power devices with five to ten attachments will be sufficient.
Main parameters of milling devices:
- power - it is measured in Watts (W) and shows what load the device is designed for and how much energy it consumes;
- speed - how many rotations the device makes per minute.
The higher the power rating, the more effective and faster the hand treatment will be. By adjusting the speed, you can choose the appropriate mode for each specific case.
The table shows the minimum parameters required for a particular purpose:
| P/n | Procedure | Power, W | Speed, rpm |
| 1 | Removal of cuticle and dead epithelium on fingers, grinding and polishing of plates, manicure | 15 | 20 thousand |
| 2 | Extension, correction of gel polish | 20 | 25 thousand |
| 3 | Mixed pedicure (device + classic edger) | 40 | 25 thousand |
| 4 | Pedicure | 50 | 35 thousand |
| 5 | Medical pedicure with treatment of ingrown nails, calluses, cracks | 50 | 50 thousand |
For a manicure, a machine with 25 thousand revolutions per minute will be enough, but you need to understand that a device with such indicators will not withstand constant use in a salon.
Economy class milling cutters
There are several types of such devices:
- Electric files. Power – up to 6 W, speed – up to 15 thousand rpm. Suitable for small amounts of work. They do not have a block and are not designed for heavy loads. The included caps are usually of the lowest quality.
- Machines with automatic clamping. Power – up to 10 W, speed – up to 25 thousand rpm. The devices look stronger because they have a compressor where the parameters are adjusted, and a stand for the router. However, they are made of insufficient quality materials, so they break quickly. Suitable for simple operations. For example, to correct the shape of a nail.
- Devices with a collet clamp. A more stable and durable option, but also suitable only for home use.
- Semi-professional. They have a locking wheel, the speed can reach 40 thousand rpm, the power usually remains at 10-15 W. Suitable for most manicure procedures, but do not always work “cleanly”. Some operations require manual modification. They wear out quickly if used every day.
Such devices are cheaper than others, but also have the appropriate properties. Processing with them takes many times longer and is not always effective.
Professional milling devices
Their power can reach up to 100 W, and the rotation speed is usually 40 thousand rpm and higher. They are resistant to constant loads and allow you to achieve the expected effect much faster. For convenience, many machines are equipped with additional options: side holders, push-button controls, thin tips, etc.
They may have a built-in vacuum cleaner that absorbs some of the dust from hand washing. Experts are not sure about the usefulness of this feature, since most of the particles still float in the air. A vacuum cleaner increases the price, but does not eliminate the need to wear masks and goggles.
Manicure stages
It is absolutely impossible to know everything. But there is a certain amount of knowledge about manicure for beginners, after mastering which you can confidently start working. It is necessary to include information about the stages of manicure.
Removal
Most often it all starts from this stage. It is he who lays the foundation for other actions. High-quality and even removal will save a fairly large amount of time on building the shape and leveling.
It is important to remember that it is not recommended to completely remove the previous coating if there are no detachments. It protects the nail from injury and damage and acts as an additional strengthening.
Manicure
It is better to perform a manicure during each procedure, because with it the final coating looks as beautiful as possible, your hands become more attractive and well-groomed.
Most often, a manicure is performed after removing and filing the mold. If you need to extend your nails, it is better to do a manicure as the next step so as not to injure the cuticle several times.
Coating
The process of coating nails with gel polish begins with thoroughly degreasing the nail plate. This can be done using a special liquid. If the client or specialist experiences itching, swelling and redness after the procedure, you can replace this product with regular alcohol.
Next you can move on to alignment. To do this, you need to apply a thin layer of base, then place a drop of material at the cuticle and smoothly pull it towards the free edge. Now you need to turn your hand over and use a thin brush to correct the architecture. The straightened nail should be placed in the lamp for 60 s.
After this, you need to apply colored gel polish in 1 or 2 layers, drying time on average 30-60 s. At the final stage you need to use a top coat. It can be used to make the final alignment to create the perfect highlight. Nails with a fully applied coating should be dried for 60-90 seconds.
Useful tips and tricks for pedicure beginners
To keep your legs looking beautiful and well-groomed for longer, you should follow some recommendations.

Remember that keeping your feet hydrated is key to making your pedicure last longer. It is necessary to moisturize the skin with creams and care for the cuticle every day. To keep your heels smooth and soft for a long time, exfoliate with sea salt.
So, anyone can do a pedicure at home. The main thing is to arm yourself with the necessary arsenal of tools, to be careful and attentive. And then your feet will become soft, well-groomed and beautiful. Good luck!
You may also be interested in:
- 10 Best Pedicure Training Courses;
- Polish or Life: The Story of How to Make a Successful Career in the Nail Business;
- How to Become a Manicurist? 6 Simple Tips for Beginners;
- What is Pedicure? 6 Non-Obvious Facts About What is Included in the Procedure and What is Necessary for It.
What's next
Don't know how to decide on a course? Here's a step-by-step plan to save money and gain a high level of knowledge:
- Are you already doing manicure and want to learn new techniques and designs? Take a closer look at specific courses that do not contain general information about manicure, diseases and sanitary rules. This way you will save time and money. Go to point 3.
- Have you just decided to become a manicurist? Or did you do a manicure just for yourself and don’t know about all the nuances? Choose beginner courses that cover multiple techniques. This way you will choose the appropriate option and learn all the features of the profession, the selection of tools, equipment and materials. You can take free courses to understand whether you like the profession or not.
- Look at the document confirming completion of training. Licensed schools issue a standard certificate, which is more valuable when applying to beauty salons. If you need to improve your qualifications or the document does not play a special role, then schools that issue a certificate are suitable.
- Study the program, look at the experience of the teachers, the period of access to the course, the availability of feedback and checking homework. Read reviews, pay attention only to constructive criticism.
- Compare prices. Some schools offer installments and monthly payment. When studying in schools with an educational license, a 13% tax deduction is possible.
- Still in doubt? Select schools with a free trial lesson. This way you will evaluate the level and format of teaching.
If you have already taken one of these courses, please tell us in the comments whether it was useful. Or maybe we forgot to include a cool course in the selection? Then write to us!
How to choose a manicure set?
If you are not a fan of hardware manicure and prefer to do a classic manicure at home yourself, you will have to provide yourself with convenient tools.
After reading our material, you could be convinced that for a trim manicure you do not need as many devices as some expensive manicure sets contain.
And perhaps the first thing to start with is writing a list of what separates you personally from a great manicure. This list will probably include not only the components of the kits, but also a special bath, as well as care products. All this will also need to be purchased.

Next, you can purchase tools that you think are right for you, in their inexpensive version. And that's why. As already mentioned, each master chooses his own tools - some prefer scissors, others tweezers. In addition, everyone has their own skin and nail characteristics. For some people, trimmed manicure is not at all suitable for physiological reasons (for example, this can happen if you have diabetes, when any wounds heal very poorly). Try doing your nails a few times first. If you are uncomfortable, change some of the tools.
By trying inexpensive tools first, you can choose the ones that work best for you. And if you want to buy what you personally need in a more expensive version. After all, as a rule, all necessary devices are sold individually.
By buying a large, expensive set at once, you can end up with a huge number of unnecessary items that will lie idle for years. It is also worth choosing a separate case for storing all the items, where everything will be laid out separately. After all, if metal tools come into contact, this can contribute to their dullness.
MBA CITY

Website : https://mba-city.ru/.
Telephone: 8-800-350-94-34.
Price : 11,500 rubles with a discount, 23,000 without a discount, there is a 13% tax refund. Free access to the first lesson is provided after registering your application.
Duration : 100 hours.
"Nail service master"
Learn how to quickly and efficiently do a manicure, master several types of designs and be able to work with different types of hands and nails. After payment, you immediately have access to all lessons, and you can study at your own pace.
Advantages:
- State-issued certificate with international regulations on completion of the “Master of Nail Service” course.
- Free first lesson.
- Support from mentors and curators.
Training program:
- Get to know the profession.
- Set up a workplace and select tools.
- Study the anatomy and physiology of the nail.
- Get acquainted with the varieties of manicure.
- Learn how to care for the skin of your hands and feet.
- Learn how to do nail extensions with acrylic and gel.
- Learn how to choose colors and create compositions.
- Master the technique of applying nail polish.
- Get to know the types of design.
- Learn how to do a pedicure, master the techniques of preparing, applying and removing the material.
- Get to know the main nail diseases.
- Learn how to comply with sanitary and hygiene requirements.
Video about the course:
Other school courses:
- Nail design.
- Nail extension.
Reviews about the school
The advantages included the opportunity to obtain education and state-issued documents at a low price. The disadvantage is the insufficient level of new knowledge. More reviews here: https://yandex.ru/maps/org/biznes_akademiya_mba_siti/205150605243/reviews/, https://www.otzyvru.com/biznes-akademiya-mba-siti.

Where to start to become a professional from scratch?
The first thing to start with is training. Of course, there is the option to study on your own, but it is unlikely that articles and videos from the Internet will be enough to become a sought-after professional. In addition, it will take much more time than when attending courses taught by experienced professionals.
Important! In addition, home training is not confirmed by anything, and any client can and has the right to demand a certificate. You will receive it in the courses, and this will already be a good start for work
At what age can you work?
Age restrictions vary for different courses. Most people start studying at the age of 18, but some schools accept students from 15–16 years old. But you should understand that few people will trust a minor master, so in some cases it’s worth waiting a couple of years.
How should you choose courses to get started?
If you plan to get serious about manicure, don't skimp on training. This is what will allow you to get the base necessary for a successful start. Find a good school where you can master all aspects of professional manicure:
- hygienic manicure;
- nail extensions;
- various designs.
To really learn, choose a general form of learning.
Attention! Typically, the courses provide all consumables, and also provide practice, during which you can practice the acquired theory on models. The main parameters when choosing courses are as follows:
The main parameters when choosing courses are as follows:
- price of training;
- duration of the entire course and lessons;
- training program, list of required topics;
- schedule;
- number of people in groups.
- school location;
- the document you will receive upon completion of the course.
Each student chooses for himself what is important to him:
- quality of training;
- school location;
- affordable price;
- or diploma.
This topic needs to be analyzed carefully and from various aspects. Understand that good courses don't come cheap. Don't be fooled by a suspiciously low price. The cost will depend on:
- rental prices;
- teachers' salaries;
- programs used.
In addition, these are high-quality equipment and consumables, the number of people in the group and the duration of the classes.
Sometimes the price is reduced by increasing the number of people in the group and offering to buy equipment and consumables on their own.
The first option is definitely unsuccessful: if there are more than 6–8 people in a group, the teacher technically cannot pay attention to everyone. If we talk about materials, then this option is suitable for some - it does not provide an opportunity to save money, but it can be a successful investment for the future. At the end of the course, everything purchased will remain with you, and you can practice or immediately start working from home
Reference
When assessing training hours, take into account whether the training will be full or part-time, what hours are considered - academic or astronomical, blocks or continuous topics
It is optimal if training is carried out like this:
“topic of the day” blocks – the teacher gives theory and demonstration, then the student practices the knowledge himself;
full days - certain procedures and technologies require a lot of time to master;
richness of the program - in addition to the manicure itself, they should provide knowledge regarding sanitation, safety, dermatology;
strict schedule - it is important that the training program is systematized and easy to understand for beginners.
If you have the opportunity to study not for a long time, but through intensive courses on specific topics, you can choose this option. It gives you the opportunity to delve deeper into the topic and gain exactly the knowledge that you need now.
Upon completion of training you must receive a certain document. Having a state diploma is a plus, but you shouldn’t chase it. For both clients and beauty salon administrations, professionalism is more important than a piece of paper about courses.
How to remove gel polish
Everything about manicure for beginners is a set of knowledge in which you should definitely include information regarding removing the coating. This is one of the main and fundamental stages, which sets the rhythm for the subsequent process. Only by using the right technique can you achieve an ideal result.
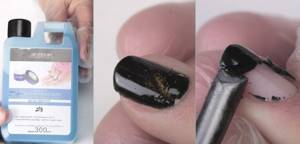
Removal using a special liquid
This technique appeared quite a long time ago. About 5 years ago, all masters used it, including specialists included in the list of the best. Nowadays, gel polish and gel remover liquid has almost completely disappeared from nail salons. The technology with this product has been replaced by a safer and more effective one.
So, the removal process begins with filing the top coating. It removes a small amount of material so that the liquid can pass deeper. Next, the composition is poured onto a small piece of cotton pad. The disc is applied to the nail, which is wrapped in foil. It fixes the composition and creates a warm effect.
If the room is cold, you can additionally use a hairdryer to warm it up.
Now you need to wait 10-15 minutes. After this, you need to unfold one finger and look at it how the liquid works. It is best to carry out these manipulations with the nail that is wrapped first. If the gel polish is sufficiently soaked, you can remove the foil one by one and use an orange stick to remove the residue.
If there is some gel polish left on the nail, it can be removed with a nail file. After completing the procedure, when re-coating is not planned, you need to thoroughly nourish the cuticle and skin of your hands with nutrients, since such liquids and products with acetone dry out the skin greatly.
The technique of removing gel polish or gel using a special liquid is increasingly losing popularity every year.
However, it has several advantages:
- Economical. The main advantage of removing the coating by soaking. For home use, few people will want to buy a fairly expensive machine and cutters. Removal with liquid will cost 20-30 rubles, since one jar is enough for at least 10 times.
- Effective. A special product actually soaks most gel polishes, which are then easy to remove.
- Suitable for beginners. Masters who are just starting to practice manicure may not have enough money to purchase a machine. Liquid will be their salvation.
However, this method has many more disadvantages:
- Procedure time. On average, it takes about 30-40 minutes to remove the coating with liquid, which significantly increases the time of the entire manicure.
- High risk of allergic reaction. The liquid contains a huge amount of chemicals, which even in people with insensitive skin cause itching, burning and irritation.
- Painful sensations. When the product's exposure time comes to an end, the nail begins to burn quite strongly due to exposure to chemical components.
- Not suitable for removing absolutely all types of material. Some gels and liquid bases simply do not dissolve with liquid.
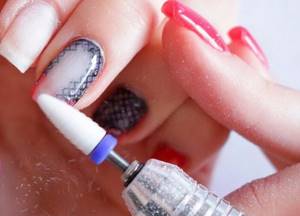
Removal using a manicure machine
This technique is the most common and safe at the moment. It allows you to remove any amount of material quickly and efficiently. The technique for long-term training is simple. First you need to choose a cutter. They differ in shape, notch and material.
- Material:
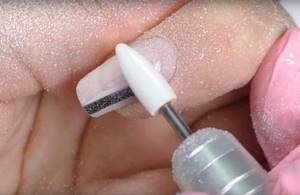
- Ceramic cutter. Most often it is white. With it, material removal occurs more smoothly. Most often, ceramic cutters are more expensive, but they can last up to one year even with daily use.
- Carbide cutter. It is rougher and is most often used as a consumable material, because its service life is no more than 6 months.
- Slicing. Cutters can have straight, oblique and cross-shaped cutting, which in turn can be small, large and super-large. The larger the teeth on the cutter, the more difficult the removal process will be. In addition, individual pieces of removed material will be larger.
- Degree of hardness. Now there are hundreds of options for cutter rigidity, the most common are 5:
- Yellow. This cutter will be the softest; it can be used to remove a thin layer of soft gel polish. Stiffer materials will be more difficult to handle. In addition, the time spent on the withdrawal process will increase.
- Red. A cutter with this degree of rigidity is also quite soft. It is perfect for beginners, as it will prevent you from cutting off excess and injuring the nail.
- Blue. A cutter with such a notch is rigid, it will allow you to quickly remove material. It is best used by craftsmen with extensive experience, because there is a risk of making a cut by removing too much.
- Black and green. The roughest options for cutters. With their help, you can easily cut down a voluminous design, gel or artificial nail length. It is best suited for experienced craftsmen who are confident in their professionalism.
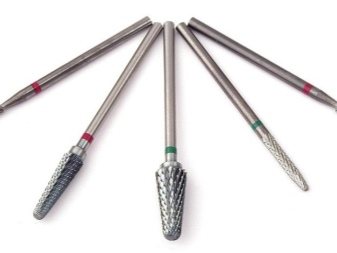
- Form:
- Corn. A cutter of this shape has a rounded shape with a pronounced “belly” and a pointed tip. The area of contact with the nail is small, so the removal process will take longer, but is safer.
- Cone. It usually has a rounded tip, which is convenient for removing material from the ends. Thanks to the large area of contact with the nail, the removal process is faster.
- Drum. This is a rather controversial version of the shape, because due to the presence of sharp ends, the cutter becomes quite dangerous. That is why it definitely cannot be used by beginners.
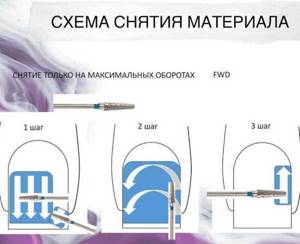
With knowledge of the technique and a well-placed hand, the removal process is quick and simple. At maximum speed, with the help of smooth but fast movements over the entire area of the nail, removal occurs. The cutter should be parallel to the nail, and movements should only be made from the cuticle to the free edge.
To remove the manicure from the ends efficiently, you can turn your hand over a little for convenience.
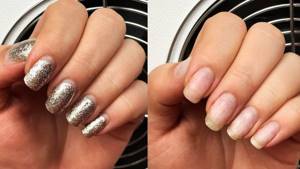
This method of material removal has many advantages:
- Rapidity. The removal process takes from 10-25 minutes.
- Quality. The material is removed evenly and accurately, so subsequent filing is minimal.
- Economical. The master will only have to spend money once, and in the future he will only have to buy cutters 1 or 2 times a year.
- Versatility. Using a router you can remove any type of material. It can handle any design and thickness.
- No allergic reactions. Removing material with a router does not cause itching, redness or irritation.
Unfortunately, there are several disadvantages:
- High price. On average, a good manicure machine costs from 4,000 rubles.
- Risk of injury. If you do not know the correct technique, you can seriously damage the nail plate and disrupt its growth.
It’s not easy to learn everything about manicure. There is a sufficient amount of knowledge in this area, so understanding it and finding all the features can be difficult, especially for those who are just plunging into this profession. That is why many checklists, online and offline courses have been created for beginning masters, where real professionals explain all the intricacies and show the main techniques in practice.
How to disinfect and sterilize manicure instruments
Many people believe that instruments for individual use do not need to be sterilized. But in vain, because skin particles can remain on them and bacteria can multiply. In addition, without regular cleaning, tools will quickly become dull and fail.
For beauty salons, there are strict instructions on how to sterilize manicure instruments. The general process includes not only sterilization of the instruments themselves, but also disinfection of the room, the master’s clothing, and work surfaces. For sterilization, a special unit is used - a sterilizer for manicure instruments (sterilization is the process of destroying fungal and bacterial spores).
Let's look at how to properly handle manicure tools and care for them at home after use.
Processing of manicure tools is carried out in several stages:
- wash tools with soap;
- immerse in a disinfectant solution in an open form;
- place in the oven preheated to 200° for 20 minutes;
- remove tools after the oven has cooled completely;
- This procedure should be carried out at least once a month.
We also disinfect the files - we spray them with disinfectant spray. After this, the file should dry completely.
Basic manicure procedure
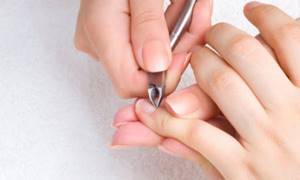
If you've never done your own manicure, start with the basic steps. First of all, you need to give your nails the desired shape and polish them. It is recommended to do these manipulations on dry nails, since otherwise you will injure the nail plate. Then soak your fingers in warm, soapy water for 10 minutes. Remove your hands from the bath, pat them dry with a napkin and apply cuticle remover to the cuticle area. Leave for 2-3 minutes, then gently push back the cuticle with a wooden stick. If necessary, trim off excess skin and hangnails with pliers. Finally, go over your nails with the smoothest side of the polishing buff and apply a nourishing cream.
If you plan to paint your nails, you need to degrease the nail plate (for example, with nail polish remover), apply a base coat, and only then apply colored polish. If you do everything correctly, your manicure will be limited to these basic manipulations. As a result, your hands will always look well-groomed.
Distinctive features of a nail professional
It is hardly possible to recognize a good master at first glance. But if you watch his work, you can be sure that this is a nail professional. What separates a pro from a beginner?
- Responsible attitude towards hygiene. Files should ideally be disposable; if not, the master uses liquid to disinfect them. The manicurist works only with gloves. He takes the tools out of craft bags. The hand bath has a layer in the form of a bag or bag.
- Use of professional equipment: from a manicure vacuum cleaner to safe lamps for drying artificial material.
- Working on brands of the same brand. A specialist in his field uses bases, varnishes and topcoats of the same brand when performing a manicure.
- Ability to perform any type of manicure: classic, unedged, hardware. The ability to select the type of service to suit the situation distinguishes a true professional.
- Limited use of cuticle oil. Amateurs usually use it liberally. A professional master prefers not to overdo it with any means and tools for work, and strives to do without oils.
- Easy removal of old coating. No products with acetone. No metal tools to remove material from your nails. Even hardware equipment only finishes up to the base.
- Accuracy and speed of coating application. The ability to quickly apply cuticle coverage comes with experience.
In addition, there is professional ethics, the ability to communicate with the client, and additionally sell him your services. Yes, there are other ways to distinguish a professional from an amateur. But these are the main ones. If something is wrong, there is no need to talk about skill.
Features of online courses

Their main advantage is the time and place chosen by the student himself. Video lessons can be studied both at home and at work during lunch breaks or other free time when the desire arises. Although in some cases, this is relaxing, and a person constantly puts off studying the material until “later,” not to mention doing practice. It turns out that such training is only suitable for disciplined and purposeful people.
In order to pass and receive a certificate online, you need to complete the following steps:
- Select a course and place an order to purchase it.
- Pay for your tuition using an appropriate method.
- Connect to educational content.
- After each lesson learned, complete a practical task and send the result for verification. There is no time limit for completing them.
- After reviewing the completed task, the specialist analyzes the errors and makes recommendations.
Successful mastery of the material ends with the student’s transition to the rank of specialist.
Lesson #6. Tools and materials for manicure and pedicure.
Do you know how professional tools differ from tools from manicure sets? How are skin tweezers different from nail clippers? And why the tool from the advertised beautiful and expensive manicure sets is not suitable for your work. No, then let's start studying.
Lesson #7. Classic edged manicure.
In this lesson you will also learn what nail lines and nail stuffing are, what hand maceration is, how to properly massage your hands and how hand massage affects the client’s attitude towards you.
Lesson #8. European manicure.
Did you know that European manicure is the safest, since instead of tweezers we will use special cuticle removers. It is cuticle removers that dissolve dead skin around the nail plate and take care of the cuticle.
Lesson #9. Hot oil manicure.
Hot oil manicure is generally the height of perfection in cosmetology; when performed, it moisturizes and therapeutically restores the skin of the hands under the influence of special creams or lotions.
Because of its importance, this lesson is divided into two parts. In the second part you will learn how to prepare your own lotion for hot manicure according to our proprietary recipe
Lesson #10. SPA manicure or hand care system.
In this lesson you will learn all the procedures that have a unique restorative and rejuvenating effect for the hands and the woman’s body as a whole. The lesson is also divided into parts as an appendix to the lesson includes a guide on applying a paraffin hand mask.
ESHKO
Website : https://www.escc.ru/.
Telephone: 8-800-200-35-01.
Price : 1,360 rubles per month for a normal rate at a discount, 1,600 without a discount. There are accelerated ones for 2,720 - 4,800 rubles. Full course without waiting - 10,400 rubles at a discount, 16,000 without a discount. You can download a free trial lesson from the link.
Duration : 10 months.
"Online manicure courses"
During the course you will learn manicure, pedicure and basic hygiene rules. The program is suitable for beginners and experienced professionals. You will receive 10 learning journals and homework assignments after each lesson.
Advantages:
- Checking homework.
- Upon completion, an ESHKO certificate and an international English Graduation certificate.
- Materials can be received in PDF format or in paper form by mail.
Training program:
- Get acquainted with the history of manicure and pedicure, the responsibilities of specialists and professional ethics.
- Learn how to organize manicure rooms, select tools and sterilize them.
- Study the structure of the nail, contraindications to the procedure, learn how to choose a varnish.
- Get acquainted with the rules and techniques of classic manicure.
- Master mini-manicure, basic, European, sanitary-hygienic, sanitary-cosmetic, hot and Deluxe.
- Learn how to do hardware, biological and French manicures.
- Get acquainted with Spanish, children's and men's manicure.
- Study the history of nail art, understand the materials and tools.
- Master marble, caviar 3D, American and Beverly Hills manicure.
- Learn to use decorative embellishments, black and white graphics, and foil.
- Learn how to extend acrylic with forms, adjust and remove acrylic nails.
We have made a selection of the best courses and schools where they teach tarot - learn to read cards and make layouts for different occasions.
- Learn gel modeling, correction and removal of gel nails.
- Learn how to build up your nails using a French manicure. Master shellac.
- Get acquainted with the features of modeling oval, square and almond shaped nails. Learn design painting.
- Master artistic painting in the Chinese style, learn how to model nails using stiletto and edge techniques.
- Get acquainted with hand skin rejuvenation techniques. Learn how to strengthen your nails and do a Japanese manicure.
- Learn how to organize a workplace for a pedicure. Get acquainted with pedicure tools and products. Master European and classic pedicure.
- Learn how to do hardware and spa pedicures, perform paraffin therapy and coat your nails with gel.
- You will learn how to remove calluses, restore a deformed nail, clean and remove calluses on the sole. Master design.
- Learn how to solve problems with ingrown toenails, take care of your feet, and give massage. Get to know the features of diabetic feet.
To learn more