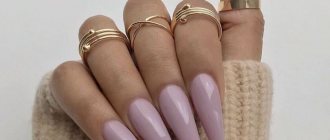
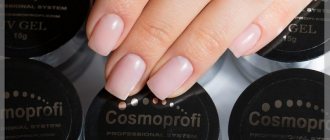
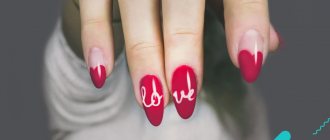
Modern technologies make it possible to build nails that are no different in aesthetics from natural ones. This is a saving straw for those who cannot grow their length or are tired of thin, brittle and dry nails given by nature.
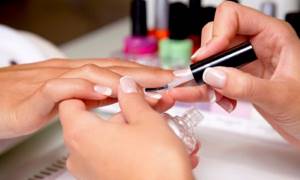
Artificial nails can be worn for 10 to 20 days, depending on the material chosen. Further correction will be required. The extension procedure itself will take from 1 to 3 hours. Popular modern materials for extensions: gel, biogel and acrylic system. Let's consider each of the options in detail.
Nail extension procedure
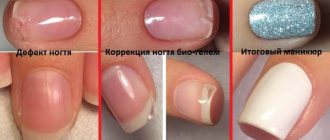
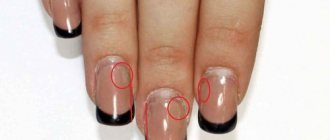
Nail extensions help increase length by applying a gel composition. In this case, it is possible to eliminate nail defects. Extended nails do not peel off or break. Due to their high strength, they rarely develop chips and scratches. The drug gives nails a uniform shade and smoothness. This allows you to combat problems such as uneven color and texture of natural nails.
Nail extensions first originated in China in ancient times. Later, modeling technology spread to European countries. Initially, acrylic was used for extensions, but the most modern and improved technology is helium technology.
Thanks to the elasticity of the gel, the nails are thin but strong. The glossy shine of the gel completely imitates natural nails, making the result look natural.
How long can extended nails be made?
The size of the extension, which can be performed safely for natural manicure and matrix, also depends on the initial state of the nail plate.
If you sawed off the free edge too much during nail correction, you should only attach it to a medium length on a small backing, with a classic shape - an oval or a soft square, to avoid strong pressure on the free edge.
If the free edge is 1-2 mm, as is recommended, the plate can be made longer, the girl has no restrictions on the choice of shape, she can even make stilettos or a “ballerina” shape. However, keep in mind that the length of the extended nail should not exceed the size of the base to which it is attached. Otherwise, a large risk zone can lead to plate fracture, even if it was healthy.
The size of the nail that can be extended depends on the type of material used for lengthening:
- Acrylic. Acrylic powder is mixed with liquid to a viscous consistency and then distributed over the nails. This option is used most often in the salon, since it can be difficult to achieve the desired consistency on your own. Acrylic is a fairly aggressive substance that often causes an allergic reaction when it comes into contact with the skin. Acrylic creates a dense base that is not subject to any mechanical stress, but because of this it should not be used to significantly lengthen nails.
- Gel. The composition is easier to use, but it takes an average of two minutes to distribute it evenly over the surface, which is due to the thick consistency of the solution. The gel base is absolutely safe for girls, which is why it is used most often now.
The porous structure of the gel will provide a manicure close to natural, which is similar to a girl’s nails and does not weigh them down, so you can create almost any length and shape using the gel.
If you want to grow long nails, it is recommended to first pay attention to the product that will be applied to the form.
Gel is especially suitable for stilettos or strictly squares, since it prevents mechanical stress on the regrown free edge, preventing it from breaking and premature convergence of the decorative coating.
The optimal size, which will look beautiful after visiting the salon and will remain in the same condition for a long time, depends only on the condition of the girl’s hands and the size of the original coating.
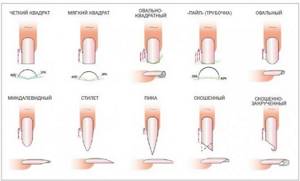
Also, when choosing the length of the nails, you need to take into account the thickness and size of the fingers:
- Thin, long fingers are recommended to be combined with a short plate length; the free edge should not exceed half of the main stock in order to visually shorten the fingers;
- Plump, short fingers. To visually lengthen them, it is recommended to use longer plates;
- Wide nail bed. In order not to emphasize the defect, you should visually draw it out with an almond or an oval; using symmetrical shapes (square, circle) is not recommended.
When decorating your nails, keep in mind some tricks: applying light colors visually lengthens the manicure, while applying dark colors, on the contrary, emphasizes its boundaries, making it more modest and smaller.
With proper selection of the optimal length for extensions, the result will last in the same state for up to 3-4 weeks. It is not recommended to keep the coating on any longer, since the risk area increases over time.
Pros and cons of gel nail extensions
The advantages of gel extension technology include:
- The procedure is performed quickly and takes no more than 2 hours.
- The plasticity of the gel makes the extended nails durable.
- The elastic structure of the gel allows you to extend the life of your nails.
- The cost of gel extensions is lower than with other materials.
- The correction is performed quickly and takes about 30 minutes.
- Natural nails are strengthened, which allows you to grow them without the risk of splitting and brittleness.
- The surface of the nail is leveled by filling the cracks and relief with the preparation.
- The gel gives nails a glossy shine.
- Helium nails are easy to remove.
- The ability of the material to allow air to pass through allows the nail plate to receive oxygen, which prevents it from becoming dry.
- The gel protects the natural nail from ultraviolet radiation, household chemicals and mechanical damage.
- The material does not cause allergies.
- The gel contains pine resin, the bactericidal properties of which have a preventive effect against fungus.
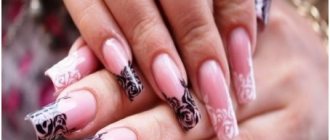
- Designs of any complexity are possible on helium nails.
The disadvantages of the procedure are:
- When the material dries in a UV lamp, a burning sensation may occur.
- Repairing a broken nail is impossible, so new extensions are necessary.
- It is difficult to remove helium nails on your own without damaging your natural ones.
- To remove extended nails, you will need to file them down, but this will damage the top layer of your natural nails.
- The material is susceptible to damage due to sudden temperature changes.
What types of acrylic gels are there?
- In banks
- In tubes
The material in the cans is a little softer than in the tubes. Each manufacturer mixes acrylic and gel in different proportions, which is why the density and consistency may vary slightly.
How to remove acrylic
A 160-200 grit file or router is suitable for removing material. Soaking polygel is useless and harmful to nails.
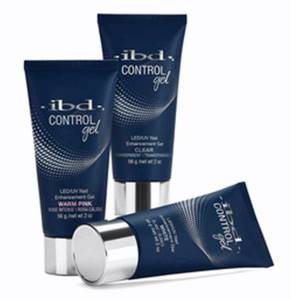
How to choose gel for nail extensions?
Gel nail extensions (step-by-step instructions with photos visually display the importance of this component) are impossible without high-quality material. Both the visual effect and the wear time of the extended nails depend on this.
When choosing a gel, you must follow the recommendations:
- It is better to choose single-phase gels. They serve as both base and top coat at the same time. The high cost of such materials is compensated by significant savings in time spent on the procedure.
- Two-phase sets contain a gel for adhesion to the top layer of the nail and a gel for the finishing coat. Their separate application makes the procedure longer and more complex.
- When using three-phase gels for adhesion, fixation and decoration, you will need to apply 3 different compositions, which is long and inconvenient.
- The consistency of the gel should be elastic, not thick or liquid.
- The composition should not contain aggressive components that give off a strong chemical odor.
Where can I buy
Purchasing a set is profitable because, on average, its price is 25% less than the cost of consumables and tools separately. Beginners can choose kits in retail stores or online. Very cheap goods, for example, are presented on the Aliexpress website, however, sometimes you have to wait a long time for orders. Professional craftsmen are advised to pay attention to the products offered in specialized nail industry stores. As a rule, high quality kits from well-known manufacturers are presented there.
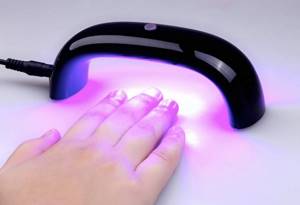
Lamps for gel nail extensions
Under the influence of the lamp, the gel hardens on the nails. Without this device, the extension procedure is impossible, so you should not skimp on it.
| Name | Advantages | Flaws | Gel polymerization time | Price |
| UV Planet Nails lamp | Polymerization of the gel occurs under the influence of ultraviolet rays. The device operates from the mains and is also equipped with a timer. | When it hardens, the gel heats up, which is accompanied by a burning sensation. The service life of UV lamps is shorter than that of LED devices. | 3 min. | 3000 rub. |
| LED Runail lamp | The lamp life is 50,000 hours. Polymerization occurs under the influence of LEDs, so the nails do not heat up. The device is equipped with a timer and automatic switching on. | Some types of gels are not suitable for working with this lamp. | 5 sec. | 5000 rub. |
When choosing a lamp, you should also pay attention to the following aspects:
- The device should be light in weight.
- The material from which the lamp is made must be resistant to damage and falling.
- The lamp power must be at least 36 watts.
- The lamp must be accompanied by a “PCT” quality certificate, which confirms the safety of working with the device.
Don't miss the most popular article in the section: How to draw monograms on nails step by step for beginners. Instructions with photos.
Criteria for evaluating the best materials
When choosing a brand that produces the most wonderful extension materials, we paid attention to a combination of such important factors as:
- increased strength of created nails;
- durability, resistance to external damage;
- viscous and plastic consistency, as well as an average degree of viscosity;
- no pungent odor;
- no burning sensation during polymerization;
- Availability of a full range of products for extensions, including related ones;
- price: the lower, the better for the user (if you don’t think about quality).
Check out the point system that formed the basis of our rating of the best materials for nail extensions and modeling.
By quality:
- 1 point
for strength (compliance with the declared); - 1 point
for wearability; - 1 point
for optimal consistency; - 1 point
for neutral odor; - 1 point
for no burning sensation during polymerization; - 1 point
for having a full range of extension products in stock; - -1 point
for complaints from allergy sufferers.
By cost:
- 5 points
for costs up to 300 rubles; - 4 points
for a cost from 300 to 600 rubles; - 3 points
for a price from 600 to 900 rubles; - 2 points
for a price from 900 to 1,200 rubles; - 1 point
for a price over 1,200 rubles.
By popularity:
- 4 points
for more than 9,000 queries in Yandex per month; - 3 points
for 6,000-9,000 queries in Yandex per month; - 2 points
for 3,000-6,000 queries in Yandex per month; - 1 point
for less than 3,000 queries in Yandex per month.
We remind you that we are not considering individual materials (such and such a gel or such and such powder), but the brand as a whole: how good are the different (!) products of the same brand, which manufacturer produces the best products for nail extensions of any type.
When collecting information about products, we used: sites with reviews of real customers, personal sales statistics of KrasotkaPro, open data from the Yandex search engine.
Modeling nails with extensions
Gel nail extensions, step-by-step instructions with photos for which makes the work easier, are impossible without proper modeling. The wear life, beauty and strength of helium nails depend on this. During the modeling process, the drug is applied to the nails in a certain shape and to the required length, and the result lasts for 1 month.

Modeling occurs using templates-forms or types. For nails with a beautiful shape, the first method is used. Another method is recommended for short nails that are prone to brittleness and difficult to correct.
Basic terms
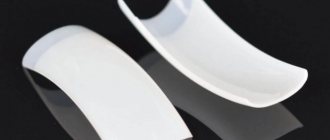
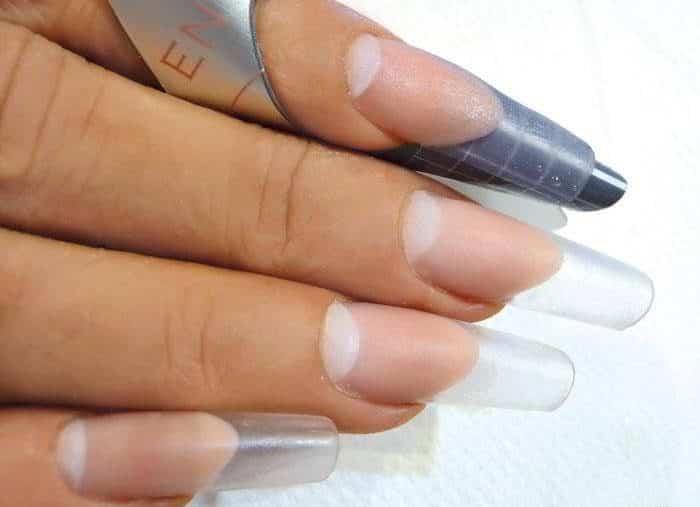
Top forms are a soft plastic product that imitates a natural nail plate and helps create an artificial nail of the desired length and curve.
Unlike conventional blanks, they are installed on the nail, and not under it. Extension on top forms is a procedure for artificially lengthening the nail using top forms and gel material. Extension using this method involves laying out the material inside the form and imprinting it on the natural nail plate.
Polygel is an extension material obtained by combining acrylic and gel formulas.
The product is odorless and has increased density, which makes it an excellent material for modeling artificial nails. Available in tubes or jars with a lid.
Technique for nail extensions on forms
Using this method, you can give your nails the desired look. As a result, they can be oval, square or pointed. The advantage of using this technology is the natural result. The transition between the product and the nail looks smooth and unnoticeable. This technique made it possible to avoid excessive thickening of nails during extensions.
The disadvantage of this service is that it is labor intensive. Creating a smooth transition requires special skills. It is extremely difficult to repeat it on your own. This technology is suitable for women with a strong and healthy nail plate who want to give it a different length or shape.
The modeling method can be different:
- The top one is done by applying helium material to the template markings and then attaching the mold. After the drug hardens, it is removed.
- The lower one consists of fixing a template with markings under the regrown edge of the nail, and the drug is distributed from above.
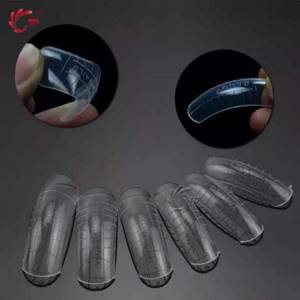
Forms or tips – which is better?
Both types and forms have their advantages and disadvantages. First of all, it is worth taking into account individual characteristics. Tips are recommended for those who have short, narrow or irregularly shaped nails. And for nails that grow downwards and bend, shapes are more suitable.
Tips are easier to use and easier to handle at home. But the shapes look thinner and more natural.
In addition, forms have several other advantages:
- they do not cover the main part of the plate, so the natural nail has access to oxygen;
- extensions on forms strengthen brittle tips on short nails;
- with this method of extension, correction can be performed without the need to completely remove the extended layer;
- The cured gel polish perfectly complements the natural nail without any obvious transition.
Whatever you choose, in any case, when adding extensions, you need to take care of your nails and make corrections regularly.
Varieties of forms
There are several types of form templates:
- Disposable items are made from flexible and soft materials. This simplifies modeling, but after the procedure the template becomes unusable.
- Reusable types have a plastic or metal base, so they last a long time. They are convenient to use, but are much more expensive.
- Round templates are suitable for working on short nails.
- Oval and almond shapes have smooth lines and are suitable for nails of any length.
- Square shapes are the most versatile and practical, also suitable for long and short nails.
- Pipe, stiletto and edge are distinguished by their pointed tip and unusual shape. They are suitable exclusively for long nails.
- The bottom and top views differ in how they are used in modeling.
Advantages and disadvantages of upper forms
Advantages
- The most unpleasant and dangerous extension procedure, filing, is eliminated
- The extension procedure time is reduced to 30-40 minutes
- Saving material reduces the cost of extensions
- The design possibilities are unlimited and execution is very simple.
- Possibility to demonstrate the design to the client before extension
- Perfect gloss
- Same shape for all nails
- Correctly formed stress zone
- Same arch on all nails
Of course, any technology has its pros and cons. Compared to classical technologies, top mold technology is not as versatile.
In particular, there are restrictions on the length and width of the nail (it cannot be greater than the length and width of the upper form).
So, the disadvantages of the upper forms:
- Limitation on the length and width of the nail
- The need for training and purchasing a rotating lamp for gel technology
However, the length of the upper forms is designed in such a way that it is enough even for the most demanding customers. As for the width and shape of the nail, the Formula Profi company is currently working to expand the range of sizes of the upper forms in order to eliminate this drawback.
But at the moment, there are few clients with non-standard nails, and the existing top forms are suitable for work in 90% of cases.
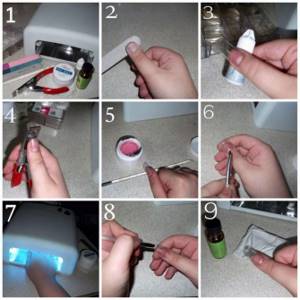
Stages of gel nail extension on forms
When performing the service, several stages are performed:
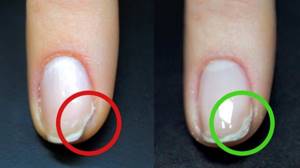
- The overgrown edge must be corrected with a file, leaving about 2 mm in length.
- The keratin layer of the nail is treated with a polishing buff until completely removed.
- Application of degreaser-dehydrant.
- Application of primer.
- Applying a thin layer of helium material and processing in a lamp.
- Establishing and trimming the template so that its curve completely coincides with the nail plate.
Step-by-step instructions with photos for nail extensions with gel polish using forms - A thin gel base should be applied at the border of the nail and the template.
- It is necessary to polymerize the substrate in a lamp and remove the sticky layer.
- It is necessary to distribute the gel preparation over the nail so that its bulk falls on the middle zone, and the layer at the edges remains thin.
- After drying in the lamp, you should draw a smile line with a nail file.
- Applying the base.
- Removing all templates.
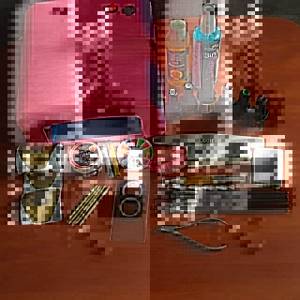
Required tools and materials
In order to make beautiful and safe extensions, you need to acquire special equipment and tools.
Among the most important tools, it is worth highlighting these products and materials:
- antiseptic solution;
- cuticle remover;
- nail scissors;
- files with different abrasiveness or cutters for hardware manicure;
- cuticle tweezers or a special orange stick;
- quick nail polish remover;
- nail dust brush;
- a dehydrator that removes the sticky layer from gel coatings;
- suitable forms for extensions;
- a primer that bonds the gel layers and the edge of the natural plate;
- base coat;
- gel brushes;
- modeling varnish;
- colored coating and items for decoration;
- finishing gel;
- UF lamp;
- care oil for cuticle treatment.
To make the extension procedure easy and successful, it is important to choose high-quality tools and materials.
Tools for nail extensions on forms / @nailcity
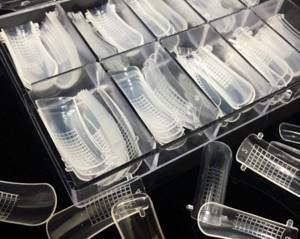
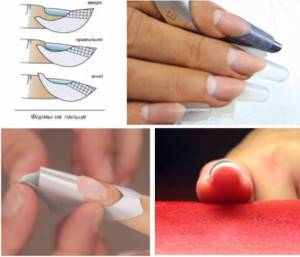
Technique for nail extension using tips
Gel nail extensions (step-by-step instructions with photos do not reflect all the nuances of the work) can be done using tips. A special feature of the technology is that the tips are attached and not removed at the end of the procedure. Tips have 2 zones: contact and free edge. The contact area is glued to the nail, and the free edge shapes its appearance.
The advantage of this technology is its versatility. Tips can be used even on soft, damaged nails. The disadvantages include the difficulty of working with tips. They must perfectly match the nail, otherwise the result will look unnatural.
Don't miss the most popular article in the section: How to extend nails with gel polish. Nail extension instructions for beginners. Photo.
Preparation of the workplace
Before applying nail extensions, a novice master must properly prepare his workplace. Some tips for organizing it:
- The room should be spacious and bright.
- The work table should be located in the corner. This will provide natural light.
- The desktop should not be very wide. The client and the master should feel comfortable sitting opposite each other.
- If the master prefers to have everything on the table, then it is advisable to choose more of it.
- The table must be stable and have a surface that is resistant to extension products.
- During the procedure, a lot of dust spreads and therefore it is recommended to choose a table with a special hood.
- Armchairs and chairs with adjustable height are selected.
- To create the right lighting, a table lamp with a mount is used.
For convenience, a novice craftsman can use a cabinet for tools and storage of nail files, as well as other auxiliary materials. The master’s workplace should be furnished comfortably and stylishly. Nothing should get in the way, everything should be at hand.
Share with your friends!
more
Read us in the Zen channel
Types of tips
Tips are divided into several types:
- Classic tips are the most versatile. Thanks to their smooth curve, they fit most nails. The cost of packaging is 200 - 300 rubles, making these tips economical.
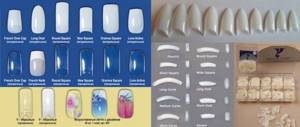
- Direct or non-contact tips are distinguished by the absence of a contact zone. They are recommended for use when creating a French manicure.
- Tips with a curved frame are used in American extension technology.
- Tapered tips allow you to create stiletto and pipe designs. They are distinguished by a narrow oblong tip.
- Almond tips are suitable for giving your nails an almond shape. This is a combination of a classic oval shape with a tapered tip.
Tips vary in color:
- White.
- Transparent.
- Flesh tone.
- With a single color coating.
- With design.
- With French design.
Types are distinguished by material:
- Polyflex, which is flexible and durable. They are best suited for adhesion to drugs and are also resistant to acetone.
- Tips made of soft plastic are mostly elastic and of good quality. They have strong adhesion to materials and are also resistant to damage.
- Nylon tips are most convenient for use in the modeling process. They are impact-resistant, flexible, but require professional skills when gluing.
- Liquid tips are made of polymer gel. Their advantage is that there is no need to use glue.
When choosing tips, it is important that they are elastic and bend well. They should also match the width of the natural nail. If the tips are slightly wider, they should be filed down. Narrow tips should not be used for extensions. This will cause the materials to peel off.
Disadvantages of the method
- For non-standard and wide nails, suitable sized tips may not be available.
- Hardened excess material can only be removed using a cutter, which is used for hardware manicure. Not all lovers of long nails have this rather expensive specialized equipment available.
- A careless and careless attitude to the tip installation procedure can lead to premature detachment of the hardened gel.
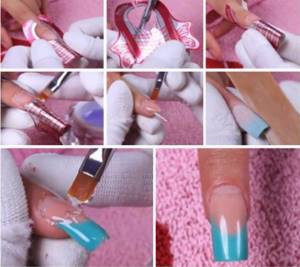
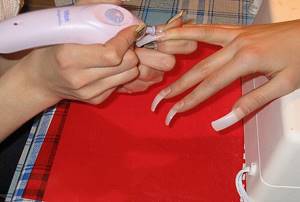
Stages of extension on tips
Gel nail extensions using tips are performed in several stages, which are recommended to be seen in the photo.
Below are step-by-step instructions:
- Nails are treated with an antiseptic.
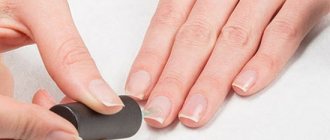
- The free edge of the nail should be completely filed, rounding the edges.
- The cuticle is pushed back with a pusher.
- The top layer of the nail must be removed with a buff.
- Apply degreaser and primer.
- The tips are attached to the nails with glue, which must be applied only to the contact area.
- The glued tips must be filed in accordance with the desired shape and length.
- It is necessary to cut down the top of the tip to remove the step at the joint.
- The gel preparation should be applied from the middle of the nail, spreading to the area along the edges.
- Nails with a frozen preparation must be filed in accordance with the desired shape.
- Applying the finish and drying it in a lamp.
Aquarium manicure
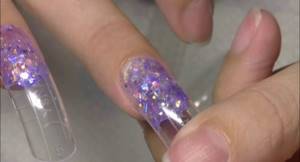
- Carry out standard preparation of nails for extensions;
- Take the mold and cover the inside with a small layer of clear polygel. The layer should be such that design elements are “sunk” in it;
- Lay out the desired design using an orange stick. Almost anything can be used as decoration - rhinestones, bouillons, kamifubiki, sparkles;
- Dry the form with the future aquarium in a lamp for 10 seconds;
- Lay polygel on top of the decor in the color of the future coating - camouflage or a bright shade, if desired;
- Distribute the material according to standard rules - less at the cuticle and on the sides, more in the stress zone and on the free edge;
- Stamp onto the nail and remove excess material;
- Dry for 15 seconds, pinch, remove the mold and dry completely;
- Cover the design with a top.
Polygel nail modeling on top forms is becoming the most popular technique.
If you haven’t tried this on yourself yet, don’t put it off. Any questions? Ask in the comments. Comment
Nail extensions at home
When performing the procedure at home, you must follow simple rules:
- The top layer of the nail can be filed only until the nail becomes dull.
- You should regularly examine the nail from different angles to see subtle transitions and steps.
- After filing the keratin layer, you should remove nail dust with a brush, otherwise the work will be sloppy.
- Do not apply preparations with a gel texture like regular varnish. The drop is stretched with the tip of the brush from the center to the surrounding area, and then to the area under the cuticle.
- The curing time for different drugs in the lamp is different, so it is important to study the instructions for them.
How much does a procedure cost in a salon?
The cost of services from manicure specialists starts from 1,500 rubles. The price depends on the professionalism of the master and the time it takes to complete the work. The price also includes the price of quality materials. The price formation is influenced by the modeling method. The more complex it is, the higher the cost. In salons with a high level of service, the price of services is traditionally higher.
The gel nail extension procedure is valued for its safety and instant results. If you do it yourself, you should use step-by-step instructions with photos to make the process easier.
Author: Alena Lash
Article design: Mila Friedan
Price
Materials for nail extensions may vary in cost, it all depends on the composition, brand and specific outlet. In the catalogs of manicure accessories in Moscow stores, products are sold at the following prices:
| Material name | Volume/weight/quantity | Price, rubles |
| Gel for nail extension | 50 ml | 800 – 2000 |
| Acrylic Powder | 20 g | 200 – 500 |
| Monomer | 100 ml | 600 – 1500 |
| Tips | 300 pcs. | 300 – 500 |
| Paper forms | 20 pcs. | 20 – 60 |
| Metal (reusable) forms | 1 PC. | 20 – 50 |
| Files | 1 PC. | 30 – 200 |
| Degreaser | 100 ml | 80 – 120 |
| Primer | 15 ml | 100 – 879 |
| Cutter | 1 PC. | 85 – 1000 |
| Glue for tips | 10 ml | 95 – 185 |
| Orange sticks | 10 pieces. | 25 – 50 |
| Nail scissors | 1 PC. | 200 – 500 |
| Acrylic brushes | 1 PC. | 45 – 1000 |
| Gel brushes | 1 PC. | 100 – 450 |
| Ultraviolet lamp | 1 PC. | 600 – 4000 |