Any beauty salon will offer you a service such as a French manicure. The cost of such a manicure is not small, but what sacrifices can you make for the sake of beauty? Watching how a nail art master does French, you may think that it is very simple and there are no special secrets and no skills are needed. However, we will dispel your assumptions and share with you secrets that will help you make a French jacket yourself.
Preparing for a manicure
When creating a French jacket, the main thing is to choose the right tools and materials. To create your own French manicure you will need:
- nail polish remover,
- metal pusher,
- file,
- orange stick,
- cuticles,
- cuticle liquid,
- polishing buff,
- base and top,
- nude and white varnishes,
- stencils.
All you have to do is be patient and diligent, then a great manicure will not keep you waiting.

Preparatory stage
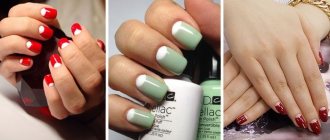
French is one of the most common design options that is suitable for any occasion, so most girls at a wedding prefer to apply this design to the nail plate. Sometimes the design is diluted with stickers, drawings or rhinestones, but this does not change its essence.
French involves first applying a basic camouflage gel, which is similar to the natural color of the nail bed, and a thin white stripe is applied to it in the area of the free edge. This design is similar to a natural nail, but it looks more neat even with a long length.
Despite the visual simplicity of the style, it is quite difficult to do it yourself, since you need to create a perfectly even base, and then draw a thin, neat strip, repeating it symmetrically on all fingers.
However, before performing a manicure, you need to prepare tools and supplies:
- Tools for processing the plate: file, orange stick or metal pusher, wire cutters, buff;
- Compositions applied to the nail: dehydrator, primer (optional), base, colored camouflage gel, white gel, top;
- Ultraviolet or LED lamp for drying;
- A thin brush for drawing a line, it is recommended to choose a dense brush made of synthetic fibers;
- Gel (if you first need to strengthen and level the surface).
Also, make sure that your work area is clean first, since the presence of unnecessary objects on the table can prevent you from accurately applying a decorative coating or design, which will ruin the result.
To remove nail dust while filing or removing the previous decorative coating, you can use a manicure vacuum cleaner.
All instruments must be pre-treated with an antiseptic so that if the periungual area is damaged, it does not introduce infection into the body.
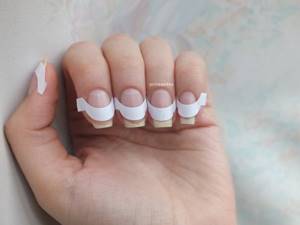
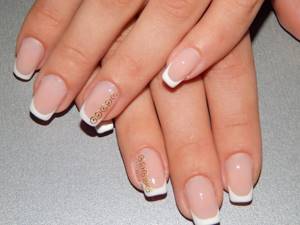
French with stripes
The easiest way to make a French jacket yourself is to use strips. If you've never done a DIY design, use stripes. The process of creating a French jacket can be divided into the following stages. The first stage is applying a transparent base or nude varnish to the plate. Next, glue a strip to the edge of the nail, moving 2-4 millimeters from the edge. The empty part of the nail is painted with a white or milky shade, after waiting for it to dry, remove the strip and then cover the entire nail with a glossy topcoat.
How to prepare your nails
The first step is to treat the nail plates with an antiseptic. After treatment, give the edge of the nail the desired shape using a nail file. Apply remover to cuticles and ridges on the sides to soften the skin. The next step is to soak the brush in a bath of warm water for 4 minutes, remove and dry.
Use a pusher spatula to push back the ridges and cuticle, trying not to press too hard to avoid wounds. Use tweezers to remove excess skin around the nail, and remove the pterygium with an orange stick soaked in water or with a pusher. All that remains is to apply the oil.
French without stripes
French without stripes differs only in the preparatory stage. The rest of the process corresponds to the above. Don't have a stencil? We bring to your attention several options for replacing strips. The first example of replacing strips is masking tape. Cut short pieces of tape to the shape of your nail, and then glue them to the free edge of the nail. Housewives will always have cling film in their kitchen. It also adheres perfectly to the nail and works on the principle of a strip. Medical tape is a great example of a replacement strip. Cut small pieces of the adhesive side of the patch and use them as stencils for French tape.
Selecting an “emoticon”
It is the smile that is the calling card of a French manicure - it covers the regrown edge of the nail. The smile comes in three shapes: arched, flat and slightly curved.
- When choosing the shape of a “smiley”, focus on naturalness : to make the manicure look as natural as possible, pay special attention to the shape of the nail plate and fingers.
- The shape of a smile also largely depends on the texture of the camouflage . When using opaque camouflage that covers the fully grown edge of the nail, it doesn't matter which smile shape you choose. However, when using translucent camouflage, you need to make sure that there is no regrowth showing through under your smile.
Camouflage is a base corrector coating made on the basis of gel or acrylic, which allows you to visually align the nail plates and, without the slightest damage to the durability of the natural nail, make the transition less noticeable, as well as lengthen the nail bed for a French manicure, hiding all imperfections under its coating. In addition, when using gel polish to create a French coat, camouflage, in addition to everything listed above, saturates the color of the top coat, so there is no need to apply several layers of the main gel polish.
Performing a French manicure using a stencil
Any girl can make herself a French jacket using a stencil. Stencils come in both paper and durable metal. There are some subtleties when using metal stencils. First, after applying a nude color or clear polish, you need to wait for it to dry. White paint is applied to the metal base, then an impression is made on the nail along the edge of the nail. The final stage is to let the polish dry, and to complete the manicure, cover the nail with a glossy or matte topcoat.
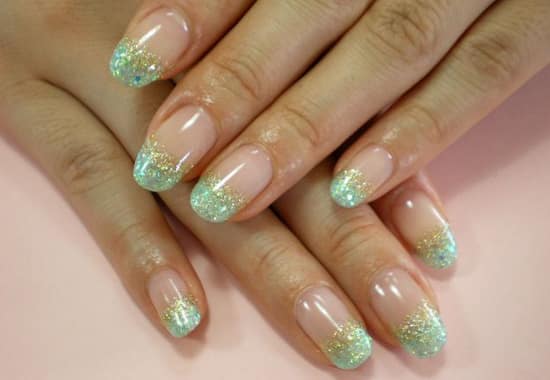
#4 With rhinestones and sparkles
The brightest and most interesting photos and ideas are obtained on nails, where French manicure is combined with rhinestones and sparkles. This is a design for all times and holidays. It’s very easy to do, because you won’t need to draw anything, except for the white edge.
- A gel base is applied, then a smile is drawn;
- There is no need to dry your nails at this stage. First you need to sprinkle them with sparkles or rhinestones. There are several options. You can apply rhinestones only along the contour, decorate the entire nail with sparkles, or gradually increase their concentration towards the end of the nail;
- When the glitter is placed, you need to dry the nail under the lamp. Afterwards, a layer of fixative is applied and dried again;
- All that remains is to process the plate to remove the sticky effect.
The price of a French manicure depends on many factors: the experience of the master, the chosen technique, the salon, and the materials used for the session.
French with a brush
Have you decided to make a French look with a brush? This means you are already an experienced user. There are several tips for creating such a manicure. For a French brush, choose a brush with long and elastic bristles. When drawing a smile, move your finger, not the brush. With this method, your smile will become clearer. The curve of the line should follow the curve of the cuticle, this will create a more natural looking design. To avoid chipping or cracking your design, use a brush to seal the edge of your nail. Use a brush with synthetic bristles.
What tools and materials are needed
Having found out whether it is possible to do French gel polish, all that remains is to stock up on tools and raw materials, taking into account the selected technique from those listed above, and watch the training video. You can take the classic version as a basis, then supplement your stock of manicure accessories taking into account your plans. In addition to the tools for manicure itself (a device or a standard set of scissors, a pusher, a nail file and tweezers), you will need to buy:
- napkins;
- rubber hoof;
- dehydrator;
- drying lamp;
- buff (polisher);
- base material;
- finishing coating;
- varnishes for the background and “smile”.
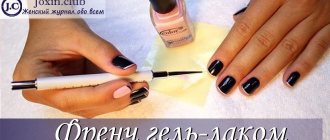
French with gel polish
French gel polish is distinguished by its strength and durability. Girls don't always have time to correct their nail design. French polish made with gel polish requires more time and painstaking work. If you follow certain rules, you can please yourself with a beautiful manicure and surprise your girlfriends. Fix each stage of this manicure and finish with drying in a UF or LED lamp. To ensure a clear smile, remove the sticky layer from the base. Use a self-leveling topcoat, with which you can easily smooth out the “step” before decorating and fix the result. If you don't get a smooth transition, use a sanding buffer to gently polish out any rough spots. To make it easier for you to work when creating a French jacket, choose medium-density varnishes and paints.
Useful tips and tricks
Not every nail technician knows how to competently and accurately draw a smile line, since it often turns out to be of different widths and depths on different fingers.
To make the procedure easier, especially at home, you can use auxiliary materials - stickers, stencils or stamping, which will become an alternative to a regular brush.
If you use special stickers for the jacket, you just need to fix them on the plate, leaving the free edge area free. Then, using a regular brush, apply contrasting gel polish to the open area and remove the sticker. You should get a perfectly even smile area.
When performing a French coat, consider other recommendations:
- Manipulations should be carried out gradually, gradually applying gel polish to each nail and then drying it. If you immediately apply a contrasting shade to all your fingers, there is a risk that somewhere it will start to flow, and somewhere you will accidentally wipe it off with your hand.
- You can also perform an inverted French manicure - “moon manicure”. Then the smile line is drawn not on the free edge, but on the cuticle area. This option looks impressive, but the gradual regrowth of nails quickly becomes noticeable.
- If there is yellowness on your nails, which may be noticeable under camouflage, pre-whiten the plate using compresses of toothpaste, baking soda or lemon juice.
- The ideal shade of camouflage gel is a combination of the tone of the periungual area and the color of the nail bed.
If you follow the recommendations and rules, you can independently draw a neat French jacket in a few hours that will look impressive in any situation.
French with simple varnish
French, made with simple varnish, has its disadvantages, such as fragility, but it also has its advantages. One of these advantages is that you can adjust the design at any time, while spending a minimum of time and materials. The first stage when creating a French manicure with a simple varnish is giving the nails a shape, removing the cuticle and polishing the nails with a buff. Then apply the base coat to the nail and let it dry completely. Make the base a soft pink or beige color. If you use a stencil, simply glue the strip and paint the space with white varnish. If you prefer to draw a smile, follow the rule that you don’t need to make the smile very thick, this will visually “eat up” the length of the nail. Secure the result of the manicure with a transparent top coat, treat the cuticle with oil, which will moisturize and slow down growth.
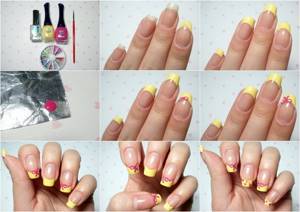
How to make a French jacket without a stencil?
- Drawing a “smile” with a brush is a little more difficult. Start by preparing your nail.
- Correct the shape of the nail.
- Use a buff to remove any imperfections on your nails.
- Treat your nails with a dehydrator and primer.
- Paint your nail with your base color and let it dry.
Afterwards, you can move on to painting a “smile” with a thin, hard brush.
- Draw a horizontal line along the edge of the nail.
- Draw small lines on the side to give the design a curve.
- Draw a semicircle with your brush, connecting the top point of the line at the side edge and the center of the nail. Repeat this on the symmetrical side of the nail.
- Then paint over the “smile” line and let it dry.
- Cover the jacket with a French top.
Ready! Now draw “smiles” on other nails just as beautifully.
To prevent the drawing from being accidentally blurred, draw a “smile” on each finger in turn and dry it.
Have you learned how to make a stunning French coat so that your friends ask in unison for the contact details of the artist? Or do you still dream of learning? Then you have a direct path to the nail industry. But before that you need to complete the courses and get a certificate.
At the manicure school, you will study in detail and practice on models all stages of classic and French manicure, learn the secrets of perfect coverage and creating stylish nail designs.
Course duration is 1-2 weeks, 4 hours each . The average cost in Moscow and St. Petersburg is from 15,000 rubles . In the regions from 5,000 rubles .
Models, varnishes and materials for design will be provided to you by the school at the time of training. But sometimes you have to buy something yourself. Therefore, carefully read the rules and curriculum at the school. It is possible that there is no “all inclusive” clause in the contract.
Students are the most important indicator of a teacher’s professionalism. Look at their work on social networks, Google reviews about the school. Look for information on third-party resources, not just on the school website.
After completing the course, you will be given a certificate confirming that you can now do your nails like a goddess! Many salon doors are open to you. Go for it!
We have told you all the secrets of the perfect French coat, and now take everything you need and start practicing on your friend, mother or aunt.
This training may be right for you:
- Best Online Manicure Courses from 1,000 Rubles
- 10 Best Manicure Training Courses in Moscow
- 10 Best Manicure and Pedicure Courses in St. Petersburg
- Best Nail Extension Courses in Moscow from 1,000 Rubles
- 10 Pedicure Training Courses in St. Petersburg
- 10 Best Nail Extension Courses in St. Petersburg
Choose the Best Courses in Your City: Yekaterinburg , Krasnodar , Nizhny Novgorod , Novosibirsk , Rostov-on-Don , Perm , Krasnoyarsk , Voronezh , Omsk .
Tell us in the comments how you feel about a black or red jacket? Do you think it looks bright and aesthetically pleasing or, conversely, inappropriate? Repost the article, these instructions will be useful to you!
Tips from nail art masters for creating a French manicure yourself
To make the nude color on your nails look beautiful, first whiten the nail plate with a simple toothpaste. To extend the life of your manicure, use a degreaser before applying the top and finish. The unevenness of the French manicure can be easily masked with a line of sparkles or glitter; this will visually hide errors in the manicure. Let each layer dry thoroughly. Ice water will help you reduce the time between drying. You just need to dip your nails in water and the polish will dry faster.
French is a timeless classic. With a little patience and skills, you can easily do this manicure yourself at home. Taking advantage of all our secrets, you will simply be a master of this matter.
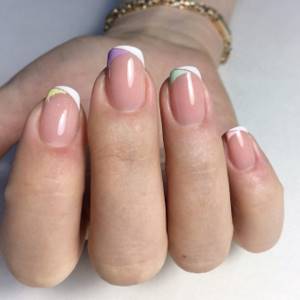
Types of French and new elements in the most popular coating
The French classic is a pink nail bed and a white free edge. But to some, this decision may seem overly conservative. Small tricks will add novelty and a touch of originality to the classics:
- French “Beverly” involves smoothing out the contrast of flesh and white with a translucent coating. Pearl or slightly shiny gel polishes or topcoats with the addition of glitter pigment are used. The same technique masks imperfections of both surfaces and lines.
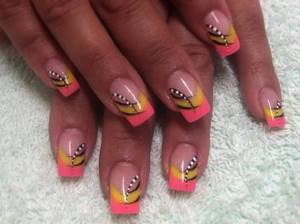
- Decorative French does not limit the choice of color. The free edge can be not only monochromatic, but also gradient or covered with a pattern.
- A geometric jacket is made with a dovetail-shaped smile line. The corner is drawn quickly with straight lines and looks very unusual.
- Asymmetrical French - an arch with one high “tendril”. As a rule, the outer side of the nail is made higher.
- A French jacket with a smile line is an excellent disguise. By placing rhinestones or shaped sparkles along the line, you can hide blemishes and decorate the coating. Additional fixation with finishing gel is required.
A French jacket from NeoNail will please the owner for 2-3 weeks. Then the coating must be removed correctly and carefully. How to do this, the training materials on the pages of our website will tell you. If these conditions are met, the legs will not suffer, and will delight you with good length and shape.
Colored French on short nails: photo
If your nails are short, you don't have to wait for them to grow to create an interesting design. A colored jacket will look very good on them.
Elegant French short nail design. A colored smile-toe lengthens short nail plates.
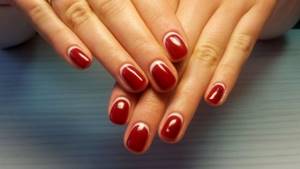
Reverse burgundy French. Bright short nails. Orange and white French on short nails.
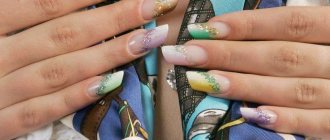
Colored French on extended nails: photo
On extended, especially long nails, you can do not just a colored, but a multi-colored jacket. And even an aquarium.
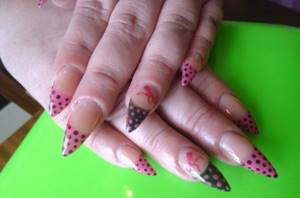
Extended nails with polka dots and bows. White and blue French.
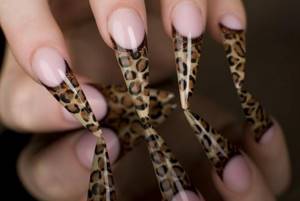
Leopard print jacket on extended stilettos. Extended nails with fan-french. Yellow and black are a great color combination for nail extensions. Long nails with a sophisticated French design.
French Aquarium.
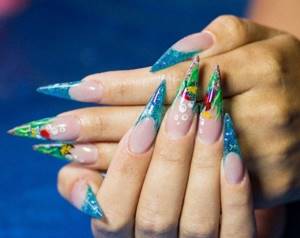
Colored French on medium nails: photo. Colored French on long nails: photo
On medium-length and long nails, the manicurist has room to give free rein to his imagination, so he can create a very beautiful French and millennium art in different colors.
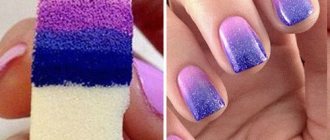
French with gradient. Red French with cherries on long nails. Stilettos with butterflies. Black French with glitter on long sharp nails. Medium nails with silver French. Multi-colored French on medium-long nails.
Two-color jacket with a pattern. Colored French polka dots on long, neat nails. French with multi-colored flowers. Rainbow jacket with butterflies.