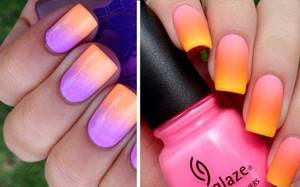
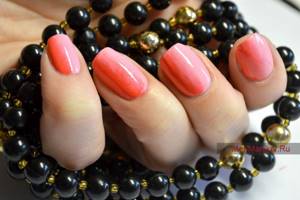
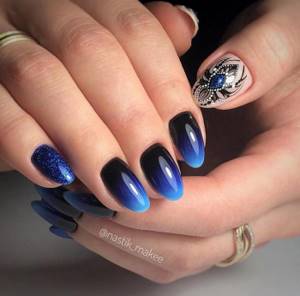
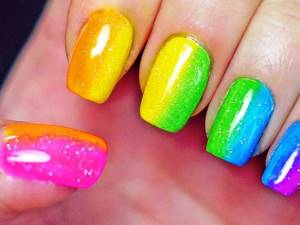
Gradient manicure or ombre is a smooth transition from one polish tone to another. The simultaneous use of several shades attracts with spectacular results. In addition, you can apply designs, rhinestones and other nail art techniques to the gradient coating. You can make a gradient with a gel polish sponge yourself; the proposed video tutorial will help you understand the intricacies of the technique.
Original gradient manicure
What is a gradient
A smooth transition from one polish color to another allows you to get a gradient nail design. Like any other manicure option, it has its advantages and disadvantages. And you need to create it following certain recommendations.
Peculiarities
Gradient nail design is remarkable because the transition in it is carried out not only between dark and light tones of the same color. A girl can choose absolutely any shades and try to combine them with each other. This is its advantage - an unexpected combination becomes an original solution and allows the owner to stand out. By varying the color scheme and types of gradient, you can get a unique design.
One small disadvantage of this design is that not all colors combine well with each other. If a girl is young and bold, and is not afraid to be bright and noticeable, she can experiment without hesitation. Business women and modest women are better suited to pastel colors that will not create a sharp contrast.
Types of gradient on nails
A gradient, or stretching as it is also called, can be drawn in several ways. In this regard, it is divided into several types:
- Simple. This type differs from the others in that the gradient effect will not be created on each nail, but on the entire hand as a whole. It is perfect for manicure at home and is created using 5 shades of the same color. To do this, a darker varnish is applied to the thumb or little finger nail. Next, the nails are painted in increasingly lighter colors. Alternatively, 3 shades can be used. In this case, the middle nail will be either the darkest or the lightest.
- Classical. Here, a smooth transition between two or three colors is carried out along the width of the nail in its central part, i.e. across. This type is also called horizontal.
- Vertical. In it, the transition occurs along the surface of the nail, i.e. vertically.
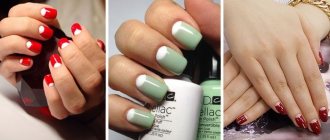
- In the style of French manicure. The principle does not change, but the colors used are beige or pink, turning into milky or white.
- With painting. In this case, the gradient will be used as a basis for the pattern.
- Brilliant. There is no play of colors as such; only one varnish is used. Sparkles are added to it, the amount of which will decrease closer to the transition border.
- Chaotic. The boundaries of transitions between colors can be located anywhere, and the colors themselves can change direction. A great example is the colorful Skittles design, which takes its name from the colorful candies of the same name.
- Linear. The design on the nails is often represented by vertical lines, which are carefully drawn with thin brushes. This type of gradient nail design does not imply blurring the boundaries between colors. A good example is the diamond geometric gradient.
Required Tools
Preparation for creating a gradient manicure begins directly with the collection of tools and materials. An approximate set can be seen in the table.
| Name | Purpose | Possible analogues |
| Degreaser | Provides stronger adhesion of the polish to the nail, thereby extending its wear time | Primer, clinser |
| Varnishes of several colors | Used to create designs | Gel varnishes or thermovarnishes |
| orange stick | Used in the process of pushing back the cuticle | Metal or plastic sticks |
| Cotton swabs and nail polish remover | Getting rid of nail polish on the skin around your nails | Corrector, tape (attached before applying varnish) |
| Fixative | Smoothes the surface, adds shine to the manicure, and helps make it more durable. | Any top coat |
| Sponges | Used to create a gradient before applying to nails | Foil, eye shadow applicator, dish sponge, etc. |
If the manicure is created using gel polish, you will additionally need a lint-free cloth, which will allow you to remove the sticky layer after polymerization, and a UV lamp directly.
Application rules
To get beautiful nails and not look funny or awkward, it is advisable to learn how to choose the right colors and type of gradient. Here are some recommendations on this matter:
if your nails are short, but you still want to make a fashionable design, you should pay attention to vertical or simple stretching; a dark tone at the base of the nail plate is better suited to long nails, because can visually shorten them; when colors are contrasting, the boundary between them should be defined as clearly as possible; to get an interesting manicure, it is better to use more varnishes; the choice of matte varnishes will not be the most successful when creating a gradient design, while glossy ones will enhance the effect; The varnishes themselves should be of the same texture; the result from using thermovarnishes will be interesting.
Ombre sponge with gel polish yourself
Gradient manicure, ombre, Dip Dye, degrade, nail polish stretching are the names of one technique that is easy for anyone to do at home.
The easiest way to apply a gradient gel polish coating is with a sponge. It is recommended to use varnish with a dense texture and rich pigmentation. In this case, only one coat of coating will be required.
Ombre
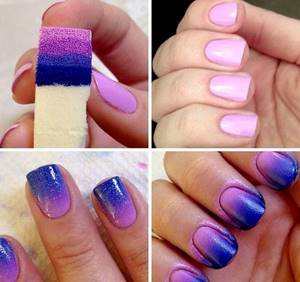
The popularity of the gradient on nails with gel polish with a sponge led to the appearance of a special sponge with small pores, with which you can create the perfect ombre without bubbles.
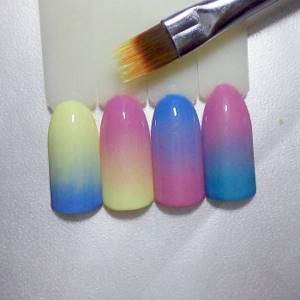
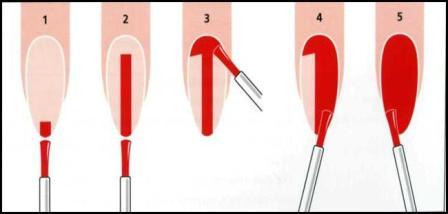
How to paint your nails in two colors using a sponge with a smooth color transition
Everything is very simple, the main thing here is to do everything carefully and not rush anywhere.
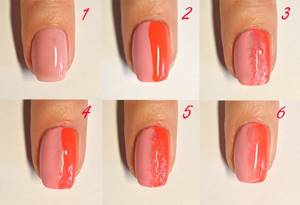
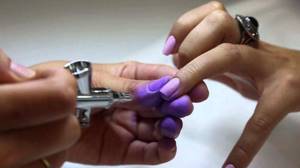
Step 1 First, choose two suitable varnishes and determine which color will be the main ones, cover your nails with them (photo 1).
Step 2 On any hard surface (plastic, thick glossy cardboard, etc.), apply two colors of varnish next to each other. Using, for example, a toothpick, carefully mix the two at the point of their contact - you will get a color stretch (photo 2). You can skip this step and apply the polish directly to the sponge.
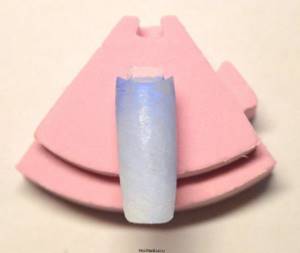
Step 3 Take a small narrow sponge (slightly wider than your nail) and scoop the polish onto the sponge (photo 3).
Step 4 Gently transfer the polish from the sponge to the nail, making an imprint (photo 4).
Step 5 The polish will also be imprinted on the finger itself, so you need to soak a cotton swab in nail polish remover and clean your finger of unnecessary polish. To make it easier to remove, first apply a rich cream to your fingers. Using the same stick, correct the coating line near the cuticle, making it even and smooth, then the manicure will look neat.
Step 6 Finish your nails with a protective coating or just clear polish.
You can also use an applicator for these purposes, then the skin practically does not get dirty:
Other techniques
In addition to the sponge, there are other options for creating a gradient manicure at home.
Method 4: glitter stretching
This method of gradient manicure consists in the fact that on a single-color varnish coating, part of the nail is covered with sparkles, and there are more of them at the tip, and by the middle of the nail they disappear. To make such a transition, no additional materials are required, only two varnishes, one of which has glitter.
- We cover the nails with background varnish and wait for it to dry.
- Using varnish with glitter, we make a stretch: we draw a brush from the free edge to the middle, leaving more glitter at the edge, and in the middle there are almost none. Stretching can also be done in the opposite direction - from the cuticle to the center of the nail.
- We cover the design with topcoat.

It’s better to use small sparkles here, and it’s better to make the transition border uneven - it looks more organic, and it’s a bit difficult to arrange the sparkles in one row :)
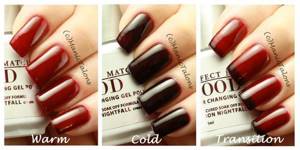
Method 5: ombre using thermovarnishes
There is no step-by-step algorithm for performing a manicure, since it is enough to purchase a thermal varnish and simply cover your nails with it, as with regular varnish, and the thermal effect itself will do its job and create a gradient. However, there is a nuance here: the ombre transition effect will be noticeable, only if there are nails that have at least a small free edge, since it works due to the difference in temperature on the nail bed and without it. Read more about thermovarnishes here.
Method 6: gradient manicure with acrylic paints
A gradient transition can also be created with acrylic paints. To do this, you will need a brush (fan or other volumetric) and a set of colored acrylic paints.
- First, a light color is applied to the tip of the nail and distributed until it decreases.
- Then the second color is mixed with the first on the palette and distributed side by side, overlapping the first and forming an even transition.
- In the third step, the second color is applied independently and goes onto the common part in order to also harmoniously combine with it.
- If there are any flaws left, they can be improved with any of these colors, “stretching” it across the entire nail.
- Here you can make a drawing or cover it with top varnish.
Manicure technique using a sponge
Simple gradient manicure technique
- First you need to do a regular manicure, treating the nail plates and cuticles.
Gradient manicure technique
Next, apply the base varnish and dry it. We apply one of the selected varnishes to the nail plate; usually the lightest shade of varnish is selected for this layer. The layer should not be thick, but dense enough. We wait until the varnish dries.
Apply the second varnish to the sponge in two stripes. This is done in such a way that one part of the sponge is densely covered with color, and the second - not so intensely. Press the sponge quickly onto the nail from the middle of the nail plate to its tip. The closer to the free edge, the denser the coloring. To do this, apply the sponge to the nail several times, most often closer to the tip.
We fix the manicure with a layer of top protective coating.
The second simple way to perform a manicure with a sponge
- The nails are covered with a base coat, which must dry.
Manicure with a sponge
Varnishes of the selected colors are applied in strips directly to the sponge and then transferred to the nail with a few slapping movements. Excess varnish that gets onto the cuticle area and finger skin is carefully removed. A top coat is applied over the dried manicure.
This method is quite simple even for a beginner, and you can verify this by watching the video:
Smooth color stretching on nails
This manicure method is more complex than the previous ones, but the boundaries between colors are almost invisible, and the transition is very smooth. To do this, carefully apply drops of varnish to the palette. They should be located close to each other.
For a beautiful color transition, carefully blend the borders of the varnishes
Depending on the desired pattern, varnish blots can be arranged vertically or horizontally in order or randomly
Mix the varnishes very carefully along the border of the colors with a needle or toothpick. Colors should transition smoothly from one to another
We blot the resulting pattern with a sponge and apply it to the nail plate with a smooth and quick movement.
Don't forget to clean the skin around the nail with concealer or nail polish remover applied to a cotton swab.
In addition, it is better to cut the sponge into smaller pieces, and apply BF or PVA glue to the cuticles, which should be removed at the end of the manicure.
To prevent bubbles from appearing on the nail coating, blot the sponge on the foil a couple of times before processing the plate.
Methods for performing nail designs with a sponge
Using a sponge, a gradient manicure can be created using different techniques: working with varnish directly on the nails, on the sponge itself, or on another surface, such as foil or film. Let's consider each of them separately.
The first common step for everyone is to treat the nails before doing the design : removing the cuticle and giving the nails the same shape and length with a nail file. I also recommend applying a base coat to protect your nails from coloring pigments.
Next, you can apply white polish or the lightest one selected for the gradient to all nails. This will make the coating more dense, the natural nail platinum will not show through the gradient, but you need to wait until the varnish is completely dry. Do not apply a large number of layers of varnish, otherwise the manicure will turn out to be very bulky.
Method 1: ombre manicure using a sponge
- Apply the selected varnish to the sponge, alternately in strips, joint to joint. We wait a couple of seconds for them to absorb a little.
- We reprint the sponge onto the nail several times until the colors are noticeably smoothed out.
- The procedure is repeated several times until you think that the effect has been achieved. If bubbles appear, make the first two prints not on the nail, but, for example, on paper.
- Cover the finished design with topcoat or clear varnish.

Method 2: gradient manicure with a sponge on foil
- Here the varnishes are applied in strips, end to end, on foil (you can use film, glossy paper, etc.), and the joints can be mixed with an orange stick. Then it is transferred to the sponge by simply reprinting. The varnishes should not have time to dry.
- Next, the algorithm is similar: the varnishes are reprinted from the sponge onto the nails.
- The process is repeated until the desired gradient effect is achieved.
- We complete the design by covering the nails with a top coat.
Method 3: degrade manicure using a sponge on your nails
- In this method, there are also differences only at the first stage: the varnishes are applied joint to joint directly on the nail plate.
- Immediately, before the varnishes begin to dry, spread them with a sponge using the same light pat as in the first two methods. The sponge should not move along the nail, otherwise the transition line may shift.
- The first two steps are repeated until you think the effect has been achieved.
- The final step is to apply topcoat varnish.
Gradient technique on nails
In fact, it just seems that it is difficult to perform such a manicure.
So, how to paint your nails using two colors on your nails? Choose a few polishes that you like. The trend now is deep black, and, as you know, almost all known shades can be combined with it. Gold, red, blue, silver, white, beige, etc. look beautiful and harmonious with black. Let’s choose, for example, gold. In addition to the coating, you will need a thick sponge or cosmetic sponge, colorless nail polish, a toothpick, cotton swabs and pads, and nail polish remover.
When everything is ready, you can begin the most important task - applying the gradient. Apply two varnishes side by side on a separate surface, not sparing them, since the sponge absorbs quite a lot and you will not have time to constantly add varnish. After this, use a toothpick to blend the edges to create a smooth transition of shades. Dip a sponge into this mixture and apply it onto the plate with a gentle movement. Don’t be afraid to stain your skin – this can be removed later with a cotton swab. This is how you get a simple manicure technique with a color transition. It looks very impressive. If the layer turns out to be translucent, then this can be solved quickly - with a second gradient layer. Without allowing the finish to dry, apply a clear polish on top to even out the gradient and give your nails a glossy shine.
Let's look at how to make a manicure with a color transition, using not two varnishes, but three or more colors to add depth to the transition. Before you paint your nails using this technique, you will need to prepare the same tools as in the previous version, but you need to add a couple of colors. If you want to make a bright spring manicure, then choose rich colors, preferably one shade. After selecting and mixing shades, proceed to application. The technique remains the same.
Advice to all beginners: if you don’t want to stain your skin, cover it with adhesive tape or tape, leaving only the nail plate free. This will make your work much easier and improve the quality of your manicure. After the coating has dried a little, carefully remove the protective stickers from the skin and enjoy the result.
How to combine colors?
The simplest method of designing a manicure with a catchy gradient is to choose several of the most stylish shades of a single color, which will differ from each other by no more than 1-2 tones. They will allow you to create the most beautiful transition.
Considering the fact that choosing colors that are very close to each other is often not so easy, you can get them quite quickly by mixing different varnishes at home. To do this, you just need to mix varnishes of the same color to obtain intermediate colors; with a light varnish, its darker counterpart is mixed. The saturation of the resulting tone will directly depend on the proportions in which the colors were taken.
To design the most eye-catching gradient, it is better to choose combinations such as:
- adjacent colors - shades that are located in adjacent sectors of such a wheel (this can be orange and yellow-ochre, light green and light green);
- very similar colors are those tones that are located 1 sector apart from each other (the most similar and are pure tones) - these are blue colors and soft purple, deep red and orange colors;
- intermediate - lines are usually mentally drawn between them that intersect at an angle of 90 degrees (yellow and reddish-orange, brick-red and violet);
- analog harmony is several colors that appear in a row on a color wheel (bluish-green, blue, bluish-violet);
- alternative harmony - luxurious combinations lying on the color wheel opposite the main color and 2 more adjacent tones (yellow, faded purple, bluish-lilac and reddish-lilac).
Varnish colors and their combinations
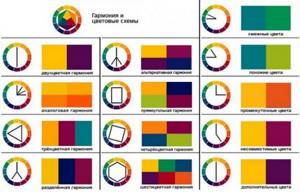
The issue of choosing colors for a gradient manicure requires special attention. To learn how to combine them correctly, I recommend using the color wheel and standard combinations.
The smoothest transition will be created by analog colors - those that are located next to each other on the color wheel. The classic version of a gradient manicure implies that the cuticle will have a lighter color, although this is not a panacea.
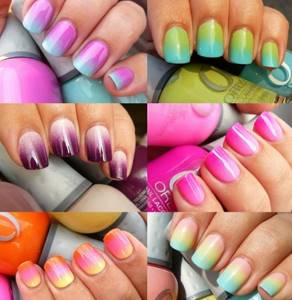
Other color combination schemes shown in the picture will also look beautiful and organic:
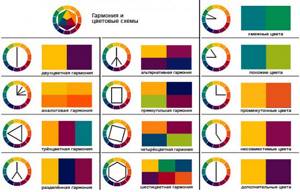
Here you can see which colors will go together and which will not from the color wheel. You can use from two to six colors in this way, getting from two-color to six-color harmony. Most often, gradient manicure uses 2 or three colors. The figure on the right shows which colors can be combined in this way (funny, similar, intermediate), and which cannot (incompatible and complementary).
To select colors, you can also use special online services, for example mudcu.be. Of course, it will be difficult to choose varnishes in accordance with the colors defined on the circle, but it should help you find a beautiful combination.
Do not use very dark varnishes to create a gradient - this effect will be practically invisible on them. It is best to use highly pigmented, dense varnishes to create a gradient manicure - this will require fewer layers to achieve the desired effect.
Secrets of manicure technique and design
Depending on the method of creating a gradient, the method of applying varnish to the nail is determined. Each method has its own nuances, taking into account which you can improve the quality of the manicure and the service life.
Secrets and nuances of performing a gradient:
- Varnishes that are used as a base should have pale shades. The color value of the base has a direct impact on the brightness and clarity of the gradient shades.
- If the manicure is short, then it is better to place dark colors at the base, gradually turning into light colors towards the tip. So, the length of the nail will visually increase.
- The coloring agent is applied using patting movements. This application technique will improve the color transition effect.
- The brightness of the manicure can be achieved if you distribute the varnish in several steps, forming several layers.
- To prevent the surface of the finished manicure from becoming porous due to the sponge or sponge, you need to apply a clear varnish before the colored layers of varnish dry.
- If varnishes are applied from foil, then before each time it is worth renewing the product on the surface.
- You can apply a design on top of the gradient. It should be small and located in a place where the color is solid.
- The sponge or sponge should be slightly damp. The product will lie evenly on the surface of the nail and dry quickly.
- In order not to smear the skin around the nail, it can be partially sealed with a paper adhesive plaster or tape.
A manicure with a sponge will be a simple solution for those who value time and want to get an original manicure design. By following the tips for creating a gradient design, you can get a unique result.
Unique solutions
The gradient will become a unique basis for the embodiment of artistic ideas. The most popular options may be:
- Manicure in the “Haze” style. Muted colors are used: brown, gray, black. For shine, varnishes with sparkles are used. It is better to use mother-of-pearl samples.
- Manicure “Sea wave”. Color palette: blue, blue, turquoise, white. On a colored background, you can create an imitation of a wave with white varnish. The pattern is applied with a thin brush.
- Thematic design. A drawing is made using a gradient stencil on a pale base. To increase contrast, you can outline the image with a bright or dark varnish.
- Strip. You can create a unique pattern on a gradient using stripes. Additional decoration can include rhinestones, stones, powders, and glitter. Shiny decorative stripes can be left in the composition.
You can develop your own design by combining several styles based on gradient varnish application
It is important to create the correct transition of colors and shades. Bright and non-standard color schemes will be quite appropriate for this manicure technique.
Ways to create a gradient on nails: classics and new items for 2020
The fashionable gradient on nails 2022 provides a unique opportunity to play with color and create unique pictures on the nails. The classic technique involves performing a horizontal gradient. You can also combine this design with additional decorative elements, patterns, abstract or floral designs. A vertical ombre manicure looks very interesting, for which it is recommended to choose contrasting shades of varnish.
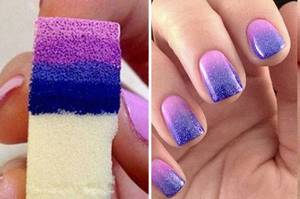
Classic homemade gradient with a sponge or sponge
This is the easiest way to get a trendy manicure using a simple foam sponge. To achieve a gradient effect, it is enough to apply a base shade of varnish to the nail, and a second shade to the sponge, which will be imprinted on the free edge.
The technique for performing a gradient with a sponge is as follows::
- a base coat is applied to the previously prepared nail plate;
- shades of varnishes are selected, which should be harmoniously combined with each other;
- base varnish is applied and dried;
- the sponge must be damp, otherwise it will absorb the polish and it will print poorly on the nail;
- several colors of varnish are applied in strips to the sponge;
- the sponge is applied to the nail and pressed lightly;
- A top coat is applied to consolidate the result.
Gradient with a comb brush
A special flat brush called a “comb” will help you create a nail design with a gradient. Thanks to its use, you can create both horizontal and vertical ombre. A gradient with a brush has the main advantage; to master the technique, it is enough to study the step-by-step principle of operation.
So, how to make a gradient on your nails with a comb brush at home:
- Apply two colors of varnish to the nail plate with a flat brush;
- Using a comb brush, carefully brush along the border of the varnish, shading it;
- you can move the brush to the sides, creating a more blurred background;
- At the end, a colorless varnish is applied to consolidate the result.
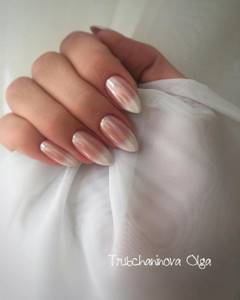
Beige gradient gel “baby boomer”
Seeing a photo of a beautiful gradient on nails using the Baby boomer technique, no girl will remain indifferent. This is one of the varieties of French manicure, which simultaneously combines a classic design and a horizontal gradient with gel polish. This manicure is elegant and sophisticated, ideal for any look.
To create a gentle gradient with gel polish on long or short nails, you should follow these tips::
- A gel polish base is applied to the nails and dried;
- The surface is coated with white gel polish and dried;
- apply beige gel polish with a fan brush and dry;
- Smooth mixing of colors is obtained;
- topcoat is applied and dried.
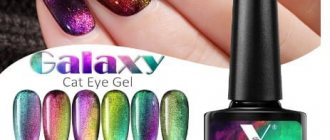
Gradient air puffing
Aeropuffing is a device for quickly applying a gradient, both classic and stencil, which can be done using an airbrush. The new trend for 2022 is a weightless multi-layer gradient consisting of small patterns. These could be autumn leaves, winter snowflakes, or anything at all. Aeropuffing is very convenient to use, although you will have to stock up on replacement sponges.
An airpuffing gradient can be done as follows::
- the first layers are base and colored gel polish;
- selected shades of gel polish or special gel paint, which is often sold in a set with a pouf, are applied to a metal or plastic palette;
- the pouf is dipped in gel polish or gel paint, printed on the palette a couple of times to remove excess paint, and only then applied to the nail;
- the resulting gradient is dried in a lamp;
- You can apply a top coat (glossy or matte) on top
The photo shows an example of a gradient using a pouf.
Photo step by step
Airbrush gradient
Airbrush is a simple artistic painting, for which a special device is used. It is used to spray paint over the nail plate, thereby creating a blurry image.
The airbrush gradient is performed according to the following scheme:
- airbrush is applied to the nail in one color;
- after the first layer has dried, apply the second using a varnish of a different shade;
- a gradient on long nails can be done with 3-4 colors of varnish;
- The design is fixed with colorless varnish.
Gradient glitter on nails (stretching glitter with a brush)
Gradient glitter on nails or stretching glitter with a brush is one of the varieties of ombre manicure. In this case, the base is glitter, which is distributed over the nail plate from top to bottom or bottom to top, creating a smooth transition.
A gradient manicure with glitter on gel polish is performed as follows::
- the nail plate is prepared, gel polish is applied in several layers, and dried;
- for design you can use loose glitter or gel polish with glitter;
- glitter is applied as close to the cuticle as possible;
- take a flat brush, place it parallel to the nail and gently shade the glitter;
- topcoat is applied and dried.

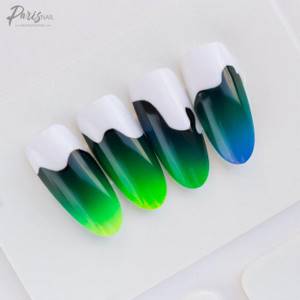
French gradient on nails
The French gradient looks interesting, stylish and sophisticated on nails, ideally complementing any look. This technique is suitable for beginners who are just mastering the ombre design technique.
To create it you must follow these steps::
- The nail plate is prepared;
- the glossy coating is removed, the nail is degreased;
- light gel polish is applied to the lower part of the nail and stretched towards the center with a brush to obtain a smooth transition;
- the layer is dried;
- take a beige gel and apply it to the rest of the nail, gently stretch it to the edge and dry it;
- topcoat is applied and dried.
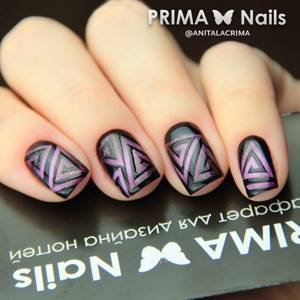
geometric gradient
The vertical geometric gradient was considered one of the most popular designs last year. It was sprinkled with glitter, powder, mixed with a pattern, etc. Now the love for this design has subsided slightly, but for some reason it seems that it will return to us, because the theme of the geometric gradient has not been fully explored.
How to make a gradient using this technique is described below.:
- the most popular shades for creating a gradient in a geometric style are charcoal black, different shades of gray and blue, purple, blue or pink;
- To apply the design you will need two brushes with fine bristles: long and short;
- Initially, the nail plate is covered with a light shade of varnish;
- then colored gel polish is applied to the palette and the drawing of the gradient begins with the main shade;
- then, as the gradient is applied, white is mixed into the main color on the palette. This way the color is stretched. Those. in fact, a geometric gradient can be created with just two gel polishes – white and colored;
- at the end the design is fixed with a transparent top.
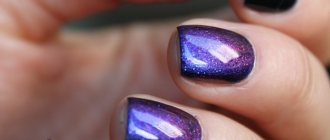
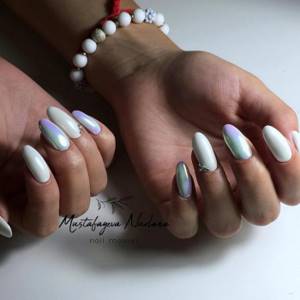
Rubbed gradient
Fashion trends 2022 did not ignore such universal nail decor as rubbing. Metallized pigments do not lose their relevance and are used to create almost every fifth manicure. Rubbing is indispensable for creating a home gradient, because it allows you to create something “beautiful” without any special skills or talents. Gradient rubbing is very simple. All you have to do is coat your nails with your favorite gel polish and choose a suitable shade of rub. On dark shades, mirror pigment looks more advantageous; for light shades, it is better to use pearl rubs. You can also choose other fashionable colors of varnish - for example, the black and red design option looks interesting.
The next lesson will help you create a beautiful gradient by rubbing yourself:
- nails and cuticles are prepared;
- apply the base and black base (on black nails the mirror effect will look bright and unusual);
- Before applying any rubbing, it is better to degrease your nails;
- the rub is applied using an applicator or finger and literally rubbed into the surface of the nail;
- Remains of pigment are removed with a brush and the finish is applied.
Gradient with sand
The gradient design and velor effect are simply beautifully combined. This manicure design looks bright and unusual, and its implementation does not require special skills or knowledge. The ideal option would be to highlight one or two fingers with sand, and leave only the ombre coating on the rest.
Sand gradient technique:
- nails are prepared, cuticles are removed;
- a classic ombre manicure is performed;
- sand is applied to the wet layer of gel polish and distributed evenly with a brush;
- you can use sand of one color or make a smooth transition of several shades;
- remove excess sand with a brush;
- on nails where there is no sand, apply a finishing coat and dry.
Fashionable gradient in the form of a pattern
Drawings occupy a special place in nail design. Ombre in the form of patterns looks very impressive and becomes the main accent in the image. In combination with a gradient stretch, it is recommended to use pastel and light shades, so that the design will not be lost against the general background and will remain bright and expressive. The transition between colors can be used as a base or become a decoration for just a few fingers. The most relevant are geometric and floral designs.
Gradient with stencil
This design option is very simple to implement. Using special stencils, you can create a variety of patterns on your nails. To make the manicure look interesting and stylish, it is better to apply the design on one nail. The technique is very simple - a classic ombre is done, but a stencil is glued to one nail, which is filled with varnish of a contrasting color. Once the varnish has dried, the sticker is carefully removed and the design is fixed with colorless varnish.
How to carefully paint your nails: step-by-step instructions
Well, now let's get to the most important moment - painting the nails. Surprisingly, not all women know how to do this correctly. Here are some secrets.
- Immediately prepare nail polish remover, cotton pads and swabs, and toothpicks. All this will come in handy if you accidentally stain your hands.
- You can apply a rich cream to the area around your fingers to make the skin cleansing process easier.
- The bottle of varnish must be warmed in your hands, then its consistency will become more uniform.
- Start coloring with your little finger, so there is less chance that you will damage the coating on other fingers.
- To carefully paint your nails, you need to start from their center. Draw a vertical strip, retreating a millimeter from the cuticle, to the edge of the nail. Next, we draw the side lines close to the central one. Do not make unnecessary strokes; in three movements you should cover the entire nail with varnish.
- When making side strokes, step back a little from the edges of the nail, this will make the manicure more elegant.
- Use enough polish on your brush to cover one nail.
- If you are using colored varnish, it is better to apply it in two layers. Each layer should dry thoroughly. We do not recommend using dryers, hair dryers or cold water to speed up the process.
- We finish the manicure with fixing varnish. It will preserve your creation for a long time.
Removing cuticles using the classic method
Applying nail polish requires a well-groomed periungual ridge - this is the only way women’s hands will look elegant and attractive. The most popular and in demand method today is the classic trimming technology.
Before removing the cuticle, immerse your hands in a warm bath for 10-15 minutes. To achieve maximum effect, you can add a little sea salt, a few drops of iodine, essential oil, and an infusion of medicinal herbs to the water.
When the skin around the nail becomes soft and pliable, it is carefully moved with an orange stick or a metal pusher to the roller and cut off with sharpened tweezers. Then a soft fortified oil or nourishing cream is applied to the treated area, and the nail plate is thoroughly wiped with a napkin so that the care products do not interfere with the coating of decorative varnish.
Rules for applying varnish
We present step-by-step recommendations on how to carefully paint your nails yourself. To do this, we will consider the procedure, by performing which you can even avoid the need to get rid of excess varnish on the cuticle and skin of the fingers.
Preparing the nail surface
The very first step is to remove the old nail polish, for which you will need a cotton pad or roller and nail polish remover. To keep your nails healthy, you should choose a product without acetone. It will cost more, but will not affect the nail plate in any way.
Before carefully painting your nails with varnish, it is advisable to do a hygienic manicure. This can be a trimmed, untrimmed or hardware procedure. During such a manicure, you need to remove or push back the cuticle, as well as align the nail plate as best as possible. This is done by sanding with a special nail file. Also at this stage, the nails are given the desired shape and length. Now remove any remaining dust from the nails and wipe them thoroughly.
Varnish application process
You should start decorating with a base transparent coating, which additionally levels the plate. Strengthening agents are good as such a base, because... They not only protect, but also treat nails. In addition, the base polish prevents the nail plate from yellowing and prevents dark and rich polishes from seeping into the nail. The last point is very important, because it is quite difficult to completely remove old varnish in dark shades.
After this, the actual application of colored varnish begins:
- Lightly heat the bottle with the selected varnish and roll it between your palms. Under no circumstances should you shake it, because... the resulting air bubbles will affect the appearance of the coating.
- Using a brush, apply enough polish to cover exactly one nail. If there is a lot of product, it will be more difficult to distribute it evenly over the surface, and it will take longer to dry.
- Now we begin to cover the nails, starting with the little finger. To do this, place a drop approximately in the center of the nail, a little closer to the cuticle, and use a brush to reach it. Then we move the brush from the center to the free edge, after which we paint the side parts. If desired, we can first move to the edge of the nail, and only then to the cuticle. At the end, be sure to seal the free edge with a gentle movement of the brush and let the nails dry.
- To get a more saturated color and avoid pale streaks, you need to apply a second coat of varnish.
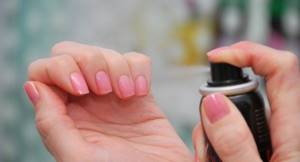
- To ensure your nails are completely dry, you can use a hairdryer at low speed or an ultraviolet lamp. However, the best way is to dry it naturally, which will retain all the shine. When all the decorating work has been completed, all that remains is to coat the nails with a fixative. It will also need time to dry, although you can use a special spray to speed up this process. This spray can be slightly oily, thereby helping to moisturize and soften the cuticle.
Tricks for a neat manicure
It’s not enough to know how to carefully paint your nails yourself; there are tricks here:
- to cover nails, it is advisable to use high-quality varnishes that have a general structure;
- It is not at all necessary to buy expensive degreasers - regular alcohol will do;
- to check whether the coating has dried, you can lightly tap your nails against each other or lightly touch them with your lips;
- between uses, varnishes should be stored in dark, cool places;
- Do not move on to the next nail without dipping the brush into the varnish again;
- if you are not satisfied with the result, you should remove it immediately and repeat the procedure;
- To ensure that the polish lasts as long as possible, do not wet your hands for several hours after application.
Tips for the perfect sponge manicure
When performing such a manicure, you need to take into account some subtleties of application and correction of the coating. Our recommendations will help you avoid some inconveniences and achieve an ideal result in the same period of time that you spend on a regular manicure.
- The color of the base will determine the saturation of the future coating. Therefore, if you use pale shades, apply them in several layers.
- Distribute dark shades at the base of the nail plate - this will make your nails look longer. This option is also more attractive in appearance.
- Using a sponge, apply the polish to your nails using light patting movements. This way you will achieve a more vibrant gradient effect.
- If you want to get an intense manicure with bright shades, distribute the polish on the nail plate in several approaches.
- Apply the fixing compound without waiting for the coating to dry completely, otherwise you will not achieve a smooth and even glossy surface. The fact is that the structure of the sponge is, as it were, imprinted when applying varnish to the nails, due to which they look porous.
- Try to update the color palette on the foil each time you start covering an individual nail.
- To prevent the skin around your nails from becoming smeared, cover the area in a circle with clear tape.
- If you do not use professional nail drying, we advise you to speed up the process by immersing your hands in cold water.
Types of gradient manicure
In nail art, three methods of applying a gradient are used: horizontal, vertical, and with a transition. These methods are considered classic, although new variations of transitions are appearing, for example, geometric.
Fashionable manicure with OMBRE effect
Gradient with transition
The transition of shades from dark to light is carried out from one finger to another, i.e. If the thumbnail is painted in a dark shade, then gradually towards the little finger the shades of the same color become lighter. The photo shows a gradual transition from light to dark shade.
Pink Ombre manicure
For these purposes, either five shades of the same color are used, or one color for each nail is whitened or another color is added.
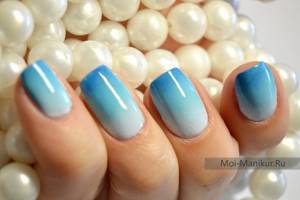
Horizontal Gradient
The transition from shade to shade begins from the cuticle area and gradually changes towards the tip of the nail. As for the color scheme, it can be a transition of shades of the same color or a combination of several contrasting colors.
Horizontal Gradient
The gradient consists of at least two shades of gel polish. Stylists advise limiting the number of shades to four on one nail.
Applying gel polish to nails
Vertical gradient
This coloring technique is carried out by changing shades from one nail fold to another. This approach allows for interesting variations. So, you can alternate gradient coloring with monochromatic coloring. For example, cover the nail of the little finger with one shade, the ring finger using a gradient technique, apply the shade that ends the transition on the ring finger to the nail of the middle finger, etc.
Vertical gradient
Another option: the nails of the little and ring fingers are painted in one shade, the index and thumb in another, and on the middle nail a smooth transition is made from one shade to another.
Smooth transitions visually lengthen the nails, so a gradient manicure looks advantageous on short nails.