In this article we will look at how to properly and on what to glue rhinestones on nails.
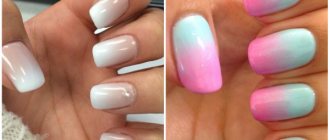
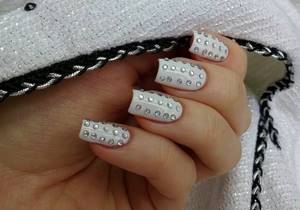
Rhinestones on a woman’s beautiful, well-groomed nails look stylish and original, but it is generally accepted that this decoration is more suitable for special occasions than for everyday life. In this article we will try to convince you that this is far from the case. If a woman’s image is well thought out, clothes, makeup and accessories are chosen tastefully, and the procedure for gluing rhinestones onto gel polish is done correctly, then they will become an excellent addition to even a strict style and will adhere firmly to the nails without causing any inconvenience.
Of course, to stick rhinestones on your nails, it is better to use the services of a specialist, but not always and not everyone has such an opportunity. In addition, many women prefer to experiment with their appearance themselves, take a creative approach to finding ideas and creating their own image, and they do it well.
What should I use to glue rhinestones on my nails?
If you glue rhinestones onto regular varnish, then you need to do this on a slightly dried, but not yet dried varnish. You can use a fixative that has also dried a little. If you glue them too early, your pattern will float. If you miss the time while the top layer is still sticky, the rhinestones will not stick at all. Simple, affordable, but short-lived - just for one evening.

Types of rhinestones
But today the basis of modern manicure design is gel polish. This is a very durable coating that preserves the beauty of your nails for up to a month, provides an almost unlimited choice of shades and allows you to firmly glue rhinestones onto your nails using different materials. What should I use to glue rhinestones on my nails?
- Top for gel polish. The simplest, but not the most convenient option, in which small rhinestones tend to blur due to the liquid composition of the top and have to be adjusted before drying.
- Top for rhinestones. A thicker one, which provides better adhesion, is not applied to the entire surface of the nail, but pointwise, under the rhinestones. Some manufacturers produce it in a gel texture.
- A mixture of topcoat and acrylic powder. It is made in a 1:3 ratio, applied pointwise, and provides good adhesion, including for large rhinestones. But this method requires a powerful drying lamp - at least 36 W.
- Special glue. It provides strong adhesion, but has one significant drawback - it dries quickly, after which it will no longer be possible to straighten the rhinestones if they are placed unevenly.
- Gel for extensions. This version is for large beads and massive compositions. It holds, as they say, “tightly.” But this is not the most economical option, both in terms of material and financial matters. In addition, when working with small stones or medium-sized rhinestones, some difficulties and problems may arise.
- A mixture of extension gel and acrylic powder. As a result, you get such sticky plasticine that it turns out to be a little more economical than the previous option, but the glue is no less strong. But there is one “but” here - the method is only suitable for rhinestones from 2.4 mm.
- Base, preferably rubber. Beginner manicurists are increasingly using this method, since the base has higher strength than the top. But let's be honest - this strength directly depends on the correctly performed manicure and the applied top coat. Large rhinestones and rhinestone compositions are not held firmly enough.
- Base plus acrylic powder. This is the most universal method, which will ensure ease of use with any size and high strength. It is necessary to dilute in approximately the same proportion as the top coat - 1 to 3. Rhinestones on nails can make you happy for a very long time!
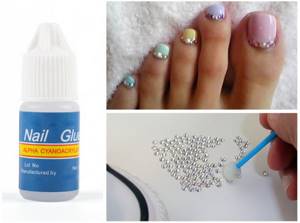
The easiest way to attach it is with special glue or topcoat.
Glue selection
To fix rhinestones on the nail plate, compounds are used that provide the desired fastening strength, do not react chemically with the rhinestone material and are invisible on the nail plate.

These include:
| Means | Description |
| Standard topcoat for gel polish | A simple solution that is always “at hand” has one drawback: in a liquid state, the top does not provide a sufficiently reliable fixation, so small rhinestones easily move and require correction before drying |
| Special top designed for attaching rhinestones | The compositions have a thicker consistency, so the rhinestones do not move. No stickiness that is inevitable when using a regular top coat |
| Top with acrylic powder added | Used for large, volumetric elements. Acrylic powder gives the composition additional thickness, which allows it to be applied pointwise, to the place where the rhinestone will be attached. |
| Special glue | Provides reliable fixation of the elements of the design, but requires some experience, since it dries quickly and does not provide the opportunity to correct mistakes. Multifunctionality of the glue: it can be used to remove cracks on the nail plate, stick tips and, according to some manufacturers, protect nails from UV rays |
| Water-based and epoxy-based adhesive | The advantage of the 1st option is that it does not stain the nail, the advantage of the 2nd is a stronger fixation |
| Construction adhesive "Moment" | Despite the aggressive composition, it will not harm the nail protected by a layer of varnish. This option will be the cheapest, but will not provide the ideal appearance and durability of the manicure. In addition, it is not suitable for gluing acrylic rhinestones, since the glue ingredients can dissolve the plastic and deprive its surface of its shine |
In specialized stores you can purchase plastic or glass rhinestones on a self-adhesive basis, which are easy to work with. Externally, they are indistinguishable from their expensive counterparts, but cannot boast of high fastening strength and durability.
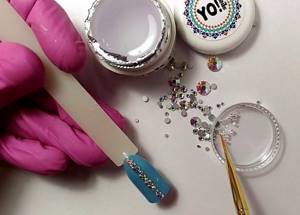
Necessary tools for gluing rhinestones on nails
In order to inlaid your nails with rhinestones at home, you need to stock up on the following tools and materials:
- natural nail file - for correcting the shape of the nail plate
- polishing buffer that you will use before coating
- orange stick - can be used for gluing rhinestones or for removing minor smudges/irritations
- gel polish of any color
- top coat and base
- rhinestones
- You may need acrylic powder
There are several ways to transfer rhinestones to your nails.
To directly transfer and stick rhinestones to your nails, you can use:
- The simplest and most popular means at hand is a toothpick dipped in water. It is moisture that helps to grab and hold the rhinestone. The method is suitable for medium and small sizes;
- the same orange stick. The algorithm for using it is the same as with a toothpick. Both of these options are suitable for small rhinestones. By the way, it is also convenient to lay out broths (small beads) with a sharp thin stick if you are using them to create a pattern;
- It is also good to apply small rhinestones with a thin, damp brush. She will not take large beads. Although for a larger size you can use an acrylic brush. Craftsmen often use this when using thick or plasticine mass as glue;
- to glue large rhinestones, use tweezers;
- It’s quite convenient to carry and glue rhinestones with dots. It is a metal stick with a round tip at the end. To take a rhinestone, you need to moisten it in water. It is convenient to glue only small rhinestones, the rest will fall off;
- The most convenient method is to use a wax pencil! It doesn’t cost that much, but it can be used to glue rhinestones of any size, and they don’t get lost during the process of transferring them to the nail. It needs to be sharpened periodically, but overall it lasts a very long time!
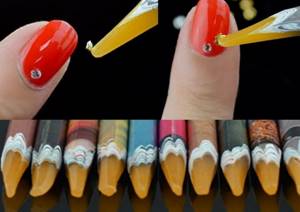
It is most convenient to work with a wax pencil
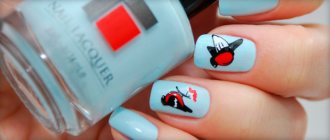
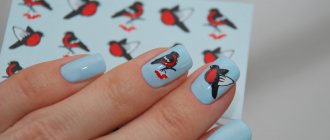
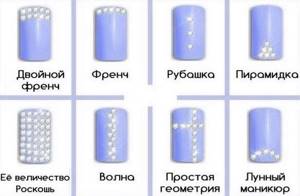
What pattern should I use with rhinestones?
Before you start covering, think through the smallest details about the future pattern. It's better to start with the classics:
- French - you can simply decorate the strip with stones or make a double French;
- chain mail is a variant of the pattern in which the entire nail plate is covered with rhinestones. But decorate only one nail, otherwise the manicure will turn out vulgar;
- a pyramid of rhinestone elements at the base of the nail;
- shirt - rhinestones arranged like buttons on clothes;
- geometry - lines of sparkling details that intersect or run parallel - looks impressive on nails;
- crown - rhinestones are laid out in an arc along the edge of the nail hole.
There are many options; in general, the placement of rhinestones depends only on your imagination. The main thing is not to combine several large elements of the same size in one composition; it is better to arrange them with smaller elements.
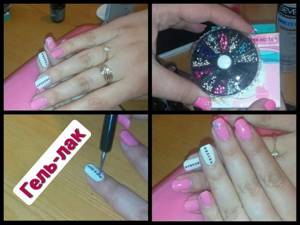
How to glue rhinestones on nails: algorithm
In principle, gluing rhinestones on your nails is the finishing touch to your manicure. But there is often confusion in the order of actions. And the most important rule is that when laying out rhinestones, you need to arm yourself with patience, do everything carefully and without haste.
Important: Do not post all the rhinestones at once! We glue large rhinestones 1-2 pieces each and dry them in a lamp, medium and small ones - 3-5 pieces each. Be sure to dry between coats! If you have a composition made of rhinestones, then it is more convenient to make it on a table/mannequin, and then transfer it to the nail plate itself. It is good to roll the broths in the base, and then lay out a pattern from them.
- Without nail preparation and manicure, we don’t glue rhinestones or even apply varnish - it looks extremely ugly!
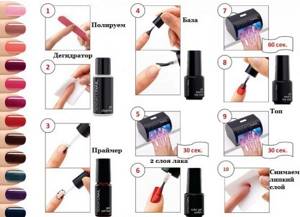
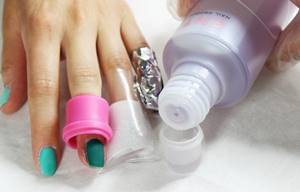
Before you begin the procedure of applying gel polish and attaching rhinestones, you need to prepare your nails by giving the desired shape and performing a hygienic manicure. We clean all dirt, carefully cut off the cuticle, remove the pterygium, clean the side ridges, and polish. If there is a split in the nail, remove it with a nail file. We apply special products that degrease the nail plate and ensure adhesion of the materials - a dehydrator (alcohol can be used) and a primer. There should not be much time between applying the primer and gel polish, otherwise the coating must be reapplied.
Important: Do not apply the primer too close to the cuticle, and do not place the base under the base of the nail. This leads to numbness!
Basic algorithm
- Applying base and gel polish
After the manicure is done, we begin to apply the base coat. It is applied to the entire surface of the nail, including its end part (we already know that we do not push the base directly under the base). It is also necessary to ensure that the base does not flow onto the cuticle or into the side sinuses. The base layer performs a protective function, protecting the nail from contact with the coloring substance of the gel polish.
Apply the required number of layers of gel polish, drying each of them completely. We remind you that you need to coat your thumbs separately to avoid the varnish running off. We do not remove the sticky layer!
And now there are different options for gluing rhinestones to the nail!
- You can glue rhinestones onto a colored coating that has previously been properly dried. After laying out, you apply a top coat to fix the rhinestones on the sides and cover the entire nail for shine.
- If you use a gel top coat for rhinestones, then it must be applied to a layer of top that is not completely dry!
- You can also usually complete your manicure by covering it evenly, but very thinly, with topcoat and drying it completely (don’t forget about the ends). We also make sure there are no leaks! If there are any, carefully remove the excess varnish with an orange stick. If your top coat has a sticky layer, remove it and degrease it! And only now do we move on to the layout.
Remember: For color - we do not remove the sticky layer, for top - we remove and degrease!
Don't post all the rhinestones at once!
- Placing rhinestones on the nail
Many inexperienced craftsmen glue rhinestones directly onto the top coat, which has not yet been dried (without glue). But this is wrong and inconvenient! You can do this if you only have one pebble. And then - so you will lose that very highlight! If you are laying out a pattern, then always dry the fixing layer of the top!
It is better to lay out rhinestones from the cuticle side, from the center, gradually moving towards the end of the nail. Always start with big rhinestones! We put a drop of base, top or glue, not too large. Otherwise, excess will leak out and ruin the smooth finish.
We fix the rhinestones on the sides with a top so that the edges don’t catch! If you have bouillons or small stones, go over the rhinestones with topcoat to secure them!
Yes, if you don't do this, you can quickly lose them. This will not affect their shine in any way! We walk so that the top flows between all the stones. Therefore, it must be used not too liquid and without a sticky layer! But at the same time, make sure that excess does not lead to streaks! If you have very large beads, then create a rubber rim around them, for example from a base and acrylic powder.
Algorithm
How to remove rhinestones from gel polish
If you remove the rhinestones correctly, they can be used again.
Typically used:
- Compositions intended for removing gel polish. They soften the base, after which the beads are easily removed with a toothpick or a manicure pusher (its back side, shaped like a spatula). The method works provided that fixation was performed on the top.
- Adhesive remover. It works in a similar way and is used for rhinestones secured with glue.
- Pushers, tweezers, and other sharp objects. To reduce the risk of damage to the rhinestones, each stone is removed separately, starting with the outer ones. He pries himself up with a spatula and lifts himself up.
- Files and buffs. When the rhinestones are glued firmly, they need to be cut down. After the rhinestones are removed, a thick layer of topcoat is removed (it can be cut off with a hard file) and the lower layers of varnish.
When starting to perform a manicure with gel polish with rhinestones for the first time, you should limit yourself to the simplest option of gluing the decor. It is recommended to leave the implementation of more complex ornaments for the future.
Gluing rhinestones to your nails is half the battle: how and what to remove the rhinestones with?
If you have used a manicure with gel polish and rhinestones to secure them, then you understand how difficult it is to remove them. Therefore, before gluing rhinestones on your nails, you should consider options for removing them!
- It is best to remove rhinestones with a nail pusher, using a sharp hatchet on the back of it. We simply pry up each stone with a hatchet and remove it. But sometimes some pebbles may not give in very readily. In addition, this procedure can be performed with several stones or fingers. Be careful - we work from the base of the nail!
- For small rhinestones, it is ideal to use a sharp cutter, prying up the stones at the base. Don't worry - several layers of varnish will protect your nail plate.
- You can use nail clippers (they have a rounded tip). This method is especially practiced for large or medium-sized rhinestones.
- You can use nail polish remover or remover, but this is a labor-intensive method. It is necessary to soak your nails by wrapping them in foil. After 10-15 minutes, the pebbles can be lifted with an orange stick. If necessary, the procedure should be repeated. Do not forget that the composition of the liquids contains aggressive substances that are harmful to natural nails!
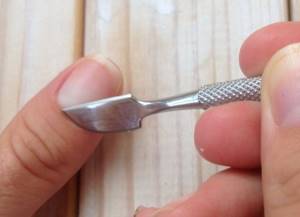
We work in the direction away from ourselves!
Iron-on stickers with rhinestones
A rhinestone pattern placed on a special thermal film will become a “lifesaver” in cases where there is no time to glue individual elements, but it will require additional equipment: a heat press or a thermal applicator.
Thermal adhesives can completely cover the entire surface of the nail or be a strip of transparent film with a pattern.
In the first case, to decorate your nails you will need:
- perform a hygienic manicure by removing hangnails and giving the nail the desired shape that matches the shape of the sticker;
- prepare the nail: that is, sand and degrease its surface;
- Place the sticker on the nail and fix it by ironing it with a heat press. Movements are performed easily and gently in the direction from the center of the nail to its edges;
- wait about 3 minutes for the adhesive base to harden.
If the thermal sticker is a strip of film with a pattern, before applying it you need to cover your nails with gel polish, including top coat.
How to properly glue rhinestones on nails: tips
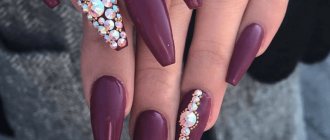
- Most designers and stylists believe that if you glue rhinestones on your nails, you should avoid other bright decorations, stones and sparkles. An overabundance of shiny accessories, which makes a woman look like a Christmas tree, indicates a lack of taste and leads to the opposite effect.
- Don't get carried away with large stones when inlaying your nails. Their abundance looks vulgar. In addition, their use is allowed only on long nails and in very limited quantities.
- The combination of the color of gel polish and stones, as well as the design on the nails, if it is included in the manicure, is of great importance. Rhinestones should be in harmony with the nail design, and not stand out from it and not create a colorful background.
- Young girls are more suitable for light-colored stones, combined with matte or light shades of gel polish. For older women, darker stones on bright gel polish are acceptable. Stones of silver and golden shades are considered neutral, which look equally beautiful on both light and dark polish, as well as on nails of any shape.
- For short nails, it is better to select small rhinestones and lay them out in bulk or in French French style - along the edge of the nail.
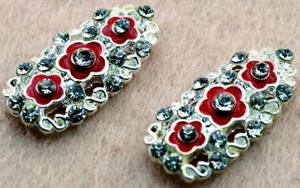
- is of particular importance . Crystal stones are more practical, effective and less susceptible to chipping; they can be used many times. Glass stones also look good. But gel and plastic ones are short-lived and, as a rule, after the first use they lose their appearance and stop shining. Therefore, they are used more often as disposable ones. Swarovski crystals are considered the best stones.
- Small stones are easier to attach and stick to nails better; they are more suitable for everyday use. Large stones are used mainly for special occasions. Although everything has its exceptions and a lot depends on the design.
- You can use not only stones as rhinestones, but also beads, bouillons, and small beads.
Abundance is not always appropriate!
The most common mistakes
Not everyone likes the design with rhinestones, but the reason for this is often mistakes when performing a manicure:
- in style, when the decor itself is chosen incorrectly;
- during the gluing process, if due to errors the result does not correspond to the desired one;
- with the wrong choice of stones and base for their fixation;
- wearing a manicure, which leads to the rhinestones quickly peeling off.
In style
Rhinestones lose their attractiveness and make a manicure look ridiculous if:
- Use several large stones at once. The design looks bulky and visually weighs down your hands. If you are laying out a composition of rhinestones, you should take only 1 large one and a scattering of medium and small ones.
- When choosing decor, do not take into account the color of the gel polish. Only white, silver or golden stones can be called universal for any shade. Colors must match the tone of the coating.
- Use large rhinestones on short nails or create complex designs with them. This visually makes the plates massive and shortens the fingers.
- In addition to a manicure with rhinestones, wear a lot of rings and bracelets on your hands, especially with inserts. This makes the whole look vulgar.
- Glue rhinestones onto stained glass gel or cat's eye. These types of coatings are very bright; the addition of rhinestones will also make the image provocative, with an excess of shine.
- A mature woman should stick cheap plastic pebbles. It looks inappropriate, like “from someone else’s shoulder.”
In progress
Mistakes in the process of gluing rhinestones will lead to the fragility of the decor and can immediately ruin the appearance of your hands:
- Fixation of stones literally at the end of the nail. This area is too mobile, the rhinestones will cling to everything and may become damaged or crack, so you should make an indent of 1-1.5 mm from the edge.
- Gluing the decor close to the cuticle. Over time, you will have to move it away with an orange stick; pebbles can interfere with this, they are easy to scratch.
- An attempt to glue additional decor between the already attached rhinestones. This will disrupt their fixation and may ruin the entire composition.
- An attempt to press on the pebbles transferred to the nail with a finger, and not with auxiliary tools. Sebum and sweat will prevent the decor from adhering well to the coating.
- Applying finishing agent to the surface of stones. This will attach them more firmly, but the decor will fade.
- Incorrect application of top at the end of the job. It is correct to first coat the areas between and around the rhinestones, and lastly, at the cuticle. Otherwise, the product will flow under the skin and the nail architecture will be damaged.
When choosing a material
In order for the manicure to last longer and maintain a presentable appearance, it is important to choose the right rhinestones and the compositions involved in the design:
- For wearing for 3 weeks, it is better to take glass stones or Swarovski. Plastic ones will fly off faster and may fade.
- Large and medium rhinestones need to be inspected to make sure there are no defects. If there are cracks or chips, this does not contribute to long-term wearing of the design.
- The top and base used as a base for decoration should be thick. Liquid formulations can cause elements on the nails to float.
- The quality of the gel polish also matters. If it does not dry well, curls or cracks during polymerization, coating defects will lead to peeling of the inlay elements.
- If you cannot work quickly with rhinestones, it is better to choose a top coat, a base with acrylic powder, or a strengthening gel over glue. The first product may dry out while the pebbles are being placed on it, and then their fixation will be unreliable.
In care
Manicure care also affects its quality and durability; the following mistakes are possible:
- the use of large rhinestones when working intensively with your hands;
- trying to pick something with your nails;
- performing household chores that involve using water and household chemicals without wearing gloves;
- self-careful filing of nails.
To prevent the decor from separating from the coating, while wearing it, you should coat the areas next to the rhinestones with topcoat 1-2 times and polymerize it.
Rhinestones can make your nail design even more attractive and stylish. But they can easily ruin a brilliant manicure or the most beautiful color of nail polish. Measurement is very important here, as well as the sequence of actions when fixing the decor. If it is correct, it will hold out until correction.
How to glue rhinestones on nails: manicure ideas
You can lay out rhinestones in classic patterns, the most popular of which are:
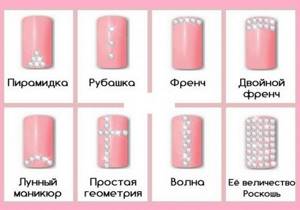
Popular models
- reverse French - in the form of a curved flat at the base of the nail
- chain mail - complete coverage of the nail plate with rhinestones (aka luxury)
- crystals - the shape of broken glass
Layout
But you can use your imagination and come up with your own original pattern to glue rhinestones onto your nails! Therefore, we offer you ideas for inspiration.
Simple but tasteful!
Ideas
On a note!
Options Options Ideas
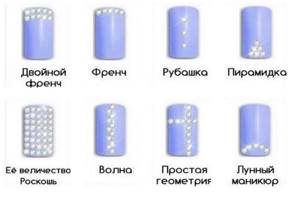
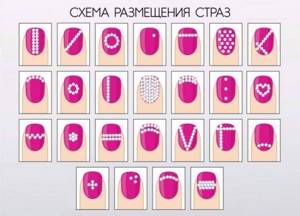
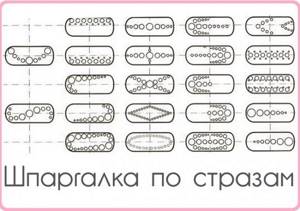
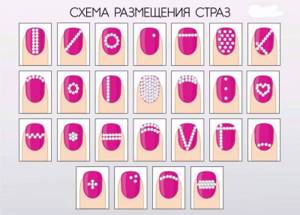
Schemes for laying out rhinestones
The location of the stones on the nails can be anything. If you do not have the necessary dexterity, experience and artistic abilities, you can use one of the standard schemes for laying out decor:
- Location at the base of the nail. This design is decorated with one or more rhinestones, a crescent is highlighted in a lunar manicure, and laid out in a “pyramid” - a triangle.
- Longitudinal lines: one or several (“shirt” - an arrangement of three or four stones at a distance from each other, like shirt buttons).
- Transverse lines: single or several.
- Diagonal.
- Simple geometry - shapes: rhombus, oval, triangle, heart.
- French manicure with rhinestone inlay.
Below are the simplest schemes that even a novice master can master.
Useful tips

To keep your shiny crystals pleasing you for as long as possible, consider these subtleties:
- Whatever the design, it should be done BEFORE gluing the rhinestones;
- Transparent rhinestones go well with any base, but colored options should be matched to the tone or play in contrast;
- Never cover large stones with finish. They must be glued to the last layer. Any, even the thinnest coating with a transparent layer will look heavy and ugly;
- A lot of glitter and shine may only be appropriate for young girls;
- If you purchased self-adhesive rhinestones laid out in a finished pattern, remember that this type is not durable. However, this option does not affect the gel base and can be removed if desired without losing the beauty of the base.
Design for a special occasion
Which design should I choose so that the rhinestones on my nails would only emphasize all its elegance? For you, we have collected several simple options that are very easy to repeat at home yourself. Choose any option, experiment and come up with something of your own.
Charming shine
The sparkle of the small particles of Pixie crystals amazes with its magnificence. One or two decorated fingers are in perfect harmony with any monochromatic manicure and go with any outfit, especially an evening dress. These rhinestone nails have become one of the popular and frequently requested ideas in 2022.
What you will need:
- manicure file;
- base;
- colored gel polish;
- top without sticky layer;
- rhinestones;
- tool for rhinestones
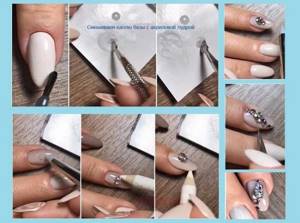
How to do:
- Use a manicure file to remove excess gloss from your nails and cover them with a base for better adhesion of materials.
- After drying, apply colored gel polish in 2 layers.
- Send your nails to polymerize in a lamp.
- Apply top coat.
- Pour the rhinestones onto the wet layer of topcoat and gently press them down a little with a brush, compacting them into an even layer.
- If there are any bald spots, then you can carefully add a few beads and arrange the rhinestones around the perimeter of the nail.
- Make a small edge with a thin brush with a top coat around the perimeter of the nail so that the glass does not cling to clothes.
The photo below shows a diagram of the placement of rhinestones on the nails.
Dear finger
What could be better than inlaying the entire nail with rhinestones? Only a sparkling inlay of hundreds of halftones! You can dot your nails with small rhinestones in a linear or chaotic order.
What you will need:
- manicure file;
- base;
- colored gel polish as a base;
- rhinestones;
- tool for attaching rhinestones;
- top
How to do:
- Treat your nails with a manicure file and apply one coat of base, drying it well in a lamp.
- Cover the nail plate with colored gel polish in 2 layers.
- Let your nails polymerize.
- Cover the nail plate with a thick base or top.
- Place crystals on your nails. In the linear version, it is recommended to place stones from the tip to the cuticle.
- If you choose a chaotic placement, then you need to select several areas on the nail where the largest crystals will be located. And after drying, you can already fill the space with small pieces of glass and broth.
- After drying, coat between the rhinestones so that all the space between them is filled with topcoat.
- It is important to create a border around the top without a sticky layer around the perimeter of the entire nail.
- Check the design with your nails to see if all the stones are in place and if they are holding well.
If in a linear placement the rhinestones float a little, then you need to lay out the central row first. Next, you need to coat the strip with topcoat and send it to polymerize in a lamp. And then add one row on each side, alternating them. Each of them individually needs to be coated with a finishing coat and sent to dry. Rhinestones on nails look great even in photos.
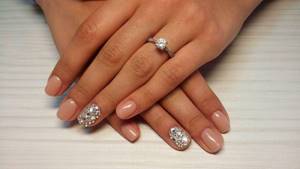
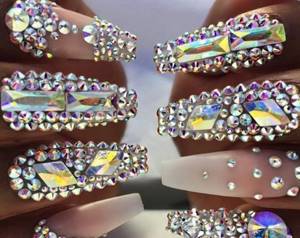
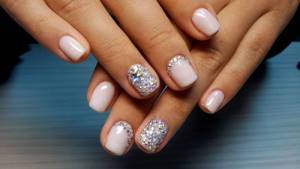
Volumetric compositions
Design with volumetric elements should be simple. If you decide to decorate your finger with several large rhinestones, then this will be quite enough. Make sure that there are no bald spots or gaps between the crystals and figures.
What you will need:
- base;
- colored gel polish;
- boat rhinestones;
- small rhinestones;
- broths;
- top
How to do:
- Apply a layer of base coat to prepared nails, drying it well in a lamp.
- Paint your nails with colored gel polish in 2 layers, each of them must be sent to polymerize in a lamp.
- Using a thin brush, apply a rubber topcoat or any material for attaching rhinestones for nails.
- Place the crystal on the material, without embedding it under the stone, and use a thin brush to apply a little extra strong gel or rubber topcoat.
- Dry the design in a lamp.
- Use a thin brush with topcoat to fill in all the voids under the stone, if any.
- Form a small border around the rhinestone, framing it with a thick top.
- After drying the largest stone, add one tier of small rhinestones and bouillons, surrounding the main one.
- Use top coat to coat the spaces between the stones and the circumference of the brooch.
Large rhinestones need to dry a little longer than small ones.
3D inlay
Large conical rhinestones can create an unusual shimmer and add extra shine to a relief manicure. For a voluminous design with rhinestones for nails, it is recommended to use very voluminous materials: very thick extension gel, gel jelly, or a mixture of acrylic and gel. The consistency should be very thick so that during the design process the stones do not scatter and do not have to be caught.
What you will need:
- base;
- colored gel polish;
- rhinestones;
- broths;
- tweezers;
- top
How to do:
- Apply base and colored gel polish to the nails, drying each layer well in the lamp.
- Place a small ball of thick material on the nail.
- Using tweezers, place 3 conical stones close to each other so that their outlines resemble the shape of a circle.
- Add a few broths in between. The design can be supplemented with a bunch of rhinestones to your liking.
- Apply topcoat to the stones around and the spaces between the decorations until the inlay does not cling to anything.
3D inlays can be multi-tiered. Before creating a design, it is recommended to plan your decoration using 2-sided tape, which will hold glass of different sizes well.
You can create a voluminous manicure using flat rhinestones for nails. For this purpose, large conical rhinestones are suitable, which need to be installed on the nail with their sides, pressed tightly against each other.
What it is
For several years in a row, these tiny jewelry have been a wonderful addition to any woman. Rhinestones on nails look equally good in a gentle romantic look, in a Gothic style or with a strict office look. Small stones can elevate any design and give it a special shine.
Rhinestones can be made from glass, crystal, plastic, ceramics and acrylic. They imitate a filigree processed gemstone, the edges of which shimmer in the light. The price for them can start from 50 rubles and end in several thousand. The famous rhinestones from Swarowski have a huge range of colors and sparkle luxuriously on ladies' fingers. Colored rhinestones have one primary color, while transparent ones take on the shade of the substrate applied to the fingers. Other crystals coated on the top surface create an iridescent glow and change their hue when exposed to sunlight.
Varieties
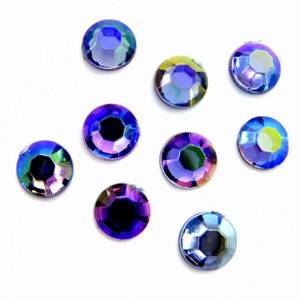
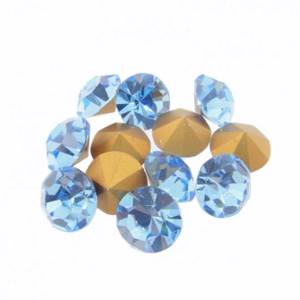
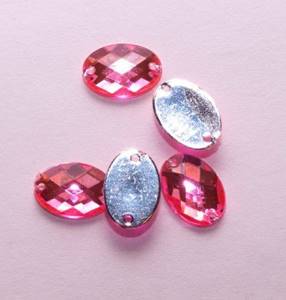
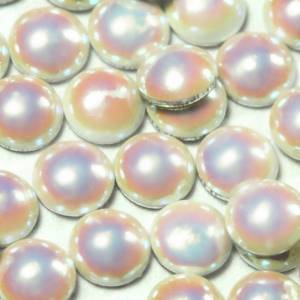
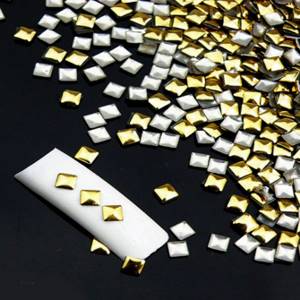
The variety of rhinestone shapes is sometimes amazing and knows no bounds. There are hundreds of varieties of small nail accessories. For you, we have collected the most popular representatives of nail decor:
| Variety | Image | Peculiarity |
| flat round |
| Round pieces of glass with edges that, at different angles, shimmer in all sorts of shades and give off a glare of light. |
| conical (edge) |
| The crystals follow the shape of a peak and have a pointed tip. Quite often it can cause discomfort when worn because it clings to clothes, tights and other surfaces. It is better to glue them quite tightly to each other. And it is best to use them pointwise in a large composition of rhinestones. Typically, rhinestones are 2 times larger than classic ones and reach sizes of 1.5 mm. With them you can create a voluminous but spiky manicure. |
| curly |
| Stones can take the shape of a rectangle, diamond, oval, square, triangle, heart, star, crown, drop and other shapes. This option is suitable for a New Year's manicure with rhinestones. |
| pearl |
| Semicircular sphere with mother-of-pearl coating. A great option to decorate a pearl manicure with them. |
| rivets |
| Metal figured rhinestones in the form of rivets. Most often I take the shape of a rhombus, square, circle or triangle. Rivets are a small but stylish accent in a geometric manicure. |
| Crystal Pixie (Pixie crystals) |
| Crystal fine and colored chips. You can get a wide variety of colors from crystals by applying them to multi-colored substrates. |
| Swarovski crystals |
| Swarovski sets offer a huge number of decorative rhinestones of different shades and shapes. These can be circles, hemispheres, pearls, hearts, stars, bows, three-dimensional cubes. Sizes start from 1.3 mm (ss3) and end at 8.7 mm (ss40). |
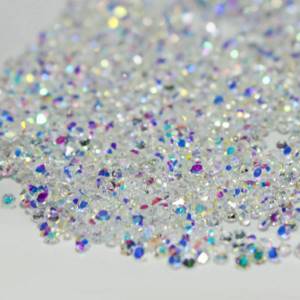

One jar of Pixie crystals is enough to cover 20-25 nails in an even layer.
Secrets of specialists
We have put together a few tips for you that will help make your nails with rhinestones perfect:
- Large rhinestones visually reduce the length of the nail and are not suitable for short nails;
- You shouldn’t create the effect of a Christmas tree and glue everything on your nails at once; it’s enough to encrust one finger with dense rhinestones or decorate each nail with several small things;
- translucent crystals can be used on colored substrates, creating a new design each time;
- colored glass should match the chosen color of your nails;
- 1 large rhinestone on one hand is enough;
- The best quality ones are glass and crystal jewelry.