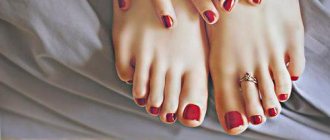
Over the 40-odd years of its existence, every season French manicure receives new variations. You can go to salons, choosing your ideal master, spending a huge amount of time and money. Or you can create the simplest design yourself. In this article you will learn how to make a French coat at home and get acquainted with several rules for creating the perfect coating. And at the end of the article you will see the best new French clothing in 2022.
Why apply acrylic powder to gel polish?
Previously, acrylic was used only in nail extensions, because it is plastic, and when hardened it becomes very durable. Thanks to these qualities, after a while it began to be used to repair and strengthen nails.
To strengthen, choose transparent powder. For extensions you will need camouflage colors in nude pink shades. They overlap the nail plate, but match its color, so this powder will be invisible. And for design they use a wide range of colors, shades and structures of acrylic powder.
After strengthening with acrylic powder, the life of the manicure is significantly extended. Also, with its help, nail art masters create various patterns, including voluminous ones, which look impressive on well-groomed nails. The powder has a porous structure, so it is safe for the nail plate and non-toxic.
Acrylic powder has many other advantages:
- Nails look well-groomed and healthier.
- The powder eliminates most possible defects of the nail plate (chips, delamination, breaks, etc.).
- Nails strengthen and become denser.
- The surface of the nails is smoothed by filling microcracks with powder.
- Protects the nail plate from temperature changes, household chemicals and other aggressive influences.
- If part of the coating is damaged, there is no need to redo the entire manicure. It is enough to perform the correction on a specific nail.
- This manicure does not require special care.
- Simply removed using a special solution.
When choosing acrylic powder, you should not save money. When working with a low-quality substance, it is difficult to achieve the desired result, even if the manicure is done by a professional. The powder will spread, and there can be no talk of any strengthening of the nails.
Types of stripes
Strips for French manicure always look like paper stickers located on a paper base. Rarely, they can be made not from paper, but from film. Based on the manufacturing principle, all such stencils can be divided into two large groups:
- Factory-made strips;
- Homemade stencils.
Of course, homemade stencils are usually less convenient to use. But the result obtained with their help does not differ from that guaranteed by purchased strips.
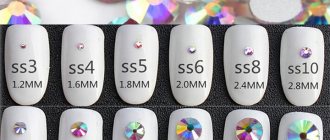
Factory-made stencils can be of different widths. This is purely a matter of convenience. Some people cannot use wide strips because they do not adhere well to the nail, which makes it impossible to obtain a clear line. Others, working with narrow strips, can cut beyond their aisles and thereby spoil the manicure. Typically, the width of the strip ranges from two to five millimeters.
In addition, their shape may be different. They can have an acute angle or be straight. Recently, stripes for French jackets with wavy outlines have begun to appear. In addition, these stencils can be asymmetrical and have varying degrees of curvature. This is done taking into account different lengths of nails, because, usually, the longer the free edge, the more the smile line should be curved towards it. Whereas for short nails it can be almost straight.
In terms of how to use strips for a French manicure, everything is limited only by your imagination. They can be moved and rotated, creating an asymmetrical smile line, re-glued several times, making a striped manicure and much more. For example, this type of manicure using the discussed stencils is popular, such as reverse French. In this case, the strip is turned over and glued closer to the cuticle, forming a thin strip next to it, covered with a contrasting color. Another popular option is a lunar manicure, the meaning of which is also to form a zone of contrasting color near the cuticle, but it will not have the shape of a strip, but an elliptical one.
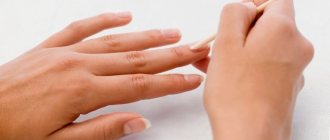
How to prepare your nails
Before applying the powder, the nail plate is prepared.
The first step is a hygienic manicure:
- Wash your hands with soap.
- Remove nail polish or other coating from nails using a special product (it is better to choose solutions with a nourishing effect).
- Keep your hands in a warm bath to soften the cuticle (5-7 minutes is enough).
- After the bath, blot your hands with a towel or napkin (no need to wipe dry).
- Using a special spatula or a stick with a wide side, push back the cuticle.
- Special tweezers are used to trim the cuticle and dead skin from the side ridges (optional procedure).
- Apply nourishing cream to your hands.
After these manipulations, prepare the nail for the direct application of acrylic powder:
- Remove the top glossy layer using a buff file.
- Treat with a primer and wait for it to dry (it will prevent the appearance of fungal and some other diseases and improve bonding).
Smile shape
A neat French manicure begins with the same and correct shape of the nails. The deepest point of the smile curve is in the center of the nail, and the tails should be at the same height. Do not lift them too high, otherwise it will look too unnatural, especially on short plates.
When shaping a smile, it is important to combine complete symmetry in the curve. It should be the same on all fingers. The rounder and sharper the nail, the more harmonious a deep smile looks. The most appropriate width is 1/5 of the nail.
The curve of the smile line should reflect the curve of the cuticle. If the free edge is long, when doing a French manicure without stripes, you need to lengthen the nail bed. This is especially appropriate on short and trapezoidal plates. But a smile with a small curve is suitable for short, square-shaped nails.
The white shade can be warm with a yellowish tint and cold with a bluish tint. The warm one may turn yellow, but it is quite dense. The bluish undertone is less dense, making it more difficult to paint.
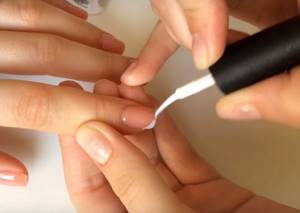
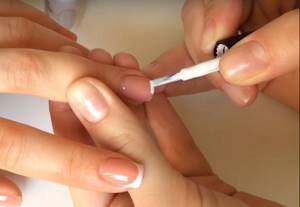
How to apply powder on gel polish: step-by-step instructions
For extensions:
- Special forms or tips are put on the nails;
- Next, mix acrylic powder and monomer. To do this, dip the brush in the monomer, and then dip it into the powder, and, making circular movements, envelop the brush with it. A thick drop forms on it.
- This drop is quickly transferred to the nail and distributed in a thin layer over the form. Then, using patting, pressing movements, level the layer. It is necessary to avoid getting the acrylic mixture on the side ridges and cuticle; the distance between them should be at least 0.3 mm.
- After each drop of acrylic, wipe the brush with a napkin.
- While the acrylic has not completely hardened, the nail is given a natural bend using tweezers. This is also done using a mold with a tube.
- When the acrylic has completely hardened, begin filing and polishing the nails. First, use a file with a large fraction of grains, and at the end a buff.
- The final design is then applied.
For design:
- First the base is applied. She is allowed to dry. Some products dry in air, some in a UV dryer (you need to read the instructions for the specific product).
- Shellac is applied to the entire surface and end sides.
- Before the gel polish has time to dry, apply powder. If you need to cover the nail completely, then first of all you need to dip the tip of the nail into a jar of powder. Then, holding your finger over the stand, apply powder with a brush over the entire surface of the nail. The brush cannot touch the surface of the nail plate.
- Shake off excess by lightly tapping on your finger.
- Dry under a UV lamp.
- Next, the nail is treated with a brush. This will help remove loose particles of powder and smooth the surface a little.
- You can stop at this stage. But you can also apply a finishing layer of gel polish. Then the nails will be smooth, without roughness.
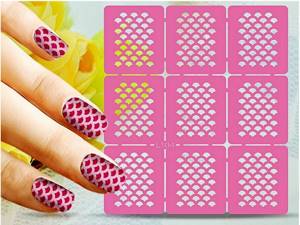
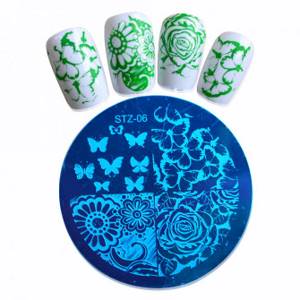
Why do you need nail stencils?
One tone of varnish looks boring and dull. A manicure blank or stencil is used to create complex designs on nails. Using such a template, you can achieve the effect of identical patterns without worrying about a trembling hand with a brush, because it is simply not needed.
Features of use
Stencils do not create any difficulties in working.
By applying a stencil and using its outlines, the manicure becomes beautiful or even unique. The contours of the stencil must be stable and not move, otherwise the intended pattern will not work. Therefore, use materials that have an adhesive base. The created stencil must be placed with the sticky side on the nail and armed with varnish. Then everything depends on your imagination. Once the varnish has dried, the workpiece can be carefully removed. The nail pattern will correspond to the location and shape of the selected template.
Specifics of working moments with stencils:
- Peel off from the backing just before gluing to the nail surface;
- use a sponge to create a pattern (a brush will make the design messy);
- remove the template after the varnish has completely dried, which is applied in 2-3 layers.
Kinds
Today there are 3 types of manicure stencils:
- Simple ones with an adhesive base (mainly used to create French manicures).
- Stencils with complex designs and patterns.
- Disc blanks (stampings) for imprinting a design on a nail using a stamp. These are reusable stencils, they are strong and durable.
Advice
! If you are not a professional, then it is better not to use disk blanks: they are several times more expensive than others (for example, regular sticky ones); their use requires certain skills.
Purchased nail templates are replete with a huge variety: they come in various geometric shapes, with images of animals and people, elements of nature and cartoon characters.
Sticky templates are the most convenient for home use - you just need to attach them to the nail. But there is one big drawback: they are not suitable if you prefer intricate patterns.
The difference between airbrush stencils
It's no secret that salon manicurists turn to blanks to save time. But in airbrushing you need to use them very skillfully so that the sharp edges and corners do not stand out. This art technique requires a smooth transition of tones, so a stencil is needed only to maintain the proportions of the drawing. What is important here is the smoothness of the lines and the effect of creating a masterpiece with your hand and brush.
How to do a French manicure with clear, white acrylic powder
French manicure is universal. It is suitable for women of all ages, for any event, as it is discreet, but at the same time effective and stylish. It's not difficult to make with acrylic powder.

Step by step how to apply powder on gel polish in French style
How to apply powder to gel polish is described in detail in step-by-step instructions:
- Powder for a French coat is non-glossy, mostly white.
- Nails look neat. The cuticle is removed and shaped.
- Apply gel polish. The last layer should be very thin.
- Open a jar of acrylic powder and dip the tip of each finger into it.
- Use a brush to remove excess.
- Cover with gel polish again.
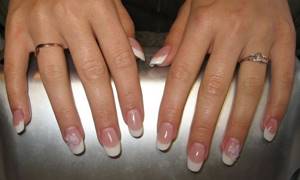
With this jacket, the coating on the tips will not wear off, crack or chip. And it will last 2-3 weeks.
Making at home
You can also make strips for French manicure yourself. Most often, tape is used for this. Both clear stationery and paper masking tape are suitable. A much worse result can be obtained when using double-sided tape, as it is excessively sticky and leaves traces of glue on the nail plate.
The most preferred use is paper masking tape. This is primarily because it is easy to cut. It does not fall apart when stretched and often sticks much better. In addition, only on it can you first draw the outlines of the future stencil. This allows you to achieve the most accurate manicure, because they will be identical and flawless.
It is more difficult to work with simple stationery tape, mainly because you have to cut strips from it immediately and “by eye”. As a result, they may not turn out the same, and the manicure may not be ideal. In addition, it is quite difficult to cut a high-quality stencil from such tape because it needs to be cut quickly and without pulling. Otherwise, even a minimal cut can cause the stencil to tear in half. Another feature of stationery tape may be excess glue that will remain on the plate. If the tape is too thick, it will bulge and adhere poorly to the nail, as a result of which the line will not be smooth and neat.
Another good option for how to do a French manicure with stripes if you don’t have any on hand is children’s stickers. You can also cut out the required stencil from them and it will be an almost exact copy of the purchased strips. They will adhere well to the nails and attach easily without leaving any sticky residue. In addition, it is very easy to create a stencil of a good and neat shape with their help. If you want to create an interesting and unusual smile line, it is recommended to cut out the template in this way. In addition, you can easily create any interesting stencil from stickers.
If you still have a lot of difficulties in how to use stickers for a French manicure and it’s inconvenient to use them, then you can do without them. Thus, some nail technicians and even amateurs can paint a perfectly smooth and neat French manicure by hand, without using stencils. Another option is to use wet thread instead of a stencil, but in order for the result to be good, a lot of practice is required. As a last resort, you can try to draw a neat smile line by hand and correct it with a cotton swab dipped in acetone.
How to use colored acrylic powder
- Before applying gel polish and powder to your nails, they are prepared in the classic way.
- Then a base coat is applied and dried in a lamp.
- Next, the nail plate is painted with gel polish of the desired color.
- Next, apply a second layer of varnish and dry again in a lamp.
- After drying, a third layer is applied, but not dried (if you need to cover the entire nail with powder) or a pattern is applied using a thin brush (if you need a pattern made of powder).
- Sprinkle the still wet gel polish generously with acrylic powder of the desired color.
- A UV lamp is used again for drying.
- Use a stiff brush to shake off any remaining powder.
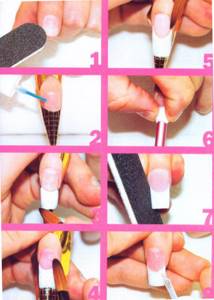
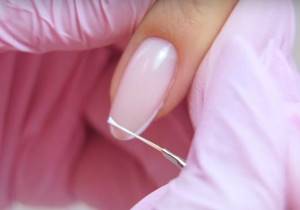
Application of strips
Strips for French manicure are necessary in order to use them to draw a clear and even smile line on extended or natural nails. They have an adhesive base, thanks to which they are firmly attached to the nail, hence another name for them - stickers for French manicure. Correct use of these stencils guarantees a high-quality and neat manicure with a minimum amount of time. These stencils must be used as follows:
Thus, from the description of the process it is clear that there is nothing complicated in how to use stickers for a French manicure. The technology described above is suitable for creating a classic French jacket or a colored one when only the color of the free edge of the nail is replaced. If you plan to replace both shades in your manicure (both pink and white), then you will need to first apply a lighter or less dense tone to the entire nail, and only then stick on strips, separating the darker area.
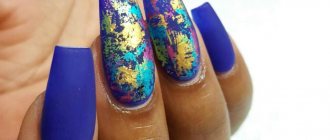
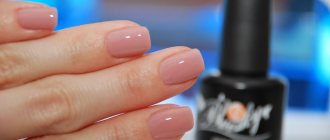
Mirror powder for gel polish
Mirror powder (mirror rubbing) is a very fine powder made of polyester. It is used to achieve a mirror effect. It is significantly superior in quality to gel polish with a metallic effect, as well as foil for manicure.
Mirror rubbing comes in different colors and shades. Apply this powder to gel polish, gel paint and acrylic. It's easy to use - even a beginner can handle it. This manicure will be resistant to water, ultraviolet rays and various solvents.
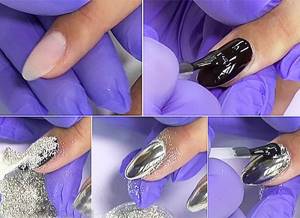
Here's how to do a manicure with mirror powder:
- As before any other manicure, the nails are prepared and a base is applied.
- Next you should apply black gel polish (other options are allowed).
- Then the nail is sprinkled with mirror rub over an open jar of powder. To do this, use a special spatula.
- Excess powder is shaken off, and the remaining powder is easily rubbed in using a sponge.
- This operation is carried out with each nail.
- The top is covered with a finishing layer of varnish and dried under a special lamp.
Review of the best manufacturers
This is another important question. In order for the manicure effect to last on your nails for a long time, you should be able to choose from the many offers the most worthy options for gel polish for a French manicure. When choosing, you should give preference to well-known branded series of nail care and design products. Cheap options do not guarantee sustainability - proven by practice!

The following brand products can ensure the freshness and long-lasting wear of a jacket:
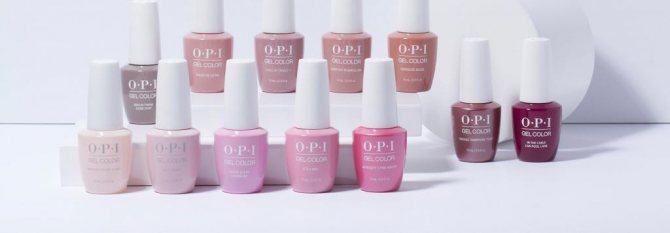
- gel polishes for French manicure OPI (Germany);
- gel polishes Masura (Japan);
- gel polishes Geleration, Kodi, PNB (USA);
- shellac gels CND (USA);
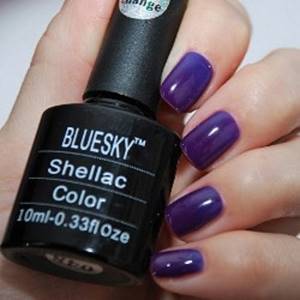
- gel polishes Canni, Cristina, Bluesky (China);
- gel polishes RuNail, “Aurelia” (Russia).
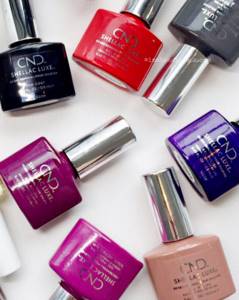
Products from Japanese and Chinese manufacturers have a pungent aroma. Domestic products differ more in their variety of shades than in their stable properties. Well, American and German products are the highest quality today.
It should be noted that the presented branded samples of gel polishes for French manicure have a rich color palette with different effects:
- neon;
- luminescent;
- mirrored;
- holographic;
- magnetic;
- cat's eye.
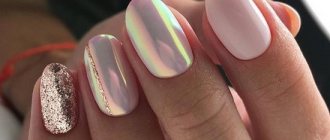
Applying shimmer powder
The shimmering rub is similar to the mirror rub, but microglitter is added to it. They create the flickering effect. It is used not only as a decorative decoration, but also to nourish and restore nails.
Easy to apply, just know the sequence of steps:
- The preparation of the nail plate occurs in the classical way.
- Next, the nails are covered with gel or gel polish of the desired color.
- Still wet nails are generously sprinkled with shimmering powder.
- Shake off excess and rub in the powder, as in the case of mirror powder.
- Then cover the coating with two layers of fixative. After each application, dry the nails under a UV lamp.
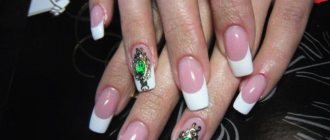
How to design a nail
Design on a French jacket is done not only by hand, with a brush, but also with the help of:
- Stamping. These are dies with a soft silicone base and accompanying plates with extruded patterns. Gel polish or paint is applied to the latter. The silicone stamp pad is then pressed onto this plate to transfer the design onto it. The next step is to imprint it on the nail, which has already been processed, covered with a camouflage base and dried. When the stamping is on the nail plate, this finger is placed in the lamp.
- Sliders. These are decals that are applied to nails that are already covered with a base, flower bed and top coat with a sticky layer. The slider is cut along the width of the nail plate and placed on a cotton pad moistened with water. This removes the dense substrate. And the transparent picture itself is fixed on the nail and straightened out. The section of the slider sticking out at the free edge must be cut off. Finally, a glossy top coat is applied over it and dried in a lamp.
- Fimo. These are polymer particles that look like fruit and berry slices. They are also glued to a sticky layer of the finishing coat, another top coat is placed on top and dried in a lamp.
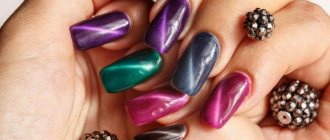
Metal powder
An original manicure with a metallic sheen looks stylish and attracts the attention of others. To become the owner of such nails, you just need to purchase acrylic powder for nail design. It consists of tiny reflective particles, which gives it superiority over gel polishes with a metallic effect. Chrome powder is available in many shades.
Using metallic powder, you don’t have to cover the entire nail with it; you can come up with many other options. For example, a chrome jacket or metal painting on the nail plate. Apply the powder to the still wet gel varnish coatings.
Don't miss the most popular article in the section: How to extend nails with gel polish. Nail extension instructions for beginners. Photo.
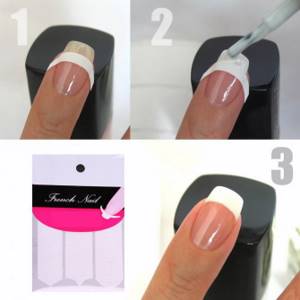
French nail polish
If you are in doubt about the best way to do a French manicure at home at minimal cost, then start with a regular one.
nail polish. Both ready-made kits and all components separately are available for sale. The kits usually include:
- base coat;
- pink camouflage;
- white nail polish for a smile;
- top coat for durability and shine.
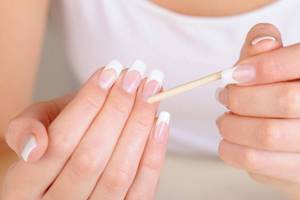
To get an even smile line the first time, use stencils for a French manicure.
Application using a sponge
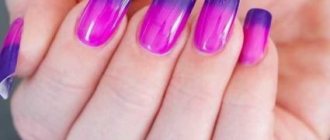
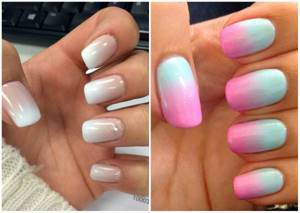
A sponge is a tool for more than just applying makeup. He will become an assistant in creating an original and fashionable manicure. It is used to rub in acrylic powder to obtain a mirror shine. It can also be used to apply an ombre manicure (a smooth and beautiful transition is obtained on the nails without a sharp change in color). Even a beginner in manicure can master this technique.
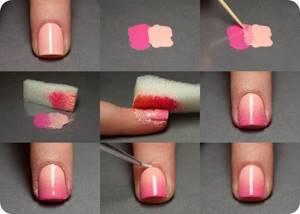
Here is an example of using a sponge in nail design:
- The first step is a hygienic manicure.
- Next, a base is applied, in this case a beige or soft pink one is used, and dried using a special lamp.
- The middle part of the nail plate is covered with a tone lighter than the base.
- Next, blend the gel polish using a sponge. Thus, a smooth transition between colors is obtained.
- White acrylic powder is applied to the edge of the nail.
- Apply the finishing layer and dry it with a UV dryer.
The history of the appearance of French
Many women associate French manicure with its French origin. Not at all, this is a misleading opinion. French style appeared back in the seventies in the USA. Hollywood stars became the first fashionistas who had to wear manicures due to professional necessity.
The large amount of time spent on decorating actresses' nails prompted producers to find a solution to this problem. Cosmetics founder Jeff Pink helped with this. His ingenious idea of designing nails made it possible to forget about the red tape with manicures and at the same time took root in everyday circles.
The French style has gained particular popularity since the development of the nail extension industry. Today it can be seen on both short and long women’s nails. He looks amazingly gentle.
What mistakes can be made
Before applying powder and gel polish to your nails, it is better to study the instructions and take into account possible errors:
- Slow work (work with acrylic as quickly as possible, since it thickens quite quickly).
- Work without a mask (when mixed with a monomer liquid, acrylic acquires an unpleasant, pungent odor).
- Neglect of antiseptic measures (the coating on the nails lasts a long time, and a fungus or other infection, being in a “locked” state for a long time, will develop).
Don't miss the most popular article in the section: How to draw monograms on nails step by step for beginners. Instructions with photos.
Camouflage
The ideal natural color for a French manicure is a shade between the color of the skin and the nail plate. Too dense a bright tone looks unnatural. But lately it has been very fashionable to paint French in dense pastel colors. The downside of the design is that with such camouflage the growing cuticle is visible. But there is a little secret on how to avoid this:
- First, apply camouflage to 2/3 of the nail, leaving a small hole.
- Use a thin brush to blend the remaining unpainted area.
- Cover only half of the nail with the second layer and extend the shade in the same way with a brush.
- You will get a densely colored transition to the free edge and a completely absent border at the cuticle.
It looks beautiful when the junction between the camouflage and the smile is as clear as possible.
There are camouflages that require a large number of layers. But you still need to draw a smile on top and cover it with a top coat to even out the design. As a result, the manicure will turn out to be too voluminous. But there is a solution to this too. After applying the camouflage layer, use a flat, angled brush to rake the varnish along the outline of the smile. The main thing is not to remove more than the future width of the white line.
Secrets of the perfect French coat
Acrylic coating removal procedure
First of all, remove the top gloss from the nails. A nail file is used for this. After this, nail polish remover is applied to cotton pads and placed on the nails. Each nail is wrapped in foil and left for 15 minutes.
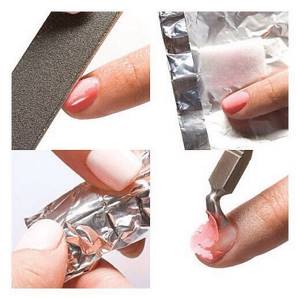
Once the coating is removed, use orange sticks to remove the residue. For the same purpose, special nail files are used. After such manipulations, the nails are ready for a new manicure.
If you decide to carry out a procedure such as applying powder to gel polish, then it is still better to contact nail art specialists. Then you will have the opportunity to fully enjoy all the advantages of this new product in the world of manicure.
Easy option
It’s easy to paint French gel polish if you use one of the following methods:
- Start the lines from the sides of the nail to the middle, bringing them together. The liner brush or the one that comes in the bottle with the product is held at a slight angle. The “whiskers” should be at the same level. If the side rollers are dirty, remove the varnish with an orange stick. This method can also be used with a hair brush.
- Start applying the gel from the middle of the plate using vertical strokes. As you paint, you need to move the tool to the growth point in one direction, then in the other. For this method, they also use a “native” gel polish brush or liner. Inaccuracies are corrected with a hair.
- On almond-shaped nails, the free edge of the nail is divided into 3 zones. You should start drawing from the growth point, that is, from the “antennae,” making a straight line to the first third. The same technique is used on the other side of the plate. When the “antennae” is ready, mark the width of the “smile” in the middle, then paint over the free space, rounding the previously drawn straight lines.
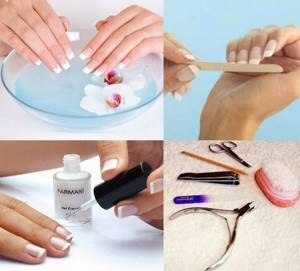
Preparing for a manicure
When creating a French jacket, the main thing is to choose the right tools and materials. To create your own French manicure you will need:
- nail polish remover,
- metal pusher,
- file,
- orange stick,
- cuticles,
- cuticle liquid,
- polishing buff,
- base and top,
- nude and white varnishes,
- stencils.
All you have to do is be patient and diligent, then a great manicure will not keep you waiting.
French stencil: “Pros” and “Cons”
An alternative way to create a smile line is the stencil technique: before applying white color, a frame is glued to the nail, which is removed before polymerization. Those considering this technique should know:
- Fastening the stencils evenly, symmetrically and at the same distance from the free edge is not as easy as it seems. With the time spent trying, you can learn how to draw a line manually.
- After removing the stencil, the line rarely remains flawless; adjustments will definitely be required.
- The sticky layer of the stencil often remains on the coating; if it is not removed, the top gel will lie unevenly and sloppily. Additional surface cleaning also takes time.
- The curve of all stencils in the set is the same, and the thumb and pinky nail require a unique line that takes into account the width of the plate.
Experienced professionals make the perfect smile line in a matter of seconds: it’s worth making the effort to master this skill and no longer think about auxiliary devices. Moreover, the latter rarely live up to expectations.