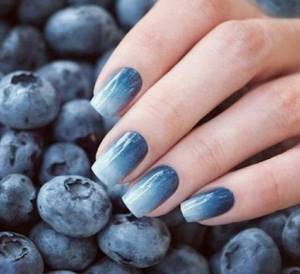
Initially, a spectacular transition from one color to another was introduced into fashion by fashion designers. Masters decorated skirts, dresses, and fashion accessories with a gradient. Over time, manicurists began to use a smooth color transition, creating stunningly beautiful nail designs. Today, gradient manicure or Ombre is popular among fashionistas all over the world. And thanks to the wide selection of gel polishes, every girl has the opportunity to decorate her nails on her own without leaving home.

Ombre gel polish
What is Ombre
There probably isn’t a single fashionista who hasn’t done Ombre on her nails or hasn’t seen this effect on a friend’s nails. Moreover, many of us have seen and admired a beautiful multi-color manicure, but did not think about the name of such a design. So, the gradient or Ombre effect is a smooth transition from one gel polish color to another. The versatility of the technology lies in the free choice of color palette. If desired, you can combine shades of the same color or select different colors, mixing them together.
Gradient in light colors
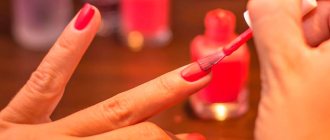
To make an ombre on your nails with gel polish, you can use a manicure brush or a small piece of sponge. Both methods are inexpensive and can easily be tried at home.
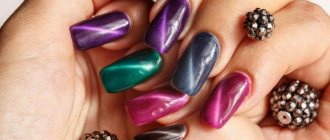
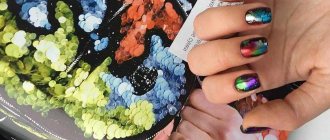
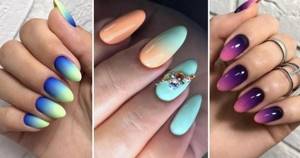
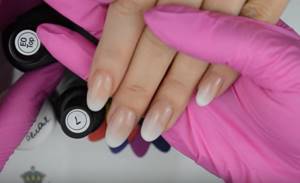
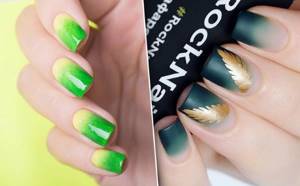
Options for amber nails with gel polish in different shades
Ambre nail gel polish is very diverse: the design can be vertical, horizontal, corner, counter, along the perimeter, etc. There are many options for the design itself:
- contrasting,
- matte,
- with drawings,
- French,
- using additional decor.
In addition, nail art masters are constantly coming up with new gradient ideas.
Manicure in bright colors
The brightest gradient manicure is performed using contrasting and deep shades:
- Any tones with black. For example, red, blue, purple, emerald.
- Any colors with white. Here it is better to choose rich tones too - burgundy, raspberry, fuchsia, indigo, green, etc.
- Several similar shades, but with different intensities. For example, burgundy, raspberry, pink. Or purple, blue, cyan.
- Tones that seem incompatible. For example, black, purple, and orange on the free edge. Or green, brown, pink. Here you need to experiment with the amount of each color - paint a narrow strip near the cuticle with the darkest, and make the same small transition with a second shade. Leave the light color for the free edge.
Gradient options on nails
When performing ombre with white or black colors, you can insert a transitional color between them and other shades. You can do it yourself by mixing the brightest tone on the palette with a transparent base (base or top).
French
French ombre looks natural, but attracts attention, and you can do it like this:
- Apply light beige gel polish or camouflage base to the nail.

- Coat the free edge with a white tint.
- Place a drop of transparent base onto the palette and dip a comb brush into it.
- Use it to shade the white shade closer to the center of the plate.
- Now the coating needs to dry.
- The nail is covered with a topcoat with a sticky layer and polymerized.
- A little acrylic powder is poured onto the border of white and beige shades.
- Now we need another drying.
- The remaining powder is brushed off the nail with a brush.
- The last layer is the finishing coat, which also needs to be dried.
Acrylic powder covers possible defects if the stretching is not very good. Otherwise, you can do without it. And for the brightness of the colors, steps 2-5 are repeated again.
French is also made in color, that is, the free edge of the nail is highlighted with shading and other colors, not necessarily white.
Matte option
A matte ombre design looks sophisticated, but is no more complicated than a traditional glossy one, for example, like this:
- The nails are covered with a light yellow flower bed over the entire plate, possibly in 2 layers, drying each one.
- Surfaces are wiped with a cleaner to get rid of stickiness.
- Using an airbrush, red paint is applied to the nails so that the side ridges have more color, and a lighter vertical stripe remains in the middle.
- Excess product is removed from the ends with a file.
- The nails are covered with a matte topcoat and dried.
You can perform shading in any other way. The main thing here is a top without a glossy effect. But you can achieve it in the absence of the necessary means in another way. The finish is applied glossy, and after polymerization the surface of the nails is polished with a buff. It is important not to completely erase the top.
Drawings and patterns
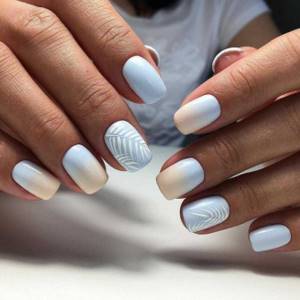
Drawings, monograms, and ornaments also go well with shading, but they should not cover the play of shades. Therefore, additional images are made in a minimalist style. It means:
- thin lines on parts of the plate (outlines of flowers and insects, graceful branches with leaves, etc.);
- the use of stamping also with narrow paths and small design elements;
- dots of different sizes made using dots;
- inscriptions that leave the border of shade transitions open;
- monograms along the base of the nail, not overlapping the shading line.
You can make a hand-drawn design three-dimensional by coloring it not with a flower bed, but with a transparent top. It will be noticeable, but will not hide the gradient.
Ombre can only be done in a drawing, and around it the nail can be painted with one color. But this is quite delicate work. And it is better to make such a design on 1-2 plates.
What decor is suitable
Various types of decor are also combined with ombre, but in such a way that the design itself is not lost against the background of additional elements:
- You can use rhinestones of different sizes to mark a hole or area near one of the side rollers. The shading line must be open.
- Foil geometry is popular. Thin strips can be glued along or across the plate, assemble corners and shapes from them, but not overlap the shade transition zone.
- Casting with foil will also decorate the ombre. Decorate part of the plate or monograms drawn with gel paint.
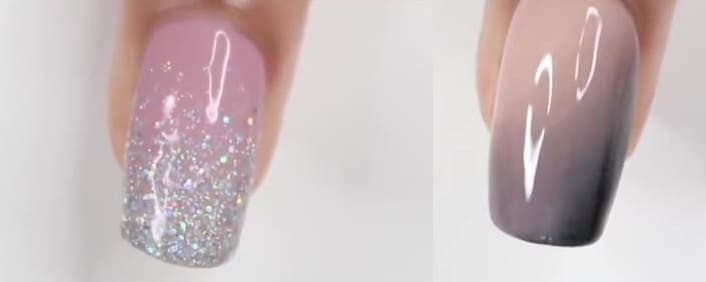
- Glitter is used to highlight the free edge of the nail or its base or side part. You can shade it with glitter or cover the entire plate with it, but with a translucent layer so that the transition is visible. The decor must first be mixed with a liquid base and top.
- Kamifubuki highlight holes or the free edge of the nail, or both. But in the latter case, the decor is selected in the same shades as the gel polish on which it is fixed. You can decorate kamifubuki 1-2 nails, distributing decorations over their entire space.
New items and fashion trends
Ombre is improving all the time, acquiring new “tricks”:
- Its implementation with negative space has become fashionable. From the free edge of the nail, the darker shade turns into a light one, and at the cuticle there remains a completely unpainted area. It is covered only with a transparent base.
- Using different shades on each finger and one main one. For example, this is how white polish is chosen, on the middle finger it is combined with pink, on the ring finger with yellow, and on the index finger all three colors are blended.
- Complementing the shading with a “cobweb”. The design is added on 1-2 nails in the form of intersecting lines, which are done with silver or black paint.
- A combination of several similar varnish tones and complementing them with transfer foil. One nail is painted with lemon yellow and white, the second with bright yellow and lemon, the third with warm and cool shades of pink, and the fourth with cool pink. And all different areas are decorated with silver foil prints.
- A combination of a gradient and a clear border of colors on 1-2 nails. From the base they are painted thick white, outlining this area with a wavy line. From it they shade from burgundy to light red. The remaining nails are also covered with light red. A matte top is appropriate here.
- Perform ombre in light colors on 3 fingers, the rest are painted white. The gradient is made different. For example, on the little finger - pink-lilac, on the ring finger they use the same colors plus blue, on the middle finger - blue and lilac. And on the nail of the last and index finger several kamifubuki stars are glued.
- Complementing the ombre with velvet sand. It should be transparent so as not to “clog” the play of colors. And it is used for 1-2 plates, giving them the appearance of being sprinkled with sugar. You can also lay out vertical tracks of velvet sand on your nails, and make the rest of the space glossy.
- Perform ombre only on the nails of one hand. And on the other, the same shades are used for a different type of design. For example, one color is taken as the main one, and the others make drawings or ornaments based on it.
- Combine with flexible foil strips. They are used on all nails, laying the material along the cuticle. The stripes follow its shape. Gel polish should be pastel shades.
- A combination of lunar design and vertical gradient. The holes are highlighted with one of the shades used in ombre.
- Adding “dew drops” to the shading. They are made using a thin brush, applying a glossy top coat. “Dew” should be on 1-2 plates.
- Using pearl rub. The decor looks good on pastel shades and is applied to all nails. The rubbing leaves the play of tones visible and emphasizes them.
Preparation
Before starting the procedure, you need to prepare the necessary tools and materials.
For an Ombre manicure you will need:
- Set of files, buff, scissors.
- Gel polish palette.
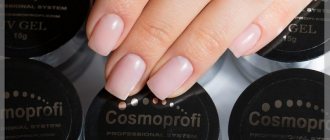
- Base and finish.
- A manicure brush or a small piece of foam.
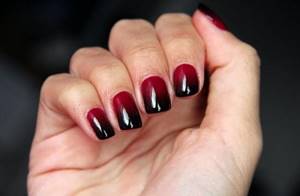
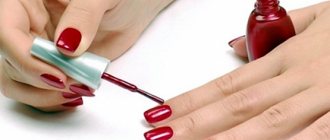
Ombre in red tones
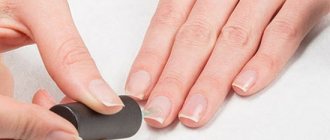
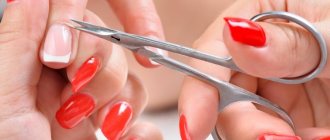
The first step is to give the nail plates the desired shape. Then carefully process the edges with a nail file and the surface of the plate with a buff. Buff is a fine-grained wide file that carefully removes the top layer from the nail, providing the necessary roughness for good adhesion of the gel polish to the nail. Also at this stage we remove the cuticles.
After treating the nails with a buff, we wipe each plate with a degreasing compound. Cover with base. To ensure high-quality adhesion of the gel polish to the nail surface, the base should be dried under a UV lamp.
Do not dry the base layer in the air or under the sun. To get a flawless Ombre manicure with gel polish, the base needs to be dried as efficiently as possible.

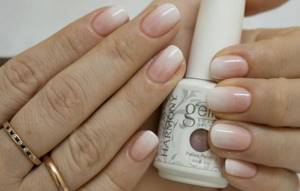
Beige and flesh colors in manicure
Features of this type of manicure
Ombre is also known as gradient, degrade. It represents a soft transition of a multi-colored palette without pronounced, clear lines. It is unique because it is suitable for different shapes and lengths of nails. It can be a practical, short length or long, extended up to 1 cm.
If you understand the creation technique, then both a beginner and a nail art professional can create the most unusual masterpieces. It is preferred by girls and women of different age categories. Any manicure becomes the final stage of your overall look. Fingers look well-groomed and beautiful. It can be created with any of the nail art coatings that exist today: acrylic, gel polish, varnish. This technique can hide imperfections in the nail plates.
Application technology
The easiest way to apply a gradient effect is using a piece of foam rubber. In order not to smear the periungual surface, it is necessary to protect the skin with a thick cream or a piece of tape. When using cream, it is important to ensure that oil does not get on the nail plate. If grease gets in, the gel polish will not stick to the surface and all efforts will be in vain.
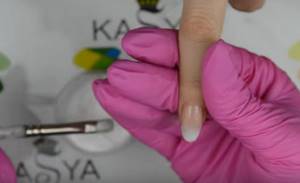
So, the step-by-step instructions recommend that you first prepare a color palette. Pour a small amount of two gels onto the foil. Using a toothpick, carefully mix them at the borders of contact. Paints mixing with each other will give a new color in the central part of the palette. Then carefully dip the sponge in the mixed gel polishes on the foil and transfer the imprint to the nail plate. The photo shows how the two colors harmoniously combine with each other, creating a beautiful manicure design on the nail.
Using a brush
To get a flawless Ombre manicure on all nails, as shown in the photo, it is recommended to use a new piece of foam after each print. This will allow you to create an ombre gel polish without smudges or gaps. After decorating all the nails, cover the plates with the finish and dry it thoroughly under a UV lamp.
Which technique name is correct?
Both gradient and ombre inherently mean a transition from one color to another.
Bright style
Depending on how the change of tones is carried out, there are several variations of the fashion trend:
- on each nail there is a smooth flow of saturation or different shades, which is more correctly called ombre;
- a similar use of several tones, but with a clear boundary between them, which fits the definition of a gradient;
- painting each plate with a separate color, but the whole hand becomes a reflection of a specific range. The technique is also an example of a gradient.
Sometimes the term dip dye is used to define this manicure (translated as “dip in paint”). Strictly speaking, this is a type of ombre using bright contrasting colors (red, blue, emerald). The technique is applicable to both makeup and hair, as well as nails.
Be that as it may, due to the use of different color schemes, the manicure acquires an individual signature, can be modified to suit any style, but at the same time does not burden itself with age or style restrictions. Both a young girl in a club and a business woman in the office can find their secret to perfect hands.
In a juicy style
A review of Nivea face creams is presented at the link. To properly combat dandruff, read the instructions for use of Nizoral shampoo.

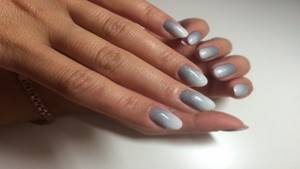
In gray tones
Nitrogina hand cream will provide deep nutrition and restoration to the skin. Find out why fingernails break and peel here.
Ombre tassel
There is another technique for creating a gradient manicure - using a manicure brush. This technology is durable. The artist has to manually paint each nail separately, constantly wiping the brush to remove excess gel.
Drying nails
The step-by-step methodology is as follows:
- After the preparatory stage, we apply gel polish of the lightest color from those selected to the nails.
- Dry the first layer in a lamp.
- Apply a small amount of dark varnish to the middle of the nail. Shade the stripe at the bottom. Dry it.
- Apply to the top of the nail and blend the gel in the center of the nail, creating an Ombre effect.
- Dry the gel polish. Cover with finishing gel.
Ombre sponge
Many girls claim that the gradient with a brush often turns out uneven, with gaps. However, the result depends on the skill and experience of the master. If it is difficult for a novice specialist to do an Ombre manicure with gel polish with a brush, it is recommended to give preference to technology using foam rubber.
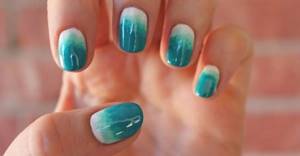
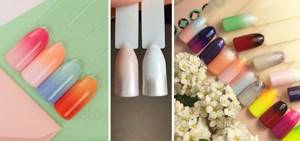
Current shade combination
Fashion highlights popular shades of each season. This year all pastel colors are popular, pink, white, purple, brown, yellow, peach, orange, mint. To have a trendy look, use these shades to decorate your nails.
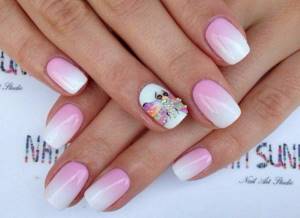
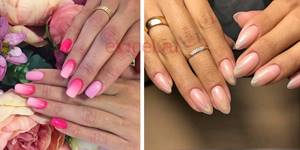
Shellac manicure on ombre nails white and pink
The white and pink duet looks gentle and emphasizes your femininity, innocence, and beauty. They are often used to create a gradient because they create the perfect manicure for everyday wear. If you add decorations to your marigolds, you can get a festive creation.
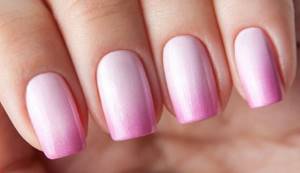
Often they create a painting of the accent finger and add sparkles and rhinestones. Shiny elements will make even the most classic coloring look solemn. This duet is popular among brides. Girls wear this tone not only on their dress, but also on their manicure. Additional decor makes the manicure more suitable for a special event.
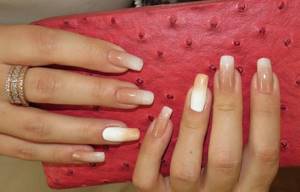
Beige ombre manicure ideas
Beige is one of the most popular. It is not demanding, convenient, practical - and these are the main criteria by which girls choose a palette for manicure. Beige is easy to complement with other tones. For example, in summer you can dilute it with bright colors, in winter you can add natural tones.
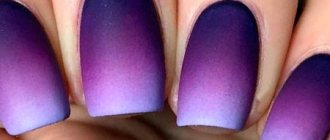
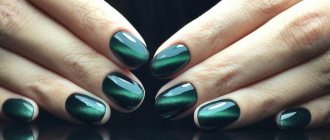
Purple ombre manicure
The purple palette is very diverse, so you can use it for a long time, while getting a variety of designs. You can make a soft transition from a dark palette tone to a lighter one. More daring girls prefer to combine different palettes, getting unusual design solutions. At the same time, both matte and glossy finishes look beautiful.
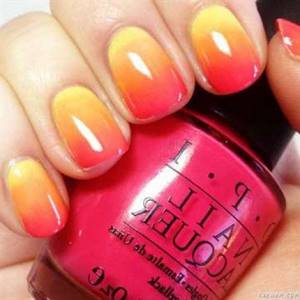
Yellow ombre
Sun colors are popular. Bright yellow in summer will highlight your good mood. He is chosen by cheerful, open girls who want to be the center of attention. If you stick to more pastel colors, then the manicure can be worn in autumn and spring.
French
French has not lost its relevance for many years. Skilled craftsmen have learned to make it using the gradient technique. At the same time, a smooth transition is made, starting from the cuticle, pink, beige to the white tip of the nails. This is a classic version of the French jacket. White harmonizes well with any palette, so French nails can be done in a variety of ways using the ombre technique.
Secrets from the professionals
- To make ombre nails with gel polish, it is recommended to use no more than three contrasting colors.
- A gradient created from three different shades of the same color looks stylish.
- A manicure with a smooth transition of colors and shades on different nails looks impressive. For example, the design begins with a dark nail design on the big finger, and ends with a light gel on the little finger.
- To preserve the beauty of an Ombre manicure for as long as possible, you should use transparent gel polish as a basis. It will allow you to periodically add color to the regrown part of the nail plate.
Learn more about the technology for creating Ombre manicure on nails with gel polish by watching the video.
Ombre manicure technique - what's the trick?
Ombre, gradient, degrade is the general name of one technique when the color palette smoothly transitions into one another. This manicure visually lengthens the nails, the border of the color transition is smoothly blurred.
Gradient manicure appeared in the early 80s of the 20th century; it was introduced into the world of fashion by the famous Hollywood actress Rihanna Daymond, when she appeared on the red carpet in an original dress and with a “vampire” manicure. This day can be considered the official date of birth of the ombre technique, which is already forty years old.
Recommendations
The gradient looks good on any nails, but do not forget about some details:
- If there are several colors on one nail, then the best option would be to use a light color at the base of the nail and a dark color at the tip.
- On short nails you should not use more than two colors - the pattern will turn out blurry and sloppy.
- It is not necessary to buy a large number of varnishes. It is possible to get by with white and colored ones, and get shades by mixing these colors.

Video on the topic of the article:
Useful video lessons
In conclusion, we invite you to watch the training videos. Popular beauty bloggers show by their own example how to properly do nail art using a sponge. Thanks to the video, you will clearly understand how to create a stylish ombre effect on your nails. Ombre manicure in summer or spring is one of the most popular designs that will never lose its relevance. Discover new horizons. Give free rein to your imagination and realize the wildest ideas in a gradient style on your nails!
Combination with other types of design solutions
- Since a gradient can be created in any color, clothes to go with it can be varied. As a rule, a girl initially decides on her external image, and then paints her nails to match it.
- Any accessories can be a great balance between clothes and manicure. If you choose accessories of the desired color scheme, then you don’t need to worry about the shades of your clothes at all.
- A pedicure should always match a manicure. It is better to create a gradient in pedicure with a brush. Of course, this is a very painstaking task that requires patience and perseverance. If you want to simplify the task for yourself or the master, then paint only the big toes with this technique, and cover the rest with an accent tone.
Today we figured out what ombre is, what tones are more preferable for it, and how to make it yourself at home. Using video tutorials you can learn all the intricacies of this technique. Share your feedback and recommendations. What criteria do you adhere to when choosing a dyeing technique and color scheme?
Author of the publication
Nail design: ombre and degrade with special effects
Ombre nail design with gel polish is an independent nail art. At the same time, it can withstand decorative loads, that is, it can be combined with other designs. And if you find a reason to take your nails for a festive stroll, you can combine your favorite ombre with any current trend.
Let's talk about trends. It is not necessary to follow them, but if you want to keep up with the times and wave your arms with a fashionable manicure, you need to take into account popular opinion. Fortunately, it is not categorical and polyphonic.
Ombre in French style
One of the options for a simple and elegant color tie is French ombre. The smooth transition of pink or beige to white looks gentle and unobtrusive. And, by the way, this particular ombre manicure will suit short nails favorably, optically lengthening them and creating the missing volume. You can experiment with colored tips or a lunar French theme by drawing a neat “smile” near the hole on a gradient substrate.
Ombre and glitters
No, rhinestones have not gone out of fashion and still decorate manicures for going out, but increasingly preference is given to finely dispersed shiny textures - for example, glitter. It also shines, is also spectacular, but does not create a strange “expensive-rich” feeling, as happens with rhinestones and stones. You can sprinkle a gradient with glitter or create one by stretching glitter on a colored background.
Ombre and rub in
An even more noble and discreet type of shiny manicure is with rubbing. You can decorate an ombre with rubbing pigment, or you can, as in the case of glitter, implement it. When creating an ombre by rubbing, pour a pigment of one color onto the free edge, and a pigment of a different color at the hole. Rub in with a sponge or brush and blend.
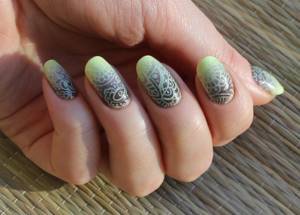
Ombre and stamping
The gradient design can be painted, but after painstaking stretching you want to rest. Thanks to the stamping technique, you can relax a little and at the same time decorate your nails with a spectacular design. Stamping is still relevant, and it cannot be otherwise. In an era of global time pressure, express designs do not go out of fashion.
Ombre and geometry
Geometric motifs remain at the top of the popular list for the same reasons as stamping. The talent of an artist, as well as a lot of time, is not needed for design. Zigzag, stripes and other geometric elements, shapes and figures are drawn quickly, and in combination with ombre they look less categorical and give the nails the right amount of relaxation.
If you don’t have enough experience for art experiments, turn to professionals. They will do whatever you want, and you don’t waste time - watch every move so that you can do it exactly at home. Beautiful manicures!
Method two
This method is easier for a beginner. However, it requires more material consumption. Performing a stretching manicure with them, as in the photo, will be faster, but it will take quite a lot of time to wipe the nail ridges off the gel.
- Repeat steps 1 - 5 from the first method;
- Pour some varnishes of both shades onto a plastic palette so that they are located close to each other. Stir them along the border with a needle or toothpick to make the transition smooth;
- Dip a sponge or fine-pored sponge into the gel. The smaller the pores, the more decorative the result will be;
- Apply the polish from the sponge onto the nail and wipe off the gel from the pre-nail ridges using a special product;
- Dry the gel under the lamp. If necessary, remove the dispersion layer with lint-free wipes;
- Apply top coat and dry everything under a lamp.
A manicure using this method is of high quality only if the coating gives a dense tone in one layer. If you are thinking about how to make stretch marks on your nails with a less dense gel, then it is better to choose the first method. Also, this method is not suitable for those whose gel is excessively thick, since the layer will turn out thick and wrinkle when drying.
Fashionable colors 2022
The amber style of nails with gel polish (the photo shows the variety of colors) is trendy this season. The advantage of manicure is an interesting and unusual combination of color and shape. The most popular manicure is on short nails with a rounded end.
If the coating is chosen successfully, the nails will look aesthetically pleasing and practical, which cannot but be appreciated by lovers of nail art. To guess the color, you should listen to the opinion of experts.
They recommend the following color solutions:
- Neutral. An excellent option is a discreet neutral tone - beige, peach, coral, gray and olive. They go perfectly with brightness; as an option, you can dilute your manicure with black stripes. Yellow, lilac, and blue patterns are considered an excellent option. Short nails will look beautiful with a deep red even burgundy manicure.
- Snow-white. The white monochrome color itself is very complex, but if the available elements are chosen correctly, then this is a real fashionable nail bomb. This is a color that, if diluted with some unusual pattern, or simple black, silver and gold stripes, will become a real find.
- Dark blue. Lovers of dark shades will not be left out; this season black and blue colors, purple and green manicures are again in fashion.
- Green shades of manicure. It would seem that green shades have sunk into oblivion, but this season is an opportunity to please yourself with your favorite and fashionable color. Masters replenish their collections with rich herbal shades and modest olive flowers.
- Grey. In winter, it was gray shades that were especially popular; in summer they will also be in demand, especially since they are combined with metallic shades.
- Metallic. Metallic manicure is still popular, but this season stylists have added a matte finish. This can be done using golden or silver gel polish with rubbing.
For ombre nails: tools and materials
Degrade manicure is a way to diversify your nails when all the colors have already been tried, but you are not in the mood for complex designs or your hands are not ready.
The gradient looks impressive, adds length to nails, can withstand almost any wardrobe and smoothes out the sharp edges of appearance and character - not only a fashionable manicure, but also beneficial in every sense.
How?
The main technical challenge when performing ombre is to achieve a smooth gradient between two or more shades at any cost. Tools for implementing a task can be very different.
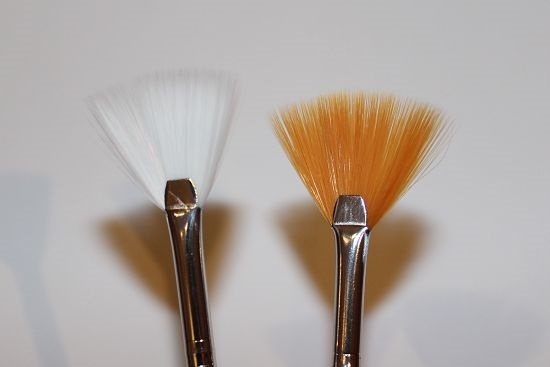
Some people prefer to use a fan-shaped brush, sweeping out colors. Others are sure that the ideal brush for ombre is a “hair”. Still others do not recognize anything other than the “comb” brush. There are those who call a dishwashing sponge the best assistant.
Progressives prefer an airbrush gun. You can try everything, because only in practice is truth born.

What?
When looking for the right shades, use Itten’s color wheel and you will be happy – a harmonious gradient. Those with impeccable taste consult him. And remember, the hardest way to depict degrade is using contrasting colors - for example, red and green or blue and yellow.
Let's move on to technology and stock up on tips, patience and an inexhaustible desire to overcome thorns on the way to the stars - the ideal gradient.
List of sources
- manicyr4ik.ru
- www.joxin.club
- etogel.ru
- lifegirl.ru
- HomeManicure.ru
- 1gellak.com
- izkosmetichki.com
- jaay.ru