Nail designs with foil for gel polish are performed using sheet, transfer, pressed, liquid, tear-off, and thermal material. With its help you can make mirror manicure, casting, “broken glass”, geometry, “leopard”, gradient and many other types of nail art.
Depending on the type of foil, it is attached to glue or a wet top. The transfer is printed onto dried and grease-free gel polish. For work you may need scissors, dots, tweezers, and an orange stick.
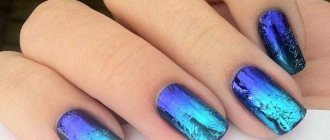
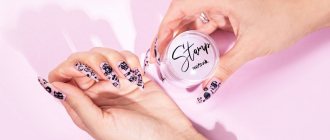
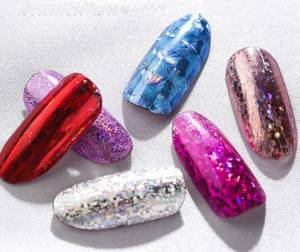
Bright manicure with foil
A manicure with foil on gel polish can be of any color due to the coating itself:
- black,
- pink,
- white,
- red.
The tint is also given with the help of the decor itself, because the foil can be not only gold, silver, but also colored, with the shine of precious metals.
On black
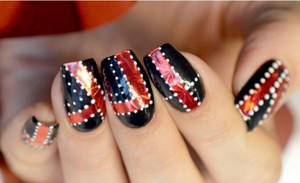
Foil on black gel polish can look both festive and laconic, for example, in the following options:
- A topcoat with a sticky layer is applied to the anthracite varnish and dried. Red transfer foil is then printed on the plate in random order to create bright streaks against the dark background. From above everything is covered with a matte top. All nails are decorated the same way.
- Strips 1-1.5 mm wide are cut from sheet or tear-off material of silver color. They must be glued along each plate in the middle. This design will also look good on short nails, visually lengthening them.
- Gold foil is imprinted at the base of the nails of the middle and ring fingers. The boundary should be blurry and unclear, for which the material is pressed against the plates several times.
Examples of foil on black gel polish
1 of 2
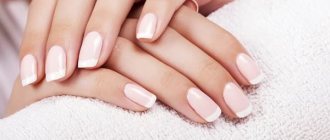
White with foil
White shade with foil can be used for daily wear, wedding or party design:
- The plates on the ring fingers are completely decorated with gold foil. You should use a lay-out or transfer. The rest of the nails are simply painted white. You can also make a vertical stripe in the center on your little finger using sheet or tear-off material.
- All nails are painted a rich milky color and coated with a glossy finish. And on the middle and ring fingers, a herringbone pattern or other large ornament is imprinted with transfer foil.
- On the nails of the thumb, index finger, and little finger, the free edge is highlighted in white, as on a French jacket, and a camouflage base is used as the basis for all. On the middle and nameless plates, half of the plates are painted in a milky tone; the border should be diagonal. Craquelures are printed on them with silver foil, covering the natural shade. Thin silver stripes are glued along the borders of white and pink, as well as parallel to it.
Examples of foil on white gel polish
1 of 3
Red gel polish
Red gel polish with foil does not require a lot of decor; the following options look organic:
- With 1-2 nails decorated with a vertical gold foil stripe and white monograms. The latter are done with gel paint and a hair brush.
- With a combination of different shades of white and a minimum of foil. All nails, except the one on the ring finger, are painted in a cool tone. And on the last one the varnish should be the color of baked milk. It is decorated with a zigzag line of silver foil. The widest strip is glued in the center, and narrower ones extend from it to the free edge and base of the plate.
- With highlighting of the plate hole on the ring finger. At the same time, it is visually divided into 3 parts: a golden one made of crinkled foil and 2 red ones. There should be a clear line between everyone. And on the little finger, the main coating is a milky camouflage base, decorated with red stripes on the hole and in the center.
- With geometry. Thin lines are drawn along the red main shade with black gel paint. And after a short drying, red foil is printed on top.
Examples of red gel polish with foil
1 of 4
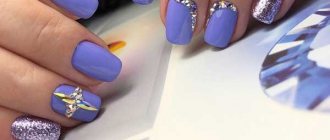
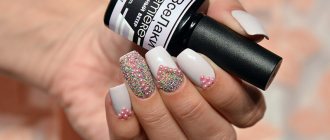
Pink with foil
Pink with foil looks sophisticated and bright, makes an ordinary manicure festive if you use one of the options:
- Using a pressed material, use the pressed material to select the holes of the plates of the middle and ring fingers. These areas should be natural in color. The rest of the middle part is painted milky, and on the nameless one a gradient of milky and cold pink-lilac is made. The last shade is also used for the little finger. And the nails of the index and thumb are painted milky pink.
- Use foil to highlight the free edge of the nail to create a kind of French manicure. You can glue arc-shaped stripes corresponding to the “smile”. Or take translated material. They are applied with chaotic strokes, but on the free edge.
- Use transfer yellow foil to decorate the nails of the middle and ring fingers. It is printed approximately in the center of the plates so that the gold design is blurry.
- On nails covered with pink, triangles are drawn in brown with bases curved along the outline of the holes and sharp corners at the end of the free edge. Transfer foil is imprinted on them in uneven spots. You can use any shade of decor.
Examples of pink gel polish with foil
1 of 3
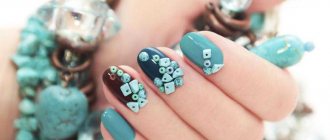
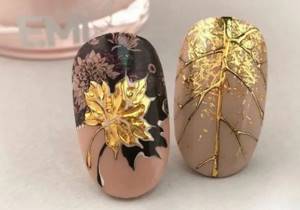
"Golden Leopard"
Leopard print is done so that the nails have elements reminiscent of the skin of a beautiful predator, that is, spots and yellow, brown, golden shades. But there are options here too:
- You can use black varnish as a base, with gold transfer foil printed on the entire surface. A topcoat is applied over it, dried, and then stains are painted with brown gel. They are polymerized and outlined with black gel paint. Then the nail is lightly tinted brown on all sides.
- All nail plates are painted with a nude milky pink shade. Then the little fingers are decorated with whole pieces of golden crinkled foil, and the middle fingers are decorated with half of the plates. On the latter, 2 parallel thin lines are drawn with black varnish, dividing the nail into 2 parts - with and without design. The pieces of foil are also outlined in dark.
Watch the video on how to make leopard print with foil:
Secrets of the technique of using foil with gel polish
Foil for gel polish will look brighter and hold more securely if:
- Before fixing or printing, lightly wipe the back side with a degreaser;
- to obtain fuzzy, “torn” prints, first crumple it;
- after drying the top layer on which the material will be glued, let the product cool slightly;
- do not use undried gel polish as a basis for attaching foil, as its pieces will get dirty;
- When fixing the decor on the free edge after drying, file the ends to get rid of excess, then remove the dust and cover with the finish.
Current trends in manicure with foil
The most fashionable options for using decor are:
- A combination of several colors of varnish and complementing the design with a cobweb. A dark shade is applied to the nails of the index, middle and thumb fingers, and a nude shade is applied to the little and middle fingers. On the latter, thin dark diagonal lines are made, leaving the base light. Gold foil is printed on the web. It is also used to decorate the hole of the little finger.
- Using foil to make a design. For example, 3 pieces of laying material in the form of butterfly wings are glued onto a black background. The remaining details of the image are painted with white gel paint; some can be highlighted with rhinestones. Instead of a butterfly, flowers, stars, twigs, hearts, monograms, etc. are also depicted.
- A combination of light varnish and contrasting shades of foil. It is used to decorate 1-2 plates in whole or in part. You can complement the design with thin straight or curved lines in black.
- Geometry with foil. The plate is painted with contrasting colors of gel polish, creating different shapes, straight or curved lines. It can be divided in this way along or across, to the diagonal, to outline the hole, the free edge. Foil is then applied to the darker color.
Trends in manicure with foil
1 of 4
Thermofoil
If you do a manicure based on thermofoil, then there are practically no difficulties at one of the stages of implementation. To work with film, it is enough to use a hair dryer or lamp . The foil is sold in the form of a plate containing ten stickers that resemble a nail plate in shape. Stickers come in different colors, with colored designs or plain ones. Before creating a design, the nails are put in order by creating a manicure and degreasing.
The time for preparing and drying the manicure is determined by the type of base chosen. If you use regular gel polish, you will have to dry it in an ultraviolet lamp and also clean the sticky layer.
Using tweezers, the foil is peeled off, but before that it is warmed up. The heated material is applied to the root of the nail plate and gently stretched to the end of the nail. After successfully applying the foil, it should be carefully leveled, and the remaining pieces should be removed using a nail file. To consolidate the result obtained, a special product is used.
Varieties of design
The types of decorative designs are very diverse:
- transfer patterns and chaotically scattered spots;
- straight and curved stripes;
- matte foil or using a velvet top;
- casting;
- mirror manicure;
- "broken glass".
They use different types of material, which can also be combined.
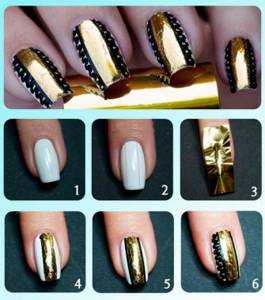
Manicure with transfer foil
The design with transfer foil can be made the same on all fingers or you can highlight 1-2 nails:
- Apply special glue over the dried varnish and polymerize it.
- Cut off a piece of decor, apply it to the entire surface of the plate, straighten and smooth it using a silicone “hoof”.
- Remove the film with a sharp movement.
- Cover the surface with topcoat and dry.
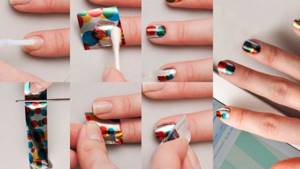
Design with transfer foil
For design you can use:
- only one color of varnish in a deep shade (black, burgundy, emerald, dark blue) in combination with gold and silver foil stripes;
- two colors – dark and lighter, with iridescent splashes of transfer decor;
- nude tones of varnish and the same shades of foil, imprinted in the form of multi-colored rain;
- light background and patterns, with the base of the plate outlined with black gel paint.
Manicure with foil stripes
A fashionable design with foil stripes should look modest:
- Nails are painted one bright color. Decor is glued onto the little, ring and middle fingers so that it follows the lines of the cuticle and one of the sinuses.
- You can use several nude shades for manicure. The strips are glued 2 pieces in parallel, along the center of each plate.
- You can make intersecting lines from strips, forming rectangles or just sharp corners. In this case, not all nails should be decorated.
Watch the video on how to do a manicure with foil tape:
The strips are always glued to a grease-free surface because they have a sticky layer. If you fix the decor unsuccessfully, you will have to redo the entire coating. The strips must be secured on top with a top.
Matte nail art
Matte design can be done in this way:
- Cover 3 nails completely with varnish, and 2/3 on the little finger and ring finger.
- At the border of gel polish and natural color, apply transfer foil or display foil.
- Cover everything with a matte top.
Matte nail art
There is also foil without a glossy sheen. It can be used with both a shiny top and a matte one.
Mirror manicure
Designs with the effect of a mirror surface of nails are performed using:
- sheet foil, placing it on the plate in one piece and cutting off the excess;
- special stickers corresponding to the size of the nail;
- liquid foil, which is applied in 2 layers on a base of dark gel polish.
Liquid foil
With the first two methods, it is important to smooth the material well on the plate.
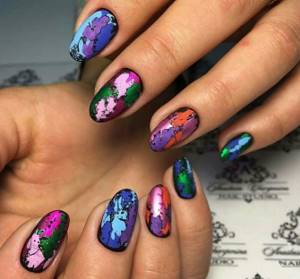
Manicure with foil prints
Designs with foil prints are very diverse:
- chaotic sparkles of a darker color than varnish, plus rhinestones;
- gold or silver on colored varnish and almost complete coverage of the nail with foil;
- highlighting individual sections of the plate with prints;
- their drawing of patterns.
Watch the video on how to print foil onto gel polish:
Transfer material is used for these designs. The plate should be dry, the surface should be wiped with a degreaser, before that you can walk over it with a buff.
Manicure “broken glass”
“Broken glass” means that the nail should look like shards, shiny and multifaceted. Typically, sheet foil of several shades is used, which is cut into pieces of different shapes. They are placed on a damp topcoat or glue, polymerized and covered with a glossy finish. The design is suitable for dark and light tones of gel polish.
Casting
Casting or patterns in combination with foil are done like this:
- The dried gel polish is treated with a buffer and degreased.
- Using a thin brush, apply the pattern in 2 layers, each one dried.
- Transfer foil is applied to the ornament so that the spraying is imprinted.
- Cover with finish and polymerize.
Casting in combination with foil
It turns out as if the pattern was drawn with foil.
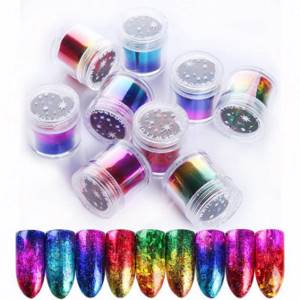
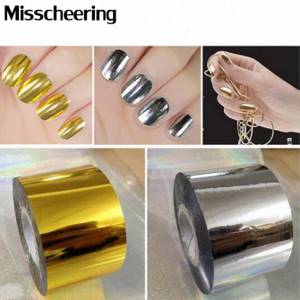
Where to buy and how to choose nail foil
You can buy nail foil at a manicure supply store. When choosing, be guided by personal preferences and skill (translated ones are much easier to use than other varieties).
Mirror design is stylish, fashionable and unusual. To create it you will need foil (transfer, tear-off, embossed, thermo, minx or any other), a special tool and a little skill. A special material (not to be confused with food packaging) is used to create mirror manicures, holograms, intricate patterns and other decorations on natural and extended nails. If everything is done correctly, the nail design will turn out neat, stylish, unusual, beautiful and durable.
More interesting articles:
Colored manicure using foil
Multi-colored foil on nails looks no less impressive than classic gold, silver or other mono shades. You can make a gradient with it using a dark or neutral tone of gel polish as a base. This type of material is often transferable and is easy to print.
We recommend reading the article on how to do a French manicure with gel polish. From it you will learn what you need to do a French manicure with gel polish, which gel polish is better and the types of French manicure with gel polish. And here is more information about how gel polish differs from shellac.
Foil nail art never goes out of fashion due to the variety of designs available. In addition, many of them are easy to perform. The main thing is not to betray good taste and not to overdo it with the amount of decor.
The difference between manicure material and food and packaging material

Packaging foil
Nail foil has nothing in common with food or packaging. The main difference between them is the structural composition .
Foil for nails can be perfectly smooth (mirror) or textured, single-color, with patterns of varying complexity. A very beautiful effect is obtained when using thermal material.
Food and packaging foil are completely unsuitable for nail design; they cannot replace decorative material.