Author: Lavanda Beauty Studio
One of the most common ways to decorate nails is the universally recognized ombre manicure 2022. Creating such a gradient creative work at home in familiar conditions will not be difficult.
Having emerged not so long ago, in a short period of time it has managed to become a priority species for literally any season. The explanation for this success is simple.
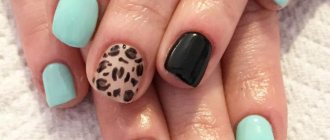
Just after looking at a small number of photos of ombre-type manicure, you involuntarily begin to admire both the variations of its independent executions and admire the additional decorative elements, which include rhinestone inclusions, painting, and stamping.

Essentially, it consists of applying a soft transition from one color scheme to another. Organically, in this way, you can combine two, three and four varnishes, but no more, so as not to lose a certain charm and aesthetics due to excessive flashiness.
Its undeniable advantage is considered to be an amazing opportunity to visually lengthen nails, so this option of ombre manicure for short nails is for those with short nails.
It has several names. In addition to the concept of gradient manicure, there are also stretching, degradation and ombre.
Features of manicure with transitional shades
Gradient design has features compared to other techniques:
- to complete the job you need from 2 to 5 shades of varnish;
- the direction of application of the material can be any;
- the technique assumes a smooth border between colors so that the transition is not visible;
- gradient is a universal manicure option, suitable for both everyday and festive looks;
- the transition can be between related or contrasting colors;
- the finished manicure assumes a glossy or matte look;
- Both regular and gel polish are suitable for making a gradient print.
Nails with a color transition (step-by-step photos will be presented below) can be created in different ways. In master classes there are options for horizontal, vertical or diagonal transition. Another way is when each nail is painted the same color, the gradient is made from the thumb to the little finger.
The ombre technique has a number of advantages:
- modernity;
- speed and ease of manicure;
- versatility, diversity of ideas.
What do you need to do?
Gradient manicure on natural nails and on nail extensions or gel polish can be created in different ways and using different materials, so here I will look at the possibilities of performing a gradient manicure on natural nails.
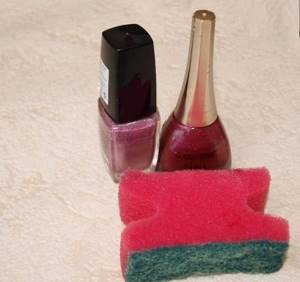
The most popular way to create an ombre manicure is using a sponge . With the growing popularity of this type of manicure, special fine-grained sponges for gradient manicure of a convenient shape have even appeared on sale, which make it easier to create a transition between colors. However, a regular dishwashing sponge will do the job very well.
Before use, the sponge is cut into pieces convenient for use so that the working surface is comparable to the size of the nails. To prevent dust from interfering with contact with the varnish, it is better to wash the sponge first and dry it.
Manicure techniques: ombre and gradient
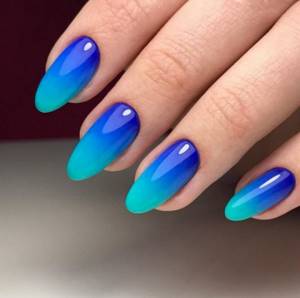
The color transition can be performed using ombre or gradient techniques. One word is of Latin origin, the other is Greek. Many do not share these concepts, identifying them. Both options are used to characterize the type of manicure, suggesting a transition between colors, but they differ from each other. Ombre is a horizontal color transition, also called a washout.

Photo of nails with a gradient color transition
The gradient is considered a more daring solution; it is the vertical or diagonal direction of the transition of colors. There is no difference in the way the work is performed. If we are demanding in terms of concepts, then ombre is characterized as a manicure in which the boundaries between colors are not visible, the transition is very soft. The gradient even allows for a clearly defined, sharp edge without being feathered.
Ombre with glitter
Stretching can be done not only with a different color, but also with sparkles. In some ways it’s even easier, because a thin brush is enough instead of an airbrush.
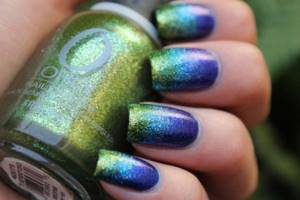
Photo: mykaleidoscope.ru
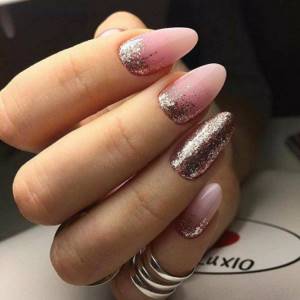
Photo: o-tendencii.com
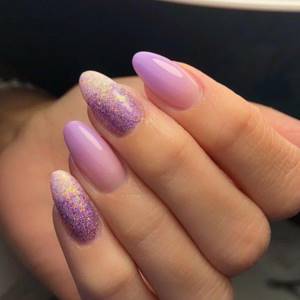
Photo: mykaleidoscope.ru

Photo: o-tendencii.com
Photo: o-tendencii.com
Table of compatible colors in manicure
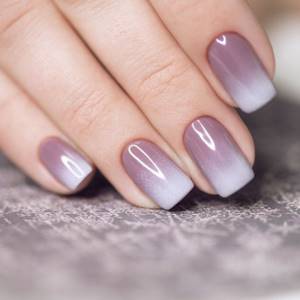
In the photo of nails with a transition of related colors, a smooth play is visible. It is not difficult to reproduce such a print in practice. When coming up with a work process, it may not be clear how they fit together. To help the master there is a special table describing the characteristics of each shade.
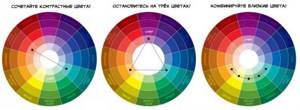
It is easier to understand which colors combine with each other using a circular pattern, where the colors border each other in segments. In accordance with it, colors located next to each other, strictly opposite, or like the vertices of an isosceles triangle are in harmony.
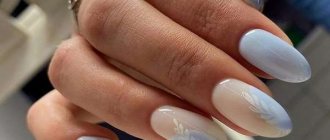
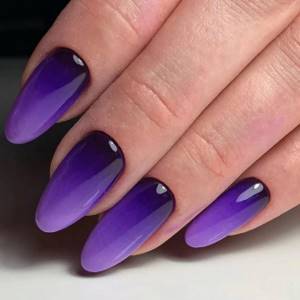
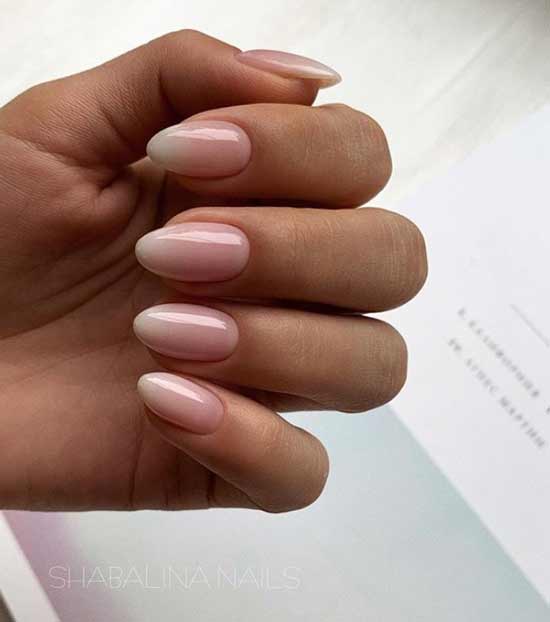
Gradient design Baby boomer
The most feminine and sensual is the “baby boomer” gradient, which represents a transition from a palette of beige shades to white. Layers, as a rule, divide the nail in half, which visually increases the length and harmonizes the shape. Interesting additions to this solution are accent geometric patterns made in a light color on a darker area at the base. But, in addition to this, holes lined with small rhinestones or sparkles around the perimeter of the nail are perfect.
Palette of shades for different looks
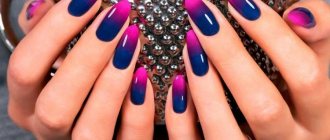
Summer is a time for bright colors. At this time, a manicure with a color transition can be contrasting, where opposite shades are combined. A bright image is suitable for relaxation, weekends, work (if it is not related to business activities).
These colors include aquamarine, mint, purple, lilac. In autumn, the shades shift to brown and gray to match the quality and appearance of coats, woolen sweaters and scarves.
If you need to paint your nails for a celebration, then a good combination would be to use a pastel tone with glitter. The shiny part will attract attention, but will not look provocative or inappropriate.
A business woman needs to choose a discreet nail color option with a transition from milky to peach, lilac or brick shade. Cool colors and warm, muted tones are suitable for this look.
The color of the varnish should be selected taking into account the color of the skin and hair. If you do not take this information into account, you can accidentally give your face a yellow, sickly tint, highlight pallor and circles under the eyes.
Beige and pink colors can give this effect to those with dark skin. For them, it is better to choose a cream or orange-copper option. Cool pink colors and pearl pink tones will look harmonious with pale skin.
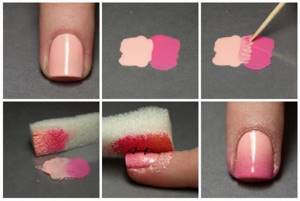
Using a sponge for smooth flow
Great option for a gradient. This method is often used at home, since it does not require the purchase of additional materials, and a small piece of sponge can be found in any home.
Let's look at how to make a manicure with a smooth gradient at home step by step.
Method 1
- Apply the base color of gel polish to the prepared nail plate, dry it in a UV lamp and achieve the required coating density.
- Take a small piece of sponge and blot the desired shade.
- Using light patting movements, apply a contrasting color to the nail.
- We wipe off any varnish that gets on the skin and dry it in a lamp.
- We repeat the procedure to obtain a smooth transition.
- We consolidate the resulting result.
Tools for painting nails with color transition
Since manicure attracts attention, it is necessary that the nail plate is well-groomed.
To perform ombre you will need several tools:
- orange stick, cuticle nippers;
- foam rubber with fine porosity;
- foil;
- brush;
- desired colors of varnish or gel polish;
- polishing buff;
- toothpick or needle;
- surface degreasing liquid;
- clinser to remove the sticky layer.
The main tool for work is a sponge and a brush. It is thanks to these things that such a flawless gradient can be achieved. The foam rubber needs to be cut into small cubes with an area slightly larger than a nail.
Household items that are suitable for this purpose include a dish sponge and a makeup sponge. Some masters say that the desired smooth transition may not be possible with the first material due to too large pores.
Set of materials
After training, many organizations offer to purchase a set of materials to continue independent work. Everything is sold in a specialized store.
Set includes:
- airbrush;
- acrylic paints - purchased individually or in a set;
- stencils and meshes for design;
- skin protection stickers;
- tweezers;
- buff;
- primer and top;
- airbrush cleaner.
Popular paint brands: OneAir, AirNai, Premium, Fluo.
The listed devices and ingredients can be purchased separately or as a set. The cost of an airbrush kit starts from 6,000 rubles.
You need to pay attention to fakes. Cheap Chinese airbrushes do not regulate the dye supply properly
Materials may not adhere well due to improper preparation of the substrate.
You can complete the design by adding sand, beads, and stucco.
How to use a sponge to achieve a gradient effect?
To achieve the effect of the drawing, you need to practice a little.
The working technique is as follows:
- The desired colors are applied to the plastic surface in layers.
- Blur the boundary between tones using a brush or needle.
- The master takes a piece of foam rubber and places it on the plastic with the palette.
- The material is pressed onto the nail, pressing for a few seconds.
When the job turns out perfectly, you can save time and start depicting the sequence of colors directly on the sponge. Another way is when part of the sponge comes off so that there are uneven edges.
The master applies the main color to the nail, after which the edge of the foam is dipped in a contrasting shade. When the base coat has dried, the sponge is pressed to the place where the other color should be. At the border of different parts, you need to apply the material to the surface several times with sharp movements.
Pros and cons of coloring
The inability to use gradient dyeing on short hair is practically the only drawback of the technique. However, it is worth remembering that doing it yourself at home is also quite difficult, because there is a risk of choosing the wrong shades, as well as not painting over the entire length.
The advantages of gradient coloring outweigh the difficulty of using it yourself. The technique does not require constant updating, since the roots grow naturally. Short hair is tinted more often than long hair, but this is only advice and not a mandatory rule.
The dyeing technique is suitable for everyone, the main thing is to choose the shade. This technique is used by women of all ages and social status. For young girls, a gradient is a way to stand out due to unnatural colors at the ends, and in adulthood, a gradient will help to visually rejuvenate.
Find out more about the popular ombre technique and the specifics of coloring:
- on dark hair;
- for red hair;
- on brown hair;
- for short hair;
- for long hair;
- for medium hair;
- how to do ombre for a man, choosing the perfect shade.
How to make a color transition with a brush?
The second way to work with a gradient is to use a brush. There is a special tool for working with gradients, but a regular one for design is also suitable.
To perform ombre, use foil on which colors are mixed. Apply the varnish to the panel with a brush, and use a toothpick to mix the contacting areas.
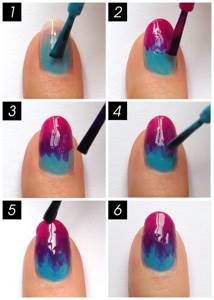
Complicating the task, the master begins to create directly on his finger. To do this, you will need a round brush, which will need to stretch each color in the chosen direction. When the next shade is applied next to the previous shade, the border is shaded using a thin, clean tool, each time removing excess varnish. This method allows you to avoid staining the skin around the nail with varnish.
Practical secrets and tips
When performing a gradient manicure with a sponge, difficulties often arise: the skin around the nails gets very dirty, the varnishes bubble, and the transition fails. There are some tricks to resolve them. To perform a gradient manicure as accurately and quickly as possible, I will share some secrets for creating it.
To prevent the skin around your nails from getting too dirty, you can use different ways to protect it:
- Apply tape around your nails and remove it when the gradient is completed. Then all the varnish that does not get on the nail will remain on the tape and will not stain the skin.
- Apply rich hand cream to the skin around the nails . This is exactly the method I use. After completing the design, it can be easily removed from the skin with a regular cotton swab along with the varnish imprinted on it. The main thing is that the cream does not get on the nails during application, since the varnish will not be able to imprint in this place. The cream should not be absorbed quickly, otherwise the varnish will not be easily removed.
- Use special products around the nails. With the popularization of gradient manicure, auxiliary materials appear to simplify its implementation. One of these is a product for applying to the skin around the nails, which is easily removed along with the printed varnish. The most popular products in this series that I know of are Kiesque Liquid Palisade and Skin DEFENDER. By the way, this product is also convenient to use for other designs where the skin may get dirty, for example, in water manicure.
As for complaints that bubbles appear on the nails when imprinted with a sponge, this problem is also solved:
- Firstly, you can use a finer-grained sponge - this will minimize the size of the bubbles;
- Secondly, in order to have fewer bubbles, it is better to make the first 2-3 prints with varnish newly applied to the sponge on paper or foil;
- Thirdly, the number of layers also affects the reduction of bubbles: the more there are, the less noticeable the points are, since with each new layer they merge more and more into a gradient.
If there is a problem with receiving a transition, then please note that:
- Perhaps the colors are not chosen very well, for example, they are too contrasting, and it is difficult to smooth them out. We will talk about the combination of colors in a gradient manicure below.
- Try making more layers of prints, waiting a little for the previous one to dry. This should help smooth the transition.
- Cover the final design with a clear finishing varnish: it gives a smooth gradient and evens out the surface.
- Use a colored base. To make the gradient clear and rich, apply one or two layers of white varnish or varnish of the lightest color chosen for the gradient. This way your nails will definitely not show through the gradient.
When performing a gradient manicure, it is worth considering that there will be a fairly large consumption of nail polishes, especially if the sponge is coarse-grained.
Instructions with photos for creating a gradient on nails with regular polish
It is better to start doing nails with a color transition (a photo of one of the options is presented below), working with regular varnish. There is a high chance that you will not get the desired effect the first time. Using regular varnish, you can redo the work as much as you like. With gel this will not be possible, and the manicure will be ruined.
Here is one option for working with a contrasting color using foam rubber. During preparation, it is necessary to remove or push back the cuticle. The second step is to apply a greasy cream, a special Vaseline-based product or PVA glue around the plate, which then allows you to quickly remove excess material.
- A base coat and white varnish are applied to the nail and dried.
- Both colors are applied to a piece of foam rubber in layers.
- The porous material is applied to the nail with short movements, achieving the desired effect.
- Remove excess varnish.
- Cover with a finishing coating, a protective agent.
What is a gradient manicure?
Gradient manicure is the creation of smooth transitions from one color to another. It can consist of at least two colors, it is better to limit it to a maximum of four nail polishes, it will no longer look organic. The advantages of this manicure include the fact that it visually lengthens the nails, so it will look beautiful on short nails.
Gradient manicure can be found not only under this name. This is the same as an ombre, degraded manicure or stretching on nails. Therefore, further I will use them all.
Gel polish manicure with color transition
The peculiarities of working with gel polish are that each layer is dried separately under a lamp. With this material it is easier to polish the surface to a perfect condition.
Nails with a color transition (photos of the stages of working with gel polish do not differ from the previous version) are easy to do. To prepare the plate, you need to push back or trim the cuticle and sand the nail. This is necessary for better adhesion of the gel polish to the surface.
The work takes place in several stages:
- The plate is covered with a layer of base varnish and dried under a lamp.
- Various paints are applied to the foil in strips, and the edges are blurred using a needle or toothpick.
- Press the palette onto a piece of sponge moistened with water.
- The foam rubber is applied to the nail several times with sharp movements.
- If the color intensity is achieved, the applied material is dried under a UV lamp.
- To make the coating more dense, apply several layers of gel, each time directing the nail under the lamp.
For each plate you need to take a new sponge, since the area is different and the colors are laid unevenly. If the pattern on the nail is uneven, then first you need to apply the foam rubber with varnish to the foil, and then try it on your finger.
Features of coloring for different hair lengths
The optimal length for gradient coloring is to the shoulder blades or below. Shorter curls look less effective. Lightening the ends in other cases will not look very neat, since the length will not be enough for a gradual transition of shades.
With a short length, the curls framing the face are colored almost from the roots. However, the strands for this are taken quite narrow. On the rest of the hair, dye is applied to the ends, using no more than 2 dyes of different shades. For long strands, the number of tones can be increased to 4 or even 5.
The difference in coloring long and short hair also lies in the possibility of artistic design. On short curls, paint is applied equally, in 2 levels. For longer strands, you can use more levels to create a semi-circle.
French manicure in ombre style
The French manicure technique involves applying white or other varnish along the smile line in a thin strip.
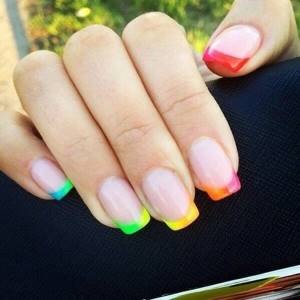
French ombre came into fashion this season, 2018-2019.
There are several options for implementation:
- over the completed manicure, a strip of contrasting color is applied in a thin line along the edge of the nail;
- the plate is painted in 2 colors, from the base to the edge it turns white, the border is blurred.
Thanks to this technique, it is possible to create a delicate ombre version. As a rule, soft pastel colors of varnish are used in the work.
How to choose

Airbrushing on nails as a manicure technique appeared several years ago. The demand for devices has led to the emergence of several dozen models adapted to the needs of the nail industry. The most popular manufacturers that beginners and experienced craftsmen should take a closer look at:
- Iwata;
- Sparmax;
- Evolution;
- Jas;
- Hansa;
- AirNails;
- Tagore;
- Fengda;
- Harder and Steenback.
The list includes European, Russian and Chinese manufacturers. For beginners, taking into account the combination of price and quality, you can try applying designs with models from Jas (China) and AirNails (Russia-China).
For salons, manicure salons and professional use with a large flow of clients, more expensive models from the manufacturers on the list are also suitable. The cost of a complete airbrush set starts from 3,000 rubles. You can also buy the handle, hose, compressor, nozzle and needle separately.
To perform professional nail designs, you will need the following device parameters:
- Bottle 2 ml;
- Air flow from 10 l/min;
- Pressure from 1.5 - 3 atmospheres;
- Productivity from 1.75 to 3 kg/cm2;
- The hose is fabric braided, not silicone. Length from 1.5 m;
- Nozzle diameter 0.2 mm - better than 0.3 mm;
- Compressor with a power of 12 W.
These same parameters are minimally sufficient when choosing a device for home use.
When working, the paint should spray evenly, into a fine dust, or gather in an even line as the nozzle approaches the work area. The trigger should have a smooth and soft stroke. There should be no drops or lumps left on the needle after applying the material to one nail. If possible, it is better to test these functions before purchasing the device.
New models of airbrushes are characterized by automatic start. The compressor starts working when the material supply trigger is pressed. Older models do not have such an automatic device, and therefore they are noisier and create vibration when the compressor itself is turned on. The airbrush will make noise and vibrate continuously throughout the entire process of applying the design to the nails, even during breaks in the supply of material, with the trigger turned off.
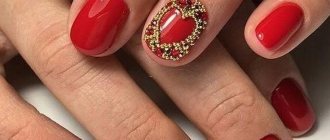
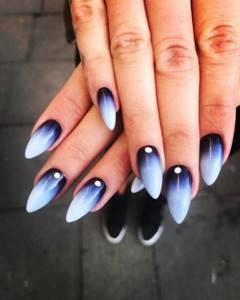
Ombre with rhinestones
The gradient looks interesting, so it does not need additional decorative elements. The combination of stretch marks with rhinestones may look inappropriate because it attracts undue attention. If a woman wants to add some sparkle to her look, she can use medium sized rhinestones on 1 nail.
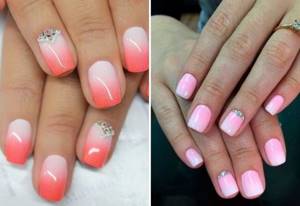
Since one of the design directions is to apply a different pattern to each finger, the color transition boundary can be indicated using decorative stones. Rhinestones are used to create a pattern, a geometric image. Full laying of one nail is allowed.
Degrade using a fan brush
A gradient on gel polish nails can also be done using a fan brush. This brush is thin and wide in shape, similar to a fan. Making such a transition from one color to another will result in a sharp roll, but this method has also earned recognition.
It’s easy to make a gradient nail design with gel polish using a fan brush:
- Apply the base color and dry.
- Drop the selected gradient varnishes onto the foil (the base one, which already covers the nails, and another one), mix them with a needle. Combine two selected colors on the foil. Apply the resulting tone with a brush to the middle of the nail.
- Apply a second color to the smile line. Take a fan brush soaked in degreaser and begin to actively sweep it over the nail, thus mixing the colors. Dry your fingers.
- Repeat steps 1 and 3.
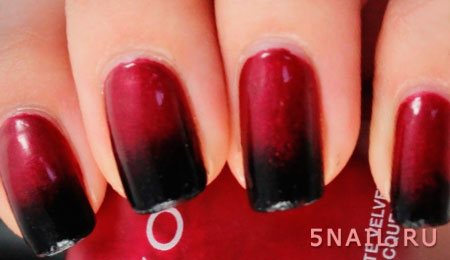
This is what a horizontal gradient made with gel polish looks like using a fan brush.
And this red manicure is suitable for sexy, ardent women.
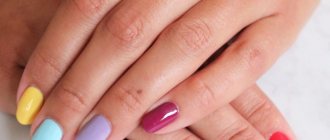
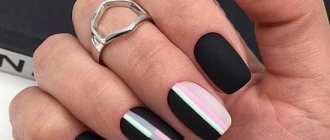
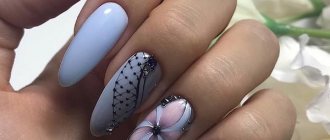
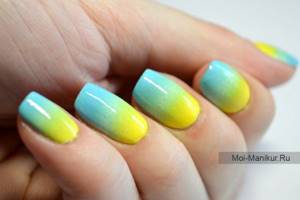
Ideas for two-color, three-color, multi-colored manicure
In the 2018-2019 season, the vertical gradient faded into the background, giving way to a horizontal design. The smoother the transition can be conveyed to the master, the more fashionable the manicure will be. But if a woman wants to replicate the idea of a diagonal color transition, then she should experiment and try different gradient directions.
Here are some ideas for using different colors:
- The idea is to use 2 varnishes: colored and white. The thumb is painted with a clean, bright color, the next - by mixing it on the palette with a few drops of a light shade. The remaining nails are painted with flowers, constantly diluting the previous mixture with white. For example, the thumb will have an orange polish, and the little finger will have a light peach polish.
- A similar principle of diluting the main color can be used when working with a gradient on each plate.
- Another option for a vertical transition is to apply several colors to each nail, not forgetting about a smooth transition. In this way you can apply 10 colors on 5 nails. It may look, for example, like this: apply burgundy and red onto a large one using a sponge so that one of them occupies 2/3 of the area. Next, place scarlet and pink, orange and lemon, delicate light green, mint, blue and lilac colors in an arbitrary ratio.
- The trends of the season allow for bold decisions when a horizontal gradient is used on each nail using shades from different ranges: sea wave and mint, and next to brick and pink or lilac-orange.
- A transition of 3 colors can be used on one nail, combining the main shades on the rest: the index finger is painted yellow, the middle finger is painted pink, the little finger is colored lilac. Then on the ring nail there is a gradient from the combination of this palette.
- The use of a related range of 4 tones on a medium-length plate looks beautiful. For example, the use of yellow, orange, scarlet and muted red. If you shade the colors, ensuring a smooth transition, then the nails have a beautiful play of color.
- The diagonal color transition does not have to be the same on all plates. The gradient can be combined with rhinestones on the border of shades, plain nails, and change the direction of the varnishes.
Manicure can say a lot about a woman, which is why so much attention is paid to this topic. Drawing nails with a color transition is not difficult, especially since there are many photos on the Internet with step-by-step actions. For an impeccable result, you need a little practice, but having mastered the basics, a woman opens up space for an unlimited number of image options for every day.
Author: Valentina Dyleyko
Article design: Mila Friedan
Techniques of a different kind
Fashionable ombre manicure can be mastered using other techniques.
For example:
- By stretching using glitter, when they are partially applied to a plain varnish coating. There may be significantly more of them at the end than on the rest of the surface. To do this, they usually use glitter varnish, directing it either from the tip to the center or from the cuticle. Small sparkles with an uneven border look more impressive;
- Take advantage of the thermal varnish, which will independently complete the desired gradient thanks to the thermal effect. Just before using it, you should carefully study all the intricacies of working with such material according to the instructions;
- Perform a manicure using acrylic paints and a fan-type brush, when after applying a light tone to the very tip of the nail, it is then distributed in decreasing order over the remaining surface. After this, another tone is superimposed next to it, which slightly overlaps the first one. This creates a uniform transition. Then apply exclusively the second color independently, covering the common part. The remaining flaws, if present, are refined using any of these two shades, which must be drawn over the entire nail. After all the procedures, you can make some kind of drawing or simply coat your work with varnish on top.
It is worth carefully studying the color selection in order to be able to choose the most organic combination of the color palette.