Girls who are used to attracting the attention of people around them will certainly enjoy decorative nail sculpting. Depending on the specific design, you can create a manicure in different moods - from casual and relaxed to strict or romantic.
Reborn like a phoenix from the ashes
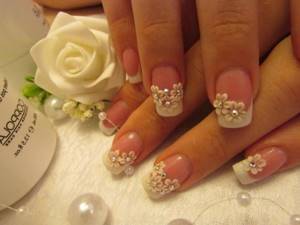
Richly decorated nails came into fashion several years ago, when masters actively increased the length and decorated it with voluminous flowers. Then the trend faded a bit. But only to now be reborn with new strength.
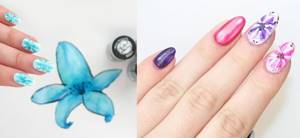
The trend for 2022 is maximum naturalness and realism. If these are buds, then they should really look like real ones. And fish or birds can create the feeling that they are about to evade.
There are a few more features:
- Increased practicality and resistance to everyday activities. Three-dimensional decor is not afraid of chips and cracks if it is made professionally.
- Wide choice of colors. Experienced craftsmen have a wide variety of acrylics, so a fashionista can realize any of her ideas.
- Apply over shellac for a neat look. Due to this, the duration of the session in the salon increases significantly.
- Suitable for medium or long nails. In short ones, the decor will be poorly visible; neither the girl herself nor those around her will be able to distinguish the beautiful details.
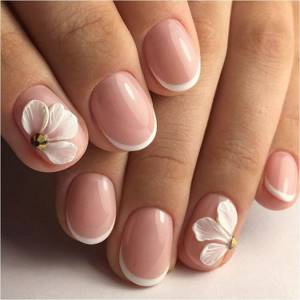
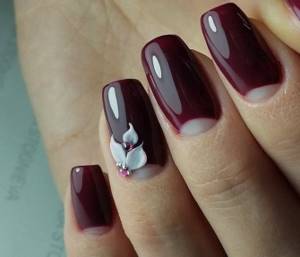
There is a stereotype that 3D modeling is only suitable for special occasions - a holiday or a wedding. Actually this is not true. For an everyday manicure, you can choose a more modest French manicure and decorate 1-2 fingers.
How to make such beauty yourself and is it possible?
It is very difficult for a non-professional to cope with the task, because even a simple 3D design requires time, skills and patience.
How to make long claws out of paper?
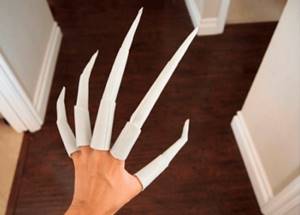
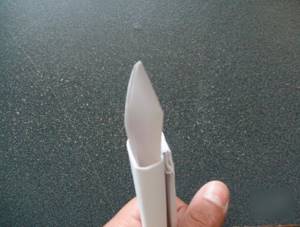
Such claws turn out to be thin and long. They are perfect for an animal image or creating a monster costume, Baba Yaga.
Required details
To create claws you need to prepare:
- paper, it should be large so that you get really long claws;
- scissors;
- a simple pencil for drawing.
Stages of working on claws
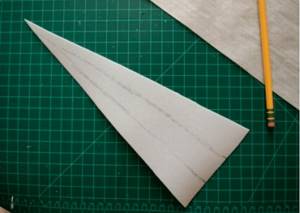
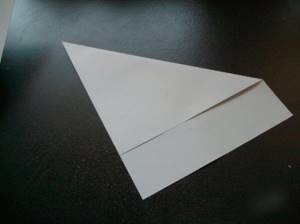
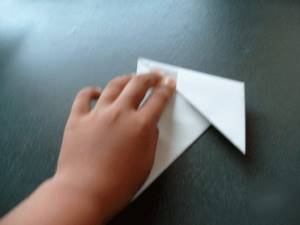
A sharp triangle is drawn on the sheet, as in the photo. Afterwards, it should be cut out. When calculating the base of the workpiece, focus on the diameter of the finger for which you are making the claw.
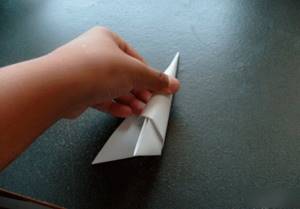
Roll the workpiece into a cone and seal the edge. This is done carefully so that the final result is more naturalistic.
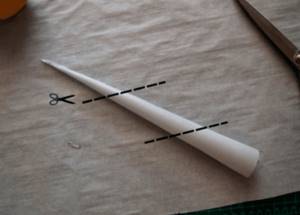
When the glue dries, you need to divide the claw into three parts in order to bend it. Use glue to assemble these parts.
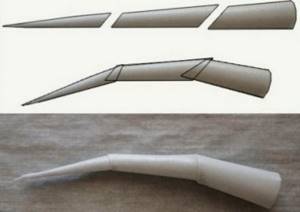
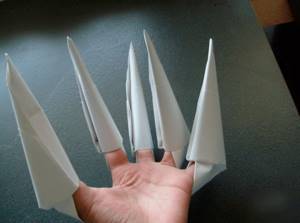
Do this with all the claws. The result is such a terrifying paw.
Video tutorial on how to make claws from stickers
Two sides of the coin
Like any other technique, volumetric decor has its advantages and disadvantages. The main thing that girls all over the world love him for is his spectacular appearance and attractive design. There are a lot of options for what exactly you can do on your nails.
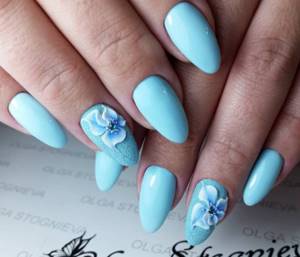
In addition, modern manufacturers produce varnishes in different colors. Among the popular ideas are those that are suitable for everyday wear. They are easy to combine with dresses, trouser suits, and skirts.
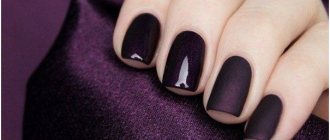
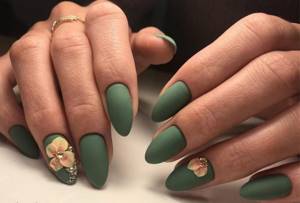
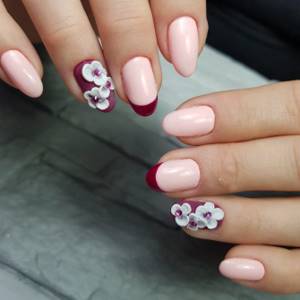
A gentle option for every day
The second important advantage is resistance to mechanical damage. The coating is not susceptible to cleaning or washing, because the molding is usually coated with a transparent polymer.
However, there are also disadvantages:
- One manicure session takes a lot of time. It takes from 2 to 4 hours to create a unique nail art, depending on the qualifications and experience of the artist. And for self-taught beginners it will take even longer.
- Uncomfortable to wear. Bulk parts cling to clothes and get in the way when doing household work.
- Weighting of nails. The manicure both looks and feels thicker and more massive compared to classic nail art;
- Risk of allergies. Some materials can damage the nail plate.
Another drawback is the high price. For one session in a beauty salon you can pay twice as much as for a regular plain coating with a design.
We recommend watching the video:
Fashionable ideas for nail extensions using tips
Liquid tips
Liquid tips are reusable plastic forms that are used to create the base of an artificial nail. Liquid tips are used for nail extension in both acrylic and gel technologies . Their shelf life is up to two years. Liquid tips are often used to create an arched jacket for the smiley line, and you can also lay out an aquarium design. Liquid tips can also be used on problem nails.
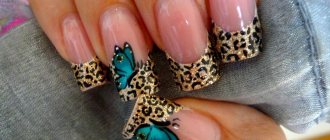
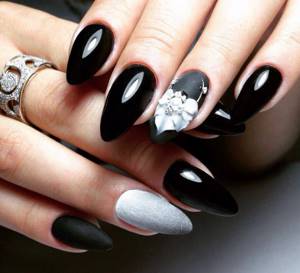
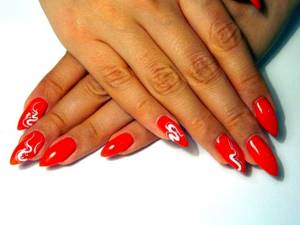
Sharp tips
This shape of the tips visually lengthens your fingers and makes them especially sophisticated . Pointed nails are associated with passion, maybe even a little aggressiveness and courage of the person wearing such nails. However, nail extensions with sharp tips are absolutely not suitable for owners of thin and long fingers - the result will look stupid and ridiculous.
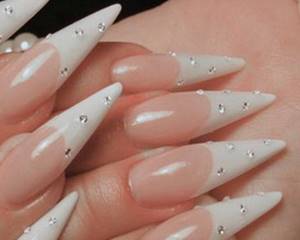
There is one more nuance, the low strength of the pointed edges of the nails, so that with an awkward and careless movement, a crack instantly appears , which is practically impossible to correct.
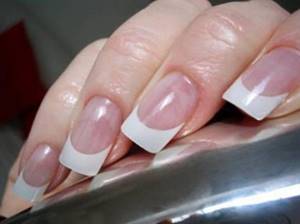
Square tips
Extension of square tips looks very natural and harmonious , making the shape of the nails more sophisticated. The special popularity of square-shaped nails became established after masters released the “French manicure” style into the world. However, it is worth remembering that owners of short and chubby fingers are not recommended to use such extensions - the appearance will be inappropriate and prim. The square shape of the tips is practical and versatile, and also does not require any restrictions during use.
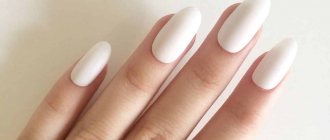
Oval tips
The oval nail shape is the most popular and is considered a traditional and classic shape. If you follow all the rules when applying extensions, the free edge of the nails mirrors the contour of the cuticle, which allows you to create an ideal balance between them, which suits almost all ladies.
This type of extension is especially recommended for owners of short and chubby fingers. It is worth drawing your attention to the fact that people with long and thin fingers should not use square tips - they will visually lengthen the nail and finger, which will seem very ugly to observers.
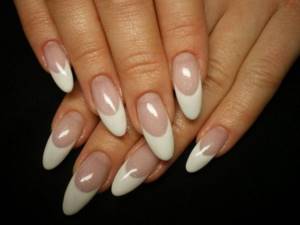
Almond tips
The almond shape will give your fingers extra elegance and grace. This form always looks very natural and natural , because it most accurately follows the natural contours of the shape of a natural nail. Acrylic extensions on almond tips look natural and are considered more durable, and the nails will retain their freshness and last up to four weeks.
Understanding the ingredients
Typically, craftsmen in beauty salons use several materials to create sculpting:
- 3D gels that have a dense texture. Thanks to this consistency, it is easy for the master to form the desired element. The best part is that it is easy to work with even for a beginner - you can make all the simple shapes. However, for a complex ornament you will have to choose something else. After finishing the session in the salon, this material must be covered with a top coat.
- 4D components allow you to experiment for a long time and bring the decor to perfection. In liquid form, the paste has a very plastic texture and resembles jelly. The composition is shiny, but after hardening the surface becomes matte. The peculiarity of this material is its drying technology - a special lamp with ultraviolet radiation is required. Although drying takes a little longer, it does not require a topcoat.
- Sculpting gel is suitable for creating small accent elements. Does not require topcoat.
- Acrylic powder, which is then mixed with a special liquid. Together they form pliable plasticine, which is not applied to the nail, but is manually shaped into the desired element.
It is best to check with the specialist before the session in the beauty salon which component will be used. After all, there is always a risk of intoxication or allergies.
Features of the gel
Gel modeling is rapidly gaining popularity. However, the main mistake that a beginning self-taught craftswoman makes is trying to sculpt something using ordinary varnish. For such purposes, a special, thicker composition is required.
Experts distinguish two types of this material:
- 3D gel, very plastic and pliable.
- 4D gel, more difficult to use.
The composition remains the most accessible. It is allowed for all girls, regardless of the condition of the body. Even pregnant women can use it to create ornaments - it is so safe.
Many girls cannot decide what to buy first - gel or acrylic. You should know that creating decor from the first component will take much more time, because each layer will have to be dried in a UV lamp.
In addition, the material is difficult to remove. First, it will take a long time to cut down the stucco molding, then remove the dust resulting from the cut. And only then will it be possible to remove the plain shellac coating using the usual method.
This is what experienced fashionistas recommend: since the process of working with gel is long and complicated, it is better to entrust the first procedures to an experienced master.
It is worth observing his actions, remembering the algorithm of actions and only after a couple of procedures begin to master sculpting on your own.
Timeless classic
Acrylic has recently enjoyed wild popularity, because with the help of this composition you can realize any ideas. There is transparent, translucent, single-color powder - in a variety of shades. To create beautiful ornaments, the master combines powder and liquid - a transparent monomer liquid that makes the powder harder.
It is customary to divide all acrylic into two groups:
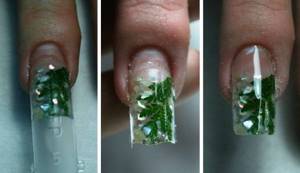
- Aquarium modeling. First, the master creates the details of the pattern, places them on the nail, and then covers the plate with a transparent fixing topcoat. As a result, the drawing turns out flat, as if hidden under transparent glass (the name comes from this analogy). The advantage of the method is obvious - the flat design looks impressive, but does not cause discomfort during everyday wear.
- Volumetric modeling involves a clearer outline of the pattern as a whole and all the details separately. Volume is achieved due to the absence of a thick layer of transparent finish. Manicure is not entirely convenient in everyday life, but it looks very beautiful and attractive.
The composition is indicated for those girls who complain of brittle nails. Acrylic has a good effect on the surface of the plate, strengthens it, gives it a healthy look and shine. However, this same material should absolutely not be used by those who have any fungal disease: the composition will create a greenhouse effect, and the disease will develop even faster.
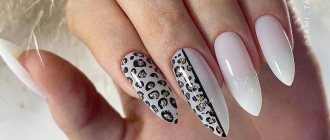
Choosing the shade and shape of the pattern
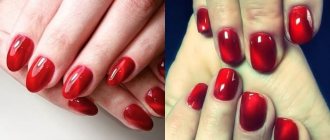
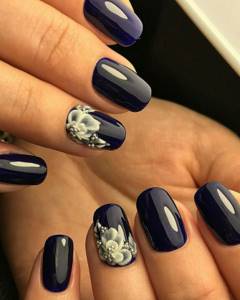
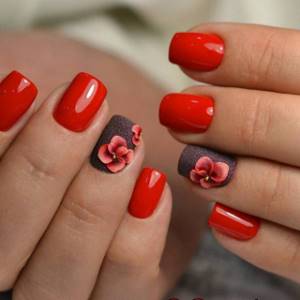
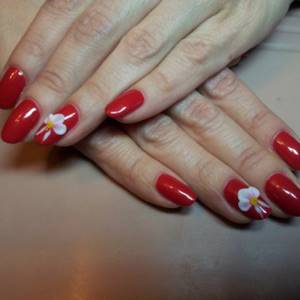
The most popular designs are on the nails of the ring fingers. Luxurious roses can be additionally decorated with rhinestones or three-dimensional modeling. Often, bright red or crimson color is used for contrast. The dark pink shade can be combined with a soft pink base. We draw white roses in a graphic style on a background of bright red varnish. The design should be thought through before applying the base color. You can make the flowers as natural as possible or transfer graphics to the surface that look more like a stencil.
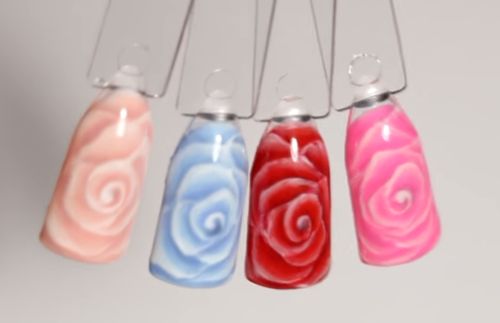
Roses on nails in different shades
When choosing the volume of a design, it is important to consider the shape of the nail. Long square-shaped nails can be decorated with a neat rose on a stem with green petals. Short nails will look better if a lush open rose is painted on them. There are practically no limits to the artist's imagination. You can safely experiment based on the properties of gel polish. It is worth considering that the spreadability of the coating will not allow you to draw a clear outline. It is better to leave a gentle, barely noticeable edging.
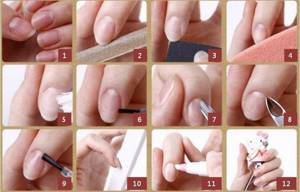
Preparatory stage
Some fashionistas still decide to bring beauty at home. Therefore, it is important to know what tools you will need.
It's best to have:
- Two types of materials - acrylic and gel. Firstly, you can choose from them the one that is more convenient to work with. Secondly, two compositions of different textures will allow you to create more diverse elements.
- Regular varnish, which will be used as a basis for further decoration. It will require the appropriate products - a base coat and a top finish.
- Additional accessories that will complete the look - rhinestones, beads, shimmering powder, beads.
Don't forget about the tools. You will have to stock up on degreaser, nail polish remover (in case some part turns out wrong the first time), tampons, foil, brushes and dots. A lamp is useful for drying.
If you are about to have your first experience working with volume, most likely, all the necessary tools will not be available. Fortunately, some can be replaced with improvised means. For example, dots: a ballpoint pen or a hairpin with a round end will do instead.
How to make nails out of paper? Origami technique
You can make nails out of paper using the origami technique, which teaches you how to fold sheets into intricate shapes. Those who are familiar with this technique will complete the task of how to make a paper “accessory” without any problems, and for those who have not yet had the opportunity to work with the origami technique, we offer a detailed master class on how to make nails out of paper.
What do you need for work?
Paper is the main material with which you will have to work. It can be anything, from notebook sheets to office A4 format. Since we have 10 fingers, we should stock up on that many sheets. The denser the material used, the harder the final result will be and will not bend.
Step-by-step instructions for performing the work
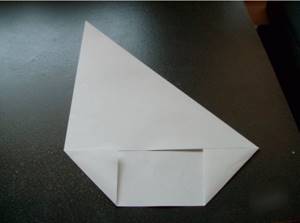
First, one nail is made, for this we take a sheet, in our case we use the office version of A4 format. You need to fold it at an angle to make a square sheet.
At the bottom, fold the edges into small corners, as shown in the photo.
Connect the upper part of the double triangle and the lower part, making a bend in the middle.
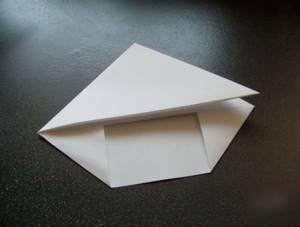
Fold the bottom with two small wrapped triangles with the top of the work. The folded edges should face inward, as in the photo.
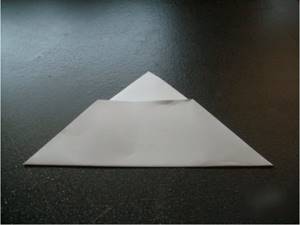
Turn the work over and you get something like this.
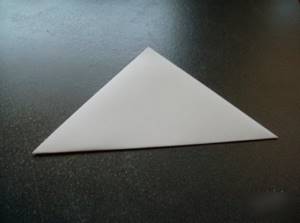
Fold the workpiece in half, bend it well so that a fold is formed in the center, since it is very important, it should divide the triangle evenly into two identical parts. Fold one side half in half, the edge should lie on the resulting fold, as in the photo.
It should look like a twist.
Wrap the already folded part with the free edge.
The protruding part must be tucked inside the product, this must be done carefully, since your finger will be in this cavity.
Make all other paper marigolds identical to the first one.
Video instructions for doing the job
Step-by-step master class
Armed with all the necessary tools, you can start creating nail art. If your nails are extended, the situation is simpler: you can immediately start creating a masterpiece. If your fingers are “naked”, you will have to pre-treat them - do a regular manicure with cuticle trimming, apply a transparent base and a plain varnish.
After the final stage - the finishing coat - it is necessary to remove the top sticky layer. Then you can start applying the 3D composition or acrylic.
Step by step procedure:
- Dosom collects a small (bead-sized) amount of material and rolls it into a ball.
- The bead is placed on the nail in the place where it should be located.
- The center is pressed with a tool so that the drop does not slide out of the desired place.
- The bead is dried well under an ultraviolet lamp.
- All elements of the drawing are executed using this algorithm.
- The result is decorated with shadows and small additions.
When the marigolds are completely ready, you can dry them under ultraviolet light.
If you are working with acrylic, the procedure is slightly different.
After preparing the surface, special glue is applied to the desired location. Then the tool takes a little acrylic, rolls the element into the desired shape and places it on the glue. When all the nail art is ready, all that remains is to apply the fixer.
When sculpting, it is important to monitor the speed of creating the decor. Applying too quickly can lead to sloppiness. By working slowly, you may not have time to dry the material and ruin the entire drawing.
Design options:
Video for you:
Preparing nails for extensions
- Use nail polish remover to remove old manicure from nails.
- Wash your hands thoroughly or gel and rinse off the foam with tap water.
- We dip our fingers into a bath of hot water - this will allow us to painlessly remove cuticles and hangnails.
- After six to ten minutes, remove your hands from the water and dry them with a towel.
- Using nail scissors with rounded ends, carefully remove cuticles and hangnails. If you feel that your cuticles have hardened again , dip your fingers in warm water for a short time.
- After treating your fingers, rub a few drops of essential oil into the areas where you cleaned. In addition, I advise you to additionally use a moisturizer, which will make your hands soft and give them a pleasant smell.
- Finally, use a nail file to trim your nails and give them the desired shape.
Secrets from the pros
What newbie would not like to get advice from a professional with extensive experience?
Experienced masters shared several recommendations and lessons for beginners who are still learning the basics of manicure.

Here's what they advise:
- Even before starting work, choose the appropriate shape and length of the nail plates. If this is your first experience with volumetric decor, you can first draw a sketch on paper - how and where exactly the details will be located.
- At first, it is preferable to do nail art with gel, since it is easier to use, although it takes more time. You can then add individual elements from the innovative 4D component.
- Each element must be dried and polymerized separately. Especially if the composition consists of several colors. If you first apply all the shades and only then put the nail under the lamp, the shades will mix with each other and the pattern will deteriorate.
- Do not sculpt near the edge or cuticle. The more free space around the stucco, the stronger and more durable it is.
A very obvious rule, which for some reason many girls forget about, is to keep the tools and work surface clean.
For example, touching the brush with your fingers is strictly prohibited. If the bristles of the brush become greasy, the process will need to be stopped.
Tools
Modeling is done using a special substance. In order to complete volumetric elements you will need one thing:
- 3D gel plasticine;
- acrylic;
- acrygel;
And available tools:
- brush for acrylic modeling;
- petal brush for design;
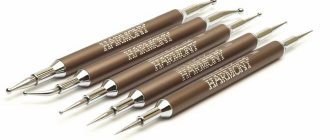
- dots;
- monomer;
- cup for monomer.
What is watercolor painting in manicure, what does it look like?
Watercolor painting represents images of various subjects with a blur effect. Translucent strokes give the design a feeling of lightness, and multi-layering adds volume and dynamics. There are several techniques for creating watercolors, which differ in the properties of the materials used.
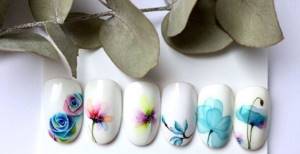
Visually, painted designs may differ, so each master can find and master a convenient way to create drawings.
“Wet on wet” manicure: how to work correctly with watercolor gel polishes?
The effect created by watercolor gel polishes is based on the interaction of an ideally selected chemical formula, percentage of pigment content and consistency. Therefore, it is preferable to choose materials from a series of one manufacturer. The most common mistake beginners make is typing material. It takes time to distribute the pigment over the base layer. The surface of the nail has an arched curve.
Excess material can drain under its own weight, forming streaks in the lateral sinuses and under the cuticle. This reduces the wear life of the material, causing the coating to peel off. The base color must be applied to the entire surface, avoiding bald spots. The layer should be very thin without leveling. For effective spreading of colored gel polish, there should be enough material on the brush.
Tools and materials needed to complete the design:
- 2 types of watercolor gel polish;
- thin brush or dots;
- lint-free wipes, dispersion remover;
- gel paint for drawing details and a hair brush.