Beautiful and well-groomed hands show how well we take care of ourselves. A beautiful and correct manicure attracts the attention of almost everyone.
But what to do if there are no additional funds to do nail design in a beauty salon?
Excellent and original nail decor can be done at home. Of course, you will have to practice for some time, but the result, and most importantly, the savings, is worth the effort and time spent.
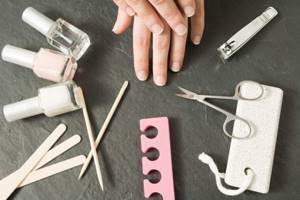
But before you start designing, you need to purchase special tools - nail art brushes, dotters and nail art tapes.
1

2
3
In this article we will show you the simplest and most beautiful manicure ideas that any girl and woman can do at home.
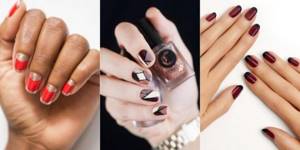
Design "Droplets"
For this manicure you will need three colors of polish and a tube.
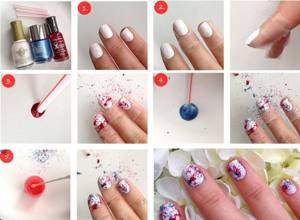
First we cover the nails with one color. Then leave a drop of varnish on the paper and dip the tube into it. Point the end of the tube with varnish onto the nail and blow out the varnish.
Make sure in advance that the working surface is covered with paper and oilcloth.
Excess nail polish on your hands can be easily removed with regular nail polish remover.
Benefits of home manicure
The advantages of doing a manicure at home include:
- Significant cost savings.
- Kits for any type of manicure and any design can be purchased at cosmetics and nail art stores.
- More thorough and constant hygienic control of the skin of the hands.
- At home, you can perform self-massage of the hands, which helps to increase blood circulation, innervation, trophism and tissue regeneration.
- You can learn the basics of nail art yourself using video courses for beginner nail artists. Such video lessons cover the details of manicure, the nuances of manicure with gel polish and shellac, foil and rhinestones.
You can perform a manicure at home manually or using specialized devices.
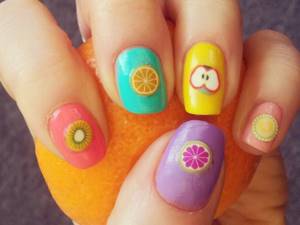
Nail design with stickers
In professional stores you can find a lot of stickers that will make the most ordinary manicure original and beautiful. And the main thing is that such a manicure takes very little time.
Whatever design you choose, remember that you need to buy high-quality varnishes that will not crumble after washing the dishes. The nail remover should be without acetone and contain a vitamin complex. A cheap product simply dries out the nail plate, which will begin to peel over time. And try to get a new manicure no more than twice a week, and also give your nails a break from polish for a few days.
Author: Alena Puzanova.
Trim manicure at home
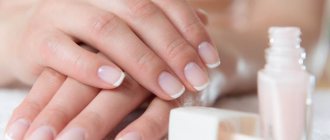
There are two main options for performing a manicure - edged and atraumatic, depending on the method of processing the cuticles. How to do a trim manicure at home:
- Fill the prepared container with hot water. Add a few drops of essential oil to the water. Place a towel next to the container and prepare all the necessary tools.
- Dip your hand into the solution. Stand for a few minutes, waiting for the muscles of the hands to completely relax.
- Remove your little finger from the water. Dry the surface of the skin with blotting movements.
- Using a trimmer, the cuticle is pushed back to the root of the nail plate.
- The cuticle is carefully cut, taking care not to damage the skin and side ridges. Careless work can lead to injury and secondary infection of the skin of the hands.
Be sure to clean areas of rough skin on your fingers. According to the indicated scheme, all fingers of both hands should be treated. After a trimmed manicure, the free edge of the nail is given the desired shape using nail files.
Before applying gel polish and shellac, be sure to polish the surface of the nail plate and degrease it with an alcohol solution. If you do not plan to apply a decorative coating, you can take a therapeutic bath with a vitamin cocktail, moisturize your hands with cream, or perform a paraffin mask.
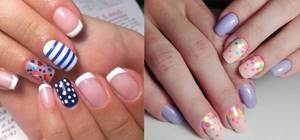
Option 2. Blue and white stripes
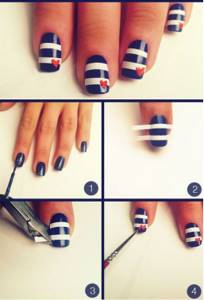
Cover your nails with dark blue polish and wait until dry. Glue 2 wide white stripes on some or all of the nails, pinch off the excess ends. Using a thin brush, draw a small heart on the tip of your fingers. Don't forget to seal with clear varnish. A simple summer version is ready!
See how easy it is to do a water manicure at home: video and step-by-step instructions
How to choose a suitable eyeliner and how to apply eyeliner, read our article
Don't know how to get rid of annoying blackheads on your nose? Many masks at: https://being-woman.ru/uhod/uhod-za-litsom/kak-izbavitsya-ot-chernyh-tochek-v-domashnih-usloviyah-narodnye-maski.html
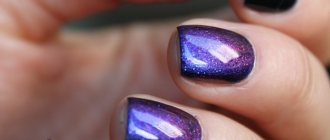
Stained glass gel
Stained glass gel polish
Nail extensions, as in the photo, will not surprise anyone nowadays. Any, even the most brittle and dull nails, can be turned into perfectly shiny and durable ones. Stained glass gels are replacing ordinary gels. They create an interesting design, imitating multi-colored glass. This gel can be of completely different shades, but always remains transparent. Due to this, the nails do not look massive.
It is self-leveling. If applied correctly after the gel has hardened, the nails do not need to be filed or sanded. Usually several layers are applied. With their help, additional strength appears and it seems that the design is “inside” the nail.
But even the most unusual manicure, as in the photo, should not be overloaded with various decorative elements. It should be airy. But there are also disadvantages to this design. Stained glass must be adjusted frequently. It is very difficult to draw old edges. And with each adjustment, the appearance of the nail becomes worse. It's easier to make a new extension. You can make an aquarium design based on stained glass gel. For such a manicure, the texture of the gel should be thick.
Types of nail stickers
Stickers vary in design and application method. Some are complete images, while others can be cut out into individual pieces.
Water
These stickers need to be dipped in water and then applied to the nail. The principle is the same as the transfer tattoos that everyone glued in childhood.
3D stickers
These are voluminous stickers made of silicate gel, thanks to which they become soft and flexible. Available in the form of small flowers, stars and other figures.
Adhesive based
The stickers are very easy to use: you just need to apply them to your nails, removing the protective film. This manicure takes minimal time, but it allows you to create a unique design on your nails.
Minx Stickers
Ultra-modern nail decor, which gained popularity among show business stars and beauty bloggers, and then migrated to the nails of fashionistas. This is a very thin coating that replaces varnish. It is evenly distributed over the entire nail plate, does not injure it and lasts about 2 weeks.
Fimo
These stickers are made in the form of polymer clay sticks, the cut of which creates a pattern. Usually these are fruits, butterflies or flowers. The elements are cut using a blade.
Manicure with kamifubuki: how to attach them to polish, gel polish, gel.
Creative decorative elements make nails bright, unusual, and memorable.
Therefore, it is not surprising that kamifubuki is most often used in manicures with gel polish and gel. Let's look at how such a nail-look is created. Standard preparation for applying the image: prepare the nail plate for coating (push back the cuticle, remove the gloss from the nails with a buff, give the nails the desired shape.
- Apply the base and cure it in a lamp.
- Cover your nails with colored gel polish in two or more layers, dry each in a lamp.
- Apply the top and, without polymerizing it, create the desired pattern by drowning the kamifubuki in the finish layer (with a toothpick dipped in water, tweezers, dots or a wax pencil). Dry the finished design.
- Apply another layer of topcoat and cure it in a lamp.
The technology is very similar when creating a manicure with kamifubuki on regular varnish. Once you've created the look you want, use two coats of sealer to ensure longevity. In lacquer form, kamifubuki are less durable, as are other voluminous design elements. You can enjoy the beauty of your fingers a little longer if for a manicure with classic polish you use a gel topcoat rather than a regular one.
Experienced manicurists point out such nuances for maximum durability of sequins in a design, such as:
- Kamifubuki can be attached to the last layer of gel polish (on the sticky layer), and only then secured with a top coat. This will make the design less layered and lighter. In addition, it will be more convenient for you to adjust the design by moving the confetti along the nail or removing unnecessary elements that tend to catch on each other, which can only be noticed on the nail. The disadvantage of this method is that the sticky layer of gel polish may not be “tenacious” enough, and the kamifubuki pattern may smudge when applying the top.
- For greater tenacity, it is better to place the confetti not on the bends of the nail plate, or in advance slightly bend the sequins under the arch of your nail.
- Sequins last best and longest in a manicure that is created with the nail plate leveled. It is in this case that the final layer of top will really fix the kamifubuki tightly.
Well, now all the secrets are revealed, it’s time to dive into the exciting creative process with your new Japanese jewelry. And we will definitely tell you many more interesting things about the textured framing of nails with the latest trendy decor.
You can buy a wide variety of colors of kamifubuks using the link.
Option 1. White with stripes
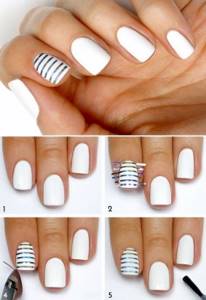
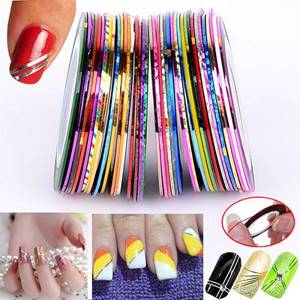
Paint your nails with white polish. Wait for it to dry completely and stick thin silver metallic manicure strips (nail tapes) to your nail (or several nails). Such strips can be bought in a store or ordered online; they cost about 50 rubles per roll of one color. Use nail clippers to cut off any excess strips. Don't forget to coat your nails with clear polish or sealer. It turned out to be a great everyday manicure!
Option 8. Bow
Cover your nails with turquoise polish and let it dry. Paint the tip diagonally with white varnish, try to make a curved line, as in the picture. When the varnish is dry, paint a bow in black along the line where the flowers join. This elegant manicure can be done for a celebration or just worn to work by drawing bows on only some of the nails.
How to attract love, money or success with nails? Find out everything about Feng Shui manicure - which fingers to paint and how to choose colors
Curly hair can be easily straightened by keratinizing the hair. Read the article for details
Unusual French manicure
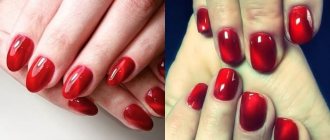
Tired of the classics? Then it's time to start experimenting with the already familiar French manicure. To add variety to this type of manicure, you can make it unique by adding color. For example, draw a bright flower on a white line. For those who do not know how to apply designs on their nails, there is a slightly simpler option - buy special stickers or stencils.
For lovers of everything bright, stylists recommend doing a French manicure using not the usual white polish, but, for example, red. You can also combine a whole palette of colors on each nail.
Don’t despair if you don’t have the time or opportunity to visit a beauty salon to get your nails in order. To create an unusual manicure, you just need to use your imagination and find some free time. Stay beautiful no matter what!
Lunar manicure
This type of manicure is quite popular, but there are so many variations that you can experiment on your own and create an original manicure yourself, using the polishes that you have in your cosmetic bag.
Although the process of creating a moon manicure is much more difficult than a French manicure, the result is worth it.
The procedure for creating a manicure begins with preparing the nails. Then you need to apply stencils and carefully apply layers of varnish. Only after the polish has completely dried can you remove the stickers and carefully apply contrasting polish to your nails using a brush. To fix the result, you need to apply a clear varnish.
Characteristics of manicure with stickers
Using stickers is the best solution for those who want to quickly and accurately create a beautiful design on their nails . With the help of stickers you can create an image for any age and occasion, make a laconic design or realize a funny idea.
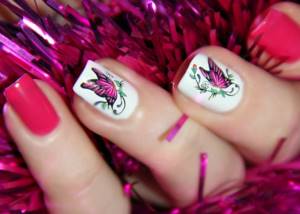
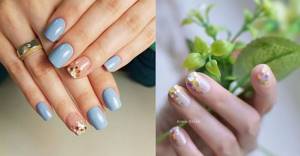
Flower stickers are the most popular
The most common patterns are floral. Decorated in pastel colors, they are ideal for creating a romantic look.
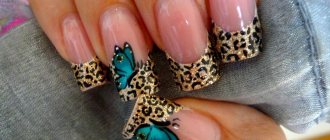
The bride's manicure will be complemented by decorations in the form of stickers with doves, hearts or angels. On the nails of adult ladies, 3D images of flowers covering the entire plate, or leopard and snake prints look good.
In winter, stickers with images of snowflakes are popular. And for summer, combinations of images of flowers, butterflies, ladybugs or fruits are great. Interspersed with gold and silver decor in the stickers will make the manicure luxurious, worthy of an evening out.
To keep your manicure stylish, it is important to choose stickers that match the color of your outfit. If the prints are bright, for a casual look it is better to decorate 1-2 fingers on each hand with them.
Atraumatic manicure at home
The second technique also has a lot of fans. For this type of manicure you will need a special solution with low acidity - remover. Manicure without cutting the cuticle for beginners:
- Wash your hands thoroughly with soap and dry with a soft towel. Before starting the procedure, you should apply an antiseptic solution to the skin of your hands to prevent the risk of tissue infection.
- Apply a soft tissue softening solution to the cuticle area of each finger. The solution can be applied with a brush or using a special dispenser.
- Depending on the composition of the solution, the exposure time is maintained.
- Using an orange stick, the cuticle is moved to the root of the nail, after which it is completely removed.
This manicure technique is used quite often and has its followers. This approach does not require the use of medicinal baths, but one should remember the danger of soft tissue burns from the remover (especially with an acidic composition).
After finishing the manicure, the master can take a bath with essential oils or a vitamin cocktail to ensure proper care for the skin of your hands. It would also be a good idea to use products to strengthen the nail plate, stimulating the nail growth area.
Matte manicure
Although special varnishes have long been available to create a matte manicure, due to the high price they are not available to everyone. But few people know that any glossy varnish can become matte in just a few seconds.
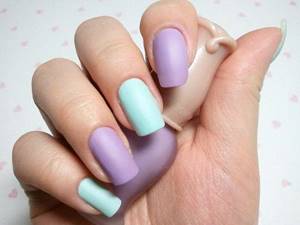
To do this, you need to apply the first ball of varnish and let it dry. After applying the second ball, each nail must be held over the steam of a preheated kettle for several seconds. It is advisable to wait until the varnish is completely dry. This little secret will help you save money, but at the same time get a matte manicure no worse than in a professional salon.
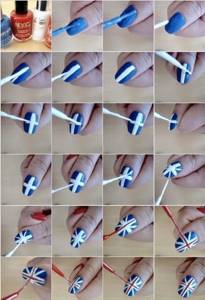
Option 3. Flag of the United Kingdom
There are a lot of fans of this manicure, but not everyone can do it with their own hands. For this design you will need 3 varnishes: red, white and blue, as well as brushes of different thicknesses. Apply 1-2 layers of blue varnish and let it dry. Using a brush, draw a cross on the nail with white polish, and 4 diagonal lines from the center with a thinner brush. Using the thinnest brush, paint a cross with red varnish inside the white cross. Seal with clear varnish. The flag is ready!