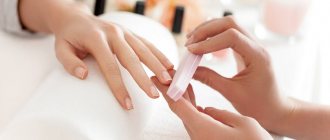
Preparatory stage
To do even the simplest manicure, you need to prepare your nails for painting:
- Using nail polish remover, you should remove the previous layer of the product.
- Then wash your hands and dry them thoroughly.
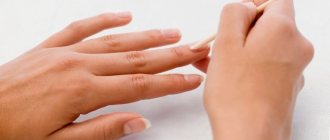
- Remove the cuticle softened with oil or a special product using a special tool or push it aside.
Manicure before and after cuticle removal - Apply a degreaser for better adhesion of the polish to the nail.
Tip for beginners: apply a base first. This step is optional, but it helps to level the plate and prevent it from yellowing and preventing paint pigment from penetrating into it. Also, in order for the polish to always lie flat on the plate, it is necessary to moisten it regularly using wax, oils and special moisturizing nail pencils.
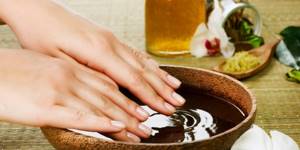
Oil mixtures can be used several times
- 1 tbsp. Dissolve gelatin in 2 glasses of hot water. Cool to room temperature.
- 50 gr. any vegetable oil, 1 tbsp. l. honey, 1 tbsp. glycerin, water. Heat in a water bath, add 1 tbsp. l. white clay.
- Mix equal parts apple cider vinegar and vegetable oil.
- Decoction of elm leaves. 1 tbsp. l. leaves per glass of water.
- Chamomile, oak bark, flax seed, all in equal parts. Brew: 1 tbsp. for 400 ml. water.
- Calendula, mint, oak bark, nettle, chamomile - in equal parts. Brew: 1 tbsp. for 400 ml. water.
- Pour milk (kefir, fermented baked milk) into a small container, add a few drops of iodine, dip your fingertips.
- 1 teaspoon of seaweed per 100 ml of boiling water, leave in a thermos for 1 hour, strain.
Baths are usually done for 20 - 30 minutes, then rinse your hands with cool water and smear with nourishing hand cream.
Step-by-step instruction
Before you begin the process of applying varnish, you should consider that the girl has 40 minutes of free time, eliminate or minimize distractions, and also think through the design. In addition, you need to check the shape of the brush; it should not be narrow and dense. Instructions for creating the perfect manicure:
- Apply wax or oil to the periungual area without touching the plate. This will help you subsequently easily remove excess material from the cuticle and rollers.
- It is recommended to apply a coat of base to facilitate subsequent application of colored varnish.
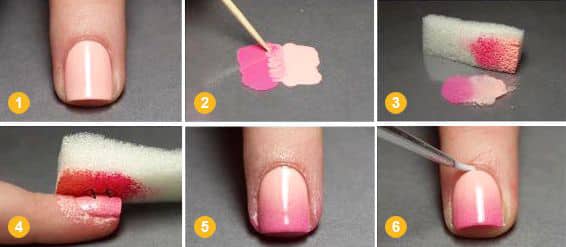
- Take a brush of colored varnish and wipe it on the edge of the bottle so that very little varnish remains on it, literally on the tip. This way it won't bleed onto the skin.
- We paint our nails with regular polish, starting with the little finger. You should place a drop in the center of the plate, then carefully “adjust” the varnish with a brush to the base.
- Then, with slow movements, holding the brush confidently, you need to apply the varnish to the side surfaces of the plate. Thus, the varnish does not flow onto the cuticle.
- You need to complete the manipulations with the brush by sealing the end of the nail. Thanks to this, the varnish will last longer.
- Apply another coat of varnish to deepen the color.
- When performing movements, the elbow should rest on the table and the hand on which we are applying the varnish should also lie on the table; you should not apply the varnish while holding your hand suspended.
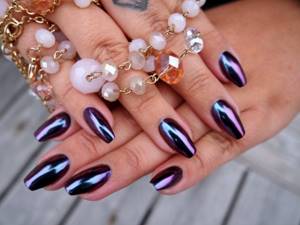
- Apply a quick-drying top coat. This item is optional, but it will extend the wear time of the coating and make the manicure perfectly glossy.
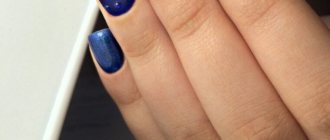
On the left is a top coat applied to the nail, on the right is a nail without a top coat.Ready-made manicure with regular polish
Conclusion
Compliance with all the described application rules and careful handling of manicure with the exception of aggressive physical influence will prolong the beauty of your nails for at least 5–7 days. If even this period does not seem enough to you, then you should turn your attention to long-term coatings - vinyllux and shellac.
Interested in learning more about this topic? Be sure to watch the video in this article for a clear step-by-step guide. If you want to share your personal experience or - I look forward to your comments!
Did you like the article? Subscribe to our Yandex.Zen channel
Text \ Photo Victoria BOLSHOVA Posted 03/26/2018
0
share:
To favorites
To print
If you want to thank, add clarification or objection to the author - add a comment!
Currently being discussed:
- Lyubov Burkina
20.08.2018
What hair color should I choose? Please give me some advice. I don't know which one I have...
- I
19.08.2018
I had eyelash extensions for 6 months and took a break. After 3 months I increased it again...
- Vasilisa
18.08.2018
Cool hairstyle
18.08.2018
Hi, can I dye my bleached hair (currently red) bright purple...
16.08.2018
Hello! I am a dark girl with black eyes. I want to dye my hair dark...
15.08.2018
The photo shows young beauties. Can older ladies have their eyebrows done? Age...
Comments »
What to do if varnish gets on the cuticle
It often happens that varnish gets on the cuticle and ruins the entire manicure, but don’t be upset, now we will show you how to fix such a manicure.
To do this we need a lint-free cloth, a flat brush and nail polish remover or acetone.
We wet the brush in nail polish remover and move it over the area where the nail polish needs to be removed. We wiped off the polish, wiped the brush on a napkin, soaked the brush in nail polish remover, repeated, and so on until it was clean.
Removing nail polish on the cuticle
Result of work: before the varnish flows and after
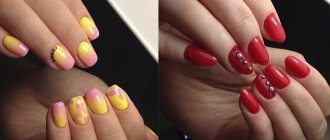
Nail art with glitter
You can create a beautiful holiday manicure using regular glitter polish. In this case, glitters or shines can be found either in the tube of varnish or sold separately. After applying the base color, without letting the polish dry, sprinkle the nail with glitter. Choose the quantity, shape and color at your discretion.
https://youtu.be/wAaB4CelyuU
As you can see, a manicure at home made with regular varnish is quite simple. And for those who are short of ideas, we have prepared an excellent photo selection that will definitely help you decorate your nails with an interesting print. The main thing is not to be afraid to experiment, because it is practically impossible to get a bad result here.
Which manicure do you like best?
Tips to help you paint your nails perfectly
The following tips on how to paint your nails correctly and beautifully will help you achieve a flawless manicure:
- Before you start applying colored varnish, you can practice using transparent varnish. Daily coating of the plates with treatment bases will help you get used to proper brush work.
- To ensure a dense and beautiful coating, the varnish should be applied in two layers.
- If the coating is damaged during drying, you can smooth it out with a damp fingertip. It is necessary to smooth the coating carefully in a circular motion.
- It is better to apply “loose” varnish on a layer of white. Thanks to this, the coating will be more saturated.
- To ensure a perfectly even coating, the varnish should be applied to the base.
- To make a hole on the plate, you can use strips cut from regular tape.
- If you only have clear varnish left at home, you can make it colored by adding blush particles and two beads that will help the materials mix.
- PVA glue will help prevent the area around the plate from getting varnished; it should first be applied with a cotton swab to the rollers and skin at the base of the nail, without touching the plate itself. When the glue dries and the nails are already painted, the film must be removed.
- If the product does not dry for a long time, you can resort to using ice water and dipping your hands in it; the coating will dry much faster.
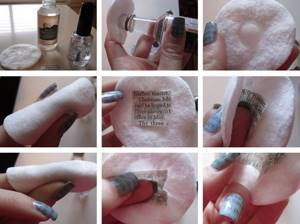
- To remove the polish from one nail and not ruin the manicure on other nails, take a cotton pad soaked in acetone, you can use the following life hack: you need to place the sponge in a glass jar, pour acetone into it and immerse one finger in it. Thus, the manicure on other nails will remain the same. The jar should be tightly closed.
- A thick layer of cream will help prevent streaks in the area around the plate after erasing the varnish.
- If you bring your nails painted with glossy varnish to a pan of boiling water, the coating will become matte.
Strengthening the nail plate
Manicurists have a separate item in their price list – strengthening the nail plate. This is a useful option for women with thin and brittle nails.
Acrylic powder is used for strengthening, which has the following advantages:
- You don't need to undergo training to learn how to use it.
- Available in any cosmetic store.
- The thickness of the acrylic powder layer is adjusted. There will be no additional volume on the nails that can spoil the appearance of the nails.
- Provides good adhesion to varnish due to its rough texture. This is an excellent property for keeping gel polish on.
- Hides cracks and imperfections of the nail plate.
You can also strengthen the nail plate with various masks and baths.
- The most common way to strengthen the nail plate is to take a salt bath. To do this, mix salt (2 tbsp), iodine (1 tsp), essential oil (3 drops) and 200 ml of water.
- It is better to use sea salt, as it has medicinal properties. Place your hands in the prepared solution for half an hour, and then lubricate the skin of your hands with a cream with nourishing properties.
- Carry out this procedure every week to strengthen the nail plate.
You can make effective masks using oil - coconut, olive, chamomile, eucalyptus, sandalwood or lemon. Use tea tree oil, which additionally has a disinfecting and anti-inflammatory effect.
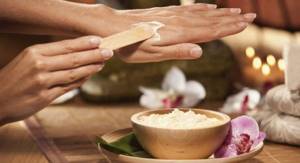
Mix a few drops of different oils and apply the mixture to the nail plate. Rub the oil mixture thoroughly with massage movements and leave overnight. To avoid staining your bed linen, wear cotton gloves. Do it for 7 days.
Interesting ideas for manicure with regular polish
Newspaper manicure
When performing such a manicure, first you need to apply a transparent varnish to the plates, then white, after which you can also distribute holographic varnish, it will add shine to the nails. When the layers have dried, apply small newspaper clippings soaked in alcohol (10 seconds) to the nail. The paper must be pressed tightly, and then apply a transparent varnish or topcoat to the nail.
Lace manicure
For this you will need an orange stick, a brush, nail polish remover and varnishes. Apply two layers of the product to the plates and wait 7-10 minutes. Then use an orange stick to create drawings; this is especially easy to do with glitter. You need to draw designs on glossy varnish with a regular brush dipped in nail polish remover and an orange stick. Then the nails are covered with top. This way you get a beautiful nail design with regular polish.
Manicure with a pattern
For it you will need a thin needle and varnishes of different colors.
The first option: you need to apply three red vertical stripes on a layer of white varnish, after which you need to make a pattern with a needle using gentle movements, moving it from one side roller to the other, gradually moving towards the free edge of the nail.
Second option: on a nail covered with dark varnish, you need to apply three white drops so that they are located on the same line, then draw a needle along this line from the edge of the plate to the base.
Third option: place a few drops of pink on a white polish, and a smaller drop of white on them, then use a needle to connect the circles in a chaotic manner.
Volume manicure
Manicure for short nails can be voluminous. After waiting for the varnish layer to dry completely, you can begin creating a knitted manicure. It is necessary to mix white varnish and the one that was already used to cover the plate, and use a brush to create a pattern as in the image.
Newspaper and ombre
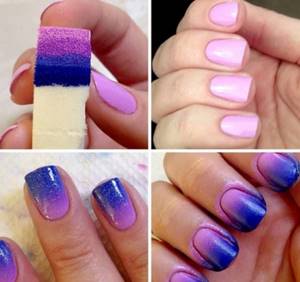
Color gradient designs are popular due to their simplicity. If it is done in salons with a special airbrush, then at home it can be done even with a simple sponge. This is ideal for New Year, birthday or any other holiday.
How to make a stylish ombre manicure at home:
- The nail is prepared and filed. A base and white varnish are applied to the plate;
- Afterwards, a small piece of sponge is cut out. Varnish is applied to it in strips. Thus, in the future you will get a gradient;
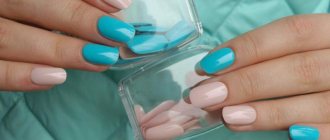
- To create an interesting winter design, you can combine red with white and gold, or blue with green and scarlet. Another secret to getting the perfect transition lies in choosing a sponge. It should be dense, without large pores;
- The nail is blotted with a sponge. Try not to press too hard, otherwise the transition will be too clear;
Ombre step by step - All that remains is to apply glitter and fixative. This will help hide sponge marks and give your manicure a salon look.
Ombre sponge
Video: gradient or ombre on nails
A newspaper manicure is no more difficult to do at home. Newspapers often use ink that can be washed off with alcohol. But, if you turn the newspaper over and rub it with alcohol, the print will simply transfer to the surface underneath it.
How to do a newspaper manicure step by step:
- The nail is painted in any color contrasting with black. This is done because the letters are most often black;
- A small piece is cut from the newspaper. It is applied with the desired side to the nail;
- You need to run a sponge soaked in alcohol over the paper several times. If the newspaper is thick, then you even need to apply the swab to the plate for a few seconds;
- When the letters have passed, you need to cover the nail with a fixative.
Newspaper manicure