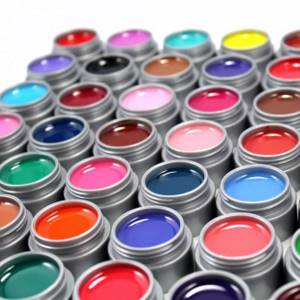
Acrylic nail paints are increasingly gaining popularity. This is a very simple safe material. Their main advantage is that they have a large palette, and for just 1000 rubles you can become the owner of a whole set with many colors of excellent quality. As for gel polishes, for this amount you will buy at most 2-3 bottles.
Acrylic paints work well; they can be used to create color mixtures, subtle elegant patterns, as well as bright details and even entire paintings. However, painting with acrylic requires skill because it dries quickly: if you hesitate a little, the drawing will dry out and it will be difficult to correct it.
If you are interested in learning more about the use of acrylic paints in nail design, then you will find a lot of useful information, namely: their types, how to choose acrylic paints for painting on nails, how to use acrylic, what ideas can be implemented in manicure with their help.
What is watercolor painting
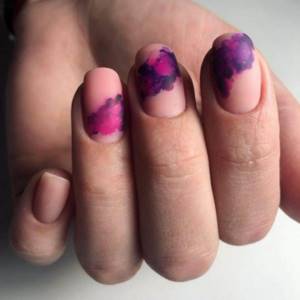
Watercolor painting is one of the types of nail painting. Thanks to the use of special tools and techniques, the patterns on the nails resemble artistic watercolor drawings with their blurriness, halftones and fuzziness.
Watercolor painting, unlike many nail art techniques, requires artistic skills from the master, since each element of the design is created manually with a brush, but at the same time it provides almost unlimited possibilities for an original design.
You can create a drawing using watercolor technique using:
- special gel polish for watercolor design;
- nail paints “Watercolor drops”;
- acrylic paints;
- artificially liquefied gel polish.
Some tips for creating watercolor nail art:
- use a light base - white, beige, nude or pastel shades. Against a dark background, watercolor is lost;
- any dye, be it paint or diluted gel, must be sufficiently liquid. When applied to the nail, the color should be washed out. To check the degree of blur, do tests on a tip or other plastic surface;
- At first, when creating a design, use the examples of other masters. This will allow you not to be distracted by fiction and practice your technique.
Simple Drawings for Beginners
At first it will be a little difficult, but each time the lesson becomes easier, the patterns become more varied, and experiments with execution techniques become bolder.
The main rule: nails must be prepared to the highest level:
- baths with warm water for the nail plates for 10 minutes soften the skin and cuticles;
- using a wooden stick or a manicure tool, cut off the rough tissue around the nails;
- polish the nail plates (once a month) or simply degrease the nails with acetone;
- on their dry, clean surface it is necessary to apply a base for varnish (the pattern fits better, the manicure looks neater);
- After 15-20 minutes you can start drawing.
What do you need to have to create patterns? Varnishes: transparent, medicinal, several decorative colors, glitter, varnish fixative. Materials - stickers, templates, nail stickers with a finished design, glitter, other decorations, several needles, thin brushes. Acrylic paints will come in handy later.
Simple patterns:
- Stickers. The plates are painted with the selected color of decorative varnish, wait for complete drying, and apply another layer. After drying, attach the sticker (instructions on the package) and cover with clear varnish. Photo stickers are glued on top of the applied base.
- Drawings: geometric shapes, lines, fruits (berries, strawberries, others), various symbols (hearts, emoticons). A pattern is applied to the prepared plates (with two layers of a single-color coating) in contrasting colors of other varnishes.
- Camouflage. Apply light green (left), dark green (center), brown or gray (right) to the nail while they are wet - use a needle to mix in random order.
- Contrast network (black/white, beige/brown, black/red, other combinations). On top of the dried finished coating of one color, lines are applied with another varnish in the form of a lattice or diamond-shaped mesh.
- Nail decorations: stars, flowers, beads, other shapes. They are attached to the wet coating, according to the invented design, and adhered to until completely dry.
- Blurred pattern (two contrasting colors or a light and dark tone of one). On top of the wet layer, a pattern (waves, circles, spiral) is applied with a brush with another varnish. Errors are corrected with a toothpick.
- French manicure (two-tone: the classic combination of white with pink or beige; outside the classics - also two-tone, but combining contrasting tones). Application sequence:
- Paint the entire nail plate with the main tone and dry it;
- cover the nail with an adhesive strip, leaving only its outer edge (approximately a third of the way);
- Paint the open part white, let it dry, remove the strip.
Something to remember! Before applying the main design, be sure to apply and then completely dry one layer of the main color of the varnish surface. After completing the drawing, it is secured with a final layer of transparent or medicinal varnish so that it can last longer.
Advice from professionals
When painting your nails with acrylics yourself, you should consider some recommendations from professional nail artists:
- To perform the procedure, you need to choose a comfortable place where your hand will lie without tension.
- When covering the surface, do not press hard on the brush.
- You shouldn’t choose a complex pattern for the first time.
- When depicting a drawing, first of all, draw an outline, which is then shaded.
- It is better to perform a complex design on one nail plate; on the remaining nails, depict simplified fragments that echo the main theme of the design in color.
- Any image made with acrylics must be fixed with a special fixative.
Lifehack for watercolor painting
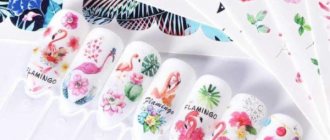
To save time or if you lack artistic skills, use ready-made watercolor-style stickers. You can find them in online stores of nail products and, of course, on Chinese sites.
Stickers can be:
- water - to separate them, you need to place the fragment in water for 10-15 seconds;
- on an adhesive basis.
Before transferring the image to the nail, do a standard manicure, apply a top coat and a colored background.
Product price
You can purchase manicure paints at any specialized or chain store. You should avoid retail places of sale with mountains of vials or tubes piled into boxes - their cost and quality will be extremely low.
To check the suitability of the purchased paint, you need to lightly dip the brush into acrylic liquid. If the dipping area immediately begins to “tighten”, the paint is fresh; if the damage to the surface remains for a long time, the paint is expired or counterfeit.
Tip: If you buy a set of acrylic paints, check all the containers, not just one to choose from. You should not trust the information about the expiration date indicated by the manufacturer on the packaging, since its storage conditions are unknown.
The price of a bottle (20 ml) of acrylic paint for painting on nails from a well-known brand is 200 rubles. and more.
Formulations of the same volume from less popular companies cost 70-90 rubles. Standard forms of release of acrylate compositions are soft tubes, glass or plastic jars, as well as pencils for creating thin and clear inscriptions.
It's time to learn how to use acrylic nail paints.
Watercolor gel polish
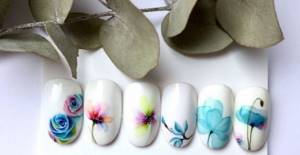
Gel polish for watercolor techniques, or watercolor gel polish, is a special medium-density gel product that is devoid of ductility.
With its help, you can create abstract patterns or apply it pointwise, creating a flowing watercolor effect. Using this method, patterns are obtained, for example, as in the photo below.
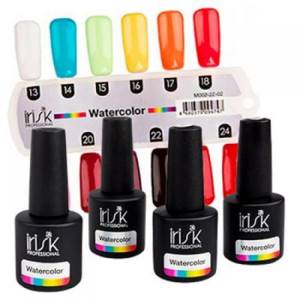
Examples of gel varnishes for watercolor techniques:
For watercolor gel polish, you need to use a special base - without it, the dye will not spread. A large selection of watercolor gel polishes is presented by the Irisk brand in the “Watercolor” collection. The manufacturer also offers a special base - Wet Gel Polish.
To create a design, prepare:
- watercolor gel polish and a special base for it;
- colored gel polish for the background;
- base and top.
Step-by-step instruction:
- Apply a thin layer of your usual base – Kodi, TNL – to the nail plate and dry it in a lamp;
- Now prepare the background - with any gel polish, preferably a light shade and dry it again in the lamp;
- Apply a special base and, without waiting for it to dry, start creating your abstract pattern. The drops will spread, mix and form streaks;
- After finishing decorating, dry the coating in a lamp. Watercolor patterns need to be dried in LED from 30 to 60 seconds, in UV - 120 seconds;
- Secure the design with topcoat, seal the ends and dry again.
With gel polishes, you can try to create a meaningful pattern with a brush, but the process will be quite labor-intensive. It is recommended for experienced nail artists with well-practiced nail painting skills to use this method. At the initial stage, try using special or acrylic paint for these purposes.
Step-by-step instructions for use
Now let's look at detailed instructions on how to use gel nail paints. In this example, we described working with gel paint for coating with gel polish.
- Apply a base coat to the prepared nail and dry for 2 minutes in a UV lamp.
- Then we cover the nail with colored gel polish and dry it for 2 minutes in a UV lamp.
- If necessary, apply another layer of colored gel polish.
- We cover the nail with top coat and also polymerize it. Remove the sticky layer from the top, if there is any.
- Open a jar or tube of gel paint of the desired color and put the required amount on the brush. For painting you need to use special brushes for nail design. We looked at which brush is intended for what here.
- Let's start drawing. If the design is complex, we recommend drying each element separately in a UV lamp. Gel paint should be dried in a UV lamp for 2 minutes, in an LED lamp for 30 seconds - 1 minute.
- Depending on the need, cover the nail with topcoat and dry it as well.
How to remove gel paint from a nail coated with gel polish? To do this, you must first file off the top coat and pattern, then remove the gel polish with your usual special product.
Features of operation
Each type of lamp that is capable of emitting ultraviolet rays has its own characteristics. Because of this, ease of use can be both more comfortable and painful.
UV lamp
Powered by network. By plugging it into the outlet and pressing the switch, you will notice a slight blinking - these are induction lamps. They last longer, withstand power failures without consequences, but are not convenient to carry - they are quite heavy. Many lamps have a fuse - during voltage surges, it will protect the unit from combustion.
Electronic type - the lamp lights up at full power immediately. Any of these types does not have much difference in service life - up to 3 months. Next, you need to upgrade the dryer - change the lamps. Each time you turn the device on/off only reduces its service life.
Since the dryer can overheat, using it during the hot season can cause a lot of inconvenience. The fan, which is often built into such units, practically does not help. Often the coating material burns the nail plate - here it’s not the lamp, but the material.
LED lamp
There is no tendency to overheat, even during long-term operation. After a pair of diodes burn out, functionality does not decrease. The applied gel does not shrink or wrinkle even if the device is partially malfunctioning. The number of times the lamp is turned on/off does not affect the “life” of such a stove.
How many watts does a lamp need to dry the gel quickly? For home use, it is enough to take a 9-watt lamp; for professionals, a higher one. Such an oven for baking gel polish is not harmful, does not have extraneous radiation, and is not capable of damaging the manicure due to its incorrect operation.
When turned on, it does not emit heat; the LED lamp is convenient for drying gels even in hot weather.
Cold cathode lamps and hybrids
During long-term operation, such a lamp has no chance to heat up, and energy consumption is minimal.
Hybrids also consume a small amount of energy; the number of starts is not taken into account - only the total temporary resource. The weight of such a lamp ranges from 2 kg.
Paint for painting “Watercolor drops”
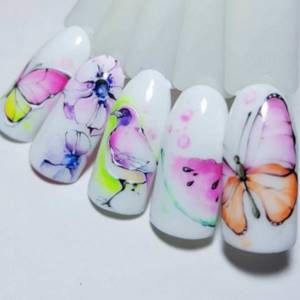
Using watercolor paint, you can create both abstract and detailed designs, such as flowers. The paint is water-based and does not require polymerization - it dries in the open air within 30-120 seconds.
Watercolor paints offered by brands:
- Irisk
- Patrisa Nail;
- In Garden;
- Dona Jerdona.
To create a drawing, no special basic tools or other additional materials are required - the drawing is drawn on a dried background and secured with a topcoat after drying.
Step-by-step instruction:
- Prepare the background - apply a thin layer of base and color, drying each layer separately;
- Drop a little paint onto foil or a palette and use a thin brush to create the desired pattern on your nails. If it is necessary to blur the pigment, wet the brush in degreaser and then pick up dye on it;
- Wait for the pattern to dry and secure the design with topcoat.
For work, use any brushes that are convenient for the master and suitable for a specific pattern. If you haven’t acquired such a tool yet, take a look at sets from TNL or Roubloff. Roubloff has a small line of Watercolor brush sets specifically for painting.
Rules for using brushes for manicure. Basic techniques
Manicure brushes - types, purpose, how to choose and care
Drawing techniques
First you need to decide on the character and style of the drawing. After all, different designs suit every woman’s look. It is images and patterns that can make you stand out from the crowd and complement your image. Let's look at the basic techniques for creating patterns on nails. Now we will explain how to learn to paint on nails.
Brushes
Which brushes to choose for manicure from all the variety? Let's get a look:
| Brush | Characteristic |
| dots (dot) | Instead of lint, the dots have a ball on its tip. There are a huge number of dosage attachments available, ranging from the smallest to the larger ones. They can easily place peas and dots of different sizes, as well as draw rounded flower petals. |
| fan | A fan-shaped brush helps to draw various patterns and waves. With it you can mix several drops of varnishes together, creating an unusual composition. |
| hair | Typically, the tip of the brush is 2-3 cm long and about 2 mm wide. This allows you to display various curved lines, monograms and curls. |
| flat | A flat brush 4 mm wide is suitable for creating patterns, brush strokes or decorative painted designs. |
| petal | The brush is somewhat reminiscent of a flat brush, but the petal brush has a cut corner. Thanks to this structure, it is convenient to display various petals. |
| fluffy | With a brush with increased fluffiness, it is easy to sprinkle glitter onto the nail plate. |
| thin | The medium thin brush has a length of 5-8 mm and is suitable for drawing dots, stripes, lines and other patterns. The short one has a length of no more than 4 mm, and it can be used to draw the smallest details in the composition. |
| Chinese | A popular brush used for Chinese nail painting. Most often it can be found in special sets. |
Painting with brushes is quite simple. The exact same principle is used here as when drawing on paper.
It is only important to correctly calculate the parameters, because the nail bed is much smaller than a landscape sheet
Needle
If you cannot find brushes at hand, then a needle will come to the rescue. How to learn to draw on nails with a needle? Here are the step-by-step instructions:
- Apply any polish to your nails as a base.
- After complete drying, use a needle to scoop out the desired shade of varnish.
- Place several dots parallel to each other on the nail.
- While the varnish is still wet, carefully connect the dots with a needle, creating unusual patterns.
- Cover the nail design with top sealer.
Step-by-step diagrams can be seen below:
Using varnishes
Don't write off the most common varnishes. You can even use them to create unusual designs on your nails.
Here it is important to choose a comfortable native varnish brush. It should not be too thick and not very long, otherwise it will be impossible to work with it
Make sure that the background matches perfectly with the shade of the design being applied.
Tape drawings
Who would have thought, but you can also draw with tape! This is a universal tool that almost every home definitely has. Fortunately, beauties from the nail industry have found a use for adhesive tape even in nail design.
How to do a manicure using tape:
- Apply a base coat to your nails and then 1-2 layers of color.
- Using nail scissors, cut out a stencil of the desired shape from tape.
- Apply a different shade of polish to your nails and let it dry.
- Carefully remove the tape.
- After everything, cover your nails with top coat.
Scotch tape is an ideal option for creating a geometric manicure, which is so popular in the new year. This could be a manicure with stripes, in which multi-colored horizontal and vertical lines alternate. Using such a handy tool, you can draw a Christmas tree, zig-zag, rhombuses, triangles and other geometric shapes.
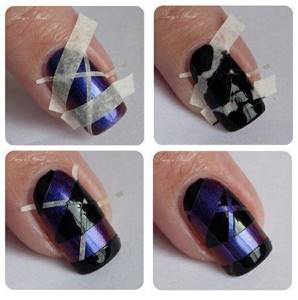
Step-by-step instructions for creating designs using adhesive tape and manicure tape:
Popular manufacturers
We have already talked about such materials, now we will talk about the manufacturers. Common and well-known brands of acrylic nail paints include:
- “Polycolor” is one of the most popular series, famous not only for its durability, but also for its wide color palette. It is worth understanding that you will have to buy Polycolor acrylic paints for nails at a higher price than other brands;
- “Wealth” is produced mainly in the form of small volume tubes (up to 12 ml), which have a low price;
- "Oumaxi" belongs to the relatively inexpensive segment of acrylic paints and has a small selection of shades used to obtain a rich palette;
- Starlet Professional is usually sold in the form of kits, which allow you not only to use the original mixtures, but also to combine them with each other.
Acrylic paint
The main advantage of working with acrylic paints is their drying time. If paint for watercolor painting sets within 1 minute, then acrylic paint gives the master 3-7 minutes to maneuver, refine and correct flaws in the drawing.
Prepare for work:
- acrylic paints in the desired tones. You can buy them individually or as a whole set, like TNL or Runail;
- brushes for painting. Choose brushes based on the complexity and composition of the drawing. To draw small details, use the thinnest brush, and to fill a large area, use a flat one;
- base and top;
- water;
- gel polish for the background.
Step-by-step instruction:
- Before painting, cover your nails with base and color, drying each layer in a lamp;
- Drop a little water and 1-2 drops of acrylic paint of the desired shade onto the foil or palette. Try not to add too much water at once, test the dye on a tip and dilute gradually until you get the desired shade;
- With light movements, outline the design on the nail and gradually draw out all the details;
- To add volume, shade large elements of the pattern with highly diluted paint with a light color tint;
- After finishing the painting, wait for 3-7 minutes to dry and cover the pattern with the finish.
Painting on nails: materials, step-by-step instructions, design ideas
Drawings
Many ladies try to paint on their own with acrylic paints at home and use step-by-step instructions to create a particular design. Usually the easiest and simplest drawings are taken for testing, since their implementation does not take too much time. The result becomes visible after just a few strokes.
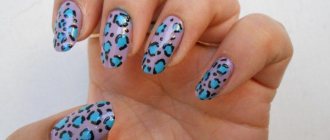
Leopard style
This is a completely simple drawing and quite simple to perform. Suitable for any nail shape and length.
At the first stage, you need to choose the color that you like best and matches your mood. It must be applied to all nails and wait until dry. Then you need to select from the palette of acrylic paints those colors that best suit the chosen varnish, and use dots to make dots in a chaotic order.
For a deeper color of the dots, use a thin brush with black paint to outline the outline of each dot.
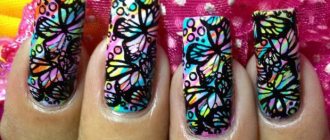
"Butterfly"
This drawing is one of the most favorite among nail art fans. He is painted using different techniques, but the result is always excellent. “Butterfly” can be used as an addition to a French or moon manicure, or to create some kind of summer composition.
First of all, you need to decide on the design and style in which the entire manicure will be performed. When this issue is resolved, you need to apply the necessary varnish to your nails and wait for it to dry completely. The butterfly can be painted with any colors of acrylic paint that are available.
In order to draw a butterfly, you do not need to have a diploma from an art school. It's simple - you need to apply paint to the selected nail with a brush, drawing four petals. They should be placed neither too close to each other nor too far apart.
Between the petals you need to draw an oblong oval - this will be the body of the butterfly. The petals, which are wings, should be decorated using any technique in circles or stripes. Then you need to draw the antennae and wait until it dries completely, then apply the finishing coat on top.
For more information on how to draw a butterfly, see the following video.
What is gel nail paint?
Modern nail art uses a wide variety of materials, using which you can create an almost imperceptible delicate and light pattern, as well as bright, eye-catching designs, make the coating translucent with light lace, or decorate your nails with paintings worthy of the title of masterpiece. One of these materials is gel nail paints.
Gel paint or gel nail paint is a thick, plastic substance with high pigmentation. This substance does not bubble or spread. Just like acrylic used for nail extensions, it polymerizes under the influence of ultraviolet lamp radiation for a maximum of two minutes.
How to properly paint wooden products with acrylic paints? The properties of this substance allow you to create super nail designs. When working with gel paints, the master can take his time, fearing that the material will harden, and carefully draw every detail of the design or element of the pattern.
Gel nail paint is a universal material. You can paint with gel paints on both natural and extended nails of any shape and length. You can make both Chinese and elegant French manicures with gel paints, and also use them for aquarium design.
In 2022, French nail design is a combination of poorly compatible design elements, colors and patterns. The classic white tips of the nails are giving way to dark, black, foil, silver colors, various intricate ornaments and patterns that highlight the free edge of the nail. Today, making a French gel paint does not mean drawing simple white or colored stripes on the free edge of the nail, but also skillfully choosing patterns, rhinestones, sparkles, foil for them, in a word, it is interesting to play with the classic version of this type of nail design, beloved by many girls.
Advantages and disadvantages
The clear advantage of this product is its resistance to drying out while work on the nail design is still in full swing. Also, the ease of use is also captivating. And many more “positives”:
- when covering the entire surface of the nail with several layers of gel paint, a minimal layer is formed that does not thicken the nail;
- the ability of the nail to “breathe” under a layer of such coating;
- optimally used for various design techniques: Chinese painting, aquarium design, for a “smile” or “moon” in French and lunar manicure, casting technique, etc. Ideal for use in a unique planar design;
- no need to intensively file the nail (remove its shiny layer);
- While the gel paint is drying, you can adjust the design;
- It is possible to mix different colors to obtain a unique shade, just like real artists do.
But besides all the positive qualities of the product, there are also minor disadvantages:
- It will not be possible to remove gel paint with special liquids; you need a mechanical solution to the problem: files, a router;
- It is inconvenient to use on thin nails, since gel paint does not provide them with additional strength.
Once you get the hang of using gel pigment to design your nails, you can create real masterpieces. And your inner sense of style will only help you create an organic tandem of gel paint and other auxiliary accessories: foil, mica, rhinestones, stones, etc.
What you need for a manicure
Before you start designing your nails with acrylic paints, place the following items close to each other: acrylic art paints of different colors (a few pieces will be enough to start), dots, a thin paint brush, a clear topcoat, colored varnish, a container with water for cleaning brushes, a palette for mixing paints, a napkin for blotting the brush, nail polish remover, a cotton swab for correcting the design and cleaning up mistakes.
For more complex designs, you can also prepare pebbles, beads, rhinestones, and seed beads.
Tip: for acrylic manicure, it is better to use synthetic fiber brushes.
Pre-workout
Before you start doing a step-by-step manicure with acrylic paints, you need to learn how to use a brush correctly - understand how it is more convenient to hold it, how hard to press, how much paint to take. Therefore, for girls just starting to learn the basics of performing manicures with acrylic, it is better to start by practicing not on nails, but on any other surface, for example, on a piece of cardboard or plastic.
Cover the selected surface with colored varnish and wait until it dries completely. Apply a little paint to the palette and mix several shades. Try to draw simple lines on the surface first with different brush angles and different pressures, taking different amounts of paint.
Then complicate the task: draw a nail plate on the surface, apply varnish to it, let it dry and try to complete the chosen pattern.
Once you feel that you have become more confident in using the brush, and the drawings have become clearer and brighter, you can begin to perform a manicure with acrylic art paints on real nails.
Geometric motifs
Idea #1
- Cover your nails with a base coat. The finished design will benefit doubly if you use a matte texture and play on the fashionable contrast with glitter.
- Draw a “V” of thin, contrasting lines toward the base of the nail.
- Draw 2 thin lines from the edge of the nail to its edges in the middle.
- Cover the “V” shape with glitter varnish. If you are afraid to go beyond the boundaries, create the outline of the design with tape.
Idea No. 2
- Apply a base light blue polish to your nails and wait until dry.
- Then it’s time to apply a rich turquoise shade – it should be applied to half of the nail along the vertical border.
- The final touch is black varnish, which should be located diagonally in the lower half of the nail.
Idea No. 3
- Apply the first coat of red polish and wait for it to dry.
- Draw 2 perpendicular black lines. This can be conveniently done using thread, which must first be dipped in varnish.
- The second thread should be used to apply white stripes that are parallel to the black lines.
- Take the third thread and use silver varnish to apply 3 finishing lines at the top and left edge.
- When the patterns are dry, secure the result of your efforts with a layer of transparent varnish.
Interesting: Red manicure: new designs 2019
Idea No. 4
- Cover your nails with soft peach polish.
- Armed with tape, create a wide vertical line border.
- Paint this space with gold varnish.
- When this coating has dried, draw the boundaries of the lines and patterns as in the photo with a thin brush with white varnish.
- Don't forget about the sealing layer of clear varnish.
Idea No. 5
- The first layer is a light purple varnish.
- This is followed by drawing rectangles to the middle of the nail in a contrasting color.
- On the other side of this rectangle, draw another, smaller one.
- Outline the larger rectangle with black nail polish.
- The final detail is a matte top.
Idea #6
The key to the success of such a drawing is patience and accuracy. Draw thin lines with black varnish after the beige base has dried, and then paint the resulting triangles with glitter.
Idea No. 7
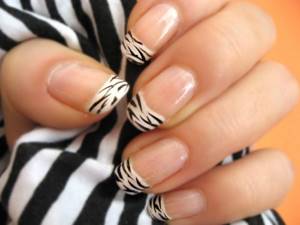
Such a different jacket
Easy nail designs for beginners are often made based on French manicure. This is a classic solution that will symbolize the elegance and good taste of a fashionista in any season.
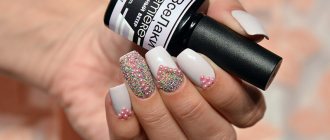
Idea #8
This design lacks the traditional smile - it is replaced by beautiful monograms with glitter. To repeat such an exquisite manicure, you need to cover your nails with beige varnish, and after it dries, draw a thin lower border of your smile. Then the fun part begins - drawing patterns. Once the curls are dry, highlight them with silver hairspray.
Idea No. 9
This original version of the French manicure will look good on square-shaped nails. It’s not difficult to repeat it at all - draw a smile with a flat stripe at the edge of the nail, and just below, in parallel, create a thin line in the same color.
Idea #10
Floristics
Idea No. 11
- Apply a base polish to your nails - a soft pink shade is ideal.
- When the tone is dry, arm yourself with a thin brush and black varnish.
- Draw a leaf stem diagonally.
- Starting from the top, draw the details of the leaf, focusing on the photo cheat sheet.
Idea No. 12
- Paint your nails pink.
- Using the drip technique, paint the cores of the daisies with yellow, and then their petals with white varnish.
Note! You should not draw the dots too large so that the image does not blur and looks neat.
To make your manicure last as long as possible, finish it off with a clear topcoat.
Idea No. 13
- The first stage is applying the base coat.
- Using a contrasting polish from the bottom left corner, draw 2 thin lines with a beautiful curve.
- After this, you should draw the leaves on the branches step by step.
- The design will be more elegant if you paint each leaf with a contrasting or shiny varnish.
Idea No. 14
Idea No. 15
Interesting: Lunar manicure 2022: fashion trends
Idea No. 16
Benefits of acrylic
Acrylic art paints have appeared on the market recently, but are already loved by professional and novice manicure lovers due to their positive properties:
- long-term preservation on nails due to weather resistance and flexibility (do not chip or crack);
- a wide variety of colors, while the brightness and shine are maintained throughout the entire time they are on the nails, and the possibility of mixing provides additional shades and scope for design ideas;
- acceptable, quite affordable cost;
- long shelf life;
- economical material - one tube is enough for several applications;
- quick drying, allowing quick application of the next layer and preventing smearing of the previous layer;
- harmlessness – during operation there is no evaporation of substances harmful to the human body;
- resistance to UV rays, which is why the painting is not susceptible to fading from exposure to sunlight;
- easy solubility in water allows you to adjust patterns during application;
- Acrylic nail paints are very convenient for beginners because of the ease of application.
Information: the only disadvantage of acrylic art paints is the poor tolerance of very low temperatures, at which the coating loses some of its properties.