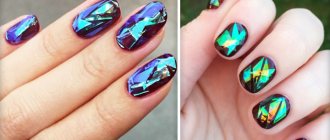
Nail art designers amaze us with their ideas every season. Some of them disappear into oblivion within a year, while others remain at the top of the TOP for a long time, as beloved and in demand among modern fashionistas. One of these popular manicure options is the “broken glass” design.
For a manicure known as “broken glass,” a special holographic foil is used, pieces of which are applied to the nail plate. The light falling on these pieces is refracted, creating a spectacular shimmer and play of color on the nails that simply cannot leave you unnoticed.
Outwardly, it resembles the shimmer of diamond facets. In addition, each design created from pieces of foil is unique, so you will never meet someone with exactly the same pattern as yours.
Features of broken glass manicure
Broken glass consists of finely chopped pieces of foil (or other shiny material), which is applied to the surface of the nail and then secured with polish or gel polish.
Features of manicure include:
- ease of implementation, despite the apparent complexity;
- the variety of materials used to perform manicures and their low prices;
- the ability to perform at home on nails of any shape and length;
- Suitable for women of any age.
Among the various design variations, every fashionista can easily choose her ideal option.
Don't miss the most popular article in the section: How to draw monograms on nails step by step for beginners. Instructions with photos.
What is a nail rub?
Nail rub is a special finely ground acrylic powder.
Its particles are so miniature and weightless that when applied they fit tightly to each other, creating the illusion of an absolutely smooth metallized surface. Usually this pigment for design is sold in a jar and its price is very symbolic, but consumption, on the contrary, is very economical. Chrome rubbing is similar in properties to foil, but significantly exceeds it in terms of durability and reflective capabilities. It has a number of advantages that not only professional nail technicians, but also beginners should know about:
- unlike varnish containing glitter, the coating with grout is easily removed from the nails without unnecessary friction;
- wide price range and the widest choice of palettes. There are even brands that make a vegan rub that is not tested on animals. A striking example of this is the company Severin or Melange;
- It’s easy to create shiny nails at home, because it doesn’t require any special skills or additional tools;
- volumetric design on nails? It’s elementary, just sprinkle a drop of glitter on the sticky layer of the design. The powder will evenly cover the decor and fix itself on it;
- regular shellac extends its original durability when grout is applied to it.
Current colors for broken glass design
The “broken glass” design first appeared in South Korea, where its journey through nail art studios began through social networks. Fashionistas around the world, inspired by the ideas, hastened to repeat the new product. To stay on trend in 2022, you need to do your manicure depending on the season.
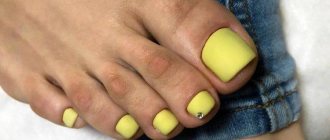
In the warm season it is:
- yellow;
- pink;
- lavender;
- peach;
- blue.
During the cold season, manicure colors become more muted:
- wine;
- dark green;
- deep blue;
- plum;
- violet;
- brown.
Manicure remains relevant at all times in:
- black;
- white;
- red flowers.
Various shades with glitter are in fashion and they are appropriate not only for evening manicure.
This:
- gold;
- silver;
- various chrome shades.
To prevent your nails from being too shiny, you can perform a New York-style manicure, in which one nail, usually the ring finger, is painted a different color.
As for the shape of the nails, it can be oval or square, depending on individual preferences. Long, pointed nails are back in fashion, but only those who suit this shape should grow and extend them. Otherwise, it is better to leave your nails short, because this length is not going to lose its position in the next few years.
Combination with different colors
White manicure with rubbing
White nail art will organically fit into any look. And if you add a rub to this incredibly versatile color, you will create the perfect manicure that is suitable for both cold and warm seasons.
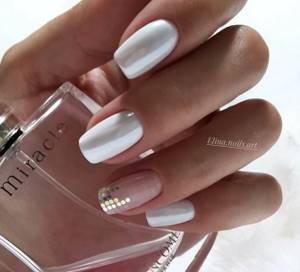
This coating will be a good choice for an evening look or going out; just decorate it with exquisite rhinestones, designs, or add a metallic effect to a few fingers.
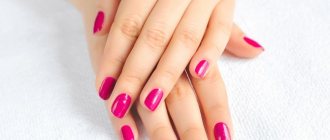
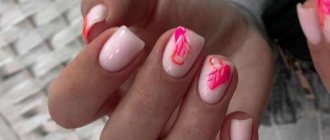
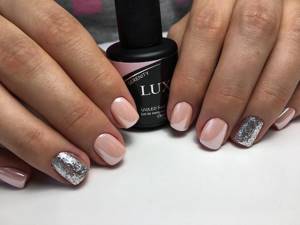
Pink manicure with rubbing
A stylish solution is nail art with a pink glow. Both bright and pastel colors are in fashion, which can be complemented with patterns, pebbles or pearls.
<> <>
Red manicure with rubbing
It will be easier to get an elegant look if, when choosing the color of the coating, you opt for the red palette. These shades are perfect for any season, especially the winter holidays. And if you add a rub to the red color, you will create an even more feminine nail art.
Blue and blue manicure with rubbing
Blue and dark blue coating looks very elegant at any time of the year. Choose the shade of coverage you need and, with the help of glitter, create something really stylish.
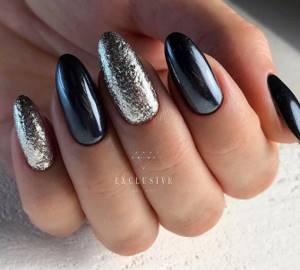
Black manicure with rubbing
The best base for glitter pigment, i.e. rubbing is a dark-colored varnish. The darker the shade, the more intense the shine. We recommend adding combined options to black glitter: geometry, abstract patterns, lunar or French French.
How to prepare your nails for the “Broken Glass” manicure
“Broken glass” on nails, despite photos and video instructions, can be ruined if the nails are not prepared for design, no matter how skillful the manicurist is.
To prepare for a manicure, you must adhere to the following tips:
- Remove old varnish. If this is a regular product, then you can use a liquid without acetone so as not to damage the surface of the nail with aggressive substances. If it is gel polish, then, in this case, you can use a device to remove the gel surface from the nail. Not everyone has a special device or time to visit a manicurist. Therefore, you can stock up on regular foil, cotton pads, nail polish remover and patience. First, apply liquid to cotton pads, wrap each nail with a disc and then with foil and wait 3-5 minutes. During this time, the gel polish will soften and can be easily removed. If it doesn’t work the first time, then the procedure must be repeated until the nails are completely clean.
- Hand care. A beautiful manicure looks great on hands with delicate skin. Therefore, manicure is not only about giving your nails a beautiful shape, but also about various baths and masks for your hands. For the bath, pour a couple of tablespoons of warm water into a small bowl. l. regular or sea salt, olive (or sesame) oil and a couple drops of lemon essential oil. The last ingredient will whiten the surface of yellowed nails. You need to keep your hands in the bath for 10-15 minutes.
- Treat the cuticle. Oil and an orange stick are useful for this. First you need to lubricate your nails and cuticles with oil, and then push it to the edge of the nail with a stick. Manicurists strongly advise against cutting off excess skin. If you don’t have a stick, then a glass or cardboard file with a rounded edge will do the job. Experts are sure that metal files should not be used when doing manicure, as they damage the nail and it begins to peel. Therefore, these options are the best.
- Shape the nail. For this purpose, you need a glass (or cardboard with a fine abrasive) file, tongs (or nail scissors) and a buff (a soft sponge-shaped file for treating the surface of the nail). First you need to shorten the length of the nail if it is too long. The next step is to shape it using a file. For short nails, oval or square shapes are always relevant, depending on individual preferences. The buff needs to be used to level the surface of the nail. In no case should you skip the last step, as the varnish will lie better on a flat plate. After all manipulations, you need to wash your hands with mild soap and wipe dry.

A broken glass manicure can be easily done at home by first preparing the nail plate. - Lubricate your hands with hand cream and after 30-40 minutes start painting your nails. All steps can be completed the day before, and only apply the varnish in the morning.
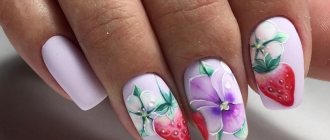
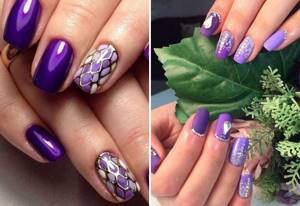
Lilac manicure ideas
A manicure in lilac color is a beauty in combination with delicate pink shades, a stylish decoration in the form of a snake pattern. This is an openwork decor created using openwork film. And small and large rhinestones will add uniqueness and style to any nail art. If you want romance, then choose polishes in pale lilac and lavender shades. Don't forget to complement the beauty with curls and smooth color transitions. Highlight a couple of marigolds by decorating them with an image of a flowering branch of a fragrant peach tree.
Here are a couple more Nailart ideas for inspiration:
- combine what at first glance does not go together - matte and mirror surfaces;
- and nails with a glossy shine and space design have been looking modern and stylish for several years in a row;
- Continuing the theme of incompatible combinations - a trendy lilac manicure should definitely be diversified with some acid-colored varnish;
- A lilac-black duet will give your nails a gothic feel;
- the combination of delicate lilac and avant-garde silver looks perfect;
- add luxury to your look with a voluminous rhinestone appliqué.
Lilac matte manicure
A non-shiny light lilac manicure looks no worse than glossy nail art. Matte beauty always looks strict and feminine at the same time. This is an excellent choice for a confident fashionista. Before you start creating lilac splendor, do not forget that the combination of matte manicure and matte lipstick is trending. If you want to bring something new to your nail design, decorate your fingers with a strip of glossy polish.
Lilac matte manicure
Lilac manicure with rhinestones
A lilac manicure with a rhinestone design always looks extraordinary and unique. These small stones are appropriate for both everyday and festive nail art. The main thing is not to forget that there should be moderation in everything. If you want to decorate your nails with large rhinestones, let them decorate one or two fingers. Otherwise, we will get a design overloaded with decorative elements. A lilac sparkling manicure is distinguished by a certain sophistication and elegance, and therefore it can be done in the form of ombre, French, moonlit or with the addition of ornaments.
Lilac manicure with rhinestones
Lilac French manicure
A lilac and white manicure in the form of a French manicure looks very stylish and harmonious. An equally interesting duet is glossy and matte lilac varnish, a combination with black. This beauty can be complemented with sparkles and thin metallic ribbons. If you are tired of traditional French nail art, replace the usual straight stripes with zigzags, complement the design with lace and patterns. As a result, you will get something individual and non-standard.
Lilac French manicure
Lilac moon manicure
A lilac manicure with holes can be a good competitor to the French one. Although, if you look from the other side, the lunar one is a kind of inverted version of the French. It is interesting that the history of this manicure began in the distant 20s of the last century, and then it was called the “Hollywood French”. Then everyone forgot about this trend, and in 2007, with the help of its collection, Dior breathed life into the forgotten lunar nail art. As for the lilac moon nail-art, you can give preference to minimalism, in a bright color, painting only the hole, or decorating it with sparkles and rhinestones.
Lilac moon manicure
Manicure lilac gradient
Lilac ombre manicure is something that will not go out of style for several more seasons. By mastering the airbrush and combining varnishes of several colors, you can create stunning cosmic beauty. To create a real masterpiece, you can use a white-lilac gradient coated with a shiny fixative. If you are crazy about delicate pastel shades, give preference to lavender and aquamarine. This combination looks bright and gentle at the same time.
Manicure lilac gradient
Lilac manicure with a pattern
A lilac manicure with a veil adds tenderness and romance to the look. And lace patterns are always associated with something elegant and luxurious. And such nude art always looks impressive and modern. In addition to the veil, the nail can be decorated with tiny flowers, all kinds of abstractions, dots, hearts, squares, etc. Give free rein to your imagination and create a unique manicure that fully emphasizes your individual style.
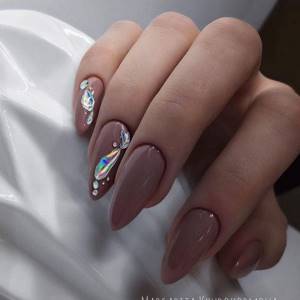
Lilac manicure “broken glass”
A bright lilac manicure created with the effect of broken glass has already become a favorite among a million fashionistas for several seasons. In the summer, this beauty, shimmering under the sun's rays, looks special. To many, this nail art resembles diamond glitter, which shimmers in all shades and colors. To create it, use pieces of foil or mirror polyethylene.
Lilac manicure “broken glass”
How to do a “Broken Glass” manicure
“Broken glass” on nails (photo instructions below) can be done in 2 ways - regular and gel polish.
- A manicure with regular varnish can be done with a base, colored, clear varnish and tweezers.
In order for the result to be successful, you should definitely use the following step-by-step instructions:
- Prepare material for broken glass. (Types of materials and methods of use are discussed below).
- Apply base.
- After the base has dried, apply varnish of the desired color.
- Apply a third layer of varnish - transparent. At this stage, the speed of the reaction is important - before the final layer has dried, you need to attach the material for the “broken glass” effect. For example, if it is foil, then stick it on with tweezers. This must be done very carefully, since the final layer is very soft and it is important not to make unnecessary movements when fixing the material. Otherwise, the transparent varnish will be smeared and unevenness will appear on the surface of the nail. Because of this, the manicure will look sloppy.
- Reapply the final clear coat.
This method of manicure does not require much time or special skills, and tools and varnishes can be purchased at any cosmetic store for a budget price.
But it also has a drawback - this design will not last longer than 6-8 days.
- A gel polish manicure requires a UV lamp, gel polish, base and top coats, material for “broken glass,” a pencil and tweezers.
Step-by-step instructions will help you perform a manicure without problems.
- Prepare materials for “broken glass” and set aside.
- Cover your nails with a base coat, apply colored gel polish of the desired color and a top coat. After application, dry all layers in a UV lamp for 2 minutes.
- Reapply the base. Using tweezers or a pencil, place pieces of “broken glass” on the nail (or nails). Apply top coat and dry in a lamp. If necessary, remove the sticky layer.
The advantage of this method is that such a manicure will last at least 3 weeks without problems. But it is worth mentioning the disadvantages - after gel polish, nails definitely need rest, since a dense layer of the product can ruin the structure of the nail. In addition, a UV lamp and other tools are needed to perform it.
Don't miss the most popular article in the section: How to extend nails with gel polish. Nail extension instructions for beginners. Photo.
Types of rubs
Unicorn
The difference between this rubbing is that it does not give its color, but only the effect is visible. The “unicorn” has more shine than, for example, the “pearl” rub and it gives a more shade of pink. It looks most beautiful on a white background, as well as on any bed shades.
However, this pigment can be applied to a substrate of any color and it will look completely different in any version. Choose for yourself the effect that you want to see on your nails.
We cover the nails with light gel polish or some other color. Apply the top in a thin layer with slight additional leveling. The surface must be absolutely perfectly flat.
Important: It is recommended to use thinner tops to avoid excessive thickening.
After the top has dried, we immediately apply the rub. Rub in with a finger or sponge so that no bald spots remain. A very beautiful effect that many fashionistas love.
Prism
In principle, it looks beautiful on any background, but it shows itself most clearly on black. Very beautiful, stunning effect. All colors of the rainbow are present. It is loved very much and is often asked to be made by clients of different ages and preferences.
The gradient looks cool with this rub. And it is on a camouflage base that it is better to do:
Cover the nails with a camouflage base of the desired color. Standard leveling of the surface with it.
We put it in the lamp to dry. After the base has polymerized, apply a top coat without a sticky layer and dry.
Using a finger or sponge, apply the rub as tightly as possible to the free edge. Then with a finger on which there is practically no pigment left, we rub the border, do it very smoothly so that our border is blurred and shaded as much as possible, gradually weakening the pressure.
This creates a beautiful gradient effect.
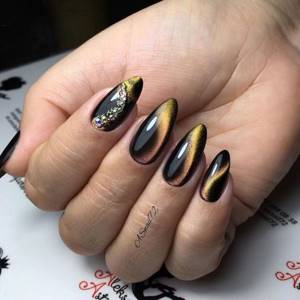
Gradient colored rubs
Colored pigments look coolest on black. We take three rubbings of different colors that match each other.
First, rub a small amount at the cuticle. Approximately one third of the nail. Trying to erode the material at the border and reduce it to nothing. Next we take the third color, which will be on the tip of the nail.
Also rub a small amount onto one third of the free edge. Using the second rub, we also rub it into the middle of our nail. When rubbing, we go to the upper third and the lower third, so that the entire border is shaded. And it turns out to be a smooth, beautiful transition between colors.
Rubbing "Aurora"
The rub is simply amazing. It is translucent and has beautiful pink, turquoise, blue and other highlights. You always admire her. It rubs in perfectly, straight to a shine. On a white base, the pigment creates a beautiful pearl effect.
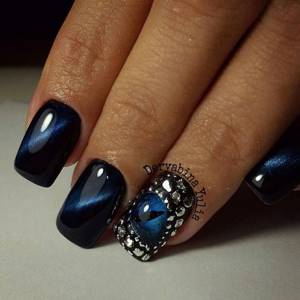
Magnetic rubbing "cat's eye"
First, coat your nails with black gel polish and dry. Then we apply the top. We dip the brush into the pigment of the color you need and begin to apply it directly onto the undried top coat. We don't mix anything separately.
No time or material is wasted. We mix our pigment into the top directly on the nail. Try to have an even coating. Next, take a magnet and bring it to our nail. A bright, clear glare gathers right before your eyes.
Important: If something doesn’t work out, you can use a brush to smooth out the pigment again and repeat the highlight. Or another magnetic figure.
Pigments are best applied to a dark substrate. On light ones they look a little dirty.
These pigments can also be used simply as a rub. Do not magnetize the strip. They also look great and add variety to your entire palette of gel polishes. You can adjust the brightness and clarity of the strip yourself. You can create different highlights on different substrates. Let's say a green highlight on a red background. This effect cannot be achieved simply with “cats”.
Rub “Volume Drops” or “Liquid Diamond”
Quick and easy nail design with rubbing. It looks very voluminous and impressive. It is done quickly and easily.
Cover the colored nail with a top coat without a sticky layer. Dry it in a lamp. Rub the mirror pigment onto the freshly dried warm top coat.
After rubbing thoroughly, remove the excess with a soft brush. Using a thick consistency top coat, apply droplets with dots or an orange stick. We try to make large drops in the middle of the nail, and smaller drops near the cuticle and side ridges. We periodically dry it in a lamp so that they do not spread.
"Yuki Flakes"
Very thin, airy. Shimmers in several shades. The consumption of this design is minimal. This technique can be performed in two ways. Looks great both under a glossy top and under a matte one.
The first method is with separate firecrackers. This is done using an applicator, finger or brush. Cover the nail with colored gel polish. The varnish must be used with residual stickiness and the stronger it is, the better the flakes will stick.
We take the flakes onto the brush and distribute them over the nail. With this method you can do it to your liking. You can add very few crackers, or you can add more. You can do stretches using cereal. Or you can simply cover the entire nail with them evenly.
Having spread all the flakes on the nail, carefully smooth all the corners with the same brush. The result is a beautiful bright rainbow mosaic.
The second way is to rub it in like a pigment, then the flakes lie evenly and completely cover the nail. Using a brush, finger or sponge, distribute the flakes over the nail, which already has gel polish with a sticky layer applied. Take more flakes and apply them tightly. You need to completely cover your nails with them.
Then we rub all the particles inside the sticky layer of our coating. To consolidate the result and ensure good wear of our design, we cover the nails with two layers of finishing gel, thoroughly sealing the ends.
Drying each layer in a lamp.
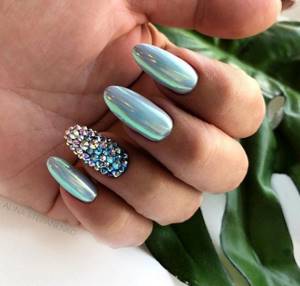
Mirror effect
Mirror manicure can be considered a “classic”. It is performed using silver powder. Nails coated with white gel polish with a silver rub are a universal option that goes with your everyday wardrobe and can easily complement a holiday look. The powder can be applied to 1 – 2 fingers so as not to overload the design.
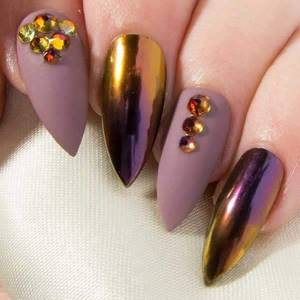
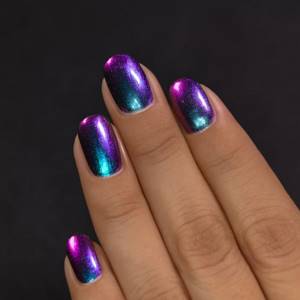
Chameleon
A popular option is the “chameleon” rub, which can be used to create a “chameleon” effect on your nails. The shimmer of emerald blue powder looks equally beautiful in combination with dark and light tones. A bright accent can be a nail coated with emerald rub against the background of a manicure with white varnish, and even no additional decor is required.
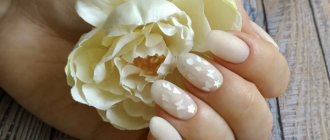
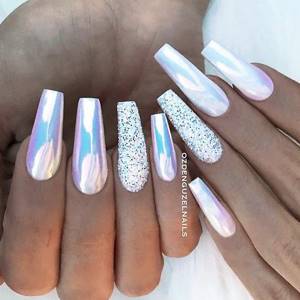
Pearl effect
Another favorite of girls is white manicure with pearl rub. It looks very feminine and delicate. Reflections of pearl powder in creamy tones create an imitation of natural pearls on the nails. This gentle effect can be complemented with a classic French manicure, a white monochromatic manicure, a wedding design for a bride, or nail art for a prom or a romantic date. By the way, pearl “pollen” has several variations. It can be dominated by different colors: pink, beige, white, blue, soft green. Depending on the shades of iridescence, using pearl rubbing, you can create the effect of fish scales, unicorn pollen, or star shine.
More photos and publications: Almond-shaped nail design: photos of the best ideas

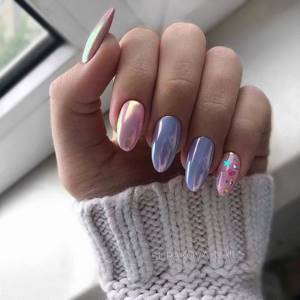
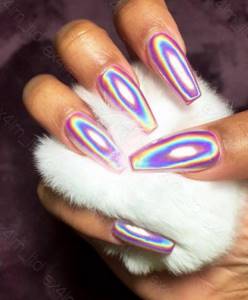
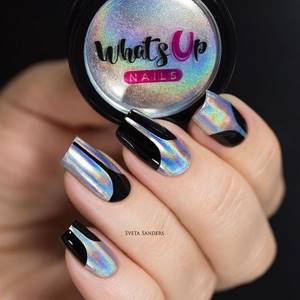
Holographic effect
Powder with a holographic effect is no less popular among girls. It will easily complement a manicure in bright shades, but it looks most advantageous in combination with pure white. The holographic effect will attract the attention of others and make them look at your manicure with interest. The coating has the effect of a prism that refracts the sun's rays. With its help you can create the effect of gasoline spilled in a puddle.
"Broken glass"
A creative design in a snow-white interpretation looks like a cracked eggshell on the nail plates. Extraordinary nail art can be successfully combined with various decorative options. They use a special manicure foil, which generates spectacular silver, gold or bronze tints under a colorless topcoat. This design is distinguished by visual lightness and tenderness.
It attracts the eye with its unique creative twist, simulating the cracked surface of the nail plates. Shards of broken glass on a white background can be recreated using colored foil or fragments of polymer film of unequal sizes.
Foam effect
One of the most creative, extraordinary and interesting designs using rubbed polymer powder. The technique, which creates an imitation of foamed nails, looks amazing in combination with snow-white gel polish. An unusual textured design is easy to make yourself at home. It is suitable for women of all ages and professional backgrounds.
The foam texture on the surface of the nail plates is imitated in the form of:
- reptile skin;
- crocodile skins;
- mermaid tail;
- miniature craters;
- lava field.
A white manicure with a foam texture allows you to create spectacular and trendy looks. You can create this design at home using a stamping kit or a set of themed sliders.
Is it possible to do a broken glass manicure at home?
The “broken glass” effect is achieved through the use of special foil for manicure.
In addition to it, you can also take special stickers, film and mica.
- Foil comes in many different types. For “broken glass” you need regular thin non-transferable manicure foil without glue on the back. It can be sold whole or already cut. If the piece is solid, then it is better to cut it over a sheet of paper. This tactic will make it easy to glue future “shards” onto the nail, and pour the remains into some container without any problems. For example, in a matchbox.
- Film (or cellophane) . This is not an ordinary plastic bag, but a special thick film that can be cut into pieces. You can buy it in flower shops and various departments for creativity.
- Stickers are thin sheets with an adhesive backing on the back and “broken glass” designs on the front. Unlike other materials, they are glued to a completely dry nail after applying regular or gel polish. To do this, you need to randomly cut the sticker into pieces, peel off the protective layer and stick it in the desired order. If the material is glued to gel polish, then apply a top coat, then dry it in a lamp and remove the sticky layer.
- Artificial mica is a material that imitates natural, that is, it has a pearlescent, iridescent structure. For manicure, it is available in liquid and dry (loose) form. The liquid material comes in the form of varnish and is applied with a brush over the painted nail. To apply dry mica you will need a small container of water, a dots (or toothpick), an orange stick and mica of the desired shade. Dip a dots or toothpick into water, pick up a piece of mica and place it on the nail, using an orange stick to form an arrangement of mica. The stick must also be dipped in water before use.
It doesn't matter what material will be used in the design. To really make it look like shards, you need to leave gaps between the pieces rather than glue them end to end.
In addition to the indicated places, you can choose materials in online stores. The quality is not inferior to the goods in the store, and the prices, on the contrary, are much lower.
French and broken glass
“Broken glass ” on the nails, the photo of which is presented below, in combination with a French coat - this is a tandem of classics and trend, which allows both types of designs to sparkle with new colors.
There are several ways to decorate your nails with splinters.
- “broken glass” is glued to the regrown part instead of the white edge;
- the fragments are attached to one or two nails (ring and index).
The base color is classic pastel. But experts say that this is a rule that can be safely broken depending on the circumstances and paint the nail with “broken glass” (or all) red, white, black, silver and gold.
To perform the French you need:
- Prepare the “shards” and think through the design - their location.
- Paint your nails in the desired color with regular or gel polish.
- Lay out pieces of material according to a thoughtful design.
- Secure the design with clear varnish for regular and top coat for gel polish. Dry and remove the sticky layer from the last one.
This manicure, due to its versatility, is suitable for girls of all ages. The restriction may be lifestyle, for example, a strict dress code in the office.
Purple manicure with rhinestones
Rhinestones take purple manicure to the next level. You can easily choose this look for any special event, which will allow you to complement any look.
Lunar manicure with broken glass design
As in a French manicure, in a moon manicure, “broken glass” can decorate a hole or 1-2 nails. Since this type of design is called anti-french, you can safely deviate from the usual range of colors and paint your nails in any of the current colors. When choosing a color, you should take into account age and lifestyle.
Bright colors are suitable for young and free girls who are not burdened by a strict dress code. Older women should opt for calm (for example, lavender) or deep dark tones (for example, wine). Also, when choosing a color, you should pay attention to your color type.
To perform a lunar manicure you need:
- Cover the nails with a base and varnish with a color selected for the hole. If it is a regular varnish, then you need to wait until it dries completely. If gel = varnish, then dry each layer for 2 minutes in a UV lamp. The ideal proven color combinations are red-white, red-black, white-beige, blue-violet. But you can take another combination.
- Glue the French stencil down onto the hole so that the polish for the rest of the nail does not accidentally get on it. Paint the nail a second color. Wait until completely dry.
- Glue the cut pieces of glass according to the desired design. Cover with clear varnish or top coat (if the manicure is done with gel polish).
What is the design feature
To create this effect, a special holographic foil is used. It is divided into pieces of irregular (or regular) shape and applied to the nail. When light hits these shiny fragments, refraction occurs and a very spectacular shimmer appears.
Often, such shine resembles the play of light on the facets of a diamond, which is why it is impossible to go unnoticed with such a design. Another advantage of this nail art is its uniqueness. It is impossible to find two absolutely identical nails.
In addition, “broken glass” is a universal design, suitable for nails of any length and shape. And the variety of colors allows you to choose the perfect manicure for every day and for special occasions.
Broken glass manicure is suitable for any nail shape.
Using this technique, you can decorate all the nails or just one, add rhinestones or leave only the effect of broken glass, decorate the nail plate in the form of a crystal or apply a line of “shards” only along the edge.
Particularly interesting are the pieces of foil “playing” based on deep, saturated color. In the new season, varnishes in dark blue, cherry or purple shades are popular. And it is better to give preference to matte colors.
Abstract manicure with broken glass
If there is no special film or foil for “broken glass,” then ordinary tape and varnish with a “metallic” effect would be the ideal solution.
This manicure will fit perfectly into any look - both everyday and evening.
- Get a manicure - apply a base and the desired color. If it is gel polish, then dry it under a UV lamp.
- Cut wide tape into thin strips (the thinner the better) and stick them on your nails in random order. This design will look great on all nails, and not separately.
- Paint your nails with a different color of polish. Dry as necessary and cover with topcoat.
Purple French
A purple jacket in a single color and with the addition of decor or a pattern is an excellent choice for a special occasion.
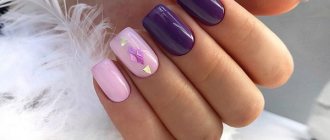
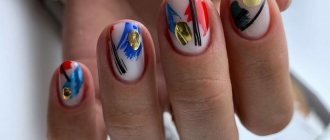
Broken glass in volumetric manicure technique
Volumetric manicure is one of the trends in nail art. By itself, it looks complete and it seems that nothing can be added to it.
But using “broken glass” will give it a “second wind.”
- Cut a fragment from the film in the shape of a nail. Cut into as thin strips as possible.
- Apply base. Apply blue polish to the thumb, index and middle fingers, and pale pink to the rest. Dry. Repeat step.
- Cover your nails with top coat. Place half of the cut strips on the wet top on the middle and ring fingers, leaving a gap between them. Dry your nails.
- Re-coat with topcoat and dry.
- Using a thin brush and a transparent topcoat, cover each strip individually with a layer of topcoat. Dry and repeat the process and dry again.
Any other design can be made using this technique. For example, geometric shapes.
Depending on the length
For long nails
The presence of long nail plates allows you to more clearly demonstrate all the magic of brilliant tints that only rubbing is capable of. In this case, you can use any type of material. The main thing is that the shine of the manicure looks harmonious with your image. The rub can be used to cover all nail plates, combined with designs, various techniques and decor. For example, we perform a manicure with one of the halographic types of powder and place voluminous flowers with pearls on the ring and middle fingers or apply cobweb patterns with small crystals to the sparkling surface. Just awesome!
A material such as rubbing is deservedly considered one of the most beloved and popular among manicurists. It is able to simultaneously transform the calmest shades and smooth out the aggression of bright or dark tones of varnish.
For short nails
Glitter also looks good on short nails. Shimmer visually narrows and lengthens the nail plate, making your fingers look more graceful. However, avoid bright colors.
Drawings and broken glass in manicure
“Broken glass” can not only be a chaotic play, but also act as a basis for a drawing. In this case, the composition will look good on two adjacent nails. Usually these are the middle and ring fingers. This design is suitable for any age. As for events, it all depends on the color - bright colors with glitter are appropriate for celebrations, and calm colors are appropriate for every day.
Here are step-by-step instructions with a butterfly drawing:
- Draw a small (1-2 cm depending on the length of the nail) butterfly on a sheet of paper folded in half.
- Draw a butterfly on the back layer of the “broken glass” sticker.
- Cut out the butterfly and cut it in half.
- Cover your nails with a base coat and the desired color. If it is gel polish, then dry it.
- Glue the neatly cut parts of the butterflies onto the adjacent nails. Cover with top. Dry if it is gel polish.
The sticker method is the simplest, accessible to beginners. If you have experience, you can create drawings from elements of “broken glass”.
Several ways to apply the rub
Method No. 1
First, cover the nails with the main color. Colors may vary. Depending on the shade you will get the effect of this design.
Dry in a lamp and cover with a top coat without a sticky layer. Rub the pigment onto the still warm, dried top. It comes in different colors and textures. It all depends on your preferences.
There is no need to feel sorry for the rub. Let there be surpluses. Otherwise, bald spots may form in the coating. Cover with finishing gel, sealing the ends well.
Method No. 2
This method is suitable for those who do not have a non-sticky top in their arsenal.
- Important: The final coat must be applied with leveling to remove any errors in the colored gel polish. Otherwise, the rubbing will show all the flaws and irregularities.
Cover the colored nail with a topcoat with a sticky layer. After drying, wipe off any residual stickiness and immediately apply the rub while the nail is still warm.
Method No. 3
Remove the sticky layer from the colored nail. Wet your finger in liquid to remove the sticky layer or alcohol, thereby picking up the liquid.
Dip a wet finger into the pigment and begin to rub it into the colored nail. While we rub, the alcohol evaporates and the same effect is obtained as in the previous methods.

Method No. 4
Let's take pearl pigment. Drop a drop of non-sticky top coat onto the foil and add pigment to this drop. You can use any one you have. Mix thoroughly. Ratio 1:1. We take a brush and apply our mixture (topcoat and rub) to any color base.
It turns out to be a very unusual color. Dry it in a lamp. Then cover with finishing gel.
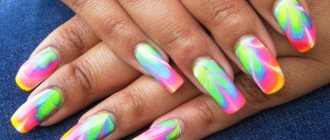
Gradient in broken glass design
The gradient or ombre effect looks very unusual. Pastel colors are suitable for romantic occasions and the office, while bright and rich colors are suitable for evening events.
In order to make it, you need to stock up on at least 2 colors of varnishes that are similar in color and a gradient brush (it’s wide) or any other available brush.
If the manicure is done with ordinary varnishes, then you can use a sponge.
- Apply base and gel polish of the main color. Dry both layers under the lamp.
- Apply polish near the base of the nail, without touching the cuticle. Using a brush, “stretch” the drops of varnish. Cover with top coat after drying and apply “shards” to it. Cover with top coat again and dry. Remove sticky layer.
When manicure with regular varnish you need:
- Apply three strips of similar colored varnishes to a small piece of sponge.
- Apply the sponge to the nail on which the base has previously been applied.
- Dry the layer and apply a transparent sealer. Glue the “shards”. Repeat the layer with clear varnish.
The “shards” should be in harmony with the main color of the gradient. For “glass” in this case, mica or film is suitable.
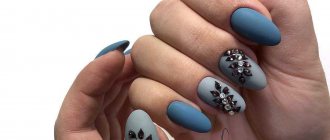
Broken glass in matte manicure
“Broken glass” on nails (photo with a matte manicure below) looks very stylish in a matte manicure. Here, as in the French manicure, you can cover a single nail or all of them - the matte background will ideally highlight the “fragments.”
This design will look good with an office dress code (if you decorate one nail).
- Prepare the glass pieces.
- Cover your nails with base and color using a matte polish. Some fashionistas, if there is no such varnish, use a regular glossy one and dry their nails over steam.
- Attach the “shards” in the required way. If it is gel polish or matte manicure, then do it without waiting for it to dry. If the nails are dried over steam, then apply a transparent layer and attach “glasses” to it.
- Apply a top coat - transparent for regular manicure and a topcoat with gel polish. In the latter case, dry each layer in a UV lamp.
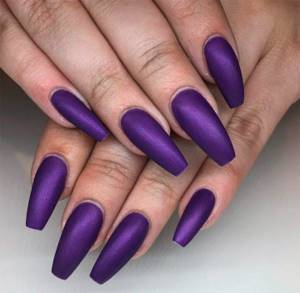
Matte purple manicure
A very luxurious finish in the form of a purple manicure can be created using a finishing top gel. The purple color in this design is revealed in a new way, striking with its beautiful and rich tone.
Purple varnish also has its own shades: eggplant, plum, amethyst, indigo, heliotrope, orchid, lilac and others. You can use the combination in a different approach, choosing different colors for each nail.
How is broken glass different from kamifubuki?
Kamifubuki is another way to decorate your nails. Although manicurists often compare kamifubuki designs to “broken glass,” they still have differences.
It is worth noting that the design technology of both types of manicure is no different.
- Kamifubuki are ready-made elements for manicure. These can be circles, stars, flowers and other shapes.
- The elements of “broken glass” differ from each other in shape and size, but have the same color, since they are randomly cut from the same material. The same cannot be said about kamifubuki - the shape and size are the same, but the colors can be very different. The only rule is that they must be combined with each other and with the colored coating, if any.
“Broken glass” on nails is a design that has deservedly won the hearts of fashionistas. Thanks to photos and video instructions from nail art masters, it will not leave the list of trends for a long time, as they amaze the imagination, and you want to immediately repeat each design.
Article design: Mila Friedan