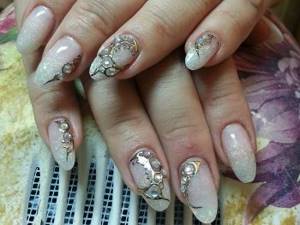
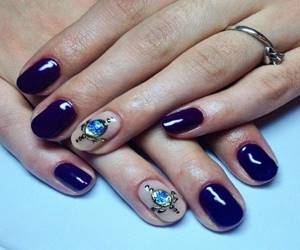
Today there are many nail design options, one of which is the “liquid stones” coating.
This design looks incredibly beautiful on the nail plate; the created stones sparkle in the light, like droplets of water.
In this article we will talk about the features, techniques and bright ideas of manicure with liquid stones.
Features of the “liquid stone” design on nails
A manicure created using this technique is reminiscent of covering nails with rhinestones. However, instead of heavy, bulky stones and natural minerals, which fall off quite quickly.
This happens especially often if they are attached to natural nail plates, special gels and other additional materials are used. With their help, craftsmen reproduce original patterns imitating precious stones, gold, platinum and silver.
Liquid stones look very natural and impressive, so it can be difficult to distinguish them from jewelry creations.
Technology
The unique technology of embodying the shine of precious stones on the edges of the nails allows you to get a truly luxurious manicure. This idea belongs to Ekaterina Miroshnichenko, who is a highly qualified stylist and author of nail techniques. Now the champion of all kinds of contests and competitions in the beauty field, he offers courses to anyone who wants to learn about the technique of creating real jewelry work on plates. The course is held at the Aqua Life beauty studio.
Liquid stones are created in conjunction with another technique - casting. In general, these nail trends allow you to get an ornate pattern, similar to a precious ring or bracelet. The stones give an exquisite shine and extravagant shine to such a noble design.
The essence of the implementation comes down to the use of a special polymer substance. The result is a three-dimensional, three-dimensional, somewhat convex pattern obtained by polymerization of the product.
An important stage in creating original nail art is the use of a sculpting agent. The author suggests using this substance to obtain a magnifying glass effect, which looks very elegant and non-trivial.
How to do a manicure with liquid stones and casting at home
The “liquid stone” technique on nails and photos of this design are gaining popularity , so now you can learn how to do a manicure in this style yourself at home. To do this, you need to prepare tools and materials that are sold in almost any decorative cosmetics store.
Liquid stone on nails: what it is and how to do it.
For a beginner in this matter, you need to follow detailed instructions to avoid ridiculous mistakes.
Another important step in creating perfect nail art, especially for natural nails, is the proper preparation of nails for applying gel and other materials, because the durability and beauty of the manicure depends on the working surface of the nail.
Execution technique
The essence of the technique is to create a multi-layer manicure. The first layer is a contour ornament or drawing made with black gel. The sketch includes closed areas, usually oval in shape, which will subsequently be filled with colored gel of one or several tones to create the most natural resemblance to a stone cut.
The layer embedded in the outline is called stained glass. Among the large number of variations on the “liquid stones” technique, there is another method. It involves the use of manicure stickers to fill the inner contour area. A coating of transparent or translucent gel will create a cameo effect on the nail plate.
One of the design options for a black outline is gilding or silvering. This is done using special manicure or regular foil. First, small strips are cut out of it, slightly larger in size than the nail plate. After drying the contour drawing with the matte side, the strip is applied to the nail and sharply torn off. Slightly uneven cuts of silver (gold) create a sophisticated effect.
The next stage of technology contains elements of sculptural art. A special gel with a thick consistency helps to give the coating different shapes. In this case, a sphere is used, which gives the stained glass a convexity. This effect is also called a magnifying glass.
The final layer is a protective coating without dispersion.
Each application of the gel requires mandatory drying under an ultraviolet lamp. Polymerization takes at least 2 minutes. Subsequent strokes are made on a hard surface.
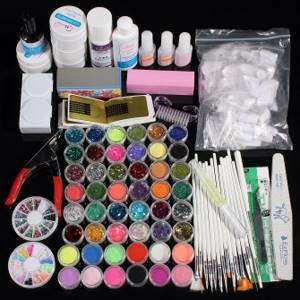
Required materials and tools
To create a manicure using the liquid stone technique, you will need the following materials and tools:
- UV lamp to speed up the drying of each layer of gel.
- Manicure foil that matches the selected stone.
- Colored art gel used to create a French jacket.
- Gel without dispersion.
- Gel paint necessary for applying contours and imprinting foil after polymerization.
- Thick sculpting gel.
- Stained glass gel for stone casting.
- Angled brush for making basic French.
- A basic brush for applying most layers of manicure.
- The so-called hair, necessary for drawing contours.
- Special polymer stones.
- Nail degreasing products.
- File to prepare nails for casting.
Advantages and disadvantages
Advantages:
- the design looks equally good on any nail plate;
- accessible execution technique;
- a wide range of colors makes it possible to create the effect of any stones that harmoniously combine with the background;
- multilayering and the use of gel material form a durable polymer coating that is resistant to mechanical damage;
- by following the rules for handling manicure, a presentable appearance will remain for up to a month;
- liquid stones favorably complement an evening or festive look;
- You can use stickers under the background of the sphere (you will get a cameo effect).
Flaws:
- homemade requires an ultraviolet lamp and a large amount of material;
- high price.
Step-by-step instructions for basic design
To create a beautiful and elegant manicure in this style, you will have to follow these steps:
- It is necessary to treat the surface of the nails with a file to remove their natural shine, otherwise the pattern will blur.
- Now the nail plates need to be degreased using alcohol or a special product.
- As soon as the nails are dry, you can cover them with gel, and a very thin layer should be applied to natural nails. After this, they should be dried under an ultraviolet lamp.
- Now you need to rid your nails of the sticky layer by wiping them with an alcohol-containing solution and you can begin to form the design, first completing its outline. Here you need to show special diligence, because the quality of the contour determines whether the selected pattern will hold or blur.
- Then, using special glue, you need to fix the foil selected to match the pebble on the nail, and when it is firmly attached, tear it off with a sharp movement.
- Decorate the “frame” of the stone with paint or gel, drying it after application under a lamp.
- Now all that remains is to form the stone itself, using a structuring gel and acrylic materials, and also cover the finished pattern with gel for a shining or mirror effect, drying each layer under a lamp.
Step by step application guide
- As for technology, you initially need to design a French jacket.
- It should be fixed in a UV lamp for a couple of minutes. The master then coats the plates with a non-dispersion protective agent. The two-minute polymerization is duplicated.
- The next step is to use black art gel. With its help you need to create ornaments. This is the basis for future casting. At this stage, it is recommended to use a hair brush, which will create clear contours and fairly voluminous lines. It is under this condition that the foil can be fixed without problems. The “blank” polymerizes again within 2 minutes. After this, gold foil is applied. It comes into contact with the plates with the matte part. Then it must be sharply torn off, as a result of which the ornament will become golden in color. This manipulation is carried out with each applied pattern. The end result will be casting.
- Next, using colored products, a “hole” is created to fix the stone itself. The author of the technique recommends using at least two shades. This will allow the pebble to become three-dimensional and shimmer under the rays of any lighting. This step is followed by a two-minute polymerization period, after which the stained glass gel must be applied. Again, it is optimal to use several versions of it, so that the end result is a multifaceted and luxurious pattern. The polymer must be fixed using a standard method.
- To make artificial nail inlay look as realistic and elegant as possible, it is advisable to cover the result with a sculptural gel. At this stage, the author of the technology recommends using a thin brush. Again, this will be followed by polymerization in a UV lamp. Then the plate is coated with a finishing agent in the form of a special gel freed from dispersion. The marigolds undergo final treatment in a UV lamp.
During such rather lengthy manipulations, a unique manicure is obtained. Despite the fact that it will take a lot of time, a fashionista will be able to amaze everyone with her individual, exclusive nail art, which, with the right selection of colors and shapes, can become part of even a business ensemble.
You can see more details on how to make such a drawing in this video:
Correct technology for applying liquid stones
To create liquid stones, multi-layer manicure technology is used, in particular three-layer manicure. Therefore, they are based on contour drawing, stained glass, and also sculptural gel.
Technique for applying liquid stones:
- At the first stage, the outline of the future gem is drawn with black gel, which in most cases is decorated with gilding or silvering, depending on the chosen foil.
- At the second stage, the prepared outline of the drawing is filled with translucent or transparent gel to create depth of color.
- At the third stage, the formation of a gem occurs. Using a sculpting gel and a fine brush, you can create an original gemstone that looks completely natural.
The technology of applying liquid stones also involves repeated use of a UV lamp, as well as coating the finished pattern with a finishing gel, which will give the stones a natural shine.
Useful tips
- When creating liquid stones, you must use sculpture or stained glass gel. It is ideal for creating jewelry that will sparkle in the sun.
- You can complement the design with various monograms made using the casting technique.
- If you need to remove a pebble, then under no circumstances should you tear it off the nail plate. Otherwise, you will greatly harm your nail.
- You can remove jewelry using a router or file with an abrasiveness of 100/100 grit. Of course, such work takes a long time, but it is the safest.
The “liquid stones” design is a great opportunity to create a bright and rich manicure without spending money on expensive materials. The technique is simple, so any girl can become the owner of a stylish and original manicure by creating a design at home.
More interesting articles:
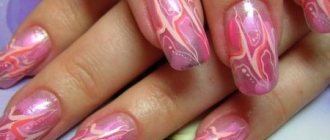
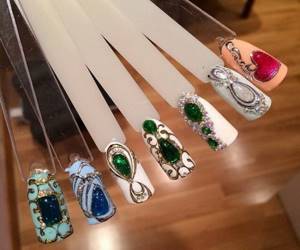
Options for imitation gemstones
Judging by numerous photos, the liquid stone casting technique will allow you to create an imitation of almost any precious stone and natural mineral on your nails - it all depends on the level of skill and creative approach of the artist.
But the following gems are especially popular:
- translucent emeralds;
- amber;
- sapphires of various shades;
- juicy rubies;
- rose quartz;
- exquisite pearls;
- luxurious turquoise;
- iridescent malachite.
How did the design come about?
The liquid stone nail design was invented several years ago by Ekaterina Miroshnichenko, a Russian nail artist, world champion in nail art. She combined several techniques, including gel extensions, casting, and gel sculpting. The artist used contours, stained glass and sculpting gels to achieve a clear shape, rich color and volume.
As a result, she managed to create a voluminous imitation of precious stones on her nails, which looks very realistic. A significant advantage of cast liquid stones is that they are voluminous and do not deform: due to the sufficient hardness of the material, dents, prints and other defects do not appear on it.
Video master class from the creator of the design:
Liquid stones for natural and extended nails
The technique of casting liquid stones was originally developed for nails extended with gel or acrylic, since it required a fairly high density of the surface to be covered and a good length. Nowadays it is actively used for natural nails, and a manicure made in this style looks quite impressive on them and is not heavy.
Liquid stone on nails: a new product for manicure and pedicure.
The only limitation in this case may be the length of the nail plate. Because to make a high-quality drawing so that it does not blur during application, a lot of free space is required.
Manicure “liquid stone”
“Liquid stones” on nails is a manicure technique that is not new, but still common. It is mainly used to create evening and New Year's designs. If you make a small “liquid stone” and use a light base, then this option can be easily worn on weekdays. It could be a classic French jacket with a stone on one finger.
Design technology with beautiful “liquid” stone
In order to create this unusual beauty on your nails, do not forget about the very first steps. We put the nails in order: apply the base layer as the first layer and dry this layer, apply color with the second and third layers. Next, we apply the top coat, preferably without a sticky layer at once, so as not to degrease the nails again later. Let's move on to the most interesting part.
Creating a manicure with “liquid stone”
- Take black gel paint and a small thin brush. We take a small amount of paint onto the brush and draw the outline of the stone, it should be oval. Then dry for about 2 minutes.
- Next, take a small piece of colored foil and degrease it on the back side so that it can be better imprinted on your finger.
- Then we apply the back side of the foil to our finger, press it tightly and tear it off. The result is not yet a voluminous stone.
- In order to add volume to our stone, we take any extension gel. We collect the gel on a thin brush and place it evenly on the surface of the foil, first carefully filling the edges, and then adding a large drop for volume. You can also turn your hand over and hold our stone down for a more voluminous shape and even distribution. Dry our pebble for 2 minutes.
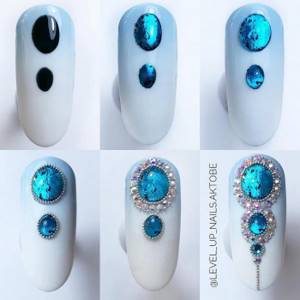
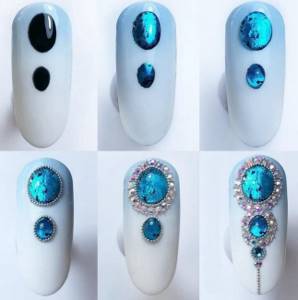
Framing the stone with rhinestones
- We prepare the rhinestones and pour them into the lid.
- Take the base and apply a drop of the base onto the foil or palette.
- Next, we take a thin brush and carefully move along the perimeter of our stone with a brush with a base on which we will plant our rhinestones.
- Next, using a stick or pencil, we begin to lay out rhinestones around it. And between the rhinestones we add silver broths. Dry for 1-2 minutes (depending on the type of lamp you have).
- The final finishing touch is to apply top coat to the decorated finger. Place a drop of topcoat on a thin brush and coat the space between the rhinestones. The rhinestones themselves cannot be covered with a top coat, as the edges of the rhinestones will merge and they will no longer sparkle so beautifully. Just as carefully, with a thin brush, coat the stone itself with topcoat and polymerize it, a little longer than usual. We use the top without stickiness!
An important point: Before creating a “liquid stone”, the surface of the nail must be thoroughly degreased, since the technology uses transfer foil, which during the process must be transferred only to a given part of the nail, and not to its entire surface.
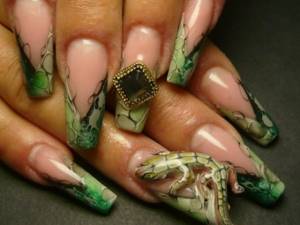
With the help of such simple manipulations, you can create a beautiful French manicure decorated with stones yourself. It can be easily done even on short nails, only the pebble itself will need to be made smaller, and the smallest rhinestones or just broths will need to be used for framing. Also, a liquid stone can be cut by casting - a design made with thick black gel-color with an imprint of metallized foil in gold or silver.
The step-by-step photos below briefly show the technology for making a design with stones.
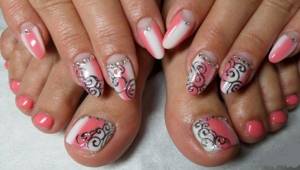
Design depending on the shape of the nails
The liquid stone technique on nails, photos of which are becoming increasingly popular in specialized and fashionable glossy magazines, is used on extended and natural nails. Therefore, the design and size of the stone is selected by the master depending on the shape of the nails.
Stone casting can be done on round, square, pointed and oval nail plates, the main thing is that they are not too short. On almost any work surface you can recreate miniature jewelry masterpieces that will delight the owner of this manicure.
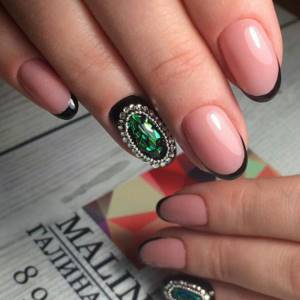
Design with colored foil
The same emerald or turquoise effect can be created not with paint, but with colored foil of one of the shades.
You will need : a brush, black gel paint, foil, gel, crystals and metal broths for decoration.
- Apply two drops of black gel paint to the buffered gel polish and polymerize.
- Press the turquoise foil with the back side to get the color.
- We spread the volume with gel and polymerize it.
- Cover with top coat and polymerize again.
- We remove the dispersion and decorate the stones with crystals and broths.
In order for the crystals to stick well, we coat the perimeter of the design with gel, plant the crystals, and after polymerization, once again we additionally go over all the recesses with a top coat, but not over the surface of the rhinestones.
It is recommended to embed the broths halfway into the top or base. If they are colored, it is better to cover them with topcoat at the finishing stage so that the color does not rub off. If they are metal, you don’t have to seal them.
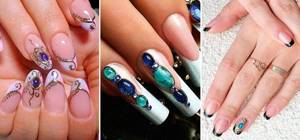
Manicure with rhinestones: types, ideas, instructions for designing and fixing crystals on nails
Design ideas: popular decor and new items
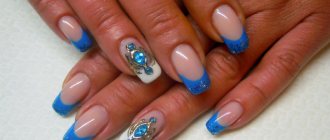
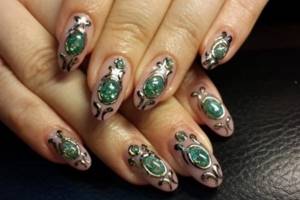
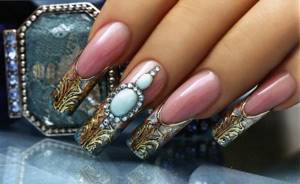
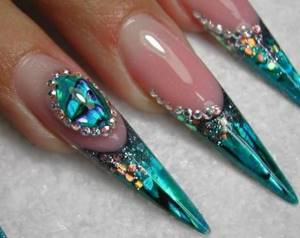
One of the most popular decors when using liquid stones are oriental motifs , which are performed in most cases on long square nails. Their tips are covered with gold, onto which a simple pattern is applied with bright blue and turquoise gel.
In order not to overload the image, casting is done only on one nail, and is not limited to one gem. At the base of the design there is a large turquoise stone, a little further away a bright red ruby is created, and around them there are many small transparent emeralds, which act as the setting of this “jewelry”.
New decor items using liquid stones represent original spring motifs. So on the nails of fashionistas appear emerald insects, ruby dragonflies, sapphire scorpions and butterflies, as well as luxurious peacock feathers, the “eyes” of which are made of large and juicy gems.
All these designs are decorated in gold, and the background of the nail plate is chosen in the most delicate pastel shades in order to concentrate attention on such an unusual contour of the liquid stone.
Shades
Look at these example photos. As you understand, the end result deserves special attention. By using special innovative polymers, young ladies can get not only greenish translucent emeralds. Imitations of stones such as:
- deep and rich green malachite with subtle tints;
- luxurious turquoise;
- crimson and red rubies;
- delicate and refined rose quartz;
- A fancy sapphire with many shade options.
Eastern style in drawing
Casting liquid stones is gaining popularity, so masters are happy to experiment, creating jewelry masterpieces on their nails. Oriental-style patterns are especially beautiful when combined with this technique, because they themselves are rich and luxurious, since they are made of “gold and jewelry.”
And liquid stones allow you to achieve stunning results, because gems made on nails look natural and bewitching, turning your fingertips into a luxurious oriental fabric, embroidered with gold and covered with bright red, blue and green stones.
Equipment Manufacturers
As for reliable equipment manufacturers that allow you to play with precious shine, edges, radiance and luxury of design, this is the E.Mi brand . The brand offers the purchase of polymers specifically aimed at creating such nail art. However, it is worth considering that only those masters who have completed the course and received certification from the author of the technique can buy them.
The use of licensed drugs is a guarantee of high quality results. This decor will be very durable and effective.
MagicNail is also widespread , offering to deviate from the basic rules of technology and use special stickers. The holographic glitter pattern looks luxurious and sophisticated.
The CNI company produces high-quality products. Another, less popular brand is Nogtika . It produces excellent stained glass gels suitable for use on the job.
The YRE brand produces gel polishes to implement this technology. The brand is distinguished by the quality and wide color range of its products.
It is difficult to compare some materials because the use of stickers and gels varies. Regarding the cost of products from the MagicNail brand, it varies from 80-100 rubles, while the drug E.Mi. The cost reaches 540 rubles. Nogtika produces products at a price of about 200 rubles per pair of jars. However, 15 grams of CNI brand product will cost approximately 1,000 rubles. The cost of YRE products varies between 400 rubles.
This lesson covers the nuances of applying eye shadow.
Read the article with a step-by-step description of makeup for brown eyes.
Experts will tell you how to apply festive makeup for blue eyes: https://pro-cosmetic.net/makiayazh/glaz/golubyh.html
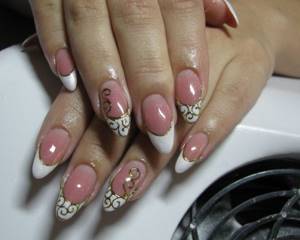
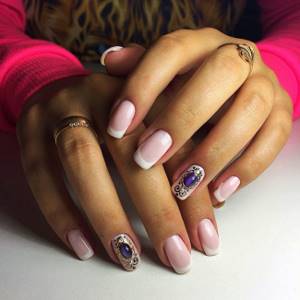
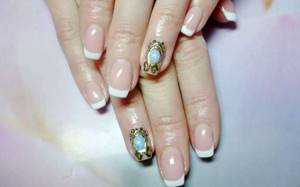
Liquid stones with French
One of the simplest designs in this style are liquid stones with a French finish. This manicure looks elegant and gentle, especially if it is created to match the jewelry that the woman is wearing. Therefore, it is not too flashy and is suitable for everyday life.
To perform this technique, you need to go through the following steps:
- Using an angled brush and white gel, draw a French pattern on the tips of the nails and it is better to choose discreet, pastel shades.
- Dry your nails under the lamp.
- Apply protective gel and fix it under the lamp.
- Using black gel and a thin brush, apply a pattern - the frame of any precious jewelry and dry the nails again.
- You need to apply gilding to your nails using foil, gluing it and sharply removing it.
- The place for the stone should be covered with yellow and silver gel to create depth of color, drying each layer with a lamp.
- Using a thin brush, cover the stone with colored stained glass gel, using the desired shade, and dry again.
- To form the volume of the stone, a sculpting gel is applied to its surface, giving it the desired shape using a thin brush. Then dry your nails under a lamp to harden the stone.
- Now all that remains is to cover the entire surface of the nail with the finishing gel and dry the nails again.
Liquid stones in combination with the casting technique: step-by-step instructions
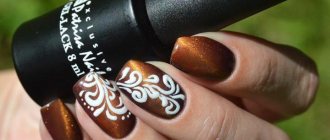
You can make a beautiful frame with imitation metal monograms using the casting technique. It is based on applying a design with black gel paint, and then sealing the paint with colored or gold or silver foil.
To complete the design you will need : a hair brush, black gel paint, gold foil, purple stained glass paint or colored purple gel, top coat and a lamp.
- We design French nails, paint the ring fingers with white gel polish and seal them with a top coat.
- After drying in the lamp, remove the sticky layer, and remove the shine from the ring fingers with a buff.
- Using black gel paint we draw the frame of the polymer and the monogram and dry it in a lamp.
- We wipe the golden foil from the back with a cotton pad soaked in a cleanser, and then apply it tightly to the paint.
- We cover the golden monograms with top coat and dry them in a lamp.
- Place extension gel in the center mixed with purple stained glass paint or purple gel paint.
- We wait until the surface is leveled. You can turn your hand with your nails down so that the polymer does not spread, but acquires an even volume.
- Dry it in a lamp.
- Cover with top coat and polymerize.
Design options for a French jacket - a selection of ideas
Liquid stone for wedding manicure
Each bride carefully thinks through her wedding look, and a special place is given to her fingers. Traditionally, girls choose a French manicure - stylish and discreet, but with the advent of liquid stones they began to increasingly resort to casting. At the same time, it is not worth decorating each nail with a gem, since the bride’s appearance should remain gentle and not overloaded.
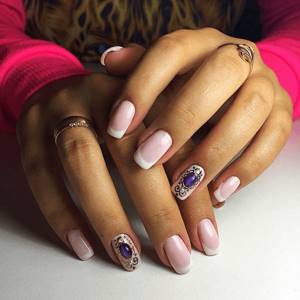
Therefore, most often they work with the ring finger, choosing not too bright stones - pearls, crystal, soft pink or white sapphires and they are framed exclusively in gold or silver to match the wedding ring.
Stylish pixie manicure with stones
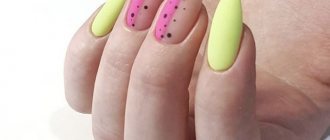
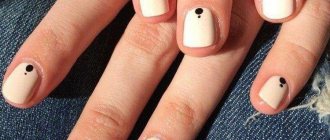
One of the simple yet unsurpassed nail art designs. Having completely covered your nails with pixie stones, you need to make bright accents in the form of several small bright stones. Manicurists advise painting the rest of the nails with a light, monochromatic color so that the manicure does not look too flashy.
Every girl pays special attention to her manicure. And it’s not surprising that all fashionistas try to follow stylish and fashionable nail art ideas
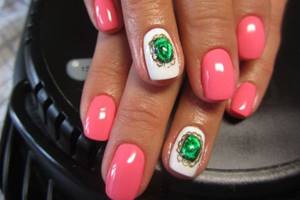
One of the spectacular decorative elements are stones. Decorating with colored stones adds a vibrant touch to the design and also attracts a lot of attention. This decor is elegantly suitable for various outfits and events. With the presence of this decorative element, it will not be difficult to attract attention to your excellent manicure.
Features of removal, how to remove a design with liquid stones?
This type of manicure looks impressive and is extremely durable, so it is not easy to remove. The main thing to remember is that you should never pick stones off your nails , otherwise you can damage their surface layer.

To get rid of the casting, you will have to use a special machine or a hard file, which you need to grind the pattern until it disappears. But in this case, tedious and long work awaits. And when there is no trace left of the stones, all that remains is to treat the nails with special solutions to remove any remaining gel.
Foil
Casting manicure
It was mentioned above that casting nail design is performed with special foil. What kind of foil is this? This is a special manicure material that can be used both for extensions and for working with natural nails. This foil is sold in sheets and strips. This is the thinnest film on a fairly dense substrate. The range of colors and types of embossing is very wide and every master will be able to find exactly what the client wants.
All foil for casting on nails is divided into two types:
- Transferable;
- Invoice.
Overlay foil can make the job a little more difficult. You must first cut out the required pattern from it, and then “plant” it on the gel. The foil casting on nails, like the one in the photo, was done using transfer material. Working with such foil is much easier, since there is no need to cut out the design in advance. However, this may seem inconvenient if the master’s hand is not too “stuffed” to apply patterns.
[yandex2] [google2]
Despite all the shine of the foil and its brightness, a cast manicure, as seen in the photo, can also be a completely everyday design. To do this, you just need to not overdo it with the decor. Whereas richly decorated casting is suitable only for a special occasion.
French with casting and liquid stones, as in the photo, is very popular. Despite the rather abundant decor and large size of the stones, this does not make the nails heavier. Such stones are called liquid because they are not made of glass, like the rhinestones we are used to, but of a polymer gel that can imitate a rhinestone. This stone is formed by gel directly on the surface of the nail.
Pros and cons of liquid stones on nails
A manicure created in this style has its advantages and disadvantages, which you should know about before you start implementing it.
The advantages of casting are undoubtedly:
- Durability. When creating this nail art, not rhinestones are used, but special gels, so the stones embodied on the nails will not fly off with any careless movement. So the completed drawing will last from a week to a month or even more - it all depends on the lifestyle of its owner.
- Beauty. This technique will allow you to create real masterpieces on your nails that are not inferior to precious stones and will captivate those around you with their radiance and rainbow tints.
- Relatively easy to apply. To create the perfect manicure you just need a little practice. In addition, you can always use ready-made pebbles made of special polymer materials that are easy to attach and sit firmly.
- Versatility. This technique is used not only on artificial, but also natural nails.
This manicure has its drawbacks:
- This technique is quite expensive, since an impressive list of ingredients is required to create polymer stones.
- This manicure is designed for long nails, since large free space is needed to complete the patterns.
- In most cases, the finished manicure turns out to be heavy and quite bright, so in everyday life it will look catchy and quite defiant.
One of the most luxurious and original manicures appeared thanks to the liquid stone technique.
With its help, you can create amazing jewelry masterpieces on your nails, at home, that are suitable for special occasions and for every day, and their photographs will not leave any fashionista indifferent.
How to do a manicure?
Nail designs that include the liquid stone technique can be done independently if you use a photo that shows step by step how to make such decor. This manicure is a three-layer nail application technology. First, the contour is distributed, and then the stained glass gels and sculpture gel. Moreover, the last component allows you to create the effect of a magnifying glass, which fills the stone with an unusual radiance.

You can do your own nail design using the liquid stone technique.
Special materials and tools will help you make a creative design. Shine and the desired color are obtained through a combination of shiny varnish with paint and foil.
Special materials and tools will help you make a creative design.
You can try these combinations:
- Vintage green gel and silver glitter are used to create the emerald.
- To obtain a ruby, a base of golden glitter is mixed with red pigment.
- For turquoise, blue varnish and silver mica are suitable.
As you gain experience, you can try combining different colors. For example, such patterns: sand motifs, oriental ornaments, velvet flowers and strict design.
The design with foil is the most original, it includes the liquid nail technique
But it is important to have extended and long nails. Casting is created using varnish
And the mineral is made by mixing stained glass paints and gel. These components are applied to a foil base. The shape is most often made more oblong, which makes the fingers more graceful and elongated.
Casting is created using varnish
To create this kind of decor, you need to have long nails, on which there is enough space for placing the pattern.
What is liquid granite?
Externally, liquid granite is practically no different from natural stone, but when you touch it, you will notice that it is smoother, warmer, and very pleasant to the touch. By origin, it is an artificial polymer, which contains up to 80% stone chips and about 20% polyester resin with a hardener.
Thanks to the liquid form, a wide variety of products can be cast from such material, which, after hardening, will be no less beautiful and luxurious in appearance than natural ones. In addition, liquid stone is easier to process and is more convenient to use and operate.
Products made from liquid granite are safe and environmentally friendly. As polymerization proceeds, various chemical reactions occur in the mixture, and no harmful elements remain in the product.
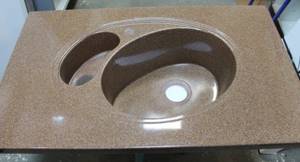
Sink made of liquid granite
The composition of liquid stone can include crumbs with a fraction of up to 2-3 mm of other types of minerals - marble, quartz. This will help make the appearance of the finished products more original and attractive.
Advice! To give liquid granite the highest strength, polyester resin can be replaced with polyurethane glue.