Hello, dear readers! Have you noticed that vintage nail art is back in fashion? Many girls use craquelure nail polish to highlight their individuality. Want “snake skin marigolds”? Or maybe you are attracted to spider manicure? Then you should definitely get acquainted with the amazing craquelure coating.
Today I will tell you what this design is and how to do it correctly. You will also learn the techniques used by professionals when applying such varnish and the rating of its best brands.
"Cracked" technology
Do you agree that a regular manicure has long ceased to be the harsh reality of a well-groomed woman? Now it can rightfully be considered a part of fine art. There are so many techniques that can be used to make real masterpieces out of tiny ladies’ nails!

So the nail industry, several years ago, borrowed the technique of artistic aging in painting - craquelure (in other words - crackle, crack). Translated from French, “craquelure” means “crack.” Which led to the creation of vintage nails in manicure.
Rules of care
In order for the decorative coating to serve for a long time, you need to take into account a few simple tips: the surface should not be wetted with plenty of water, and it is forbidden to use abrasives or chemical compounds for cleaning. Do wet cleaning no more than twice a week with a soft cloth and soapy water.
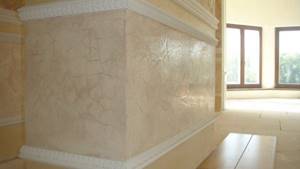
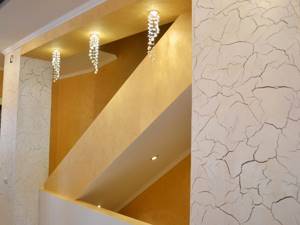
Stylish decor for a cafe
Important! Craquelure is a fragile coating that can be damaged by impact or when moving furniture. The base may crack in the wrong place, which will lead to the detachment of a large fragment. Only a specialist can restore it to its original appearance.
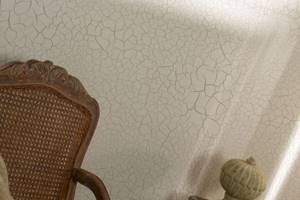
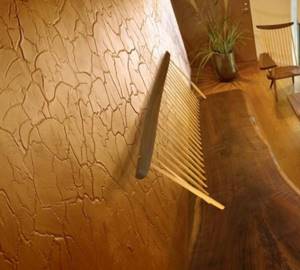
The surface of the walls
Craquelure looks impressive and gives the room a special atmosphere. If you apply the varnish correctly and take care of it, this coating will last a long time.
Varieties
Ten years ago, “antique” designs on nails were created using a brush, then they got the hang of using foil. However, the nail industry does not stand still. Experts have created a varnish with a craquelure effect.
This is interesting. What do you think causes cracking? It turns out it's all down to one tricky component. The varnish contains a special solvent, the particles of which repel each other at the molecular level. As a result, small cracks and veins appear, which expose the first layer of coating.
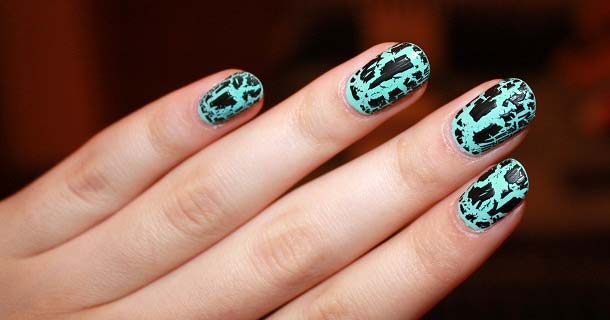
These days, four types of craquelure on nails are most often used:
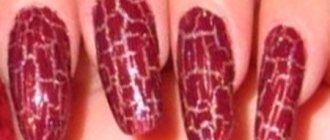
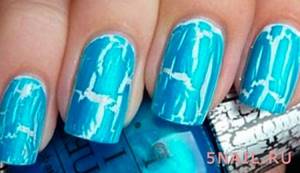
- python - imitation snake skin;
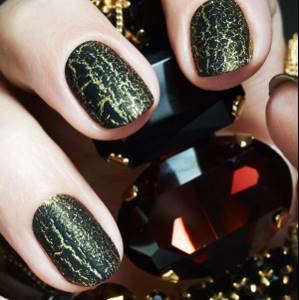
- crocodile - your nails will look like the skin of this reptile;
- cobweb - the nail is strewn with small cracks that look like a cobweb;
- fence crack - creates an imitation of large cracks, like on an old, shabby fence.
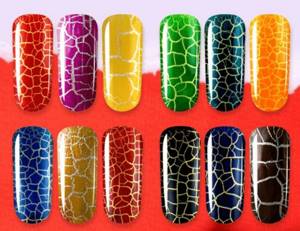
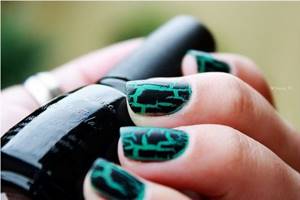
Craquelure coating can be hard or soft. The first is the most popular in nail art. This is what allows you to create pronounced cracks.
For short nails
In this section we have selected successful designs for short nails. Please note that there are practically no truly short nails without a free edge in the photo - the craquelure pattern does not show up well in a small area.
Chocolate brown and white – it seems nothing special, but it looks stylish.
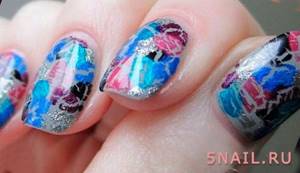
The most interesting and at the same time the most time-consuming part of the coverage are gradient or multi-color backgrounds. The photo shows that the substrate for the craquelure is a gradient or watercolor.
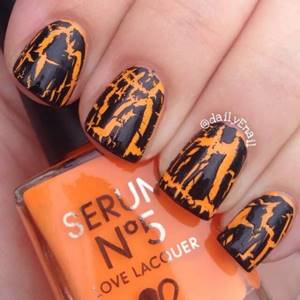
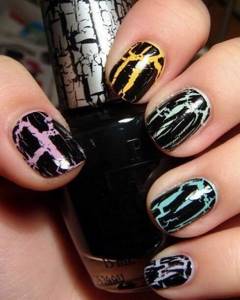
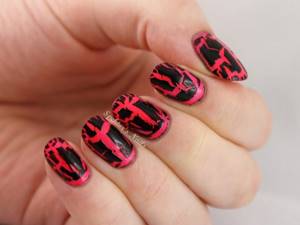
Orange and black is a Halloween color combination. At the same time it looks bright and creative.
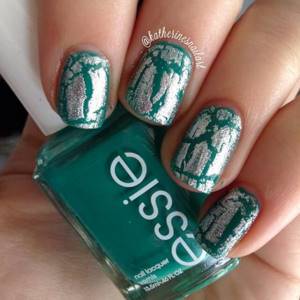
The photo shows the shade “Stripes & sails” from Essie. In combination with silver craquelure varnish, you get a feminine and sophisticated manicure.
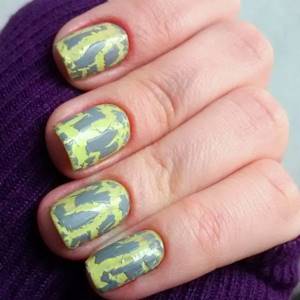
And this is an example of how to make a craquelure calm and restrained. To do this, take a yellow color close to pastel and a classic gray color.
This combination of colors creates the effect of antiquity, which artists achieve with the help of craquelure. However, with such a manicure it is quite possible to go to the office or to official meetings - everything is not too bright and quite simple.
Spider craquelure with small cracks in a similar color scheme is a manicure option for the New Year.
Here the craquelure is applied directly on top of the natural nail plate. If you decide to do it again, don’t forget to apply a clear base coat to your nails.
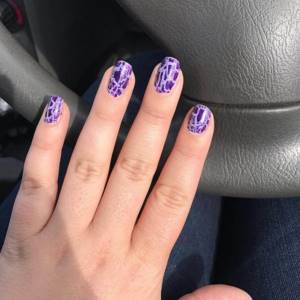
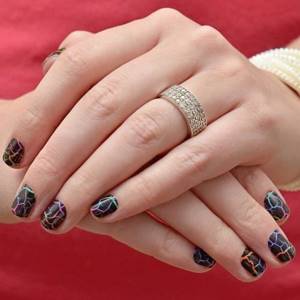
Despite the recommendation about contrast, try to choose shades within 1 color, as in this photo. Lilac and violet complement each other without getting lost.

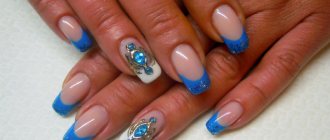
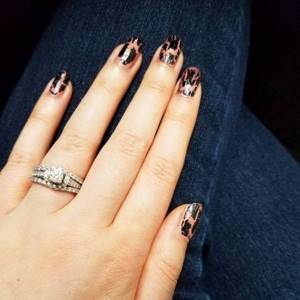
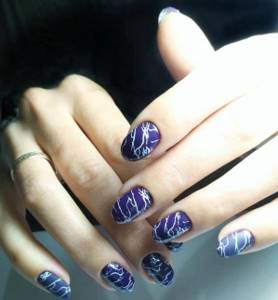
Rich blue in tandem with black is an elegant manicure for everyday wear or to complement a festive look.
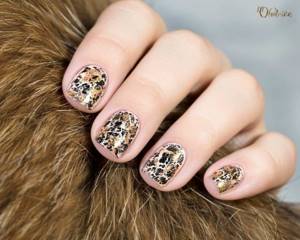
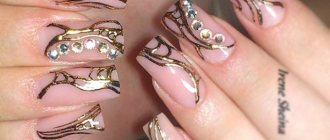
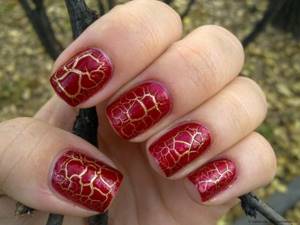
On top of the cracked layer, you can apply, for example, light glitter or foil prints. It turns out a kind of animal print.
It’s paradoxical that even bright colors – green, yellow, orange – look quite calm under the craquelure.
Such shallow and narrow cracks, combined with dark purple elements, create a lightning strike pattern.
Multiple background colors work especially well when they are within the same species, as here, all of which are considered pastels.
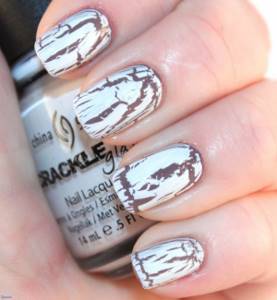
Here white craquelure varnish is combined with flesh brown. By using such a background, you can achieve the effect of negative space.
White manicure is always a relevant solution
Demonstration that even incompatible colors on nails can create an unexpectedly harmonious duet.
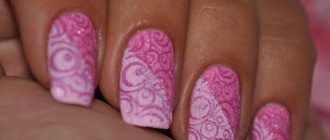
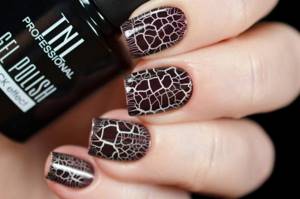
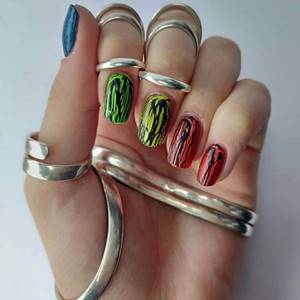
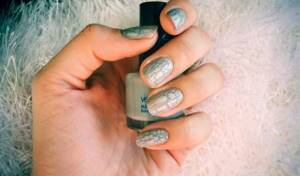
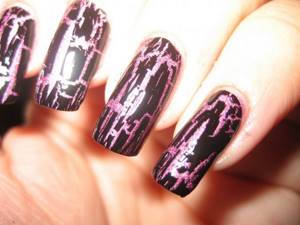
If the craquelure creates small cracks, the pattern becomes like snakeskin.
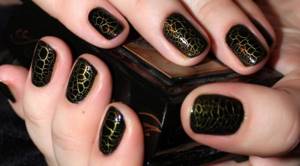
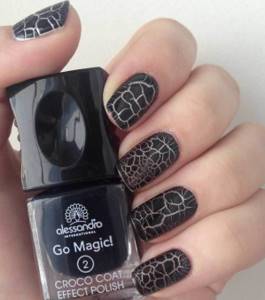
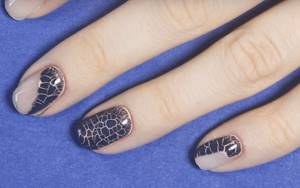
And this pattern is no longer about snake skin, but about crocodile skin. Stylish, feminine and attractive.
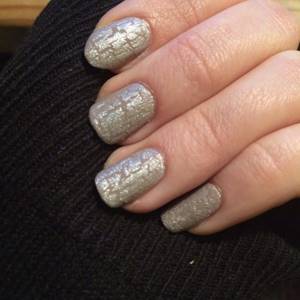
Calm gray manicure with cracks. The color looks good on nails of any length.
Manicure on short nails: fashionable shades, ideas, trends
Create openwork cracks
Making a craquelure manicure is quite simple. Any of us can easily cope with this task, even at home. However, before moving on to step-by-step recommendations, I would like to tell you a little about some of the nuances in working with such a coating.
This is interesting. Did you know that craquelure has one very unusual and interesting property? As the varnish coating dries, cracks of various lengths and shapes appear - they never repeat! As a result, each of your nails will have a completely unique design.
Application of two-component varnish
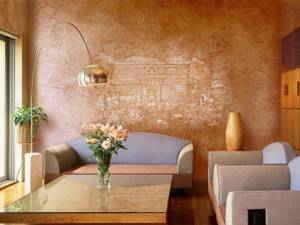
The principle of working with this tool is labor-intensive, but the effort expended is worth it, the result is excellent. The wall itself is painted in the chosen color, after which a universal varnish is applied to the dry wall. After a few hours, the procedure is repeated. Then treat the wall with finishing plaster or paint.
The decorated surface dries within 24 hours, using a hairdryer, the cracks will be more prominent and deeper. Grouting should be done after the top layer has dried. Dark shades of oil paint, gold powder, and colored dry pastels are suitable for this. Rub the product into the cracks with a soft sponge. Excess is removed with a rag soaked in vegetable oil. The finished surface is wiped with a dry cloth and a protective varnish is applied.
Decoration of large premises
The decorative surface can be smooth or embossed. You can apply textured paint. The technique is individual, but there are similarities:
- The plaster layer should not be more than 4 mm. For water-based paint, 1 mm is enough, otherwise it will be difficult to avoid the formation of smudges.
- Cracks are the main finishing elements; there is no need to create an additional bright texture. Experts recommend leaving small layers or shagreen.
- You need to work quickly and join the sections before the finishing layer hardens. Leveling the solution and creating texture should take no more than 15 minutes. When painting walls, the maximum pause is 3 minutes; if longer, the paint will pull together behind the brush.
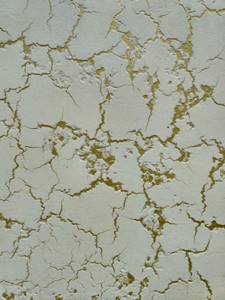
Uniqueness of the drawing
Ideal for the bedroom
Design secrets
Creating a spectacular craquelure coating depends primarily on the correct combination of colors and the right combination of two primary colors. There are several subtleties to achieve the perfect manicure with imitation cracks. The nail experts' recommendations are as follows:
- Choose complementary shades of varnish. This way you will get the most natural nail surface with small cracks.
- For a more pronounced openwork pattern, use contrasting or bright colors (classic - black and white).
- For pronounced deep cracks, spread the varnish in a thick layer.
- In order not to spoil the appearance of your nails, do not use a transparent varnish or hardener as a base. Otherwise, the decor will look like unerased old remnants from a previous manicure.
- Not quite sure how to apply once the polish is completely dry? Here you can deviate from the rules (paint from the base to the edge of the nail) and distribute the substance randomly. This will give you a more interesting finish.
Experts advise not to be afraid to fantasize while working. There are a ton of ideas! For example, it is not forbidden to use a hairdryer to speed up drying. Due to the strong air flow, it can slightly change the craquelure surface.
Features and secrets of designing a “cracked” manicure
The craquelure effect can be created in two ways: using special enamel marked “craquelure” or “crackle” or using casting foil.
The main secret to the perfect cracked nail design is the right combination of colors. For craquelure manicure, only 2 colors of enamel are often used. It is from their successful and correct combination that the effect of cracks is obtained.
Girls who decide to make a craquelure nail design for the first time are recommended to use “crackle” polish in white or black. They are universal, so they will be combined with any shade of varnish.
To create an original nail design, stylists advise experimenting and instead of the usual vertical application of “crackle” coating, make it horizontal, circular, or diagonal.
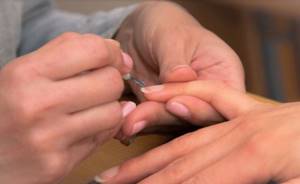
Execution technique
In order to do a crack manicure, you need to acquire the following tools and materials:
- manicure set;
- "base";
- regular colored polish or you can use gel polish;
- craquelure varnish;
- finishing coating.
First of all, you need to do a classic manicure: remove the old coating (if any), file your nails and give them the desired shape, polish the surface with buff.
Then you will need to perform the following series of actions:
- Paint your nails with the “base” and let it dry thoroughly.
- Apply regular varnish. Choose the color depending on the craquelure. Don't forget that the tones must match.
- Cover your nails with several layers of crackling nail polish. Do this carefully and quickly, since the substance tends to harden at lightning speed.
- Spread the top coat and let it dry for 3-5 minutes. Manicure is ready!
Advice. Before opening a bottle of craquelure, you need to roll it out well between your palms. This is due to the fact that small particles that are responsible for cracking usually settle at the bottom.
I suggest you watch a video in which the master shows how to apply gel polish with a craquelure effect. There is nothing complicated about it. You can see for yourself!
Advantages and disadvantages
Decorative plaster based on craquelure has positive and negative characteristics. This should be understood by those who decide to use it in their home. Advantages:
- High aesthetic appeal. Craquelure differs from other decorative materials. The walls will be original. There are no identical patterns, since small cracks form randomly.
- Long service life.
- Wide range of surfaces. The varnish adheres well to concrete, plaster, brick, plaster, cardboard, and other materials.
- Moisture resistance. The material is resistant to the development of pathogenic microorganisms and mold.
- Environmental Safety.
- Variability of coverage. For maximum design aesthetics, the surface can be additionally painted or varnished.
Living room decor
We must not forget about the shortcomings, which also affect the final quality of the repair:
- High price. This drawback is not related to the actual cost of the varnish, but to the fact that you will have to pay a large sum for the work of a real master.
- Difficult to apply. Craquelure is difficult to work with. To create a unique design you will have to invite a specialist or do a little training yourself.
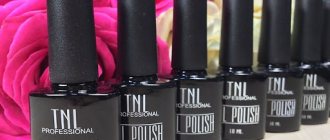
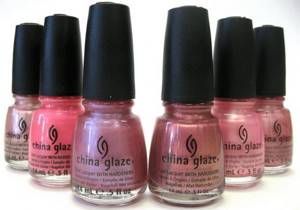
Craquelure varnish: review of the best brands
Many companies produce cracked varnish coatings. They are available for both professional and home use. Below I have given a rating of the most popular manufacturers.
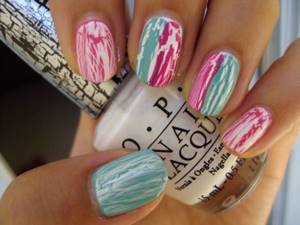
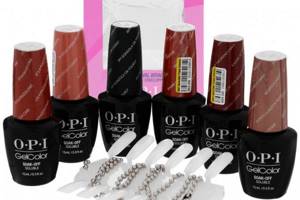
O.P.I.
American brand, leader in the nail industry. Sells craquelure varnishes in natural shades: olive, coral, pearl, gray, gray-brown. After drying, the effect of small cracks is created. All products have a liquid texture, so you need to apply the varnish in several (4-5) layers. Lasts a long time. There is only one drawback - the palette is not very rich, the colors are dim. The price for 15 ml is at the level of 600-700 rubles.
D.L.
Dance Legend is a Russian company that has been on the nail industry market for 15 years. Craquelure varnish is presented in a wide range of colors, so you can come up with a variety of combinations. Dries quickly, lasts a long time, cracks well. The cost of a 12 ml bottle is about 300 rubles.
El Corazon Crackle
Russian manufacturer of cosmetics. This is a budget brand. However, the quality of the products remains at a high level. The line of craquelure varnishes is presented in a large assortment. You can find any color: from dark to very bright. The company claims that all craquelure coatings begin to crack within 10 seconds of application. They dry quickly and do not require many layers (two are enough). The price for a small bottle is from 150 rubles.
China Glaze
This is not Chinese at all, as one might assume, but the most American brand. The company appeared in California and gained fame in the mid-1990s. Produces products for professionals in the nail industry. The craquelure coating is durable, there is a rich palette of shades. Does not require the application of a colorless “top”, since the varnish does not fade. You can buy the product in specialized stores. Cost – from 300 rubles.
Sally Hanson
Also an American company, it has occupied one of the leading positions in the nail industry market for 50 years. Varnishes with a craquelure effect have a wide range of shades and last a long time. The brush is easy to use. The consistency of the substance is thick. It cracks well, spreads evenly, and produces interesting patterns. The price is around 400 rubles.
DIY surface decoration
If you follow the recommendations of specialists, you can carry out the necessary repair work on your own, saving a decent amount of the family budget. To do this, you need to prepare tools and consumables:
- Protective varnish.
- Textured plaster.
- Sponge.
- Sash tool.
- Craquelure varnish.
- Putty knife.
- Multifunctional grout or acrylic enamel.
The grout and the paint itself must be chosen in contrasting shades so that the pattern stands out and is bright. Cracks can have different shapes. If the varnish is applied with a brush, the pattern will be parallel and deep. To work you need a flat brush with synthetic bristles. If you cannot do without a sponge, then it must be of the right size so that it is convenient to use. To make the pattern varied, strokes can be applied in different directions.
Stylish option
Varnish is available in two types:
- One-component. It is easy to apply to the base and dries quickly.
- Two-component. The application principle has its own peculiarities; drying takes longer. To speed up the process, use a hair dryer.
From the video you can learn how decorative painting with neat cracks is done:
Reviews
I decided to find out how girls feel about cracked manicure technology. I suggest you read the opinions of consumers. They are taken from popular Internet resources.
- Anya, 22 years old - “I love experiments in manicure, so I was happy to purchase an inexpensive craquelure varnish from the Russian brand El Corazon. I liked the effect with cracks, I chose universal colors. The appearance of the marigolds changed immediately. Many didn’t even believe that it was such a varnish - they thought that I had painted the nail plate like that.”
- Zhenya, 31 years old - “For 15 years now, I can’t imagine my nails without coating. I bought a new product from OPI - craquelure varnish. But at first I didn’t know how to use it. It turns out there is nothing complicated about this. The craquelure fits well on the nail, the cracking effect appears after 2-3 minutes. It’s a pity that this design didn’t last long – only 5 days.”
- Marina, 28 years old - “Once I tried to give myself a cracked manicure using varnish from Dance Legend. To be honest, I didn’t understand this design at all. Yes, it looks unusual, but after applying the black craquelure it felt like I was digging in the garden and forgot to wash my hands. The effect is for an amateur."
Creating craquelure
The process of using (applying) this varnish is very simple and is almost no different from simply painting a nail in one tone. Prepare your nail plates before applying. File the free edge, remove the cuticle, polish and degrease them. After this, you can proceed directly to the design creation process.
- Apply a protective base and dry thoroughly. It is better to make the layer as thin as possible;
- Apply a background layer, that is, the color that you want to show through the cracks. It is important that it be bright and rich, and most importantly, contrasting with the tone of the craquelure, otherwise the effect will not be achieved and the manicure will simply look sloppy. Some craquelure varnishes reveal their effect on any background, and some only on the one that comes with them. It is better to find out this aspect before starting a manicure;
- Dry this layer thoroughly. If necessary, apply a second one and dry thoroughly. After that, start applying craquelure nail polish. It is important to know that it needs to be applied thinly, so that the background layer is slightly visible. Otherwise, the varnish will not crack, and all the work will go down the drain;
- Dry this layer. If you watch it during the drying process, you will notice how cracks appear and increase literally before your eyes;
- After the varnish has dried, apply a protective topcoat and dry it thoroughly too.
After this, we can assume that the craquelure manicure, as in the photo, is ready.
If desired, before applying the final layer of fixative, you can decorate or supplement the pattern. This can be done using drawings with a thin brush or applying rhinestones. Some masters manage to combine craquelure with stamping, but this is quite difficult in the absence of sufficient practice. [yandex2] [google2]
Let's sum it up
- Craquelure nail polish once made a real splash in the nail industry. With its help you can achieve an amazing “aged” or “animal” image on the nail plate.
- In order for it all to look appropriate, it is important to correctly combine shades. But don't be afraid to experiment! This is welcome.
- The coating process is quite simple and does not require much time. Even a beginner can handle the technique.
- For a long-lasting craquelure manicure, choose proven products. Focus on consumer reviews and don’t be afraid to imagine.
Have you done craquelure on your nails? What do you think of this technology? Share your opinion in the comments!
See you in the next articles!
The nuances of using cracking varnish
If you want to make your crackle manicure look like the work of a professional, there are a few important things you should know.
Color selection
Many girls are interested in how to properly combine craquelure nail polish with a shade of the base coat. It is best to use colors from a contrasting range - white, black, etc. By the way, all possible shades are combined with black and white colors. Mutually complementary shades of the coating will also look interesting, for example, dark blue and soft blue or poisonous fuchsia and soft pink.
Nail length
There is one important nuance in the length of the nail bed - a manicure with this design will not look beautiful on very short nails. Therefore, make sure that your nails have a longer length. The cracking coating on extended nails, as well as on top of gel polish, looks even more beautiful.
Application methods
The type of cracks will depend on how you apply the cracking nail design.
- If you want your nails to look like fence crack or want to achieve the effect of hard craquelure with large cracks, then apply a thin layer of craquelure varnish. Before you paint your nail, wipe the brush dry and then begin applying the coating.
- The effect of soft craquelure with thin cracks is easy to achieve. To do this, apply a sufficiently thick layer of varnish with a cracking effect. Craquelure varnish can be applied not only from top to bottom, but also diagonally. You can combine different brush stroke directions and end up with a manicure with beautiful cracks.
- Another option for applying the coating is to paint only the tip of the nail and end up with a French craquelure.
Craquelure quality
- Under no circumstances use a jar of thick old varnish that has already formed lumps, otherwise your coating will look ugly.
- Before each use, the craquelure must be mixed, but under no circumstances should it be shaken.
- The craquelure effect will not work if you apply the coating to clean nails without a base.
The price for a jar of this product for nail art varies from 100 to 1000 rubles. This difference in cost is explained by the popularity of the manufacturer's brand. OPI, China, Glaze, Dance Legend, XD, Crackle are the most popular brands and they cannot be cheap. There is also a difference between the fake and the original - it is a small bottle. Real craquelure cannot be contained in a large bottle.
What errors can occur during application?
Apply the varnish using a wide brush in even strokes. You cannot brush the brush twice over the same area. Under normal temperature conditions, the size of cracks depends on the thickness of the varnish layer. The varnish dries in about 30 minutes. You can't overdry it. A poorly applied layer must be washed off and reapplied. This is easy to do if the varnish is water-based. To get small cracks on the surface, it is better to use a sponge. You need to dry the varnish until your finger sticks to it, but does not get dirty. Cracks do not always appear on a completely dry layer.
When using a hairdryer, it is not recommended to direct a strong stream of hot air onto the product. With a thin layer the cracks are smaller, with a thick layer they are larger.
Acrylic paint is selected with a matte surface. A one-component varnish should be placed between its two layers. After work, brushes are washed with turpentine, then with water and laundry soap.