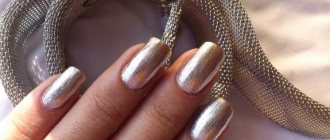
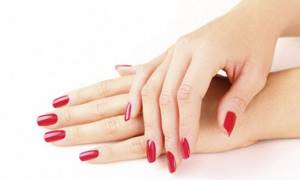
Well-groomed hands and a beautiful manicure are an integral part of the image of a modern girl. Increasingly, to carry out this procedure, girls choose special equipment - a milling cutter for hardware manicure and pedicure. Its use allows you to get a clean manicure, easily reach hard-to-reach places, create an even and neat coating “under the cuticle,” and also remove overgrown gel polish without soaking or exposure to chemicals that often cause allergic reactions.
However, sometimes even a professional manicurist finds it difficult to choose the appropriate model of apparatus for manicure and pedicure among the abundance of offers. Let's look at the types of routers, their key characteristics and differences.
What it is?
Hardware manicure, compared to traditional edged manicure, has made a significant step forward both for masters and for those who use this service. Such technical improvement allows the master to significantly improve the quality of his work. As for clients, for them, hardware manicure provides real comfort and safety: the fear of pain, cuts and long-healing wounds is a thing of the past.
Compared to edged manicure, hardware manicure has a number of advantages:
- long-lasting results with minimal time investment;
- exclusion of fungal diseases;
- guaranteed improvement in the quality of the nail plate due to quick adjustment of its shape and soft grinding;
- absence of microcracks and cuts;
- painlessness of the procedure and its safety;
- Possibility of treating problem nails.
Mastering the technique of performing hardware manicure is quite a feasible task. It is especially relevant for those who cannot do trimmed manicures often enough due to peeling, breaking or extended nails.
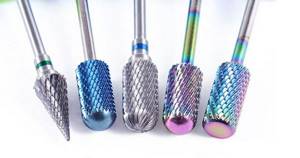
Types of cutters by shape
A manicure machine can replace many tools that were previously used for manicure purposes: nail files, nippers, scissors, buffs. By changing cutters, you can achieve a certain effect, since each attachment for a milling cutter has its own purpose. Rotating, it processes the nail, cuticle, skin around the nail, etc. The main thing is to know which form to choose for a particular area.
The most necessary attachments of the mini-kit (for home or as a starter kit for professional use) should include cutters for the following purposes: grinding and polishing the nail, cleaning it from rough skin, caring for cuticles, removing hard artificial coatings.
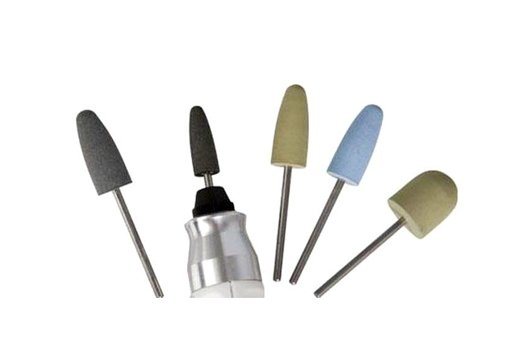
Milling cutter with attachments
The required set should also include the milling machine itself, which has a standard hole for cutters. Typically, attachments are suitable for all devices. The leading manufacturers of milling cutters are Strong, nail power, Scarlett, Beurer, Irisk, Babyliss, Kads, Vitek, Runeil. Most of these companies also produce components - nozzles (cutters) and caps.
A review of pedicure devices proves that the market is large enough to make the right choice. Their dimensions are different, they also look different.
For salon use, the list of cutters is varied and includes attachments of different shapes and materials.
Needle-shaped
The name fully characterizes the shape of the nozzle. It looks like a needle. It often has low abrasiveness, belongs to the fissure type of attachments - it penetrates into the most inaccessible places (removal of pterygium, treatment of periungual sinuses, cracks and calluses during pedicure, etc.). It has a gradation of thickness - from 1.2 to 1.8 mm.
Needle shape
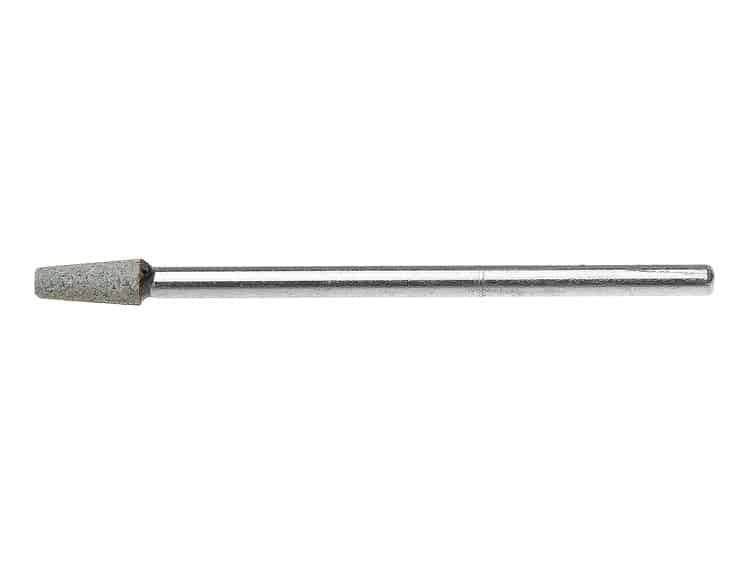
Reverse cone
It has the shape of a cone, with its widened part turned outward. It is used to level the nail plate, polish small calluses, and correct the shape of the nail. There are varieties with a rounded back part and a flat one. It is popularly used in pedicures, as there are various options for the abrasive of this attachment.
Reverse cone
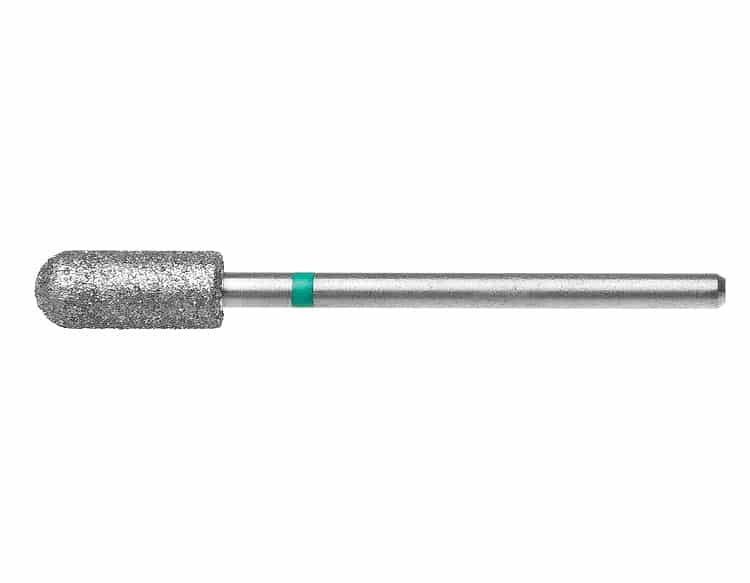
Ball
This attachment is often called a bur; such drills are also used for dental purposes. Varieties of ball diameters (from 1 to 2.1 mm) allow you to make a neat cuticle line and are used to treat areas near the nail. The ball can also be used to remove cuticles, smooth out cracks and other unevenness of the artificial nail.
Ball shaped cutter
Rounded cylinder
They come in different widths. If it is 2.3mm, then it is convenient for them to process side ridges, adjust the shape of the nail plate at the free edge, and remove a layer from artificial nails.
If you use 1.6mm, then the nozzle is suitable for treating the skin around the nails. Also used to treat the area under the nail after extensions. The spherical tip of the cylinder gently cleanses away dead skin and layers.
Rounded cylinder
Pointed cylinder
It is a cylinder with a sharp end. They call it "bullet". This router attachment comes in a choice of 1.2 and 1.4 mm. It is most popular for nail design, namely for preparing a place for inserting a rhinestone or stone.
After extending gel nails, the cutter will help to even out the space under the nail. Also used in treating the skin around the nail plate.
Pointed cylinder
Flame
The nozzle is almost universally used. It looks like a candle flame or an inverted drop. There are variations in the size of the convex section and tip. Suitable for treating nails from all sides - cuticles, periungual ridges, removing pterygium, polishing artificial nail coating, pedicure.
Cone
Like most other nozzles, it has different diameters with varying degrees of abrasiveness. You can use it to cut off excess gel during extensions and make a shape. The conical nozzle is also suitable for removing cuticles during pedicures and caring for the skin around the nail.
Cone shaped cutter
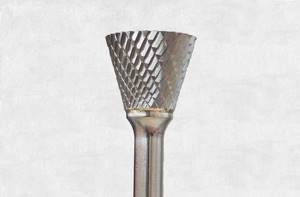
Frustum
A good cutter for working with artificial nail coatings. Having selected the required diameter, you can use the nozzle to polish the gel or acrylic coating of the nail, or remove a layer of shellac. Also suitable for caring for rough nails and skin on the feet, and correcting the shape of the nail.
Frustum
All attachments in the hands of an experienced professional will give the expected effect. For beginners, you should carefully select the nozzle depending on the task at hand.
Rating of manicure devices
This rating includes cars that have earned recognition from experts and users. We offer you the top 8 proven and popular models.
Strong 210/105L
market.yandex.ru / Prt Scr
This machine can be considered professional, as it has high power, is almost silent, produces up to 35 thousand revolutions, making it suitable for working not only with natural nails, but also with artificial and foot nails. The Strong manicure machine of this model is produced with a pedal for nail salons and without a pedal for home use. The brand's authority in the market is high, since the manufacturer is a Korean company that also develops and produces surgical equipment.
According to reviews, the device is reliable, easy to use and pleasant in appearance. Comes well equipped. The micromotor is equipped with a cooling system, which makes long-term care procedures possible. Among the shortcomings, users note expensive service at an official service center and the lack of a speed scale on the regulator, which is why they have to be adjusted “by eye”.
The average price is 14,890 rubles.
Marathon 3 Champion
market.yandex.ru / Prt Scr
Another device that claims to be professional, but is often chosen for home use. It's powerful, fast, and comes with a set of slim-bodied handles for precise handling. The Marathon manicure machine attracts with its reliability, quiet operation and compactness. The number of revolutions can be adjusted, but, as in the previous model, there is no speed scale, which is not very convenient. Another disadvantage is that the handle heats up during prolonged use, so the machine is suitable for home use and even a small manicure salon, but not for streaming customer service.
In reviews, users note that the device copes well with its functions, does not vibrate, and is quiet. It is equipped with a long cord, and the body itself is smooth and without sharp corners, looks aesthetically pleasing and is easy to clean.
The average price is 8990 rubles.
Beurer MP 100
market.yandex.ru / Prt Scr
In the line of household machines, the Beurer manicure machine is one of the leaders in consumer liking. It is chosen for its stylish appearance, a set of 10 attachments and German quality - the equipment is produced in Germany. Used for hands and feet, which is determined by its sufficient power. Equipped with convenient options: reverse, illuminated knob, speed can be smoothly adjusted.
According to customer reviews, the machine is very convenient and does not require the purchase of additional cutters. The body is of high quality, the cutters and handle are compactly placed in a special case in its upper part. However, with prolonged use it gets very hot, so doing both a manicure and a pedicure one after the other will not work. And it’s a bit expensive for “amateur” equipment.
The average price is 10,150 rubles.
RuNail PM-35000

market.yandex.ru / Prt Scr
Despite the fact that the manufacturer has provided the machine with a high number of revolutions and decent power, it is important to understand that the RuNail manicure machine is not intended for salon use. If you use it at home from time to time to tidy up your hands and feet, it will serve faithfully for years. If you try to “squeeze it to the maximum”, the manufacturer’s stated warranty period of six months will work out, and that’s probably all.
With careful household use, the model from the Russian manufacturer is convenient and practical. The handle is light, fits well in the palm of your hand, does not create vibrations when turned on, and the intensity of rotation of the cutter can be smoothly adjusted. There is a reverse and even a pedal included. Among the shortcomings, the only noteworthy ones are an obsessive buzzing during operation and low-quality cutters that come with the device. But the cost of the machine compensates for these disadvantages.
The average price is 5040 rubles.
IriskProfessionalJD-400
market.yandex.ru / Prt Scr
The manufacturer positions this model as a professional one, although its characteristics are unlikely to reach everyday use in the salon. But for home use, the Russian manicure machine Irisk is perfect. The rotation speed of its cutters is sufficient for working with natural and artificial nails and rough skin of the feet. The machine lasts a long time, is equipped with a comfortable and light handle, is inexpensive to maintain and, most importantly, is cheaper than many of its competitors.
The low price allows you to put up with its specific design, similar to equipment from treatment rooms, a slider regulator and an unsuccessful set of cutters that will have to be replaced with other attachments.
The average price is 4800 rubles.
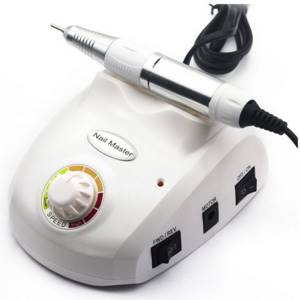
NailMaster ZS-603
market.yandex.ru / Prt Scr
The package includes a set of cutters for manicure and foot treatment, and a pen stand. The handle of the NailMaster manicure machine itself is lightweight, ergonomically shaped, the device is compact and durable. For home use, it is quite suitable both in terms of power and speed of rotation of the nozzles. The latter can be smoothly adjusted. The device is available in different colors and at a reasonable price.
According to reviews, it attracts attention with its operating efficiency and low noise level. But you shouldn’t expect miracles from the machine: you should use it only for personal purposes.
The average price is 2200 rubles.
NailDrill PRO ZS-717
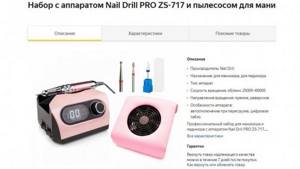
market.yandex.ru / Prt Scr
This model is interesting due to its affordable price and rich equipment. The NailDrill manicure machine comes with a vacuum cleaner, which solves the problem of disposing of skin and nail microparticles during operation. Positioned as professional equipment: it has a rotation speed of up to 60 thousand revolutions, and turns off when overloaded. The design of the model with a large digital display that allows you to control the settings is also interesting.
The set includes a set of three ceramic nail cutters. The handle is made in a metal case and equipped with a cooling system. One of the disadvantages of the model is the short warranty period declared by the manufacturer: only six months for the device and three months for the vacuum cleaner.
The average price is 6690 rubles.
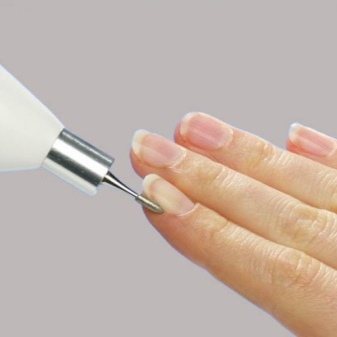
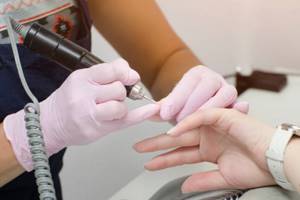
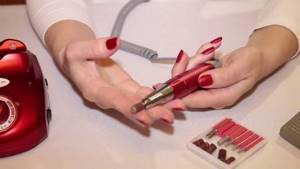
What is a manicure cutter and why do you need it?
A manicure cutter is an electrical device designed for nail care. With its help, you can adjust the shape of the plate, grind and polish, and remove dead skin and cuticle.
A photo of a manicure router shows that it looks like a small handle with a rotating shaft at the end; replaceable attachments are installed on the latter. Using the device provides many advantages. Hardware treatment speeds up the process of manicure nail care, does not harm their structure and does not injure the delicate skin near the plates.
Home and salon routers look almost the same, but differ in size and capabilities
Other options
A manicure cutter with a built-in mini-vacuum cleaner is original, since when these devices operate, fine dust is released. You can also purchase a vacuum cleaner with a dust collector.
It is important that the device fits comfortably in your hand. Otherwise, the load on the hand increases and there is a risk of injury. Weight is also important if the device will be transported.
Important information about using the machine
It is recommended that you familiarize yourself with the types of equipment and necessary materials in advance. Training in hardware manicure is not complete without practical training; you need to purchase a machine and cutters for it.
Types of procedures
There are classic and combined (or combo) treatment with the device. In addition, it is possible to prepare the plate for further gel coating. There is nothing complicated in the first option, since only the cuticle and side ridges are processed and the nails are shaped. Step-by-step hardware manicure includes the following steps:
- removal of old coating, if any;
- plate alignment;
- processing the cuticle with cutters (lifting, removing, polishing), as well as side rollers;
- giving shape to nails.
After watching the video tutorial, you can make sure that there is nothing difficult about this. Gradually, home processing time will be reduced, and the quality of processing will increase.
The combo involves the use of a machine, scissors or tweezers. First, the skin is treated with cutters, then the cuticle is trimmed in the usual way, as with a classic manicure. The advantage of this method is that you do not need to make a hand bath first. The technology is suitable even for neglected nails that have not been previously treated.
The plates are rarely left uncoated, because this is how the manicure looks complete and the hands look well-groomed. Gel polish under the cuticle is popular, that is, the material is applied close to the hole. It is necessary to thoroughly clean the pterygium and lift the cuticle; this is impossible to do without a device.
Cutters, apparatus and other materials
The first thing you should think about is the machine and cutters. As for the first tool, it all depends on the capabilities and goals. Hardware manicure allows the use of a small device from the middle price category. A good device is a router with a power of about 35 W. For professional work, a machine with a power of 100 W or more is required.
It is advisable to pay attention to the number of revolutions: for hands you can use up to 20 thousand rpm, pedicures are done at 35 thousand rpm
It is better to give preference to a device with a cooling system, reverse and a handle with a collet clamp. It is under these conditions that the work will bring pleasure, and during the session there will be no unpleasant sensations.
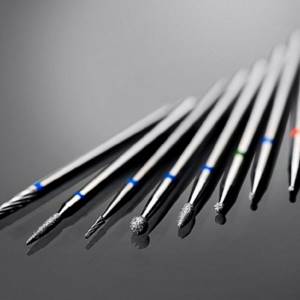
There are a lot of cutters, they are divided into 3 groups: for filing a nail, polishing a plate and polishing. In addition, they are made from different materials (ceramic, metal, diamond, silicone) and have different abrasiveness.
Learning hardware manicure does not require a large number of attachments. For home use, 2-3 cone-shaped ceramic cutters will be enough. They do not heat up and therefore do not cause discomfort. Red markings indicate low abrasiveness, blue markings indicate medium abrasiveness.
You will also need a pusher or wooden sticks to push back the cuticle, a brush to remove dust, files and buffs. Hardware manicure for beginners may involve shaping nails with a router. It is worth saying that it is sometimes difficult for beginners to do this, so it does not hurt to have a regular metal or glass file on hand.
Electric motor
The manicure milling machine has one of two electric motor options. Brushless suitable for professionals. This engine has uninterrupted, silent operation with a service life of several thousand hours.
A brushed brush motor is slower and emits a lot of dust. It breaks quickly. But for home use you can choose this type.
How to choose the right router for hardware manicure and pedicure
Power
The optimal power for a home manicure cutter is about 60 W. It is acceptable to purchase devices with a rating of about 30 W. If the power is less, the router will not be able to provide truly convenient operation and will also quickly fail.
Speed
A home nail cutter should maintain around 25,000 rpm. Professional devices have a higher rate, up to 35,000 spins. Such devices allow you to work with pedicures and extended nails, but they are also more expensive.
Possibility of disassembling the handle
It is necessary to purchase manicure cutters with collapsible handles. If necessary, this will allow you to install new collets, brushes and springs as the old ones wear out. Otherwise, if individual parts fail, you will have to replace the entire handle, and this will cost much more.
engine's type
Professional manicure cutters are equipped with a brushless electric motor with silent operation and large durability reserves. Home devices are usually equipped with brushed motors and are noisier, and also produce a lot of dust in the process.
Clamp type for cutters
Attachments for a manicure router can be purchased separately, so the equipment when choosing is not particularly important
But you need to pay attention to the method of attaching the tips. The most convenient to use are automatic clamps, where you just need to insert a new attachment into the socket, and semi-automatic ones, where you need to turn the lever until it clicks.
Cutters and clamps
It is better to choose a router for manicure and pedicure that includes a minimum of attachments. They can be purchased separately if required. In relation to the clamps, different fastening methods are proposed:
- Fixation in manual mode follows after tightening the washer. The user needs to click on the required button.
- In the semi-automatic type, the action is performed by turning the lever until it clicks.
- It is easier with an automatic clamp, where the cutter is inserted, after which the device will work.
TOP 5 attachments that a beginner must have
If you are just starting your acquaintance with hardware manicure and pedicure, purchase the basic five cutters, with which you can create the necessary shape and thoroughly process the nail and skin around it.
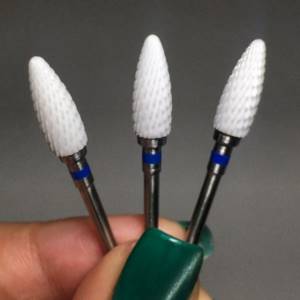
Diamond or metal corn with red notch
Use “corn” to remove the gel polish and treat the sides of the nail. The cutter has a rounded shape with a pronounced “belly” and a rounded tip. The nozzle does not heat up during use. It must be operated at 20-25 thousand rpm, selecting the FWD mode.
For beginners, it is recommended to buy 1 “Corn” with diamond coating and one carbide.
Flame with red notch
One of the main cutters that a novice master needs. With its help, the artificial layer is removed and the excess pterygium is cleaned. It should be used by turning on the device at a speed of 15-17 thousand revolutions. 10-15 cutters will be required.
FOR REFERENCE Pterygium is a thin film that fits tightly to the nail plate, the lower layer of the cuticle.
"Ball" with a red notch
Use the “Ball” cutter to remove rough skin around the nail and cut off the cuticle)
It should be used with caution, without pressing too hard on the nail, as it is very easy to get cut and ruin the natural nail.
The “Ball” cutter is used from the bottom up. The most optimal is 15-20 thousand revolutions.
Silicone cutters
Soft attachments are used for grinding and polishing the native nail. Use the cutter at the lowest speed, running several times from bottom to top of the nail. 3-5 nozzles are enough.
"Barrel"
This cutter is very convenient for shaping the nail, cutting the cuticle, and removing rough skin. The barrel is convenient and quick to do a pedicure and treat your feet. They work with the nozzle at a speed of 15 thousand revolutions.
—————————————————————————————————————————
Safety regulations
Now there are many master classes and video lessons with the help of which you can learn how to beautifully treat your nails and fingers. You also need to follow safety precautions:
- The device cannot be used suspended; both elbows must be placed on the work surface. It doesn't matter how you lean. Let it be comfortable.
- The nail is treated with short, but sliding and smooth movements, no more than 3 seconds. Do not allow the router to cut into the nail.
- The device must be kept parallel to the work surface at all times.
- Pressure force is also considered a relevant criterion. The handle must be constantly moving.
- It is necessary to bring hygiene skills to automaticity. Before treating nails with nail polish remover, remove the old coating, then keep your fingers in a bath of warm water, wipe and disinfect. The cutters must also be treated with a special liquid. Professionals use heat treatment of tools.
- When using nozzles, you should start with coarse-grained ones and gradually move on to fine abrasiveness and polishing.
Step-by-step hardware manicure technique
The procedure is carried out in the following sequence:
- Remove previous covering.
- Degrease hands and treat with antiseptic agents.
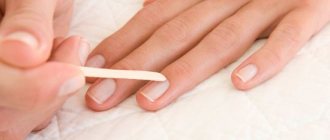
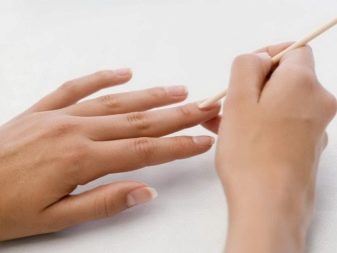
- Apply softening oil to the cuticle and gently move it away using an orange stick.
- Adjust the shape of the nail and its width.
- Use a cone-shaped diamond tip to remove the stratum corneum from the side ridges and open the cuticle.
- Clean the plate from the pterygium using a truncated cone cutter.
- Remove the separated part of the cuticle using a ball-shaped nozzle with minimal rigidity.
- Remove excess nail length using a cylindrical cap. Leave at least 2 mm.
- Treat the nail plates with silicone or cotton polishing cutters. You can use felt tips. The main thing is that the surface does not heat up. To do this, the device must always move without stopping.
- Remove dust with a special brush.
- Wipe your nails with degreasing lotion.
- Apply decorative coating.
- Treat your hands with oil or suitable cream. Easy to massage.
The master adapts the care process to himself, as a result, some stages may change places. But the essence remains the same: the cuticle is processed, the stratum corneum is removed from the skin ridges, the nails are given the desired shape, the plates are polished.
Pros and cons of hardware manicure
Hardware manicure has many advantages:
- Execution speed. Processing with the device does not require preliminary steaming, as in the classical technique, which significantly saves time. The entire process is automated, and the session lasts on average 20-40 minutes, depending on how hands are used.
- Safety. The likelihood of injuring the skin is virtually eliminated, since the procedure does not involve the use of sharp instruments. This also reduces the risk of infection. This is especially true for those with thin skin with closely spaced blood vessels.
- Duration of effect. Since the cuticle is not cut, it grows slower, making hands look well-groomed for up to several weeks. If you additionally regularly treat the cuticles with a tangerine wood stick, you can extend the effect for another week.
- Large selection of attachments. With the help of cutters you can work with both hands and rough skin of the feet. The caps also grind, polish, and give the desired shape to different types of nails. One device replaces many tools.
- Painless. The procedure does not cause pain even for those people who have a low sensitivity threshold. The only reason why you can feel pain is that the plate is too thin. However, with it, hardware manicure is contraindicated.
Step-by-step instruction
Many nail technicians develop their own sequence of stages over time, but they all boil down to the following basic ones: shaping the nail plate, polishing the nail plate, processing the cuticle and side ridges.
Stages of performing hardware manicure:
- Using a pusher or an orange stick, gently push back the cuticle
- A file is used to shape and adjust the width of the nail
- The side ridges are processed with a diamond cone and the cuticle is lifted/opened at a right angle
- Using a thin truncated cone, the pterygium is cleaned along the roundness of the nail plate
- Use a medium-sized ball of soft abrasiveness to remove the cuticle, which by this time is completely separated and turned away from the nail
- Use a cylinder or trapezoid to remove the length of the plate, leaving a minimum of 2 mm
- The plates are processed using a polishing attachment or polisher. The nozzle must be in continuous motion to avoid heating the surface
- Dust is brushed off with a brush
- Nails are wiped with a sponge soaked in a cleanser or dehydrator.
- The design is made with varnish or gel polish
- Apply cuticle oil or nourishing cream with light massaging movements.
How to use?
Any device comes complete with instructions, and before using the machine, you need to study the recommendations. Each tip has a description, so you can figure out what they are for, even if you decide to do a manicure at home for the first time. Before inserting the attachment into the machine, treat it with alcohol or another disinfectant solution.
If you have not worked with a router before, it is better to first practice on artificial nails or other suitable surfaces to understand how the device works and determine the appropriate pressure and power. Start processing at low speeds so as not to injure the nail or skin.
- There are step-by-step instructions for using the machine that will help you get acquainted with this device.
- First you need to remove the old varnish. Use your usual nail polish remover. Before starting work, your hands must be dry, so you need to dry them thoroughly.
- Take a wooden stick and gently push back the cuticle so as not to damage it. It is better to first apply a special solution to soften the cuticle to make the work easier. Such products are easy to find in manicure departments.
- Using a medium-hard nozzle, work on the cuticles and skin on the side rollers. Do not press the router too hard to avoid damage.
Find a soft ball-shaped nozzle and go over your palms and fingers to remove the top layer of dead skin cells. Use a trapezoidal or cylinder-shaped nozzle to even out the shape of the nail. After this, you can start polishing using a special attachment. This stage is considered the most difficult, so you need to do everything carefully
Work carefully and do not hold the polisher in one area. Use a small brush or brush to remove dust and skin particles. After finishing the work, you can use a nail strengthening compound or cover them with varnish.
Using the machine, you can not only process your nails, but also remove gel polish if you want to get rid of the annoying coating
To do this, it is important to choose the right nozzles - ceramic or metal are suitable.
In addition, this work is performed at high speeds, so care must be taken not to damage the nail plate. It is recommended to take breaks so that your arms don’t get tired and your movements are precise.
To remove the coating, follow the step-by-step instructions:
It is recommended to take breaks so that your arms don’t get tired and your movements are precise. To remove the coating, follow the step-by-step instructions:
- movements need to start from the cuticle, performing circular movements in an arc, first clockwise, and then in the other direction;
- after this, you should remove the varnish on the sides of the nail plate;
- The final stage is to work with the middle of the nail, you need to move the nozzle up and down to remove any remaining coating.
Advantages and contraindications of hardware manicure
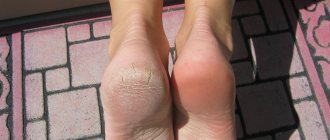
The main advantages of hardware manicure are its gentle effect on the skin, versatility and long-lasting effect. This technique is suitable for varnished or problematic nails, as well as for extended ones, as it does not injure the nail plate and the skin around it. It is also suitable for calluses, dry skin, and ingrown nails.
Among the contraindications of hardware manicure, the following should be noted:
- fungal diseases
- inflammation of the skin around the nail
- depleted nail plate
It is not recommended to do manicure in children under 12–14 years of age.
Manicure with a machine is done only on dry hands. They should never be steamed or moistened before work.
In addition, it is important to maintain sterility: disinfect instruments and hands. Before getting a manicure, carefully familiarize yourself with the technique and rules for working with the device.
The best brands
Previously, manicure cutters were used only in salons. Now they are on free sale. There are devices for different wallets. The best brands are:
- Promed.
- Proxxon.
- Micro-NX.
- Vitalina.
- Multibor.
- "Satellite".
- AnyXing.
Nail Drill, Option, and “Strong” devices are also popular. According to reviews, the Magic Bits Mini manicure router is in demand, characterized by functionality and high quality. To choose the right device, you should familiarize yourself with the basic selection parameters.
Operating principles of distance learning courses
Video lessons are aimed at people who, due to their busy schedule, do not attend such lectures on a regular basis. The advantages of such training:
- You choose the place yourself. For lessons, you don’t need to go to the other side of the city, leave work or look for a babysitter for your child. You can watch video lessons anywhere: in the kitchen, in a cafe, in public transport. Availability of Internet and desire is a priority.
- You decide the time yourself. Today you watch two videos at once, and tomorrow you can take a day off. There are no strict restrictions.
- Minimizing stress. There is no teacher standing over your head with a pointer. Calmly review the lessons, take notes, try them in practice.
- Price policy. The cost of such a course is cheaper than similar ones that include practical training. The money saved can be spent on purchasing tools.
There is only one drawback - you will have to train on your own.
How to properly remove unnatural nails
Extended nails should be removed using a router strictly according to the instructions - otherwise, there is a serious chance of damaging the natural plate. It can take up to 10 minutes to treat one finger. So, the order will be as follows.
- To begin with, the working area is reduced - for this you can use a crankcase or nail clippers. The procedure is carried out carefully to prevent cracking of the gel.
- Now you will need a cutter with a coarse-grain coating - this will help cut down the gel layer to the required thickness. Other nozzles should not be used. During operation, a cloud of dust is formed, and the shooting particles can damage your eyes, so it is better to wear glasses and take care of your respiratory tract. A gel layer no thicker than 0.5 mm is left on the nails.
- After removing the artificial plates, the surface of the nail is sanded. During this process, the device constantly moves so that the nail itself does not have time to heat up.
As for acrylic materials, there is a small addition - they can be removed not only mechanically (using a milling cutter), but also by treating them with solvent compounds. The above technique also takes part in these actions: during the preliminary removal of the top coating and the final grinding of the plate. The procedure for removing acrylic false nails can be seen here:
Various attachments are used to remove gel polish from nails. The optimal choice is a ceramic cutter. It does not heat up and removes coating perfectly even at low speeds. Its only drawback is the price of about 1,500 rubles. If you don't have that budget, take a look at carbide cutters. They cost 4 times less, but when working, you should set high speeds, which can lead to burns in inexperienced hands. More detailed information on how to remove gel polish with a router is in this video:
Regardless of the chosen method of removal, after the procedure the nail plate requires care and restoration. To avoid infections and the development of inflammation, this point cannot be ignored.
Criterias of choice

- Power is the most important indicator for choosing a machine. A professional device should have a power of at least 30-40 W. This will allow you to perform all types of work: manicure, pedicure, material removal, and filing of artificial nails. Is it 50 W or more? Here is a powerful device that can withstand even the most severe loads. Machines designed for manicure and pedicure are more powerful than just for manicure. So if you are also going to do a pedicure, choose a device with an indicator of 35 watts or more.
- Number of revolutions per minute. Typically, the rotation speed of the cutter can be adjusted during operation. But it should be at least 20,000 rpm for basic manipulations such as processing the cuticle and skin on the nail folds. 30,000 - 35,000 rpm is a very good indicator, but beginners are not recommended to immediately turn the machine on at full speed to avoid injury. You will need high speed to remove gel polish and biogel from nails.
- Cutter clamp type. There are manual, automatic and semi-automatic. The main disadvantage of manual (mechanical) clamping is that you will need more time to replace cutters. Sometimes during a manicure you need to change them up to 4-5 times, which is not very convenient to do manually when a client is waiting for you. But for a home manicure - why not? With automatic clamping, replacement is much faster. But if after use you accidentally forget to insert a cutter or plug into the device, the clamp will close and you are unlikely to be able to open it yourself. You will have to send the device in for repair. Therefore, automatic clamping requires careful handling.
- The presence of a pedal. It is not fundamentally important for operation, but it is quite convenient when you can control the device using a pedal. Your hands will be free for other work, which speeds up and facilitates the manicure process.
- Handle weight. There is a motor in the handle; usually in professional devices it fits quite comfortably in the hand. The optimal weight of the handle, convenient for work, is about 200 g. More - the hand will get tired; much less - it means that the device does not have a very powerful motor.
Speed
For household individual use, a milling cutter for manicure and pedicure with an indicator of 10-20 thousand rpm is suitable. If it will be used frequently, then a device with 35-40 thousand rpm is required. Professional manicure cutters have this parameter of at least 45,000. In any case, it is better to choose a device that has a speed switch.
Selecting cutter material
Depending on what material they are made of, attachments for hardware manicure are:
- diamond (from natural or artificial stone);
- ceramic (baked);
- combined (silicon-carbide);
- metal (steel, hard alloys).
Diamond
Diamond cutters are designed for:
- treatment of sensitive skin and thin nails;
- removal of thin cuticle.
Diamond spraying allows you to make the surface of the skin and nail plate more even. Small-diameter attachments help polish the nail ridge, while larger ones can remove calluses.
Diamond cutters are expensive, but reliable and durable
Diamond bits according to the manufacturing method are divided into:
- sintered (diamond dust is mixed with glue and heat treated at high temperature);
- deposited (stone chips are glued to the base blank during electrolysis).
The degree of hardness of a diamond cutter can be determined by the number of side notches and their shade. A black mark indicates high hardness, a blue mark indicates medium, etc.
Hardware manicure with diamond cutters - video
Ceramic cutters
Ceramic cutters can be included either in a professional machine set or in a mini-set for home use. The rigidity of ceramic tips is less than that of diamond ones. They are used to process the most difficult areas:
- removal of calluses, rough, keratinized skin;
- grinding down hard, dense nails;
- cuticle processing.
Ceramic is considered safer than diamond coating, but it wears out faster
You can determine the grain size of a ceramic cutter by its color:
- white - up to 200 microns;
- blue or pink - up to 100 microns;
- black (“artificial pumice”) – up to 400 microns.
Ceramic cutters - video
Combined
Combined attachments for manicure apparatus (“sand caps”) are a godsend for beginners. The combination of silicon and carbide is attractive due to its low cost and ease of use. You can find such cutters in any specialized store.
Sand caps vary in diameter, size and abrasiveness
Professionals consider silicon carbide caps to be disposable because they are enough for 1 manicure procedure. After use in the salon, such cutters are disposed of.
The roughness of the caps is determined in special units. They are selected depending on the operation:
- removing the main layer of the nail plate (grinding) – up to 80 units;
- grinding - up to 150 units;
- final polishing - up to 320 units.
Metal
Metal cutters can be made of high-quality alloy (medical) steel or hard alloys. With these attachments you can:
- remove keratinized areas on the nail fold;
- treat the cuticle.
Metal alloy cutter - strong and rigid
A carbide cutter made of tungsten and carbide is almost never used for natural nails, since there is a risk of harming the nail plate. But it will be useful for adjusting the length of artificial nails (acrylic).
Metal cutters have notches, which can be:
- straight;
- oblique;
- cruciform.
Direct notching is considered the toughest to work with. The cross-shaped notch is hammered much slower than the others, therefore it is considered the most durable. Reversible attachments that can rotate in both directions will be useful for left-handers.
Metal and diamond tips are classified as universal. With their help you can do many operations. They are equally suitable for sanding skin and filing nails.
What types of cutters can be used in the machine?
Even the most ordinary nail cutter should have a set of basic attachments. They differ in shape and material of manufacture. Each of them has its own goals. Let's look at the most popular cutters for manicure.
- Ceramic cutters are used to process cuticles. The most common one is corundum nozzle. This material allows you to remove the stratum corneum gently and without harm to the skin.
- When working with artificial nails, you cannot do without tungsten carbide cutters. This material has increased hardness and can damage natural nails. But for gel or acrylic nails, this attachment is ideal: it will easily give the desired shape to the material.
- Polishing cutters made of fabric materials (cotton, felt) or silicone are used to smooth the surface of the nails and give it shine.
Advice: when purchasing additional cutters, you should definitely pay attention to their price. Cheap attachments tend to wear out quickly.
What you need to know about the structure of the nail to use a milling cutter
For the procedure to be effective and safe, you need to know some physiological features. You should start with the skin. It has 3 layers:
- Dermal – the deepest. If you touch it, it will bleed.
- Epidermal - protects the base layer from damage. But it also cannot be cut, it contains living cells.
- The horny layer is a dead layer consisting of several more layers. You can remove everything except the bottom one, otherwise regeneration processes start and the cuticle grows faster.
The nail plate is surrounded on three sides by skin ridges. The one located at the lower edge is called the eponychium. Its main function is to prevent harmful bacteria from entering the nail root. That is why it cannot be touched. The cuticle is the dried part of the eponychium. It needs to be removed along with the pterygium (skin that has grown on the plate)
Based on this, it is important to consider the following points when doing a manicure:
- The nail bed contains nerve endings and capillaries. If you damage them and cut off the excess, it will hurt, after which a wound will form. It takes a very long time to heal.
- Only the stratum corneum can be processed with cutters. But you also need to not overdo it, so that the body does not begin to quickly replenish lost living cells.
- To understand whether part of the cuticle is horny or not, you need to bring your fingers close to the lamp and examine their color. If it is pink or red, you cannot touch such skin.