From this material you will learn:
- When do you need to straighten your nails?
- Causes of uneven nails
- Stages of nail straightening
- Materials for straightening nails
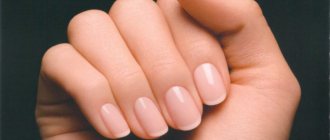
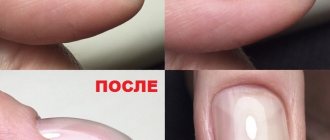
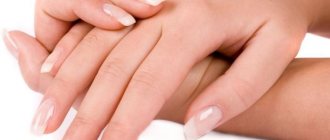
A flawless manicure cannot be imagined on uneven nails, riddled with grooves or indentations. Often the nail plate is thin, breaks easily, and has unevenness. These are the consequences of the harmful effects of the environment, household chemicals, poor diet and other factors. Besides the fact that it is unsightly, the varnish on such nails does not last long. But we can fix everything. If you are faced with a similar problem, straightening your nails will help you.
This is a simple procedure, thanks to which the nail plate becomes stronger, acquires a beautiful aesthetic appearance, and also receives additional protection. Why nails become deformed, how strengthening is carried out and with what materials, we will tell you in this article.
When do you need to straighten your nails?
Of course, everyone would like to have beautiful nails, but, unfortunately, not everyone can boast of this by nature. As a rule, smooth and hard nail plates are quite rare. Most often, specialists have to work with problematic nails. It must be said that exposing the plate to various buffs, files or devices has a negative effect.
The procedure for straightening nails is carried out both on short nails and on long ones if:
- we need to make them stronger;
- the nail plate is damaged.
By straightening the nails, the master is able to eliminate various defects (for example, waves, tubercles, etc.). Typically this procedure takes place in 2 stages:
1. The surface is primed with a base coat and the unevenness disappears.
2. An even coating is created with a smooth transition in the cuticle area and side ridges.
This is a very useful procedure with many positive effects:
- nails are strengthened, the coating lasts until correction (about two weeks);
- the plate is restored, the nail begins to grow correctly;
- the process is easy to perform and affordable (to strengthen and straighten nails, you do not need to spend money on special products; the procedure itself lasts no more than 10 minutes);
- when the coating is removed using a device, it is necessary to level it so that the base layer remains intact, thanks to this the nails will be protected from mechanical deformation;
- aesthetics appear, nails become smooth and beautiful, the smooth plate reflects glare and shines.
Why do you need to straighten your nails?
A natural nail is rarely perfectly even and smooth; all its bumps and depressions are emphasized when coated with gel polish.
And leveling the nail plate with a base solves several problems for the master at once:
- strengthening thin and brittle nails;
- masking irregularities, bumps, depressions and other defects;
- increasing the wear life of the coating.
The procedure guarantees excellent coverage, takes up to 10 minutes and allows you to increase your check. This is a universal and useful service that is beneficial to master.
If you do not know how to correctly perform this procedure, we recommend taking a webinar on straightening the nail plate.
At the webinar you will learn how to quickly and efficiently straighten your nails.
Causes of uneven nails
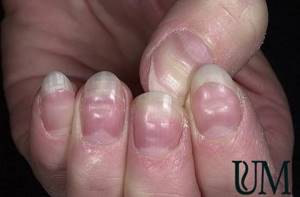
If you want a beautiful manicure, but you have thin and uneven legs, then it is unlikely to work. Even if you buy expensive varnish, the situation will not change - the manicure will look sloppy. It should be noted that nail defects such as bumps and dents usually indicate some kind of health problem.
If you want a beautiful manicure, but you have thin and uneven legs, then it is unlikely to work. Even if you buy expensive varnish, the situation will not change - the manicure will look sloppy. It should be noted that nail defects such as bumps and dents usually indicate some kind of health problem.
Ribbed nails usually occur due to microtrauma of the nail plate. Sometimes these are the first signs of diseases such as psoriasis, fungal infections, etc. But in most cases, this may simply be a structural feature, which is easily corrected in the modern world.
Recommended reading:
- Nail shapes: what are they and who are they suitable for?
- How to put on makeup correctly: lessons on perfect makeup
- Dark manicure on nails: the best color combinations and techniques for 2021-2022.
Let's look at the main reasons that can lead to changes in the nail plate:
- Mechanical damage. If the nails are injured, this may well cause their deformation and the formation of unevenness.
- Poor quality nail treatment and coating removal. For example, the use of hard files that are not designed to work with a natural plate injures it and causes the formation of tubercles.
- Using household chemicals without protection. If you do laundry, clean the house, or wash dishes without gloves, then harmful chemicals in cleaning products destroy your nails.
- Habit of biting nails. Usually, bitten nails are followed by their inevitable deformation, inflammation forms on the skin, and bacteria and viruses enter the body. Try to fight this bad habit.
- Fungal disease. The fungus is easy to catch when visiting public places. Typically, the affected areas are constantly itchy and bothersome. With this disease, the nails become thin and ribbed. It is imperative to consult a dermatologist who will prescribe treatment with special medications.
- Vitamin deficiency or hormonal imbalance. If you notice that your nails often begin to break, flake and become deformed, this may indicate a lack of vitamins, a lack or improper absorption of iron, or hormonal imbalances. Here, too, consultation with a specialist is required. He will most likely suggest getting tested, working on your diet, and advising you to take vitamin supplements.
- Smoking. Surprisingly, this addiction directly affects the condition of the nails: as a rule, they change color, microdamages form on them, and the risk of fungal infection significantly increases.
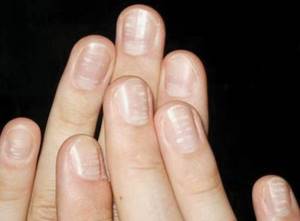
What are bumps and why do they appear?
Often we don’t think about the reason for ridged nails. And in vain, since such changes do not appear without a reason. Often problematic nails are a sign that a person is unhealthy. The appearance of nails and hair can tell about many diseases.
As a rule, the presence of vertical grooves that begin at the cuticle and end near the tip does not mean anything serious; just taking a course of vitamins is enough. And wavy plates with transverse stripes are a serious warning sign that should not be ignored. So why might they appear?
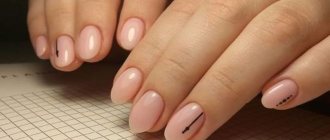
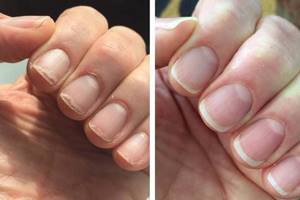
Stages of nail straightening
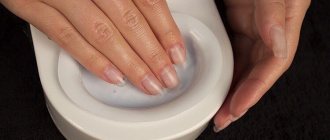
Let's take a closer look at how to straighten your nails. To prepare for it, you must file, remove the cuticle and the top thin film of protection, sand the nail plate, apply a primer, etc. After all this is done, you can begin the leveling process.
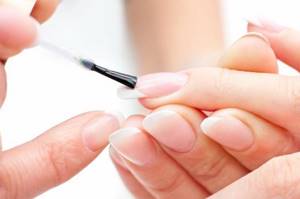
Apply a thin layer of base coat to the nails. We dry it using a special lamp. How long this process will take depends on the characteristics of the lamp.
Use a brush to place a large dot in the center. Then it is distributed to the upper edge. Due to this, the correct roundness and crescent bend are formed.
Movements with the brush should be done carefully, touching the nail only with its tip, without pressure.
Sign up for eyelash extensions at Anna Klyuchko's studios with a 15% discount until February 8
12 studios throughout Moscow, St. Petersburg, Nizhny Novgorod and Tula
223 masters for every taste
High-quality service with a 7-day guarantee
Regular promotions and gifts for clients
Full volume 1990₽ 1692₽ Double volume 2590₽ 2202₽ Triple volume 2890₽ 2457₽ Hollywood volume 3400₽ 2890₽
Book 15% discount
If for some reason it was not possible to apply the coating evenly, then this can be easily corrected - you just need to carefully turn your hands with your nails down. Gravity will allow the base to flow evenly and distribute the coating.
The last layer of base is applied to the transverse part of the nail plate, as if sealing it.
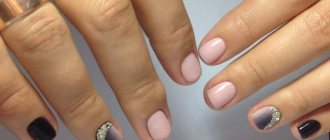
Benefits of leveling with gel polish
- Availability. This is the simplest option that does not require special skill or special skills. This means you can do it yourself if you have an ice lamp at home.
- High durability of color coating. When struggling with external imperfections of nails, do not forget about their beauty. By applying a colored coating to an appropriately prepared base, you will increase the durability of such a manicure. In addition, the polish or gel polish itself will not penetrate the grooves. So the base coat also performs a protective function.
- Instant effect. This is the most obvious advantage. You do not have to wait for the cause of the defect to be eliminated. In just a few minutes you will restore your nails to an attractive and healthy appearance.
- Possibility to correct the shape of the nail. When choosing this method, in addition to aligning depressions with waves and curvatures, you can correct the shape of the nail.
Instead of a base, you can use biogel.
Materials for straightening nails
In order to straighten your nails, you can use several basic products. What exactly to choose depends on what kind of damage the nail plate has.
Base
Typically, this coating is applied to longitudinal or transverse grooves on the nails. Use a thick or medium-thick base. It depends on how deep the irregularities are. This coating usually has a rubber base. The process itself includes the following:
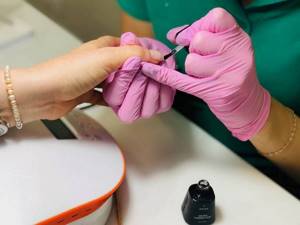
- Preparing the nail plate. Before we start straightening our nails, we do a manicure. This can be done either using a machine or manually. We remove the cuticle and peel off the thin film from the top layer of the plate. Using a nail file suitable for natural nails, file off the top smooth layer. Treat with a degreaser. Next, apply a primer, preferably one that does not contain acids, and distribute it evenly.
- Apply a thin base coat. To ensure that the entire nail is covered evenly, first apply a thin layer of base. The main thing is to make sure that the coating does not get under the cuticle. If this happens, then using an orange stick can easily fix everything. Dry the coating using a lamp.
- Apply further thick coats of base coat. Next, we apply a thick layer of base to hide all the unevenness of the nail plate under it: we drip the base onto the nail, just above the cuticle. Then we distribute it over the entire surface so that closer to the root of the nail the coating layer becomes very thin. We make sure that each layer seals the end properly. This is very important, because if moisture or air gets under the coating, the manicure will not last very long.
- Shutdown. Turn your hands over with your nails down for a few seconds so that the coating is evenly distributed. The base will be pulled closer to the middle of the nail, and only a small layer will remain in the cuticle and side ridge areas. Dry the layer in a lamp.
How to level the nail plate?
Both beginners and professionals are wondering: which base is best for leveling?
What other means can be used to level the nail plate?
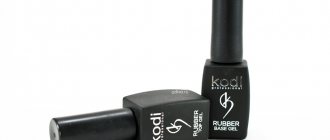
The main materials for straightening nails are rubber base, biogel and extension gel.
These products have their own characteristics and indications for use. We tell you in detail about each! Leveling can be done using a base, biogel and gel
Leveling the nail plate with a rubber base
Rubber bases provide excellent adhesion of the artificial material to the nail, preventing chipping and peeling of the coating.
When choosing a base for leveling your nails, it is important to pay attention to its consistency: it should be thick enough to form the ideal longitudinal and transverse arches of the nail and not flow onto the side ridges.
You should also know that leveling the nail with a base is performed on a thin layer of base (substrate, as masters call it).
When distributing the main volume of the base over the surface of the nail, the brush is in the air and does not press on the material so as not to leave grooves and dents.
If you do not understand the technique, perform the procedure for a long time and inconsistently, it is worth taking the webinar “Architecture: Volume and Form”, which contains all the information on how to base level the nails and achieve ideal architecture on any type of nails.
The following bases have gained well-deserved popularity and demand among nail artists:
- Base for gel polish RUBBER, Uno, 15 ml
- Rubber base Kodi, 12 ml
- Rubber base “Ideal nails” InGarden, 11 ml
- Firming base Elastic Rubber, Mystique, 15 ml
- Rubber base for gel polish, Bloom, 15 ml
The entire range of rubber bases for leveling the nail plate.
We have a huge selection of rubber bases on our website!
Leveling the nail plate with biogel
Biogel is good because it not only straightens the nail plate, but also has a healing effect. The material is created on the basis of teak wood resin, proteins and rubber, and contains useful components, thanks to which it restores nails.
Biogel is suitable for smoothing flaking, thin and brittle nails. It is non-toxic and can be used by pregnant and breastfeeding women.
The material is distinguished by the fact that it remains elastic after polymerization (and not hard like bases and gels), so the nail plate is not overloaded and can absorb the entire load: household work with your hands, light blows.
The most popular biogels are:
- Biogel classic, transparent, ruNail, 15 g
- Bio-gel transparent, Option, 15 ml
- Viscose nail gel Patrisa Nail, 15 g
More products are available in the “biogels for smoothing nails” section.
Leveling the nail plate with extension gel
Gel is significantly different from biogel: it is a synthetic material that becomes hard and durable after polymerization, but does not heal the nails.
The gel is more resistant to chipping and cracking, lasts a long time, compacts and strengthens the nail plate well, masking all its irregularities.
The best leveling gels:
- Natural Composite EMI Gel, 5 g
- UV gel, transparent, ruNail, 15 g
- UV gel Ivory, milky, OneNail, 50 ml
- Nail modeling gel No. 08 Nail Republic, 15 g
A huge selection of gels for leveling the nail plate in the ParisNail online store.
Leveling the nail plate with a base is the easiest and fastest option. Biogel has a healing effect and elasticity, and is also easily removed with a special liquid. Extension gel makes nails thicker and denser, and is not at all susceptible to chipping and cracking. Anyone can learn quality alignment!
Extension and correction with solid gels
There are such difficult situations when the nail has been injured and simply cannot grow in a certain place, or it grows crookedly, which spoils the whole appearance. In such cases, it is simply necessary to perform additional extensions or correction with solid gels.
1. Apply a small amount of base gel to the nail plate using rubbing movements.
2. We place the disposable form on the finger and perform additional extension of the free edge with a constructive transparent gel.
3. If the nail is trapezoidal or growing crookedly, it is important to press the nail plate to give it a beautiful shape and set the correct direction.
4. We complete the nail design and apply the third layer, leveling the surface as much as possible.
5. Remove the sticky layer.
6. Using a file, we even out the shape, focusing on the length of the other nails.
7. We cut with a safe carbide drum.
8. We cut out the thickness of the free edge with a carbide cutter with a black belt.