- 1 Several ways to make a beautiful gradient on your nails with gel polish - step-by-step video for beginners
- 2 Pros and cons of manicure with ombre effect 2.1 Advantages:
- 2.2 Disadvantages:
- 19.1 Method 1
Pros and cons of ombre manicure
Like any manicure design, the gradient has its advantages and disadvantages. Let's look at some of them:
Advantages:
- A huge number of options for creating an ombre effect. Great combination with other designs. You can use a large number of color shades in one manicure, thereby creating a bright and original manicure.
- Ombre manicure is universal. Using different shades, you can create both everyday and bright holiday manicures.
- Ombre can be used in symbiosis with other types of manicure, for example, French or moonlight. The result is always very unusual and impressive.
- You can do this manicure with a specialist or yourself, at home, if you have at least some skills in performing the degrade technique.
Flaws:
The technique of performing degrade will require patience and extreme accuracy; difficulties may often arise with the selection and combination of shades
If you have problems with this, then it is better to entrust the work to a professional at least for the first time. When combining the ombre effect with other designs, it is important not to overdo it. For example, using incompatible colors and even using rhinestones will look ugly and awkward
If you know that there are problems with a sense of proportion, then it is better to look for photos of finished works or consult with someone.
Nail design: ombre and degrade with special effects
Ombre nail design with gel polish is an independent nail art. At the same time, it can withstand decorative loads, that is, it can be combined with other designs. And if you find a reason to take your nails for a festive stroll, you can combine your favorite ombre with any current trend.
Let's talk about trends. It is not necessary to follow them, but if you want to keep up with the times and wave your arms with a fashionable manicure, you need to take into account popular opinion. Fortunately, it is not categorical and polyphonic.
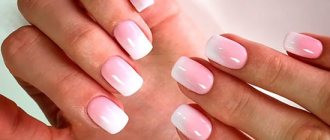
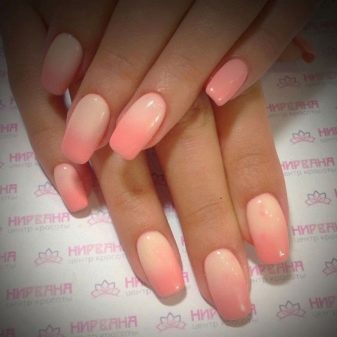
One of the options for a simple and elegant color tie is French ombre. The smooth transition of pink or beige to white looks gentle and unobtrusive. And, by the way, this particular ombre manicure will suit short nails favorably, optically lengthening them and creating the missing volume. You can experiment with colored tips or a lunar French theme by drawing a neat “smile” near the hole on a gradient substrate.
No, rhinestones have not gone out of fashion and still decorate manicures for going out, but increasingly preference is given to finely dispersed shiny textures - for example, glitter. It also shines, is also spectacular, but does not create a strange “expensive-rich” feeling, as happens with rhinestones and stones. You can sprinkle a gradient with glitter or create one by stretching glitter on a colored background.

An even more noble and discreet type of shiny manicure is with rubbing. You can decorate an ombre with rubbing pigment, or you can, as in the case of glitter, implement it. When creating an ombre by rubbing, pour a pigment of one color onto the free edge, and a pigment of a different color at the hole. Rub in with a sponge or brush and blend.
The gradient design can be painted, but after painstaking stretching you want to rest. Thanks to the stamping technique, you can relax a little and at the same time decorate your nails with a spectacular design. Stamping is still relevant, and it cannot be otherwise. In an era of global time pressure, express designs do not go out of fashion.
Geometric motifs remain at the top of the popular list for the same reasons as stamping. The talent of an artist, as well as a lot of time, is not needed for design. Zigzag, stripes and other geometric elements, shapes and figures are drawn quickly, and in combination with ombre they look less categorical and give the nails the right amount of relaxation.
If you don’t have enough experience for art experiments, turn to professionals. They will do whatever you want, and you don’t waste time - watch every move so that you can do it exactly at home. Beautiful manicures!
Interesting manicure ideas with ombre effect
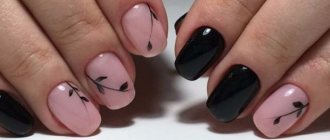
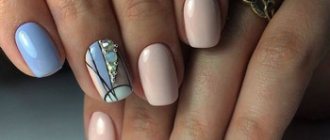
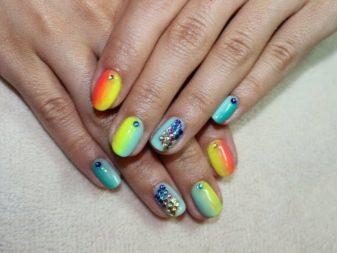
There are a lot of manicure design ideas using a gradient. You can dilute the gradient with patterns, stickers, and rhinestones. You can also use different gradient techniques (vertical, horizontal, diagonal, geometric) in one design. Improvise, show your imagination, but do not forget about a sense of proportion, then you will have no equal.
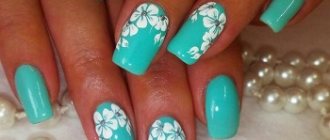
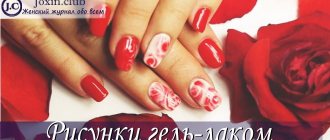
Rice. 1. Combination of ombre using an airbrush with French manicure and patterns. A very gentle winter option. Rice. 2. Ombre using colored acrylic powder. It looks interesting due to its “rough” texture. Rice. 3. A combination of vertical ombre with a rose pattern. Feminine and delicate design option. Rice. 4. Manicure for a romantic look using rhinestones. Perfect for a bride's wedding manicure. Rice. 5. A stylish and bright combination of a vertical gradient with a lunar manicure. A wonderful summer design.
A beautiful manicure is not difficult. A little patience, training, and every day you will be able to open new “horizons” of gradient manicure. Your beauty is in your hands!
https://youtube.com/watch?v=vBwZUVU0_Ps
Pros and cons of coloring
The inability to use gradient dyeing on short hair is practically the only drawback of the technique. However, it is worth remembering that doing it yourself at home is also quite difficult, because there is a risk of choosing the wrong shades, as well as not painting over the entire length.
The advantages of gradient coloring outweigh the difficulty of using it yourself. The technique does not require constant updating, since the roots grow naturally. Short hair is tinted more often than long hair, but this is only advice and not a mandatory rule.
The dyeing technique is suitable for everyone, the main thing is to choose the shade. This technique is used by women of all ages and social status. For young girls, a gradient is a way to stand out due to unnatural colors at the ends, and in adulthood, a gradient will help to visually rejuvenate.
Find out more about the popular ombre technique and the specifics of coloring:
- on dark hair;
- for red hair;
- on brown hair;
- for short hair;
- for long hair;
- for medium hair;
- how to do ombre for a man, choosing the perfect shade.
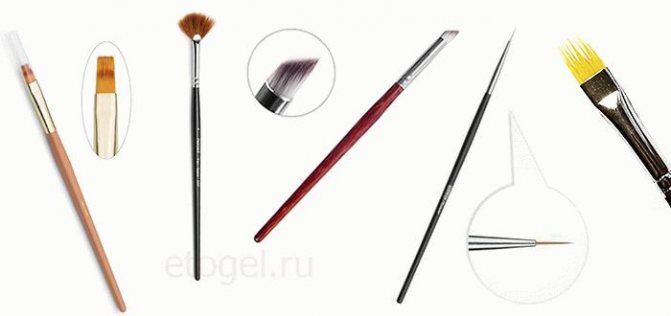
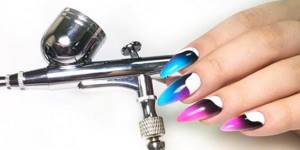
Types of airbrushes for manicure
There are different types of airbrushes, and almost all of them are suitable as a tool for creating a manicure.
Based on the principle of connecting air flow and paint, they are divided into:
- Internal - two elements are mixed directly inside the instrument;
- External - air and paint are mixed at the exit of the nozzle. This type of tool is considered the simplest and is more suitable for beginners than professionals.
By control method:
- Single - an external spray model, where the master can control the air flow or the flow of paint. Adjusting the air flow is considered more convenient, since it can be used to create fine lines and small details;
- Double – allows you to control both flows. In turn, they are divided into:
- manual action - in order to start the paint supply, you need to press the button, and to supply air, pull it back. Thus, only the intensity of the air supply can be controlled;
— fixed action — is automatic, that is, when the button is released, two streams are supplied at once;
Independent - allow you to control both flows at the same time, thanks to this they are valued more than others.
By type of inclusion:
- Push-button – the mechanism is started by a button located at the top;
- Trigger - the work is started by a trigger located at the bottom of the tool.
Location of the paint container:
- Above. The principle of supply is gravitational - paint enters the air flow through the hole and mixes with it;
- From below. The supply principle is siphonic - a tube runs from the container to the device, through which the paint enters the air flow. The convenience of this option is that you can quickly change a container with one color to another, without having to wash it.
Selection of materials: why is it so important to use original sponges (poufs)?
As the practice of testing the use of non-original (Chinese) poufs (sponges) to create the effect of airbrushing without using an airbrush has shown, they have a lot of significant shortcomings compared to the original. Namely:
- cheap sponges have uneven edges and a rough surface, as they are spongy and porous in texture;
- analogues are characterized by low wear resistance (their large pores are quickly clogged with gel pastes), and such poufs are destroyed more quickly when cleaned;
- during the work process, particles of the sponge often stick to the design, breaking away from the sponge itself;
- Chinese gel pastes (paints) and sponges do not create the effect of airbrushing, as they do not provide the necessary clarity;
- the non-original sponge is unevenly attached to the holder (holder). This obvious distortion of the sponge causes a high probability that the sponge will come off the holder right during the creation of the design.
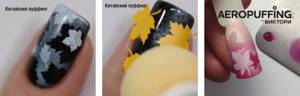
That is why manufacturers and nail technicians who have already tried this technique advise not to chase unnecessary savings and use only original tools and consumables. Only in this case will one set serve you for a long time, more than recouping its cost, and will bring only positive emotions during the work process.
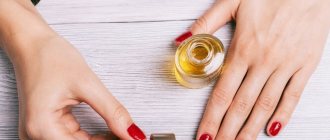
The final stage of manicure
After creating the design, you need to dry your nails under the lamp for 4-5 minutes. After this, you should fix the gel polish with a top coat. After the nails are completely dry, the cuticle must be lubricated with a special oil.
Author's gradient
Gradient gel polish manicure is a fashionable and practical way to decorate your nails. Many options for performing multi-color manicure allow you to find a suitable design for every woman. The technique of creating a gradient manicure is not complicated, but it does require patience and time. Step-by-step implementation of the technology for creating a gradient will make your nails beautiful even at home.
Simple design options
We create a gradient on the French jacket using stencils and a sponge:
- Apply clear base and dry completely.
- Glue on the stencils for the French jacket.
- Drop gel polishes of different shades onto the palette.
- Saturate the sponge so that the stripes transfer to it.
- Hold the sponge so that the printed stripes lie vertically on the nail. Apply paint by rolling the sponge on the free edge and without going beyond the stencil. For a brighter color, repeat again.
- Remove the stencil with tweezers (carefully) and cover the plate with topcoat. Dry.
Ombre with a transition over the entire hand - each next nail on one hand will be painted a tone lighter than the previous one.
The technique requires gel polishes in the same color palette, but in different shades. You can use white to mix the coatings until you get the desired tone. If you use gel polishes from different brands, check their compatibility so that the material does not wrinkle under the lamp. Then everything is very simple, using the technique of applying gel varnishes - we apply shades alternately to the dried base, achieving a transition from dark (on the thumb) to light (on the little finger). We finish, as usual, with top coat and drying.
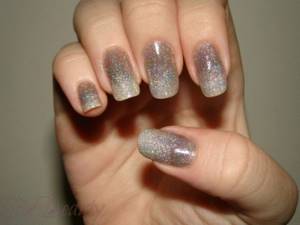
You can create an ombre look with shiny gel polish. Let's take glitter coatings. Apply one color with glitter from the base to ¼ of the nail, cover the rest with another selected color with glitter. Using a comb, we stretch the colors until we achieve a smooth transition. Dry and cover with topcoat. If you don't like a lot of glitter, do a glittery degrade manicure on one finger and cover the rest with a regular color.
The second way to make a shining manicure using the ombre technique. We cover the plate with the main color. Apply transparent gel polish with colored glitter near the cuticle, drag it with a flat brush over the entire nail, and adjust the border with a thin brush. It’s even easier to sprinkle the gradient with glitter and stretch it over the surface or blend it with a fan brush.
A sparkling finish can be combined with a matte finish.
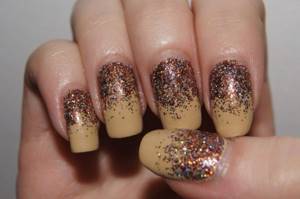
We stretch the glitter from the cuticle or apply it with a sponge.
Holographics with a gradient look noble.
Ombre with rubbing looks discreet. Apply a base color coat. We pour rubbing of one color at the hole, another color - on the free edge. Rub with a sponge or brush, shading the borders.
A fashionable gradient for those who are good at technology.
Creating a gradient with a sponge
The most common way to create a gradient on your nails involves using a sponge or an ordinary kitchen sponge. This method is recommended for beginners.
Step-by-step design process:
- Take a sponge and cut off a small piece, slightly larger than a nail.
- Apply a couple of drops of varnish of different colors to the surface of the sponge. Mix drops of varnish with a brush to create a color stretch.
- Apply the sponge to the nail so that the gel polish imprints on it. The sponge is applied with light, patting movements. To fix the color, the procedure can be repeated, but only after the first layer has dried.
Gradient sponge
In addition to the above, there is another way to make a gradient of gel polish with a sponge. It involves using a tablet on which gel polish is applied and the transition is shaded. You can use any surface as a tablet - plastic, glass, silicone. To create a transition, take an orange stick or a regular toothpick.
In the future, the sponge must be slightly moistened, pressed onto the resulting range, and then onto the nail. You shouldn’t rub your nail with a sponge for a long time, otherwise the varnishes will mix and give a dirty tint.
After the nails are completely dry, you need to remove any remaining polish from the skin. A cotton swab is suitable for this, which must be dipped in nail polish remover in advance. The process of creating a gradient using a sponge on short nails can be seen in the video.
Practical secrets and tips
When performing a gradient manicure with a sponge, difficulties often arise: the skin around the nails gets very dirty, the varnishes bubble, and the transition fails. There are some tricks to resolve them. To perform a gradient manicure as accurately and quickly as possible, I will share some secrets for creating it.
To prevent the skin around your nails from getting too dirty, you can use different ways to protect it:
- Apply tape around your nails and remove it when the gradient is completed. Then all the varnish that does not get on the nail will remain on the tape and will not stain the skin.
- Apply rich hand cream to the skin around the nails . This is exactly the method I use. After completing the design, it can be easily removed from the skin with a regular cotton swab along with the varnish imprinted on it. The main thing is that the cream does not get on the nails during application, since the varnish will not be able to imprint in this place. The cream should not be absorbed quickly, otherwise the varnish will not be easily removed.
- Use special products around the nails. With the popularization of gradient manicure, auxiliary materials appear to simplify its implementation. One of these is a product for applying to the skin around the nails, which is easily removed along with the printed varnish. The most popular products in this series that I know of are Kiesque Liquid Palisade and Skin DEFENDER. By the way, this product is also convenient to use for other designs where the skin may get dirty, for example, in water manicure.
Peculiarities
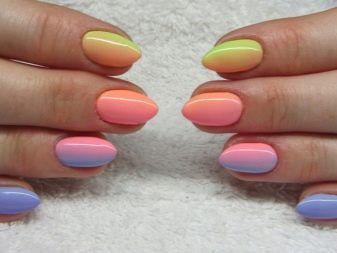
Ombre (or gradient manicure) is a transition from one tone to another. Not only delicate, but also bright shades can be used. This nail art turns out to be quite fresh and interesting, suitable for any style, emphasizing femininity and beauty. Let's look at the main features.
Ease of implementation. The technique is simple. Even an unprofessional master can do it. You can use ombre at home. It will be easy to design your nails yourself.
Harmony. It’s interesting that no matter what tonalities you choose, they will always be harmoniously combined. All thanks to the smooth transition from one shade to another. You can combine a variety of colors.
Effectiveness. Ombre nails are stylish and unusual. It can be supplemented with various design elements, decorated with rhinestones, glitter and other decor.
Saving money. To do nail art at home, you don’t need to spend exorbitant amounts of money. All materials and elements are sold at an affordable price in professional stores
It is only important to monitor the quality of the product.
A unique design will not take much of your time and effort. But the result will be great.
It is important to buy them only in trusted stores so that nail art does not disappoint you. You will need a nail degreaser, a file, gel polishes of selected tones, a base, top coat, a thin brush, a sponge, a sponge
The polymerization process will be carried out by a UV lamp.
8 photos
What is a gradient in manicure, features in preparing the design and choosing colors
Ombre or gradient is a manicure built on smooth horizontal, vertical, diagonal transitions of several shades of varnish or paint on the nail plate.
Gradient with mirror rubbing The most popular option is a combination of two or three colors. The darkest or densest color always “works” in a set. It will be required the least, and it is it that affects the saturation and coloring of other colors.
So, when creating a manicure, a gradient of red and pink colors - darker red must be introduced with a brush into pink, smoothly painting over the intermediate zone and creating a third, coral color at the junction.
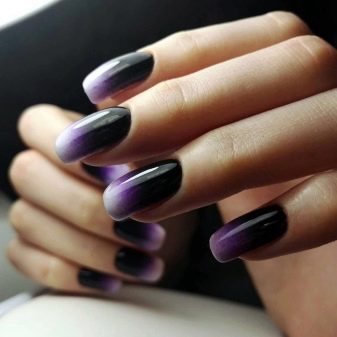
The most complex combination of shades is the black-red gradient. Masters say that once you master black and red ombre, all other combinations will seem easy to perform. This is due to the fact that black is the dirtiest color in the palette. Even the smallest uneven strokes or an extra drop of black can ruin the entire transition. Especially if you work with a brush.
Nude ombre with a mirror rub It is better to choose shades for the gradient based on the color wheel. Neighboring colors of the same group go well together, cold with cold, and warm with warm. Contrasting tones look original.
The easiest way for beginners is to work with neon gel polishes when drawing a gradient in a manicure. Neon colors blend perfectly on the blending line, and ombre always results in an almost imperceptible transition.
- For the base it is recommended to use white varnish. This is more true if you use loose, soft shades for the gradient. White makes light and pastel colors brighter and more expressive.
- The second option is to use the lightest shade of varnish from those selected for the composition for the base. If the colors are well pigmented, you can work without a base coat, applying the shades directly to the varnish base.
It is recommended to apply two or more layers of gradient, be it varnish or paint. Beginners can use self-leveling gel polish to get a perfectly even coating even at the stage of mastering the technique.
For ombre nails: tools and materials
Degrade manicure is a way to diversify your nails when all the colors have already been tried, but you are not in the mood for complex designs or your hands are not ready.
The gradient looks impressive, adds length to nails, can withstand almost any wardrobe and smoothes out the sharp edges of appearance and character - not only a fashionable manicure, but also beneficial in every sense.
The main technical challenge when performing ombre is to achieve a smooth gradient between two or more shades at any cost. Tools for implementing a task can be very different.
Some people prefer to use a fan-shaped brush, sweeping out colors. Others are sure that the ideal brush for ombre is a “hair”. Still others do not recognize anything other than the “comb” brush. There are those who call a dishwashing sponge the best assistant.
This is interesting: How to use nail grout
Progressives prefer an airbrush gun. You can try everything, because only in practice is truth born.
When looking for the right shades, use Itten’s color wheel and you will be happy – a harmonious gradient. Those with impeccable taste consult him. And remember, the hardest way to depict degrade is using contrasting colors - for example, red and green or blue and yellow.
It is no less difficult to pour not from empty to empty, but from dark color to light. But related colors, for example, pink and red, merge into a gradient without any problems.
Let's move on to technology and stock up on tips, patience and an inexhaustible desire to overcome thorns on the way to the stars - the ideal gradient.
Features of manicure
Gradient design is a popular subtype of French nail art, which represents a beautiful smooth transition of very close and similar colors or, on the contrary, contrasting opposite colors. In a gradient nail design, there are necessarily boundaries between the colors used, only they are not clear, but blurred.
The main distinguishing feature of a nail gradient is the fact that there is not just one color on the nail, but a whole inflorescence of colors and tones. And the colors themselves, which dramatically change from a more saturated and dark tone to a lighter one, and, conversely, at the request of the owner of the nails, create either light and smooth, or sharp and sometimes even rough transitions of the color spectrum.
The gradient is applied to the nails both vertically - which is more common - and horizontally - the main thing is to do this according to a clear pattern, and then with cross-border mixing the much-needed transition from a faded color to a more saturated tone will be obtained. Few masters can tell you the maximum possible number of colors or tones: some choose no more than four colors, others work with a good dozen - here a lot depends on the creativity of the master, as well as on the shapes and parameters of the nails themselves.
There are several types of gradient nail decor.
- The tip of the nail is painted over with varnish of a lighter shade, after which this color will gradually flow into a much darker tone. For this kind of idea, you can choose colors from the same shade range or varnishes that are completely opposite in saturation and color.
- The color of nails can change with a visually inconspicuous transition from one nail to the second. Here, they usually choose several shades at once in a single color scheme.
A gradient on a manicure always looks attractive, it will be more than appropriate under various circumstances, the main thing is to choose the right colors. Gradient coverage can be created using both bold and catchy and rather dull pastel undertones.
This kind of coverage is perfect for both respectable ladies and very young girls - after all, it is suitable for all ages. Many people believe that creating a gradient is a very complicated technique, but in fact it is much easier to “smear” the polish on your nails than to draw flowers, designs or letters on it. If you set out to learn how to decorate your nails using this method, you will soon be able to select the most interesting ideas for yourself.
Pros of gradient:
- simple methods of execution;
- magnificent combinations of any shades;
- catchy look;
- inexpensive tools and decorative materials;
- the opportunity to come up with a unique design yourself.
Features of coloring for different hair lengths
The optimal length for gradient coloring is to the shoulder blades or below. Shorter curls look less effective. Lightening the ends in other cases will not look very neat, since the length will not be enough for a gradual transition of shades.
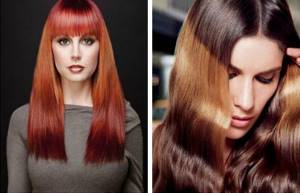
With a short length, the curls framing the face are colored almost from the roots. However, the strands for this are taken quite narrow. On the rest of the hair, dye is applied to the ends, using no more than 2 dyes of different shades. For long strands, the number of tones can be increased to 4 or even 5.
The difference in coloring long and short hair also lies in the possibility of artistic design. On short curls, paint is applied equally, in 2 levels. For longer strands, you can use more levels to create a semi-circle.
How to do it step by step?
Performing a manicure using the gradient technique is quite simple at home, using a step-by-step guide and using little tricks for the perfect effect. Smooth transitions are made using a special brush; novice artists use sponges or ordinary household sponges with small pores. You can draw clear transitions using a stencil or tape.
Before creating a unique design, your nails should be carefully prepared. The old coating is carefully removed, the nails are lowered into a nourishing bath with oil and salt. After this, the hands are treated with a nutrient and the nails are degreased. The nail plate needs to be leveled, given the desired shape and length. After this, a base coat is applied to protect the nail. If the selected shades of gel polish are quite light and transparent, a milky white base will give them brightness instead of the usual transparent one. The detailed technology for applying manicure in the gradient style is described below.
Classic horizontal sponge gradient.
- After drying the base layer, take the selected two or three tones of gel polish and drop a drop of each color onto a piece of foil next to each other. Using a needle or toothpick, mix the boundaries of the coating.
- Take a sponge with a fine porous structure and dip it in the resulting colors. First, we make two or three prints here on the foil to get rid of excess paint. Then, using light tapping movements, apply a three-layer gradient to the nail.
- To smooth out any resulting bubbles, immediately apply a clear top coat on top and then dry under a UV lamp for 10 minutes.
Vertical ombre with a flat brush with a rounded tip.
- We take the two selected shades and apply them vertically on the dried and prepared base next to each other. You can do two layers at once.
- Using a damp brush in a clinser, with quick vertical movements from the lunula to the tip, lightly rub the boundary between the layers of gel polish.
- Dry the coating under the lamp. Then we repeat the procedure to obtain a more saturated tone one or two more times. We cover the top with a protective coating and finally carefully seal the manicure under the influence of a UV lamp.
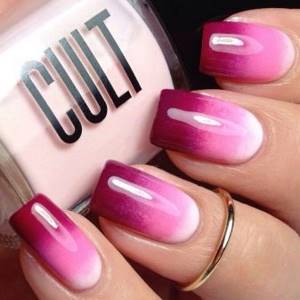
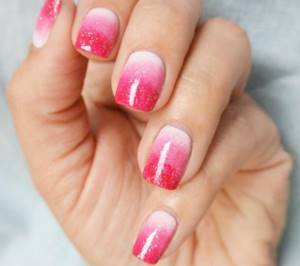
Shining “ombre” manicure in pink shades
For this manicure you will need a base base, three shades of pink polish, nude or any other color for the base, clear polish, glitter and a sponge. First of all, as always, you need to deal with the cuticles and give your nails the shape of your choice. After this, apply a neutral base polish (you can use white, beige or nude color).
"Dad is offended." Agata Muceniece about her relationship with Priluchny after the divorce
Women's jeans: before you buy them, you need to pay attention to one detail
It’s good to wash often: myths about shampoo and hair care that only harm
Prepare an original mixture of varnishes on a smooth surface (3 shades of pink), transfer them to a damp sponge from light to dark. Take the sponge and slowly apply it to the nail plate, then press lightly.
Cover the ombre with a clear varnish and apply a layer of glitter with a brush (you can sprinkle it or take a ready-made transparent varnish with glitter).
Remove excess polish using remover.
How to choose
Airbrushing on nails as a manicure technique appeared several years ago. The demand for devices has led to the emergence of several dozen models adapted to the needs of the nail industry. The most popular manufacturers that beginners and experienced craftsmen should take a closer look at:
- Iwata;
- Sparmax;
- Evolution;
- Jas;
- Hansa;
- AirNails;
- Tagore;
- Fengda;
- Harder and Steenback.
The list includes European, Russian and Chinese manufacturers. For beginners, taking into account the combination of price and quality, you can try applying designs with models from Jas (China) and AirNails (Russia-China).
For salons, manicure salons and professional use with a large flow of clients, more expensive models from the manufacturers on the list are also suitable. The cost of a complete airbrush set starts from 3,000 rubles. You can also buy the handle, hose, compressor, nozzle and needle separately.
To perform professional nail designs, you will need the following device parameters:
- Bottle 2 ml;
- Air flow from 10 l/min;
- Pressure from 1.5 - 3 atmospheres;
- Productivity from 1.75 to 3 kg/cm2;
- The hose is fabric braided, not silicone. Length from 1.5 m;
- Nozzle diameter 0.2 mm - better than 0.3 mm;
- Compressor with a power of 12 W.
These same parameters are minimally sufficient when choosing a device for home use.
When working, the paint should spray evenly, into a fine dust, or gather in an even line as the nozzle approaches the work area. The trigger should have a smooth and soft stroke. There should be no drops or lumps left on the needle after applying the material to one nail. If possible, it is better to test these functions before purchasing the device.
New models of airbrushes are characterized by automatic start. The compressor starts working when the material supply trigger is pressed. Older models do not have such an automatic device, and therefore they are noisier and create vibration when the compressor itself is turned on. The airbrush will make noise and vibrate continuously throughout the entire process of applying the design to the nails, even during breaks in the supply of material, with the trigger turned off.
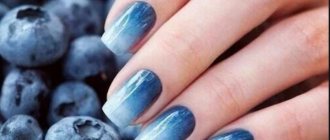
Ombre manicure – about smooth transitions
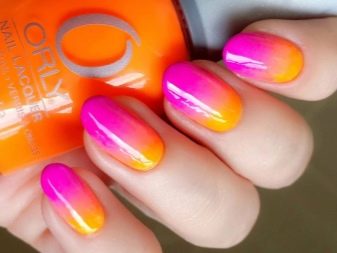
Ombre manicure, or as it is also called, gradient or degrade, is one of the popular types of manicure, since the technology for its implementation is very simple. Moreover, it is suitable for both short and long nails. This method visually lengthens the nail. Its peculiarity is the transition of colors with a blurred border both horizontally and vertically. The color palette can be varied, the most daring, fantasy combinations are possible. Ombre means “darkened” in French. There are a huge number of ombre options. These include bright acidic colors, restrained pastels, and contrasting ones. A transition manicure is universal.
Nowadays, it is not surprising for a girl to go to a beauty salon and “order” a certain nail design from the master. But previously, the field of manicure was so primitive that even banal nail cleaning could only be afforded by people of privileged status. It is believed that the first noble lady to have her own personal manicurist was the ancient Egyptian queen Nefertiti and, by the way, it was she who came up with the idea of gradient decor. True, there are a number of nuances here. In those days, nails were covered exclusively with natural and affordable dyes, often food products or ocher. According to archaeological excavations, even during burial, the Egyptian queen had an improvised manicure with a rich pigment at the base of the nail bed, which slowly lost its original intensity towards the end of the free edge.
Gradient manicure in a modern and familiar interpretation appeared much later - in the 80s of the last century. It was brought into fashion by the then famous Golden Hollywood actress, Rihanna Daymond. Appearing on the Red Carpet at the Oscars, the spectacular beauty literally made a splash with her sexy floor-length satin dress and unusual “vampire” style manicure. The public liked the original nail art so much that the very next day after the release of photos and video reports from such a significant cinematic event, lovely ladies attacked nearby beauty studios with a request to implement a similar decor on their fragile fingers. This caused a wave in the fashion industry, as more than 16 designers, including Gucci, Prada, Dolce and Stefano Gabanna, sent models wearing jackets and skirts with smooth color transitions onto the catwalk. And in the 2000s, hairdressers, inspired by the gradient technique, came up with the most textured, stylish coloring called “ombre”.
By the way, there are a thousand and one varieties of such a sensational gradient manicure; ProstoNail specialists have collected information about the most popular of them into a compact cheat sheet.
| A variety of gradient | Features and Specifications |
| Simple | This type differs from the others in that the gradient effect will not be created on each nail, but on the entire hand as a whole. It is perfect for manicure at home and is created using 5 shades of the same color. To do this, a darker varnish is applied to the thumb or little finger nail. Next, the nails are painted in increasingly lighter colors. Alternatively, 3 shades can be used. In this case, the middle nail will be either the darkest or the lightest. |
| Classic or horizontal | The gradient is made along the width of the nail plates, and the colors themselves are mixed horizontally |
| Vertical | Created as an alternative to the classic horizontal ombre. It is not difficult to guess that the gradient is placed vertically |
| Variations on the theme of French manicure | Essentially, you are doing the same discreet French in a calm, beige and white color scheme. True, instead of clearly drawing the smile line, you blur the border of the free edge onto a general nude background |
| With nail art | In this case, the vertical or horizontal gradient is only part of the overall pattern or an effective background for it |
| Brilliant | The transition on such nails is carried out not by playing with the degree of pigment saturation, but by playing with the degree of concentration of the sparkles themselves |
| Linear | The design on the nails is often represented by vertical lines, which are carefully drawn with thin brushes. This type of nail design does not imply blurring the boundaries between colors. A good example is the diamond geometric gradient. |
| Chaotic | There are no limits to human imagination. Only you decide how, where and on what part of the nail or marigolds there will be an area with the desired gradient |
Gradient on gel polish with a sponge or sponge
Use a regular dishwashing sponge with small holes. Before use, a new sponge must be divided into pieces, rinsed and dried.
Take pieces according to the size of the nail, and they should also be high so that you can control the pressure.
- Make preparations: apply cream and do a manicure, polish the plate a little;
- Cover the varnish base with a thin layer and dry with a lamp;
- Apply the first part of the tint coating of the tone that will be located closer to the cuticle to the entire plate and dry;
- Cover the plate from the center to the tip with the second shade;
- Quickly, before it dries, blot the line between the shades with a sponge or sponge, then again, but a little closer to the cuticle with the clean edge of the sponge, dry under the lamp;
- If you wish, you can also cover the very end with a third color;
- After the tint coating has dried, apply top coat and let dry;
- Remove excess coating with a stick dipped in nail polish remover.
Method two:
- Repeat the algorithm of the previous method until the base dries;
- Pour varnishes of 2 shades into a small bowl and get a third color, it should be a binder between the two main ones;
- Cover the palette with varnishes - from dark to light, apply them tightly to each other without gaps between shades;
- Mix the varnishes with a stick along two edges, obtaining a soft gradient from dark to light on the palette;
- Dip a wide sponge;
- Transfer the impression from the sponge to the nail;
- Dry using a lamp;
- Apply top coat and dry.
Ombre with sponge
If working with a brush is too difficult for you or you simply don’t have such a tool at hand, you can create a beautiful manicure using a porous sponge. There are two options for ombre with a sponge:
- With a palette. Apply short strips of the selected varnishes to the palette so that their borders merge. Using a toothpick, mix the contact area. Dip a sponge into the polish and press the sponge onto your nail. If necessary, repeat the manipulation.
- No palette. Apply the selected colors directly to the sponge. Make an imprint on your nails by alternately pressing the sponge higher and higher.
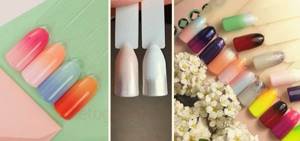
Choice of shades
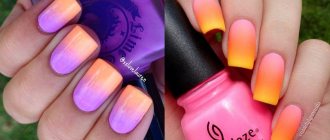
Fashion dictates its own rules. Every woman wants to be in trend, have fashionable clothes and a stylish manicure. This season, all nude shades and pastel tones are quite popular. They are suitable for both young ladies and wealthy mature representatives of the fair sex. A gradient in cream, soft pink, and caramel tones will look attractive. You can use delicate yellow, wine, chocolate, shades.
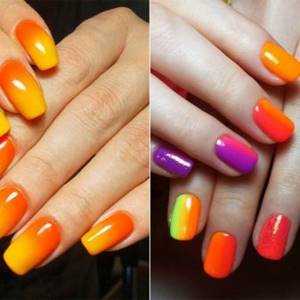
Bright colors are suitable for creative and courageous people. They are also in fashion today. You can not be afraid to experiment and combine a variety of shades and tones. For example, green and blue, purple, red, orange and others
It is important not only to choose fashionable colors, but also to give preference to your favorite tones
Gradient gel polish using a sponge and stencil
A gradient of gel polish using a sponge and a stencil turns out to be very catchy, so you can design one or two nails on each hand like this:
- The plate is covered with base and dried. The surfaces of the nails on which the stencil needs to be glued are treated with a buff.
- Use a napkin to remove sawdust. The stencil is separated from the base with tweezers and attached to the nail. You need to smooth it out, fix it well and use scissors to cut off the parts that are outside the plate.
- Strips of gel polish are applied to the palette in the order in which they want to be seen on the nail, layering one color on top of another and blending the transitions. There can be 2-3 shades.
- A sponge is applied to this multi-colored print. And then it is leaned against the surface of the nail with a stencil so that the open areas are painted.
- Now you can peel off the protective film by carefully picking up the edges with tweezers and pulling in the direction of the design. The finger must be placed in the lamp.
- A top coat is applied over the dried gel polish. It is also polymerized.
A striped gradient is also made using stencils:
- The strips are glued onto a dried camouflage base across the plate.
- The remaining open space is painted with white gel paint on a third of the nail.
- Each mini-strip is shaded with a sponge closer to the middle of the plate.
- Dry and repeat steps 2 and 3 a couple more times.
- After the next polymerization, the strips are removed, the nail is covered with a top coat without a sticky layer, and dried.
- New stencil devices are glued again across the plate, but this time covering the gradient.
- Gel paint in 3 layers is applied to the open stripes, only on the other side of the nail and almost up to half of it.
- Each time it is shaded with a sponge and polymerized without removing the stencil.
- After drying the 3rd layer of white gel paint, the strips are peeled off.
- The last step is to apply topcoat and dry.
Watch the video on how to make a gradient with gel polish using a sponge and stencil:
General rules
Before doing a manicure, pay attention to a few rules that will help you do the job efficiently, and the nail polish will look great and last a long time. Of course, experience should not be ignored, but it is safe to say. That the second time you will be more professional, and the next time you will become a real master. Here are some tips to help you:
- The varnish should be applied to a damp sponge.
- Use a base coat to smooth the nail surface. It will help you not only make the surface smooth, but also perform a better manicure.
- It is recommended to apply clear varnish when the ombre is still wet. After using the sponge, the surface will become somewhat rough, and the varnish will help make it smooth and shiny.
- Before working on each nail, update the palette of varnishes.
Set of materials
After training, many organizations offer to purchase a set of materials to continue independent work. Everything is sold in a specialized store.
Set includes:
- airbrush;
- acrylic paints - purchased individually or in a set;
- stencils and meshes for design;
- skin protection stickers;
- tweezers;
- buff;
- primer and top;
- airbrush cleaner.
Popular paint brands: OneAir, AirNai, Premium, Fluo.
The listed devices and ingredients can be purchased separately or as a set. The cost of an airbrush kit starts from 6,000 rubles.
You need to pay attention to fakes. Cheap Chinese airbrushes do not regulate the dye supply properly
Materials may not adhere well due to improper preparation of the substrate.
You can complete the design by adding sand, beads, and stucco.
Using a sponge for smooth flow
Great option for a gradient. This method is often used at home, since it does not require the purchase of additional materials, and a small piece of sponge can be found in any home.
Let's look at how to make a manicure with a smooth gradient at home step by step.
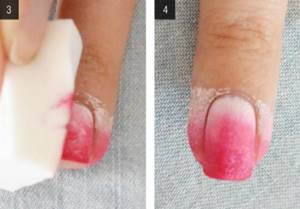
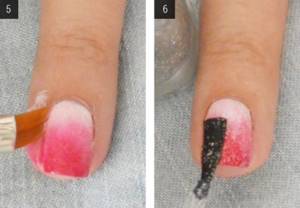
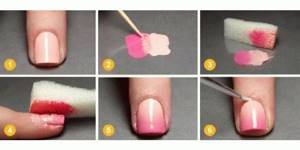
Method 1
- Apply the base color of gel polish to the prepared nail plate, dry it in a UV lamp and achieve the required coating density.
- Take a small piece of sponge and blot the desired shade.
- Using light patting movements, apply a contrasting color to the nail.
- We wipe off any varnish that gets on the skin and dry it in a lamp.
- We repeat the procedure to obtain a smooth transition.
- We consolidate the resulting result.
List of required tools
To perform this technique, you will need simple items that can be found in the kitchen of each of us.
- To paint with a sponge, you will need the actual sponge or sponge.
- foil or any other material that will not absorb varnish. You can stretch the tape onto the surface of the paper or use an unnecessary enamel plate.
- Varnishes can be of all colors of the rainbow. Perhaps somewhere at the bottom of your makeup bag there are acidic or dramatic black and crimson colors that you haven’t used for a long time. Perhaps it is in combination with each other that they will find a new life and will delight you as never before.