Home page » Beauty » Nails
Author of the article
Svetlana Pavlikhina
Reading time: 6 minutes
AA
There are many ideas for creating a beautiful and original manicure. But bringing them to life turns out to be problematic. A special nail tape can make the task easier. The main thing is to figure out how to use this simple accessory and choose the most suitable option.
Varieties
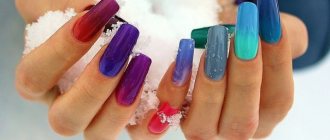
Tapes vary in thickness and color. This allows you to create an interesting manicure and make the image original.
The products have the following characteristics:
- presence of textured rough coating;
- transparent;
- rainbow tints;
- flexible options.
Decorative adhesive tape is supplied in reels.
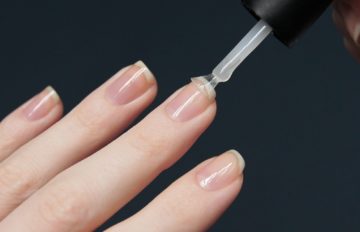
Liquid tapes are commercially available. They are not used to create a nail design, but as an auxiliary material that protects the periungual tissues from varnish. This product is sold in bottles equipped with a brush.
https://youtu.be/https://www.youtube.com/watch?v=6kWMhTqN1fc
_
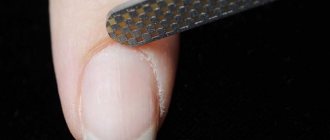
Application technology
Classic tape can only be used for regular manicure. When working with gel polishes, you should forget about it: in the ultraviolet lamp, which is needed to dry the gel, the tape will cut into the nail so that it cannot be pulled off. If you want to create geometric patterns on your nails when painting with shellac, you need to buy a special roll of threads. These are thin adhesive strips that you can use to make lines.
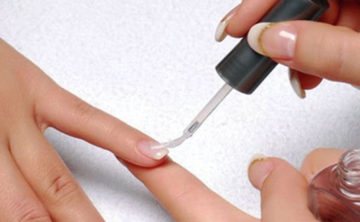
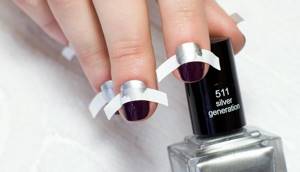
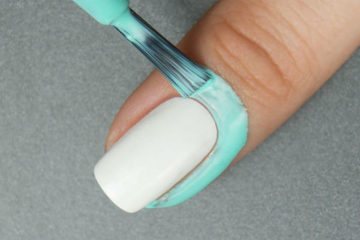
So, let's return to classic nail art. After applying the base, you need to apply the base color and let it dry. After this, the necessary sections are cut out of the tape and glued to the nail.
Advice:
To avoid making 10 identical pieces, carefully use each piece on 2-3 nails until the stickiness becomes zero.
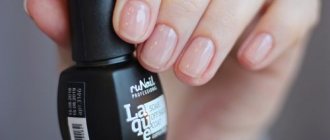
The next layer of varnish is placed on top of the nail with tape, which will form a pattern. This layer also needs to dry. Next, it’s time to remove the tape. Regular tape will have to be “torn off”, but be careful; the window insulation agent can be pre-wetted with water.
Sticky residues should be removed with a cotton pad moistened with water or a room cleaning product (glass liquid, dishwashing gel, etc.). Never use products containing acetone! The last step of the manicure is applying the topcoat.
Recommendations for selection
Recommendations to follow when choosing a product:
- buy products with a maximum thickness of 1 mm;
- if you want to combine ribbons with rhinestones, buy tiny stones, otherwise they will look pretentious;
- take into account the shape and length: for almond-shaped nails, medium or thin options are selected; if the nail plate is square, semicircular, then a shiny but very thin ribbon is used;
- thick options are designed for making large patterns, while thin ones allow you to apply small strokes.
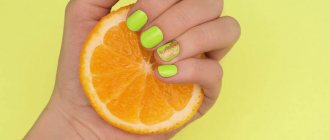
How to do a manicure using tape, step by step guide
An award should be given to the person who invented manicure tape, because it is not only good for office purposes, but also helps you create wonderful designs on your nails.
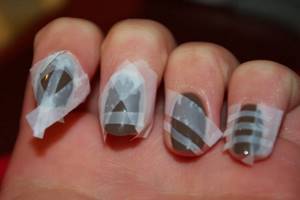
In the photo below the algorithm for creating this type of manicure you can see how nail tape helps make it easier to create a beautiful pattern in just a few steps:
- Stage one! Choose a color palette. In any manicure with patterns, a combination of three varnishes of different textures will look impressive: glossy, matte and shiny.
- Paint all your nails. Remember that before this you need to polish your nails, give them the same shape and remove the cuticles.
- Third stage. Take transparent or colored tape and cut off the required element with scissors. Think about the shape of the pattern in advance to make it easier for you to decide on the length and width of the tape. Next, you will have to apply tape to your colored nails. The varnish must dry completely, otherwise it will begin to come off along with the tape. If you have little time for a manicure, you can do the pattern the next day after applying the coating.
- Paint the area free of tape with any color and let dry. Quickly remove the tape and remove the adhesive layer that remains on the nail.
- The final step. Finally, glitter, a sticker or any other decoration can be applied.

Here's a video version of the lesson!
And another video, this time with tape and foil! An unusual idea.
Terms of use
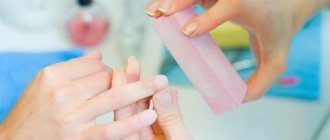
Gluing tape at home is quite simple. The main thing is to properly prepare the nail plates, after which you can start doing the manicure.
Preparatory work
At the preparatory stage, the following manipulations are performed:
- The surface is cleaned of old coating.
- The nails are given the desired length and shape.
- Using an orange stick, cuticles are pushed back.
- Nourishing cream is applied to the hands.
- The surface of the plates is degreased. For this purpose, nail polish remover, alcohol or a special degreaser are used.
Gluing rules
When your nails are prepared, you can apply the tape:
- A base layer of varnish is applied to the surface.
- The coating is dried.
- A ribbon is glued on top according to the selected pattern, and the desired design is created.
- A layer of varnish of a different shade is applied on top.
- The manicure tape is removed.
- The coating is drying.
Tape for nail design - the choice of those who value their own time and money
Such ribbons are a budget option for fashionistas who want to save money on a salon manicure and at the same time achieve an equally amazing result that is strikingly effective and neat (or introduce this method of decoration in your salon, giving clients the opportunity to use the express service of creating a luxurious design).
This is a great way to express your creative self, because they can be used to create a smile line in a French manicure, and to cut out beautiful figures. There are practically no disadvantages to self-adhesive nail tape: you can choose the desired color, width and location for its location, and cut out the desired shapes from it. The only “but”: after gluing it must be cut with perfect precision. Moreover, if you choose a place for the tape on the border with the free edge, fold it behind the nail plate, carefully trim the remaining tape and file the free edge.
Tape gluing technology depending on surface type
The ribbon can be attached to regular varnish and shellac.
To carry out these manipulations you need a minimum of materials and tools:
- varnish coating;
- ribbon;
- scissors;
- tweezers;
- tweezers.
Gluing onto a natural nail
Working with natural nails does not cause any difficulties. The following actions are performed:
- The nail surface is prepared.
- A coating of the desired color is applied to the surface.
- The varnish is dried.
- Using tweezers and tweezers, peel off the required amount of tape. To make it easier to glue, it is recommended to measure with a small margin.
- A tape is glued to the plate in accordance with the selected design.
- The material is pressed along the edges with a manicure stick or finger.
- The excess is trimmed off.
- To consolidate the result, a top coat is applied on top.
For gel polish
The technology is in many ways similar to that used on natural nails:
- The surface is prepared for the procedure.
- The base coat is applied.
- The surface is dried under an LED or UV lamp.
- Apply shellac in the shade you like and dry it under a lamp.
- The top is applied.
- After the coating has dried, the tape is glued.
- At the final stage, the nails are covered with a finishing coat.
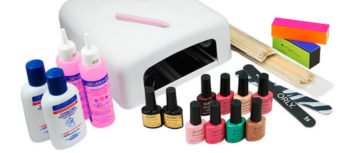
What you will need
At the preparatory stage, collect the required tools:
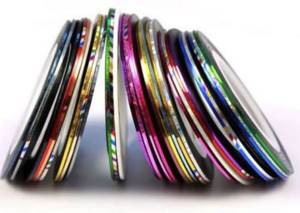
- Low tack tape. Narrow or wide, colored or transparent – there is a purpose for each type.
- Base for varnish, fixing coating.
- Background enamels that match each other.
- Manicure scissors.
- Decor as desired - sparkles, stones, kamifubiki.

Scotch tape is the main tool in such nail art. When choosing it, pay attention to the following points:
- Adhesiveness – it should not be too high so as not to smear the varnishes and damage the base.
- Size – wide ribbons will have to be cut for convenience, but for certain ornaments this is exactly what is needed.
- One-sided - double-sided sticks to the fingers, creating discomfort when working.
- Traces are bad; if stripes remain after peeling off, you won’t be able to do a neat job with such tape.
Connect the tape firmly to the surface of the nail, otherwise the polish may spread.
Why the tape peels off and how to avoid it
Tape manicures often fade quickly. Such problems are observed when nail design rules are not followed. It is quite simple to glue the tape so that it does not come off.
To do this, you need to adhere to the following recommendations:
- You should first go over the nail plates with a buff. This creates roughness for reliable grip.
- Apply the ribbon with light tension. First, you should fix it on the most convex area, then press the edges with your finger or a manicure stick.
- Cut the tape so that there is a small gap (maximum 0.5 mm). Due to this, it can be securely fixed with the help of a finishing coating and prevent premature peeling.
- It is recommended to cut the product from the coil and along the edges of the nail using tweezers. When using scissors there is a risk of raising the edge.
- Apply top coat. Thanks to this, the manicure will be as durable as possible.
- Apply the tape only to a dry surface.
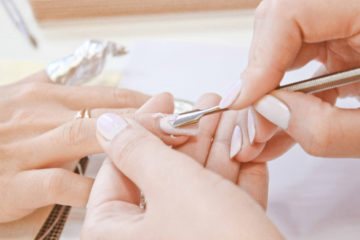
Preparatory stage
Before the nail painting procedure itself, they need to be prepared for this:
- moving the cuticle to the edge of the plate;
- cuticle removal. If you work without a special device, you can remove the cuticle and hangnails with tweezers, scissors, or a special stick.
- A scalpel or pocket knife is also suitable for these purposes;
- drying the nail with a hairdryer, wiping with a towel. Before applying varnish, hands must be completely dry;
- polishing with a buff (an extremely gentle nail file);
- shaping nails;
- applying the base layer.
Base coating refers specifically to the preparatory stage, because the tape should not be applied directly to the nail. To create the pattern, we will need medium or low tack tape and scissors to cut the necessary parts from the surface. It is better to take a wide roll to give room to your imagination and cut out a variety of shapes from it. You can buy it at any office supply store, but it’s better to look at “Home Goods” and buy white window tape. Firstly, it is white and more visible, and secondly, it is definitely less sticky than regular one.
Pros and cons of self-adhesive tape
With the help of nail design you can give an original look to even the simplest manicure. Decorative tapes are in no way inferior to other types of coating. Their use creates a vibrant design.
The material has advantages and disadvantages.
Among the positive aspects, the following stand out:

- Easy to use. Even a beginner can handle a manicure. It is not necessary to have special equipment for this. The work can be easily done at home.
- Easy to glue, reliable fixation. High-quality material will last a long time both on regular varnish and on shellac.
- Rich assortment. On sale you can find ribbons of various widths and shades. They can be combined to come up with new designs.
- Safety. No negative effects on nails were detected.
- Low price. Every fashionista can afford such material.
Decorative ribbons have no disadvantages . But it is worth remembering that when applying to a regular varnish coating, you should wait for it to dry completely, otherwise, if you need to re-glue the tape, there is a risk that it will come off along with the varnish.
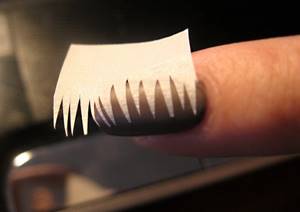
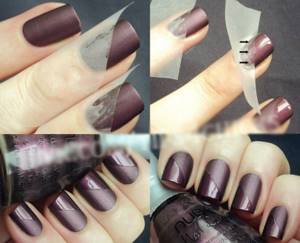
Bold manicure with a predatory print
A predatory print always adds confidence and attractiveness, and a manicure in this style will definitely not leave you unnoticed.
- We take two varnishes: dark brown and light brown.
- Paint the nail plate with light brown varnish.
- We cut out a stencil from tape: on one edge of the tape we cut the spiky teeth characteristic of the print.
- Paste the stencil onto the nail.
- Paint the nail along with the stencil with dark brown varnish .
- We fix the result with a nail base - a daring, predatory manicure is ready!
What can be replaced
One replacement option is regular stationery tape, but only as a stencil. It makes it possible to draw even stripes and perform a moon or French manicure. Figures are cut out of it, for example, hearts, stars.
Foil is also used. When using it, you need to take into account that the absence of a sticky layer leads to difficulties when performing nail design.
Liquid tapes can be replaced with PVA glue. Simply spread it around the nail and wait until it dries completely. In this case, a film is formed that protects the skin from contamination that is inevitable when performing a manicure.
Upon completion of the procedure, the dried glue is removed with tweezers.
Another replacement option is Vaseline. However, when lubricating the periungual tissues, the protection is not very reliable, and getting the product on the nails leads to poor fixation of the varnish coating.
Manicure ideas
Masters of the nail industry know many ways to design nails. It is better for beginners to follow proven approaches, and professionals who have been decorating their nails with interesting patterns for a long time can come up with a catchy option themselves.
Now we will look at popular ideas that will not require much effort and time to implement.
Festive French
The classic approach involves a clear drawing of the smile line, which gives the nails naturalness and elegance. To make your work easier, manufacturers of nail art products have come up with special stickers that can be found on every corner.
But what to do if they are not at hand, and you need a French jacket as soon as possible?
Scotch tape will come to the rescue.
In the traditional version, smiles with rounded edges are drawn, but this cannot be done with electrical tape and other similar devices. This nail art is best done on short nails. Thin and straight edging looks harmonious in a small area.
However, cunning fashionistas have come up with a way out: you will need a small round-shaped cap, for example, from varnish. A piece of wide adhesive tape is glued onto it, and then cut along the contour to make a semicircle. You need to make ten such blanks.
Then everything is as usual: the plate is covered with background varnish, dried, the forms are glued, colored or white enamel is applied to the tip of the nail, the sticker is torn off. The result is a perfect French jacket with regular rounded edges.
You can reproduce non-standard options: highlight the free edge of the nail or hole diagonally or crosswise with contrasting colors.
As for the colors you choose, today the classic harmony of white and nude is less valued than before. For everyday looks, choose unusual combinations. For example, good combinations of wine and beige, black and silver, red and gold, rich green and cream.
It all depends on your personal preferences.
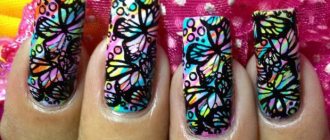
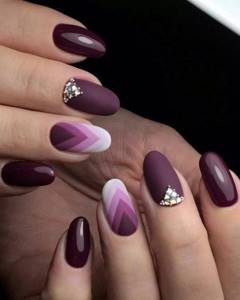
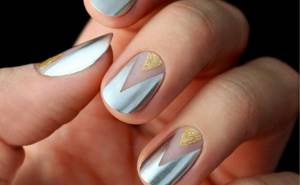
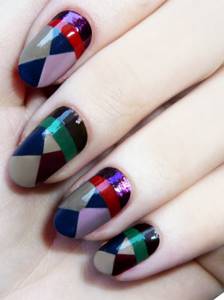
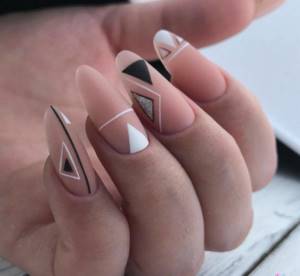
Bright geometry
Design geometry remains one of the most popular for many seasons. Agree that manually drawing shapes so that they are even and neat is not an easy task. And again, miracle tape will help us.
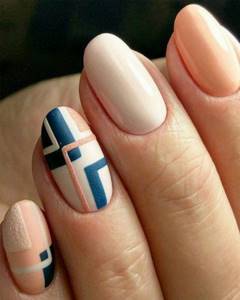
Just tape off those areas that will later be painted a different color. To form triangles you will need three sticky strips at once, for a square - four. Play with the placement of the picture, try to create a multifaceted composition.
Practice will do its job, you will be able to get better at it, and soon the decorating process will take less and less time.
The chosen color scheme determines what impression your nail design will make on others.
So, if your life is dominated by business meetings and other work moments, choose a pastel palette. For holidays and vacations, rich shades that improve your mood are suitable.
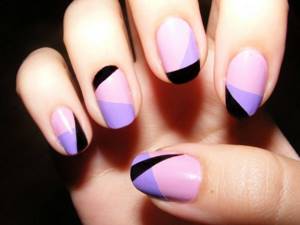
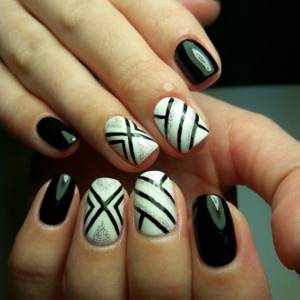
Diagonals
This wonderful variation also won its admirers. For an elegant and festive look, cover your nails with multi-colored stripes in the shape of a rainbow. Don’t be afraid if the joints are sloppy; subsequently all the irregularities will be hidden under a dark layer.
Now stick several pieces of electrical tape diagonally or parallel, perpendicularly - in general, as your heart desires. Cover the plate with a dark color. After removing the stickers, beautiful rainbow rays will remain in their place.
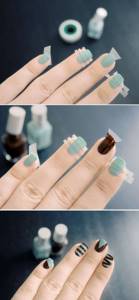
Photo example
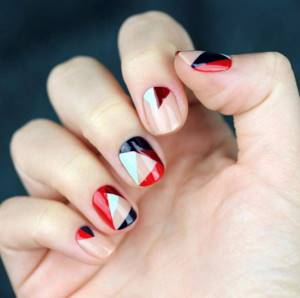
Intriguing puzzles
Everyone knows what this mental entertainment looks like.
For this manicure you will need:
- cut a stencil in the shape of a mosaic piece from a wide ribbon;
- paint your nails with white polish;
- glue two puzzles perpendicularly;
- paint over the part where the sticker is missing;
- As soon as everything is dry, remove the glued puzzle. The spectacular design is ready.
You can modify the task somewhat. Cut out small squares, and after the enamel has dried and the tape has been removed, draw circles in certain places.
Leaf veins
A spectacular creation, quite suitable for an evening look. For the background, choose an emerald green shade with glitter.
Then apply pieces of tape, imitating the veins of a leaf, like rays coming out from one point. Cover the plate with black and remove the tapes.
Golden chess
The original design will definitely not go unnoticed with the right selection of shades.
Created in a few steps:
- the surface of the nail is covered with a transparent base and then with a black tone;
- then mark a quarter of the plate in the form of a square with electrical tape, paint the free part with gold;
- remove the tape, then cover the second square located diagonally from the previously painted figure;
- Also paint the unpasted area golden;
- cover the work with topcoat.
Water design
Everyone knows what beauty can be achieved with the water nail art technique. In this option, different shades of enamels are dripped alternately into a container of water, then ornate stains are created with a toothpick or thin stick.
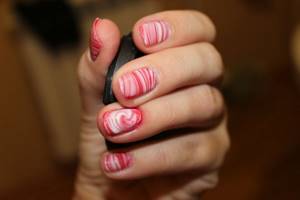
Afterwards, all that remains is to soak your nail in a glass and clean your finger from stains. However, this is not so easy to do. Electrical tape will help here; you can use it to cover the skin around the nail so that nothing unnecessary gets on it. Simply removing the sticky one is much easier than wiping your finger with acetone.
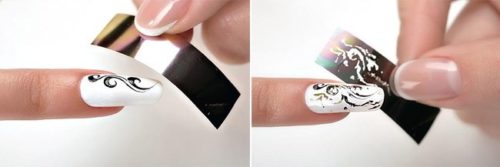
Scotch tape as an independent decorative element
Here things are even simpler. It is enough to cut out interesting shapes and paste them after drying the background. All that remains is to cover the work with topcoat.
You can use colored adhesive tape to lay out certain stripes, patterns or ornaments, and also secure the result with a transparent coating.
Differences between liquid tape and self-adhesive tape
There are significant differences between these materials:
- The liquid version is designed to protect the skin from pollution. It is applied around the nail plates before performing nail design and removed immediately after completion of the procedure.
- Duct tape serves a different function. It is intended for decoration. Thanks to her, she is able to create the perfect manicure without any professional skills and give her nails a sophisticated look.
Features and Benefits
It is important to note that ordinary stationery tape will not work for us. It leaves a sticky residue and can even tear off a piece of enamel.
If you don’t have anything suitable at hand, stick it several times to the back of your hand. This will remove excess stickiness.
In general, when decorating the nail plate in this way, masters use special adhesive tape.

The main advantage of this approach is the availability of materials and ease of implementation. Using this device, you can decorate the plate with several colors, creating a clear border between them. When working, the shades will not spread or mix if you separate them with thin sticky strips. It is very difficult to achieve this effect manually.

Trends 2022 offer the following nail art options, which can be created using adhesive tape:
- French;
- mosaic;
- geometric patterns;
- stars;
- chess field;
- multi-colored stripes located in different directions.
You can come up with other variations, it all depends on the imagination of the master.
There are two types of tape: colored and transparent. The first is used as an auxiliary material; after applying and drying the varnishes, it is completely removed from the plate. The second acts as an independent decor.
How to choose tape
If you choose the wrong adhesive tape, you can ruin the entire nail design. The main criteria that you should focus on when choosing are the number of adhesive sides, adhesiveness and the size of the accessory.
By number of adhesive sides
Manicure tape can have either one or two adhesive sides. Beginners are advised to avoid the double-sided option. It is more difficult to work with such an object than with a one-sided one, since it actively sticks to the hands, making it difficult to accurately stick to the nail plate.
By stickiness
Modern manicure tapes, available in stores selling nail tools, can have varying degrees of adhesiveness. It is recommended to choose strips that are less sticky. When applying the coating, they do not leave sloppy adhesive marks on the nail plate, providing the opportunity to create a high-quality design.
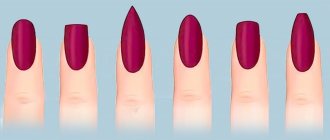
To size
Decorative strips can be either narrow or wide. The size of the adhesive tape should be selected based on what type of nail design you want to get in the end. For example, for graphic decor it is worth taking narrow adhesive tape. If a French style is required, then you can take simple stripes for a medium-width design.