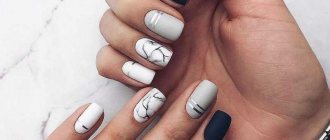
Artistic design with acrylic paints on nails never goes out of style. At the same time, it is not necessary to run to an expensive salon and look for an artist. You can learn to work with paints yourself and create real masterpieces on your nails.
To do this, you should understand what types of acrylic there are, learn and try the most popular application techniques and listen to the recommendations of the masters.
Pros of acrylic paints
Manicure can be performed using various materials. What colors do masters use to paint on their nails? Most often it is acrylic. Simple varnish is also used along with them, but the design is less aesthetically pleasing. What are the advantages of this particular material?
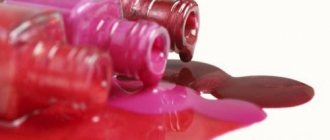
Acrylic paints
- Wide color palette and the ability to mix shades to create new ones;
- The painting looks more artistic and complete than when using varnish;
- The paint dries quickly and the next layer can be applied;
- Simple designs with acrylic paints are easy to do on your nails, making them ideal for beginners;
- The material is very economical with a long shelf life;
- The design is easy to adjust during the creation process.
The paint dries quite quickly on the nails. Often, beginners need a little more time to complete a design. In this case, the paint can be diluted a little with water. It can also be used to correct the drawing.
Application techniques
The versatility of acrylic paints allows you to work with them in a variety of techniques. Thanks to the density and ability to maintain the texture of strokes, you can achieve the effect of oil paints, but it is worth considering that without a miraculous “top” coating, such a design will be short-lived, and the applied colorless varnish will smooth out the surface. The watercolor design technique with acrylic paints is less common, but also possible. For such work, the surface of the nail must be primed with one layer of paint; as a rule, white is used for this. Otherwise, the paint, heavily diluted with water, will simply roll off the glossy surface. This primer will not take much time, since drying the layer does not require more than 3 minutes. The sliding technique
, which nail technologists included in their arsenal not so long ago, allows you to obtain an almost three-dimensional image.
Its base is acrylic paints mixed with construction gel. The color obtained in this way not only becomes especially bright, but also acquires volume, which is actively used in the technique of aquarium gel design and in gel bas-relief modeling. Unfortunately, this technique is not available to masters who do not have an ultraviolet lamp, because without it the gel will not harden on the nails and will not retain its properties. In general, the layer-by-layer application of the design, diluted with layers of transparent material, looks truly mesmerizing.
Nail designers use glaze In nail painting, this technique allows you to add a perspective effect even in a flat design. By the way, da Vinci used layer-by-layer application of translucent tones for a volume effect.
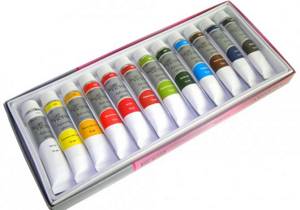
Paint selection
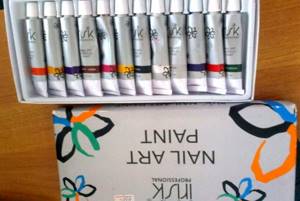
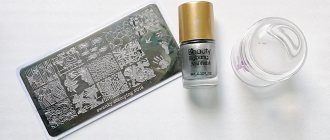
IRISK paints
The question of which acrylic paints are best for nail design is decided by each master independently. The price category of all leading brands is approximately the same. The price of paints is not very high. However, they all have certain characteristics.
The Runail brand produces paints suitable for watercolor painting. They mix well and are diluted with water. IRISK materials also belong to the same type. They also mix well, but have richer colors.
Designs and patterns on nails with acrylic paints, videos of which you can find on the Internet, are most often made with Polycolor brand material. These are the latest generation paints. They are quite expensive, but they are usually used by high-level professionals.
The Qumaxi color palette is characterized by the presence of bright and unusual shades. In particular, metallic colors, gold, silver. LadyVictor paints are distinguished by their rich colors and brightness. When dry, they acquire a glossy effect.
Basics for beginners
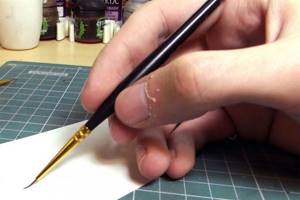
How to hold a brush
In this part of the article we will try to answer the question of how to properly paint with acrylic paints on nails. First of all, you need to get used to how to hold the brush. It's worth practicing a little on cardboard or plastic.
It is best to cover any surface with colored nail polish and, after it has completely dried, start painting with acrylic. The technique of painting with acrylic paints on nails is quite simple. Pay special attention to the pressure applied to the brush, the required amount of paint, the intensity of the color and the result of mixing shades. It is more convenient to take the paint not directly from the bottle, but to apply a few large drops to the palette.
After training, we learn how to paint on nails with acrylic paints. Draw a nail plate on cardboard, cover it with varnish and try to apply the selected design. Once you get it quite clearly and neatly, you can start performing an acrylic manicure, a photo of which you can add to your portfolio as a nail service master.
Step-by-step instructions “Golden pattern” 2016 photo
To create an artistic painting you will need a base varnish, black or dark brown varnish, gold varnish or gold glitter, a fixative varnish, and thin brushes.
Execution steps:
- Cover your nails with base coat.
- Apply black (dark brown) polish to your nails and let dry.
- Using a brush with gold varnish, draw any lines or other design on a black background. The main thing here is to ensure that the pattern does not turn out sloppy. You can simply apply gold glitter to a black surface.
- Cover your nails with a fixative varnish.
An example of a manicure
Below is a step-by-step nail design with acrylic paints, a photo and video version of which can be found below. By strictly following the advice, you can create an aesthetically pleasing and sustainable painting. But first, it would be nice to practice on plastic or cardboard.

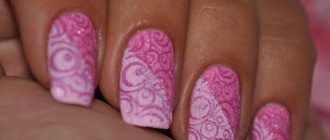
Drawings with acrylic paints
- Treat your nails as you would for a regular manicure. Give them a beautiful shape, file them, treat the cuticle. Then degrease the plate;
- Apply base coat;
- Once dry, coat your nails with a colored polish. The manicure we describe with acrylic paints at home has a fairly simple pattern and only two colors are used, so it may be worth choosing contrasting shades;
- Wait for the varnish to dry completely;
- Now, if you have practiced enough on cardboard, you can start creating. The most complex design should be placed on only one nail. For example, on the ring or index finger. Apply a simple sketchy butterfly on it using the main color. Complete the pattern of her wings with a few strokes and dots of auxiliary shade;
- An important tip on how to carefully paint on nails with acrylic paints is that each subsequent color is applied after the previous one has completely dried;
- On the remaining nails it is enough to make patterns in the form of stripes and dots, not too complex;
- Apply a layer of top coat.
Fairly simple acrylic nail designs for beginners can be found on the Internet or in magazines. At the initial stages of creativity, you can limit yourself to 2 - 3 manicure colors. Then gradually complicate it and add new shades. Watercolor design can be considered the “highest aerobatics” of painting.
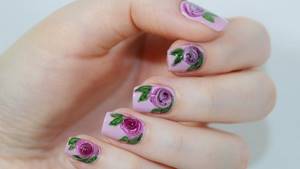
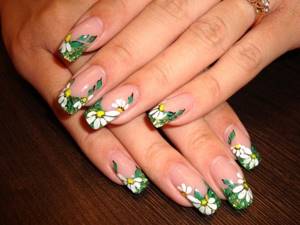
Implementation of floral design
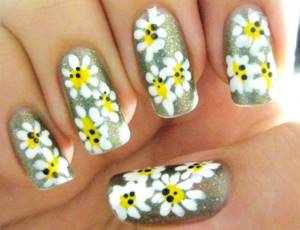
Painting nails with acrylic paints, as can be seen from the photo, often carries floral and romantic motifs. The simplest option is a drawing of daisies. You just need to put a yellow dot and paint white petals with a few strokes of a thin brush. If you have mastered this pattern well, then you can move on to a more complex pattern. Below is how to paint more complex flowers on your nails with acrylic paints step by step.
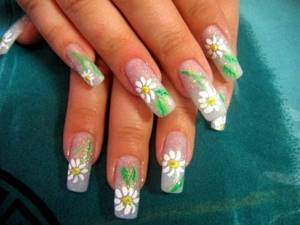
Daisies
- We cover the nail with a base coat, then with a colored coating and dry it;
- The outline of the future petal is drawn with two strokes. The third stroke is painting;
- We repeat this action five times, forming a flower, if necessary, draw another one nearby;
- Using a thinner brush, apply strokes to each petal from the center of the flower to the middle, so that the greatest density of color falls on the future core of the flower;
- On the borders of the petals we apply paint similar to the shade of the base varnish, as if “separating” the petals. Such sophisticated nail designs will look much more like professional paintings;
- The core is applied to the center of the flower in one point;
- If necessary, add green leaves or other complementary elements;
- After completing the design on all nails, wait for it to dry completely;
- We apply a finishing coat to your nails that will add shine and a finished look to your design.
Simple drawing

Daisies
Bright drawing

Simple drawing
Let us remind you once again that each new layer is applied after the previous one has completely dried. If your design involves acrylic nail paints, then this becomes the basic rule on how to use them. Of course, in the case of watercolor painting, this rule may be violated.
Delicate daisies - the simplest drawing
The easiest way to draw daisies. The choice of color is up to your taste. You can try the harmony of colors on special tips (or ordinary cheap plastic nails that are supposed to be glued on with glue).
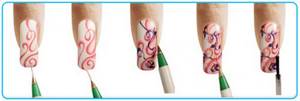
Flower nail design technique:
- Place a drop of varnish on a piece of thick paper or foil. Armed with a pen or dots, carefully place five dots. These are the petals of your future flower.
- It is better to place one flower at the edge of the nail. Two or three flowers look great on the grown-out part of the nail. If you want to place flowers over the entire surface of the nail, then do not make the designs too large.
- Using varnish of the same color, place a few additional dots around the entire composition. They will act as a connecting element, and your daisies will not look scattered.
- Now you need a varnish of a contrasting color. Also, drop a drop of varnish onto the paper and carefully mark the centers of your simple flower designs.
- If you want a festive option, then the centers can be marked with small rhinestones. They are easy to stick to clear varnish.
- The finishing touch is a fixative varnish.
Hardware manicure video training for beginners
Gel nails 2016 photos new
Fashionable shoes 2016 photo
Secrets from the professionals
Schemes of drawings
In various sources you can find very complex schemes of drawings on nails with acrylic paints. They seem almost impossible to accomplish. However, masters with extensive experience can do this. In addition, you need to know a few subtleties, which will be described below.
- Acrylic is a fairly liquid material, and therefore it is better to carry out the design on a support so that it does not flow;
- Do not mix materials from different manufacturers;
- It is better to apply the pattern with a synthetic brush, specially made for working with acrylic;
- There are different opinions on how to dry acrylic paints on nails. Depending on the manufacturer, they take different times to dry. But most often it is a few seconds. Contrary to popular belief, a UV lamp is not needed.
Now you know everything about the technique of such nail art. Any instructional video from the Internet will make painting on nails with acrylic paints even more understandable for you. After a few training sessions, you will be able to complete the most complex designs on your own.