Foam manicure is a type of textured design that, with its simplicity, fits perfectly into the general trend of nail minimalism. As soon as they call it: snake skin, crocodile skin, mermaid tail, lava, lunar craters. Masters agree on only one thing - it’s fast, simple, incredibly stylish and, best of all, suitable for absolutely all ages and occupations. Today we will tell you about all the subtleties and life hacks of bubble nails manicure, which has become so popular that it threatens to seriously displace traditional winter design methods and become the most popular New Year's nail outfit.
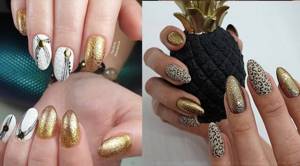
Photo author: @_teodora_atanasova_/Photo author: @sheva.nail
What is bubble manicure
Bubble design is a type of manicure in which the surface of one or more nails is covered with bubbles. Despite the apparent complexity of execution, creating such a coating is quite simple. If you wish, you can do this yourself without contacting a manicurist.
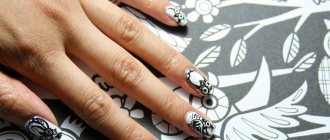
The peculiarity of the design with bubbles is the ability to recreate interesting and unusual effects. Depending on the color and texture, the design on the nails can imitate reptile skin, lunar craters, honeycombs, porous chocolate, and thin lace. A foam manicure is created using available materials: soap bubbles, shaving cosmetics, etc.
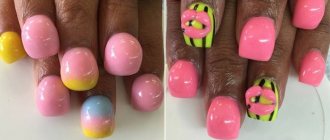
For short nails
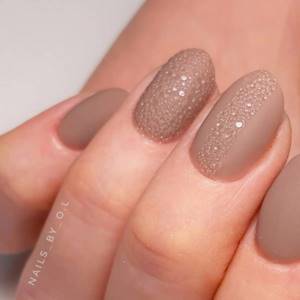
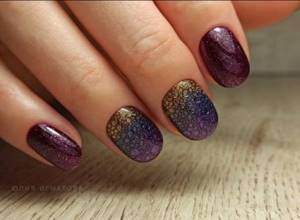
On short nails, you can be a little bolder and cover the entire nail with foam. Due to the small area, there will be no feeling of pretentiousness and oversaturation.
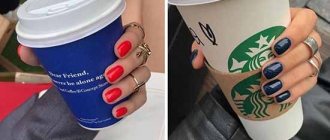
When choosing a color, be guided by the occasion, your own desires and fashion trends. Pastel shades, classic black, and the 2022 color blue are still popular.
Black manicure ideas
Manicure in blue tones: design ideas in different techniques and textures
Blue manicure ideas, combinations and tones
Pros and cons of bubble nails
Advantages of bubble design:
- Versatility. Manicure looks good on any nails, regardless of their length and shape. On a small plate, the bubbles will look like neat stone beads, which will appeal to lovers of jewelry made from natural materials. If you want your nails to look more impressive, you should grow them to the desired length or resort to extensions. If your own plate is weak and thin, it can be strengthened with a base or acrylic powder.
- Practicality. Manicure with foam is characterized by the presence of a rough, ribbed surface. But despite this, the design is comfortable to wear. It does not cling to clothes and does not require special care. Dirt and cosmetics that get into the cells are quickly removed when washing your hands (including when using a soiled matte top). Thanks to this, the manicure retains its beauty as the nail plate grows (until the next visit to the master). To ensure that the design does not cause inconvenience during wearing, it must be carried out in compliance with technology.
- Easy to create. Different tools and means are used to apply decor, so the master can choose what he is more comfortable and accustomed to working with. Thanks to this, foam nail design is completed as quickly as possible. Some specialists apply bubbles with tip sticks, others with a fan (makeup) brush, and still others with their fingers. It is especially convenient to work with your hands if the foam is thick.
This decor option also has disadvantages. These include the following:
- Dependence of wear time on the initial condition of the nails. When creating a manicure, the plate is covered with 4-5 layers of material. This is a significant load that only healthy nails can cope with. If they are initially damaged, additional reinforcement will be required. Otherwise, the condition of the plate will worsen, and the nails may be damaged when performing household and work tasks.
- The need for careful adherence to technology. The last stage of the manicure is “combing” the texture - removing the prickliness with the help of nippers or a buff. If this is not done, the design will be uncomfortable to wear. Nails will cling to hair and clothing and leave scratches on the skin. Another important point is that the foam should be evenly distributed over the surface of the plate (from the cuticle to the free edge). Large margins look unsightly and disrupt the visual integrity of the design.
- The need to work at speed. You need to create a design quickly, because bubbles burst quickly. The master processes 1 nail at a time: evenly distributes the foam and immediately sends the client’s hand into the lamp.
To avoid mistakes, you should understand how to do a manicure correctly. You must act strictly according to the instructions, without skipping a single step.
Manicure with foam No. 2 – texture design
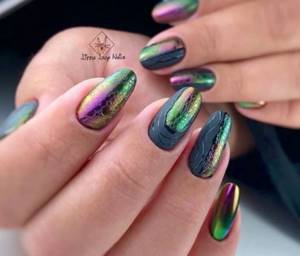
For several seasons in a row, the texture of crocodile or python skin has been on trend. This year will be no exception. So, foam on nails can create a very interesting effect, similar to these materials. In step-by-step photos I'll demonstrate how to make the popular lizard design.
I used a fairly bright green color as a basis. By the way, green will be very popular this summer, in all shades, from lemon green to mysterious dark green.
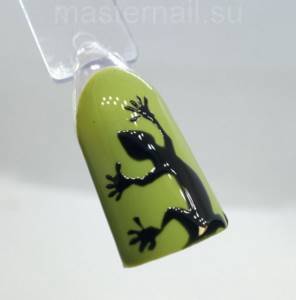
Next, I painted a lizard with black gel paint. Before creating the design, I covered the nail with the thinnest layer of topcoat without any residual stickiness. Why is this necessary? Some gel polishes and gel paints quickly spread over the surface, and the outline of the design becomes blurry and ugly. To avoid this, you need to remove stickiness from the work surface. Then, while drawing, you won’t have to periodically dry the image in the lamp.
After the lizard was drawn, I covered the tips with a velvet effect topcoat.
It took off the stickiness when the top cooled down a little after the lamp.
Next, I took the topcoat (again, without stickiness) and applied it with a thin brush only in the area of the drawing.
Immediately she carefully placed the foam on top of the drawing and quickly sent the tips into the lamp.
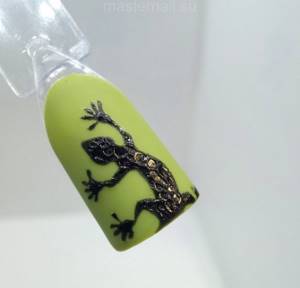
After drying, foam bubbles appeared only in the area of the drawing, like scales. To complete the manicure, simply walk over the entire surface with a clinser.
Now you know how to make individual designs using foam. To prevent the top and bubbles from spreading, you need to act very quickly.
How to choose the right materials for foam design
To avoid any difficulties when creating bubble nails, you need to prepare the necessary tools and materials in advance:
- manicure accessories (scissors, nippers, spatula, file, buff);
- base, single-layer gel polish, top (liquid or medium thickness);
- soap scum;
- tool for applying foam (brush, sponge, etc.);
- paper napkins
- other: gloves, antiseptic, cuticle softening oil, hand cream, disposable gloves (if necessary).
You can choose any means for creating foam. The bubble effect is achieved by using household chemicals for washing dishes, shaving and washing foam, and soap. You can try several options and understand which one is more convenient to work with.
To obtain a pattern with small bubbles, the product is mixed with water and shaken vigorously for a long time. Large cells are obtained if you shake the mixture briefly and lightly.
Bright manicure with bubbles
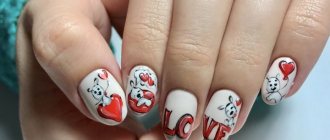
A manicure with bubbles is quite simple to perform. There is a misconception that all simple designs cannot be stylish and vibrant. However, a large number of photos of incredibly colorful bubble designs debunk this myth.
Techniques based on the contrast of gel polishes are very popular. The pattern created by the foam will appear much more clearly if the color of the base coating is diametrically opposite. At home, this method makes it possible to significantly expand the arsenal of designs. It allows you to create different variations of foam manicure, having a small palette of shades in stock. Rubbing fits perfectly into the described technique. It is applied with rubbing movements onto the base layer of varnish and secured with a non-sticky top coat.
The brightest (neon) colors can be created using pigments. This material is similar in properties to the one mentioned earlier. It is a fine powder.
The application technique is different and consists of the following steps:
- Applying base color.
- Drying in a lamp (Led – 20 sec., UV – 1 min.).
- Applying pigment using a brush (fan).
- Complete polymerization cycle.
- Coating with a topcoat with a sticky layer.
- Removing stickiness with a degreaser.
The pigment appears most clearly on white gel polish. A prerequisite is that the material has a sticky layer after drying. The powder is not rubbed in, but applied with a brush and distributed over the surface. Residues are removed with light sweeping movements. Repeated drying is necessary to fix the pigment on the sticky layer. If there is no varnish with the required characteristics, you can cover it with a topcoat with adhesion. The use of such compositions ensures sealing of the material between layers, preventing detachments and chips.
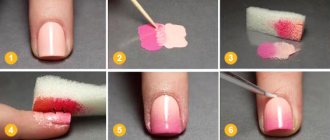
How to do a foam manicure: step-by-step instructions
You need to make bubbles on your nails in stages. The instructions for performing a manicure are as follows:
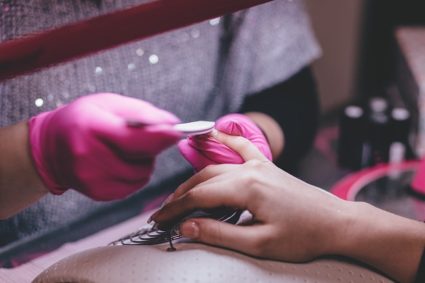
- Treat the nail plates, preparing them for further work. Perform a hardware, edged or combined manicure. Remove gloss with a buff. Apply degreaser and acid-free primer.
- Create the first layer using a base (rubber or tint camouflage). The material is applied in 1 layer and dried according to the manufacturer's requirements.
- After the base has dried, cover your nails with colored gel polish. The material can be either dark or light (depending on personal preference). The only requirement for shellac is high density.
- The next step in creating bubble nails is to dry the coating and remove the sticky layer. Apply a glossy or matte topcoat and dry thoroughly in a lamp.
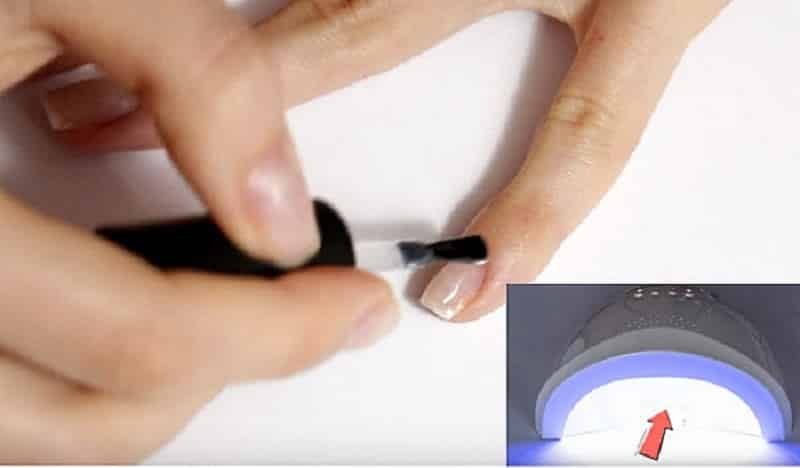
- Apply a second coat of top, but in a thin layer (using a semi-dry brush). There is no need to dry it in a lamp.
- Apply foam and distribute over the entire nail plate. Put your hand into the lamp.
- Moisten a paper towel with a degreaser and remove any remaining foam.
- Check the coating for any protruding areas that may subsequently cling to clothing and hair. Cut them off with pliers or remove them with a buff.
There is no need to apply a third layer of topcoat.
Nail design with foam is done step by step. Skipping at least one step will result in a decrease in the quality of the coating.
Textured foam manicure: history of the trend
Original nail decoration with imitation of natural textures or animalistic textures (reptile skin or fish scales) is not a new topic in nail art. But foam nails are the simplest and most accessible technique for beginners to create a spectacular and trendy look. If previously experienced craftsmen used natural snake skin, imitated lava and mermaid tails using 4D gels, combined thick tops, gels and sprinkling with acrylic or glitter to create patterns (and beginners with little experience resorted to stamping or thematic sliders), now the most A simple mono manicure takes a minimum of time and effort, and looks just as attractive as painstaking work that takes many hours.
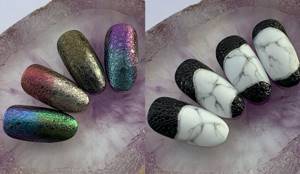
Photo by: @dze_manik
The general theme in the nail industry in 2022 is a return to naturalness, simplicity, minimalism, as well as a promise to combine techniques (using several trendy ways to decorate natural or extended nails in one look). And the trend for manicure with improvised means - the most common soap foam, which in the form of soap for cleansing the hands of a master or client is present in the office of any nail artist - fits perfectly into these two contradictory directions. Depending on the artist’s inspiration, the client’s imagination and the availability of the necessary varieties of decorative materials at hand, nails in any state of health can be presented with a unique outfit that will give not only a lot of good mood, but also a sea of compliments.
Photo by: @stylowypazur_official
Like any other technique, bubble nails have their advantages and disadvantages, important points and life hacks that you need to know about before offering this design to a client or trying it on yourself. Let's take a closer look at the features of the new trend.
Types of bubble manicure
Bubble manicure gives room for imagination. Proof of this is the large number of varieties, each of which has its own characteristics.
Main types of manicure:
- Lava (pumice) effect. Nails are covered with gel polish of the same color, the result is fixed with a matte top coat.
- "Cat". It involves a combination of soap foam and coatings that create volumetric glare (magnetic rubbing, etc.).
- Foil under foam. It is performed using single-color shellac, matte or glossy foil.
- Colored foam on a contrasting background. Nails are coated with shellac and dried in a lamp. A layer of gel polish of a contrasting color is applied on top, and foam is distributed over it (without pre-drying).
- Rubbing. Foam manicure looks good in combination with any products (especially those that imitate jewelry or metals).
- Rhinestones. Jewelry can be of any shape. The main thing is that they are combined with the selected texture and shade of shellac.
- Smooth foam. After applying the foam, the nails are carefully polished and covered with a glossy top coat. This allows you to create beautiful highlights, make wear more comfortable and last longer.
- Neon foam. Involves the use of bright, “screaming” pigments. A good option for brave, confident girls. These nails look best in summer (especially in combination with tanned skin).
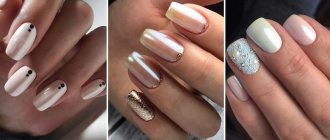
- French. The nail is covered with pastel pink or soft beige varnish, and a different color and soap bubbles are applied to the crescent-shaped tip. If desired, several nails can be done using this technique, and the rest can be covered with a single-color varnish.
- Three-dimensional decor. 3D elements go well with the foam design option. These can be sliders, volumetric flowers, patterns and shapes. If necessary, liquid metal can be used. To make such a design beautiful, you need to have good taste. If you go too far with the number of decorative elements, the manicure will look funny and even vulgar.
Types of bubble nails. Top 10 most spectacular variations of trendy manicure
Fashionable foam manicure allows the master to create without limiting the flight of imagination. You can use absolutely all decorative coatings, bulk decor and materials for painting, casting, sculpting, as well as to create the effect of volume and depth. Let's look at the most popular options for making foam nails according to Youtube and Instagram craftswomen.
- Lava nails (pumice nails)
. This design involves the use of only a matte topcoat. Additionally, the image is not decorated with anything and, for greater stylistic similarity, is executed in a monocolor version. The top of the marigolds is not additionally fixed with a top, so that the effect of the textured natural surface does not disappear.
Photo by: @alla_nails/Photo by: @shimmer_beauty_studio
Photo by: @lolka_nail_art/Photo by: @marafet_nails_art
- Foam rub
. At the request of the client (and the inspiration of the master), absolutely any rubbing can be used. Rubs that imitate precious metals or stones look especially chic. But if the idea allows, you can use the most delicate options (pearl rubs) or creative decor (rubs “”). Have you accumulated rubs in your decor arsenal that are not pleasing with their visual graininess? Don't be afraid to use them for this look! With additional fixation with a top and foam, the shortcomings of dry decor will be reliably hidden in the original image.
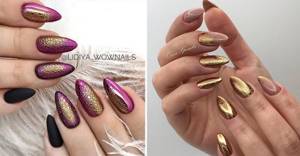
Photo author: @lidiya_wownails/Photo author: @nogti_service_05
Photo by: @nastroenie.nails/Photo by: @rknails___
- Foam "cat"
. This type of bubble marigold is the second most popular after rubbing! Because the look combines one of the most favorite coatings - “Kitty” gel polishes (with even a 5D effect), and 2 trendy techniques at once - “foam manicure” and “volumetric highlight”. If you want to perform a manicure using the combination of 2 techniques, do not forget to acquire powerful magnets for playing with metal particles in the thickness of the gel polish coating. And if you don’t have ready-made “cats”, mix your favorite gel polish with magnetic rubbing!
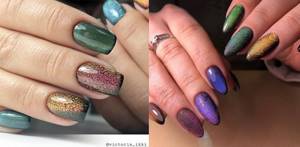
Photo author: @victoria_ikki/Photo author: @legeyda.olga
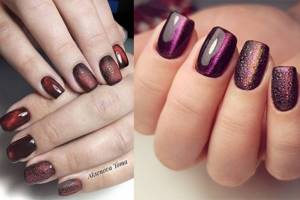
Photo author: @aksenova_toma_nails/Photo author: @elena_muzika_nail
- Foil under foam
. Another spectacular nail decor that goes well with foam (and evokes associations with molten or solidifying lava) is glossy or matte foil. It is preferable to use a one-color decor without a pattern, since the pattern under the bubbles will be difficult to distinguish. If the image allows you to complement the textured design with drawing gel paints or gel pastes, this can be done either on neighboring fingers, or done using the same beautiful product as the “Cobweb” gel paint (in the classic version, or “cobweb” metallic ").
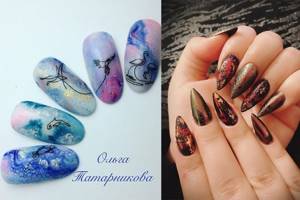
Photo author: @tatarnikova_kogalym/Photo author: @heavenlynailsbypatrycja
Photo by: @_nails_mary_/Photo by: @heavenlynailsbypatrycja
- Colored foam on a contrasting base
(“canvas” is made of contrasting gel polishes applied in layers). The foam is applied in this way not on the top covering the selected gel polish, but on the second color of the gel polish (not dried). This flirty design evokes associations with openwork lace (veil) and is perfect for those who do not like to combine texture with additional decor, but want to see an interesting twist in the finished design. Such “foamy” nails look attractive both in a rough lava design and with the perfect highlight of a glossy top.
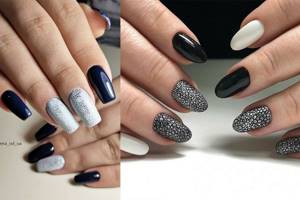
Photo author: @nails_elena_od_ua/Photo author: @olesianails_korolev
Photo author: @nail_shellac_minsk/Photo author: @jal.nailartist
- Foam and rhinestone inlay
. With a certain selection of colors, bubble manicure is visually very reminiscent of sea corals, which love to show off on nails paired with artificial pearls, bright broths and a fashionable girl’s best friends - artificial diamonds. Rhinestones can be either flat or conical. The main thing is that they combine beautifully with the texture of the foam, do not draw attention to themselves, and match the color of the main shade of the gel polish.
Photo author: @liza.kushnarevich/Photo author: @goodilina_anastasiya
Photo author: @_nailslabelle_/Photo author: @nailstylist_ninakonnik
- Neon foam
. In a certain sense, foam nails are a kind of shocking nail art, and therefore bold natures choose the daring duo of lava foam and neon coatings (or neon pigments). With such an explosion of color and its spectacular frame, your hands will definitely not be left unnoticed! And they will lift your spirits for a long time with their beauty.
Photo by: @pro_nails_berezoof/Photo by: @katrin_beauty_style
- Smooth foam
(aquarium bubble nails). Girls who cannot imagine their image without a breathtakingly beautiful perfect highlight on their nails, as well as those who prefer ease of wear in nail design, choose foam under the reliable fixation of a glossy top. This image loses its natural originality (texture), but gains in durability and wearing comfort. Quite often, this type of foam on nails is supplemented with sliders, flexible tapes, and 3D decor.
Photo author: @tatiana_paraso4ka/Photo author: @nataliavolkova_nail
Photo by: @sokol_nails_master/Photo by: @vilutevilute
- French foam, “moon” foam or foam patterns
. Both modest women and fashionistas will find the ideal option for themselves in the variety of foam looks. Include foam in your favorite nude or creative French manicure, use it to make painting on your nails voluminous and “alive”, play with abstractions, ethnicity and geometry (decorating the hole or side edges of the nail with foam)! A soapy “trick” in your favorite design will help you fall in love with it with renewed vigor, and the master will not sigh when you meet: “Well, they’ve come for a French jacket again!”
Photo by: @eolin.nails/Photo by: @aseevanail24
Photo author: @nailolgasaenko/Photo author: @mani_maniaczka
- Foam with 3D decor
. Molding and three-dimensional painting, a recent hit - the “Tear of a Unicorn” design, also coexist perfectly with foam in one design. Openwork bubbles in a contrasting color or the same color as the gel polish base will beautifully highlight liquid metal, 3D sliders, and favorite figures/flowers/ornaments. In such a manicure, the main thing is to ensure that the accent smoothly balances between the two leading nail decoration techniques. Otherwise, the newest trend will not be revealed in all its charm.
Photo author: @darya_kamenskih/Photo author: @irinakaraustova
Photo author: @_ekaterina.zhukova_/Photo author: @ok.sana3676
Nails with foam over regular polish
Not every woman has the opportunity to constantly use shellac (due to lack of time or money). Some girls are allergic to gel, which forces them to opt for classic varnishes.
It is difficult to answer the question whether a foam manicure will last without fixing it in a lamp. The length of time you can wear a bubble design depends on various factors (products used, care, etc.).
You cannot count on the fact that classic varnish will last as long as gel.
But this method has an important advantage - the ability to update the design more often and try on different images.
Another difficulty when using classic varnish is that without drying in an ultraviolet lamp, the bubble quickly bursts. Therefore, creating a design requires skill.
For long nails
Foam manicure in itself looks elegant and attracts attention, so there is no need to supplement it with decor. As for the area of filling with bubbles, it all depends on the client’s desire and imagination. The accent design looks sophisticated and elegant.
The color combination can be any - the rules are the same as in classic gel polish coating.
Orange manicure ideas
Manicure trends 2020
Bubles nail design tips
To avoid mistakes when designing bubbles, you need to follow the following recommendations:
- Strengthen thin nails before designing.
- Strictly follow the sequence of actions.
- Use thick shellacs, which are applied in 1 layer.
- Send your hand into the lamp immediately after applying the foam.
- Treat nails one at a time.
- After drying in the lamp, inspect the finished work for any thorny areas. Remove protruding jagged edges with a buff or nippers so that the bubble manicure will last a long time and your nails will not catch on anything.
Foam nails and classic nail polishes
Unfortunately, not all nail fashionistas can constantly wear gel polish without interruptions, or are generally forced to make a choice in favor of weekly gel polishes or classic nail polishes due to an allergy to gel polish.
But even such restrictions will not prevent you from being on the crest of manicure fashion and delighting yourself with a foam manicure. Is it possible to decorate polishes with foam, and will such a manicure be wearable? Find answers and options for lacquer-foam design in the video master class presented below. Author of the video: Nails Nails As for the wearability of such an image, you can only find out in practice. A mixture of varnish, water foam without fixation with a top coat and even with the most reliable finishes for weekly gel polishes, of course, will not show the same phenomenal durability as a gel polish manicure. However, it will allow you to change your look more often and “bring to light” your entire arsenal of varnish coatings.
Armed with theory and choosing an image you like, reinforce your knowledge with visual learning. We have selected for you the most informative reviews of the new manicure trend that will help resolve all possible difficulties and questions when trying to perform foam nails.
Photo author: @tatyana_nailsmaster/Photo author: @nogotochki_saratov64
Foam manicure ideas: photos of spectacular nail art
Design ideas
Manicure with bubbles in 2022 has become a separate trend in the nail art industry. As mentioned earlier, there are a number of options in which it can act as an independent, full-fledged design in various versions. So, for example, the pattern may be present on all 10 fingers of the hand or only on some, creating an accent. Foam design can cover the entire surface of the nail, have a chaotic or geometric arrangement.
Today, nail service professionals offer a lot of ideas for combining foam and other existing techniques, namely:
- gradient;
- aquarium;
- French;
- stamping;
- patterns;
- marble.
The gradient can be made by rubbing, pigments or gel polishes of various shades. Aquarium technology creates the effect of sparkling water with bubbles. To do this, when modeling the nail, a foam pattern is created on the first layer of material. A clear construction gel is then applied to the substrate to create the architecture. This technique often uses fimo decor, the shape of which resembles fruit.
The classic French version can be complemented with several nails with a bubble design. A design in which the foam pattern follows the line of a smile looks more original. When combining techniques such as stamping, patterns (monograms, geometry, drawings), marble drawing, a pattern of bubbles is applied to the nail in fragments.
The location depends on the idea and individual preferences:
- horizontally;
- vertical;
- diagonally;
- along the smile line;
- chaotic.
Nail service professionals continue to experiment with variations of foam manicure, so this list is constantly updated with new items. Not every woman has the skills to perform the previously listed techniques.
For such cases, manufacturers of nail art products have developed various decor:
- rhinestones, stones, broths;
- sparkles of various sizes;
- marmalade for nails, velvet sand;
- sliders, stickers;
- foil (potal, tear-off, transfer);
- cobweb;
- dried flower
The use of these products significantly reduces the time required to perform a manicure. A huge advantage of using them is the ability to create an original design with minimal skills.
Over the past 10 years, nail services have advanced significantly. Taking into account the wishes of consumers, manufacturers constantly improved their products and developed new materials. And the masters experimented with new techniques for using them. This is how a large number of popular manicure techniques arose. Designs with bubbles have become popular due to their ease of implementation, the ability to realize fantasies and uniqueness.
Step-by-step instructions for caviar design using gel polish
Broths essentially stick to the surface, so for a good “adhesion” you need to create a sticky base. For the gel polish base for broths, the usual traditional preparation is carried out. Step by step it looks like this:
- perform a hygienic manicure by removing the cuticle, treating the side ridges, and forming the free edge of the nail; Hygienic manicure before starting design
- after sanding the surface of the nail with a buff, apply primer and base to the nail and dry;
Nail preparation - Apply the first layer of color coating and dry. Then apply a second coat and dry again; Application of color coating
- Apply special glue to the nail and sprinkle it with broth. To adjust the location of small balls, you can use an orange stick to move small elements along the nail, and you can simply press the broths to the surface of the nail with your finger; Design with bouillons
- dry your nails and run a brush over the nail to remove any loose balls;
- “seal” the manicure around the edges with the top so that the broths do not interfere with everyday wear and do not fall off on the first day, dry. “Sealing” the nail
Ready-made manicure
The glue holds the broth longer and this manicure looks more aesthetically pleasing. If there is simply no glue, then a top without drying is used instead: the desired design is laid out on it and then dried in a lamp.
Nail design with bouillons and gel polish
Manicure with broths and gel polish
Fashionable nail designs with bouillons
You can cover your nails with broths in any way you like: cover the entire nail surface with them, place them on the nail hole, complement the design, etc. Favorite designs include caviar, gradient, and patterns. But there are no limits to imagination, right?
Caviar manicure on all nails
Making a real “boom” out of small balls on your nails turns out to be a fashion trend, it’s called caviar design. A scattering of small beads is placed on the entire surface of the nail, and the color can be the same for all nails, or it can combine several. There are even special mixes of broths, when different colors of balls are mixed in one bottle.
Caviar manicure is suitable for both short and medium-length nails. On long nails, bouillons do not look so impressive, and they are uncomfortable to wear. It is more logical to make a “game” on the natural nail plate, so as not to layer the thickness. You should not make such a design if your everyday look should be strict and without frills. Not suitable for women of respectable age.
SONY DSC
Focus on one or two fingers
By complementing any manicure technique, you can make an interesting design on several nails. Any accent is allowed: a simple pattern, a scattering of broths (caviar manicure), an addition to the picture, etc.
The design, which is made in a different color from the main coating, stands out well. For example, for pale blue nail art, “caviar” on several nails in the form of golden broths is suitable.
French or moon manicure
Small balls are inconvenient to wear only on the tip of the nail, so when creating a French or lunar nail art, the broths are placed on “convenient” areas: the base of the nail or the direction from the cuticle to the middle of the nail plate.
It is important to decorate a classic French manicure or lunar nail art with stylish applications made from bouillons and other decorative materials: cut liquid stones, rhinestones and bouillons, etc. It is also trendy to emphasize the smile line with small balls, imitating pearl beads.
French manicure with bouillons French manicure with bouillons Lunar design with bouillons
Creating patterns and drawings with broths
Creating a caviar design, although the technique is simpler, the painstaking work of applying the broths in the form of a beautiful pattern will give a stunning result and will not leave the manicure unattended. The labor-intensive process can also pose difficulties if patterns and designs are laid out on quick-drying compounds (transparent varnish, for example). In this regard, a gel polish top coat that dries only under a UV lamp is more convenient.
With the help of small balls you can lay out monograms, apply geometric designs, make dotted decorations with broths, and decorate nails with a design already applied. There are plenty of options, and finding your favorite is only possible through trial and experience.
Drawings with bouillons Drawings with bouillons Patterns with bouillons
Stretching with broths or gradient
Even with small balls you can make a beautiful and effective gradient. It is done according to the principle of a caviar manicure, and the transitions between colors occur by smoothly mixing colors for a gradient. Between the broths you can make inclusions of rhinestones to match the manicure, larger balls, semi-beads, etc.
Another gradient option is to partially cover the nail with broth. This is done in the direction from the tip of the nail to the middle, gradually reducing the density of applying small balls to the nail.
Stretching with broths Gradient with broths Stretching with broths Gradient with broths
3d design
Three-dimensional graphics are now used in various areas of life, even in manicure. Using bouillons, making such a 3D design is quite simple, since the balls themselves are already a three-dimensional figure. Performing a 3D style manicure in technique is no different from the usual use of broths in manicure, but requires careful thought before starting nail art and detailed laying out of small beads.
Among the options for this design are floral nail art, imitation of beads, chains, etc. This manicure is complemented with other decorative elements in the style of a three-dimensional image: semi-beads, rhinestones, modeling, etc.
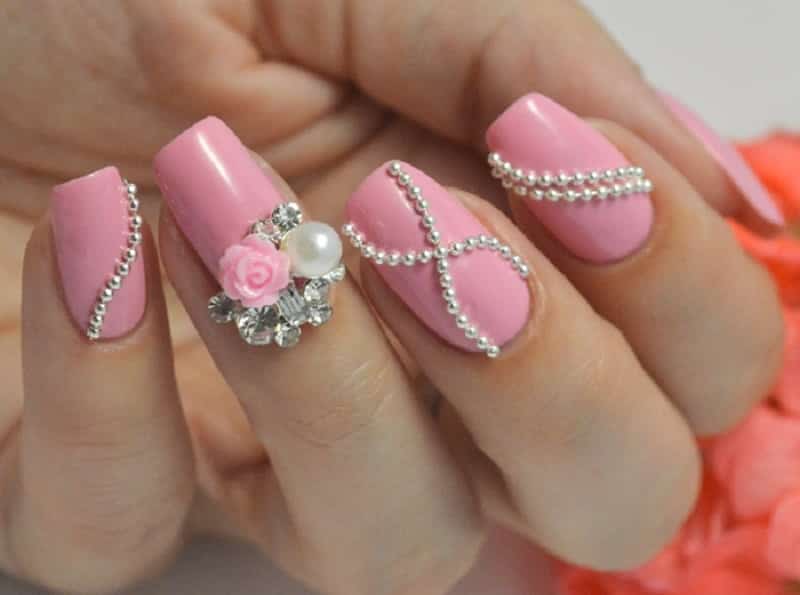
Wedding manicure with white broths
Even a beautiful wedding manicure can be done using these tiny broths. Simple ornaments and patterns can add a “zest” to a wedding design. It is advisable to use white broths for manicure if the bride’s image contains elements in the form of pearls (pearl beads, bracelet, dress embroidery, etc.) or the outfit is not burdened with any decorative items.
Cat eye manicure
Decorative varnish with a cat's eye effect can also be decorated with broths. The most popular option for this design is to frame the liquid stone on the ring finger with small balls coated with metal (gold, silver, etc.). The stone is placed at the base of the nail or in the middle, and a layer of broth is formed around it.
It is effective to do a manicure with a cat's eye and bouillons on medium-length or short nails. Small balls can be used to decorate any part of the nail, placed on selected nails or on all of them, it all depends on the intended design.
Manicure cat's eye with bouillons Nail design - cat's eye with bouillons Nail design with bouillons in the cat's eye style
Matte nails combined with an accent foam manicure
Stylish matte manicure design with foam and rubbing
Stylish, gentle, cute... All this is about the newfangled bubble manicure with foam in a matte design, made in a variety of variations. If we are talking about an everyday manicure with foam, then a matte effect in a delicate shade of blue, pink, cream and beige for spring-summer, or a calm dark color for autumn-winter is the ideal choice. At the same time, you can play with different textures and combine a velvet coating with a rub on a foam design - a chic idea for a festive Bubble Nails manicure.
Photos of the best and most effective bubbl manicure options
<