Decorating your nails with gel polish has many advantages, since the wear-resistant coating remains in the same condition for up to a month or more. Because of this, girls are eager to learn this technology and begin to do it themselves at home, trying to achieve a positive result.
However, keep in mind that before covering your nails with gel polish, you need to pay attention to all the intricacies of the technique, since failure to comply with any stage may affect the quality of the work.
What is gel polish coating
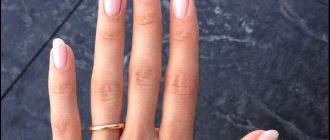
In a short time, gel polish coating has gained enormous popularity among women who care about their appearance and want to look perfect in any situation. Gel polish is a hybrid of gel and polish that stays on your nails for several weeks. This coating is durable, does not chip or crack under prolonged exposure to water, cleaning chemicals and other factors. And if ordinary nail polish may not look aesthetically pleasing within a few hours after application, then gel polish will decorate women’s hands for at least 2 weeks.
The advantages of gel polish coating include:
- convenience and speed of application;
- no unpleasant odor;
- large selection of colors and application techniques;
- durability and decorativeness.
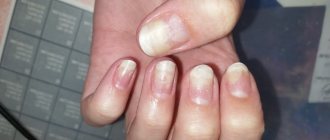
The main disadvantage of gel polish appears as the nail grows: unpainted areas at the base look sloppy and spoil the appearance of the manicure. But using some techniques, for example, French, helps to avoid this trouble.
Tips for doing a manicure
In order for your manicure to last as long as possible on your nails and look beautiful, you need to follow a few tips that will help you avoid mistakes:
- before work, it is better not to take nail baths less than two hours before the manicure;
- if you don’t have enough experience, then you shouldn’t work on all your nails at once; it’s better to paint 1-2 nails at a time;
- During the day it is better to avoid strong contact with water, especially when washing floors and visiting the pool;
- do not apply a thick layer, remove excess product on the brush.
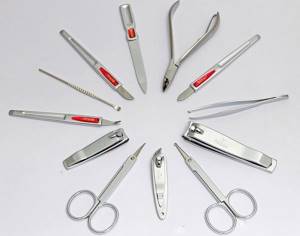
What you need for a gel polish manicure
To start creating a design, you must first collect all the necessary supplies:
- manicure set for preparing nails for coating;
- lamp;
- base and top coats;
- colored gel polish;
- degreaser;
- nourishing cream for nails and cuticles.
For better adhesion of the coating to the surface of the nail plate, you can use a primer - a special composition that should be applied to prepared nails before applying the base.
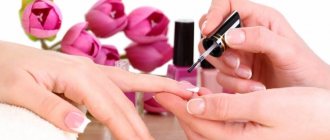
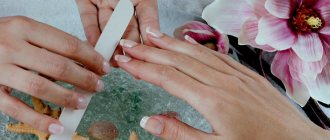
How to prepare your nails for gel polish
Before you start performing a manicure with gel polish step by step, you need to properly prepare the nail plates - only on well-groomed hands will the coating look aesthetically pleasing and attractive.
First, using files of varying abrasiveness, the desired shape is given. It should be even and the same on all nails. The cuticles are pushed back using a special stick and trimmed. Usually, when performing a standard manicure, a bath is used to steam the fingers. With this method, at least 1 hour must pass before applying gel polish.
Use a buff (grinding file) to polish and level the upper surface of the plate. After processing, it should become matte and lose its glossiness. There is no need to press hard on the file; sanding is carried out with light movements. This procedure is necessary for better adhesion of the coating to the surface of the nail.
Degreasing nails is the final stage of preparation for applying gel polish. Here they use cotton pads soaked in a special degreaser, nail polish remover or alcohol. The nails are thoroughly wiped, sometimes this procedure is repeated.
Nail designs
We suggest considering the available options for creating designs on nail plates. It’s not so difficult to create a small artistic masterpiece on your nails. To do this, you may need a variety of tools. Here you will find a list of the most popular techniques:
- Creating “paintings” with a needle;
- Using a brush to create drawings;
- Regular tape for small masterpieces.
Home craftswomen create a wide variety of designs. You can find all the details in our next series of articles.
Sequence of applying gel polish
Step-by-step instructions detailing the process of applying gel polish at home will help beginners create a beautiful manicure on their own.
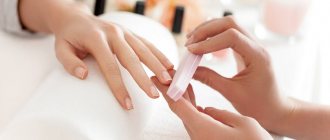
Applying base coat
The base coat is responsible for the strength of the manicure and also evens out the nail surface. Therefore, the quality of the entire application depends on the quality of the base. Put a little base on the brush and cover the nail with it, moving from the center of the plate to the cuticle, and then to the free edge. The base coating is applied in a thin layer, spreading it over the entire surface of the plate, not forgetting its ends. After the base is applied, the nails are dried in a lamp. From the moment you apply the base to your nails, it is important to ensure that dust particles, hairs and other small debris do not fall on their surface, otherwise the quality of the manicure will be poor.
Important! After drying, a sticky layer forms on the application surface. There is no need to remove it, since it is responsible for high-quality and strong adhesion of the manicure layers.
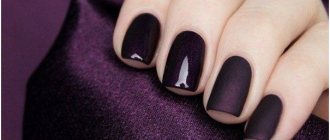
Covering nails with colored gel polish
A large palette of gel polish shades allows you to create interesting and varied nail designs. For beginner fashionistas who use gel polish on their own at home, it is recommended to use the simplest option and apply only one color you like.
The color is carefully and evenly applied to the nail plate. Don't worry if the resulting layer is translucent or appears in stripes. Often several layers of varnish may be needed to achieve the perfect finish.
Important! It is not recommended to apply gel polish in a thick layer: it is usually applied step by step, in 2-3 steps, after each of which the nails are dried in a lamp.
Applying the finishing coat
The final coating, otherwise known as top, is applied to consolidate the result. It is responsible for the durability of the manicure and protects the surface from scratches and damage. The structure of the top can be glossy or matte. A manicure with a top coat without a sticky layer is simple and suitable for beginners.
Those who like additional decorative elements (stones and rhinestones) are recommended to use a topcoat with a sticky layer, because this is what the decorations are attached to. At the end of the work, the sticky layer of the top is removed with a degreaser.
All stages of applying gel polish at home are very important, none of them should be skipped.
Video manicure tutorial for beginners step by step:
Required Tools
Before creating a manicure, you need to make sure that all the required tools and materials are prepared:
- UV lamp - manicure is impossible without it, as it ensures the hardening of the varnish. It is important to dry the gel well; lamps with a power lower than 36 W are not suitable. A more convenient model would be an LED lamp, which dries nails many times faster;
- The base is one of the most important materials, which is responsible for the strength of the manicure and the protection of the nail plate;
- Top coat - it is applied at the very end, when the manicure is completed. There are 2 types: matte and gloss;
- Gel polishes of all colors and shades;
- Degreaser – a product that removes fat from the surface of the nail;
- Manicure scissors, files, buff, orange stick or pusher;
- Various rhinestones, bouillons, stickers, stencils, sparkles;
- Small lint-free wipes. If they are not there, take a soft cloth or other material. Cotton pads will not work, as pieces of cotton wool will stick to the gel;
- Cuticle oil applied to soothe and nourish irritated skin around the nail.
It’s not worth buying a lot of materials at once, especially at a high cost. Not all are suitable, the best of them are selected with experience.
How to paint your nails with gel polish
Looking at the step-by-step instructions, you might think that doing a manicure at home with your own hands is not at all difficult. There are several nuances that cannot be neglected when creating a beautiful, high-quality manicure:
- Depending on the type of lamp used, the drying time for the base, color and top can be different: in a UV lamp it is 2 minutes, in an LED lamp it is only 30 seconds.
- The base and top are applied exclusively in one thin layer, and there can be several layers of color.
- You cannot use a topcoat instead of a basecoat and vice versa. These two tools have completely different functions.
- The best effect is achieved when choosing a base, top and color from the same manufacturer.
- If gel polish is applied to extended unnatural nails, they should not be made too thick, otherwise the gel polish applied in several layers will not look aesthetically pleasing.
- Before drawing and applying additional layers of gel polish, each of them is dried in a lamp.
- All glued rhinestones and stones on top are secured with a finishing coating, carefully covering all the spaces between them.
A multilayer design requires good final drying; its time is increased by 1.5 times (compared to the usual drying of each layer).
All these rules will help you create a high-quality manicure with gel polish coating yourself at home.
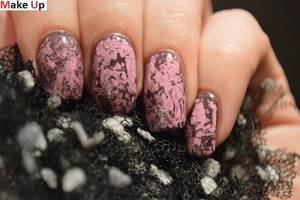
Craquelure effect: beautiful and simple
Fashionistas have long been familiar with this effect, as it has been popular for quite a long time. The essence of this coloring method is that the end result is cracked nails. Today, this effect can be easily achieved by using a special varnish that cracks when dried. But to create a beautiful manicure with this varnish, you need to remember 4 rules:
- To begin with, as always, the nail plate is degreased and a protective layer is applied.
- Then you apply the base color. It is better to apply 2 layers. Be sure to wait until it is completely dry.
- Apply crackle varnish. Apply it carefully and as close to the cuticle as possible to avoid indentations. The varnish dries within 5 minutes. The size of the cracks depends on the number of layers. If you apply a thin layer, the cracks will be small. The denser the layer, the thicker the cracks will be. It's usually difficult to make just one option perfect. The varnish dries quickly and the result is a mixture of fine and large cracks. Crackle can be applied diagonally to the nail, which will give a unique effect.
- Experts recommend making a strengthening layer.
Cracks on nails are an excellent option for a one-time “going out in public.” However, girls love variety, so this technique will not work for every time. As an alternative, nail art works great.
How to remove gel polish correctly
Proper removal of gel polish is no less important a process than its application. Incorrectly performed manipulations contribute to injury to the nail plate. To prevent this from happening, you need to follow the general step-by-step instructions:
- Hands are washed with water, dried, and sprayed with antiseptic.
- Cotton swabs (for convenience, each of them is cut in half) are moistened in gel polish remover and placed on the fingers. You can secure the cotton wool with pieces of foil, wrapping them around your fingers on top.
- Maintain in this state for 10-20 minutes, depending on the time specified by the manufacturer of the liquid. During this time, the composition will soften the gel polish.
- When the time is up, the foil and cotton wool are removed. If some part of the coating still remains on the nail, carefully clean it off with an orange stick.
- In order to completely clean the nail plate, it is polished with a buff. After this, it is given the desired shape.
- The final step in removing gel polish is treating the nails, cuticles and finger skin with oil-based nourishing compounds.
Before reapplying the design, the old coating must be carefully removed. Otherwise, the new manicure will be rough and of poor quality.
First stage - manicure
Shortly before the procedure, it is advisable to avoid soaking your nails, otherwise you will not be able to properly apply gel polish to them. The plate absorbs water well and will flake when filing. To soften the cuticle, it is better to use a remover.
Hardware
Rules for working with a manicure device:
- all movements are made from the center to the edges - in the direction opposite to the rotation of the nozzle;
- the working cutter is held at an angle of 45 degrees;
- the optimal safe speed is from 10 to 12 thousand revolutions.
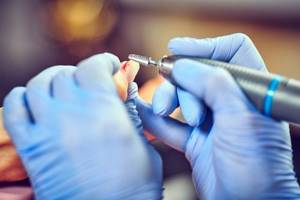
Rules for working with a manicure device
The equipment is used mainly in salons; in inept hands, it can easily injure the nail plate. Because of this, the nozzle should not be held in one place for more than a second, or pressed against the skin or nails.
If there is no experience, the device is turned on at low speeds, and to remove the glossy layer, they resort to a buff or file.
Mechanical
For complete beginners, it is advisable to trim the cuticle with nail scissors. The method does not require additional costs or skills; to perform a mechanical manicure, it is enough to:
- nail scissors;
- orange stick;
- files 180-240 grit.

Mechanical manicure
The cuticle is softened with a special agent and moved away from the surface of the plate. The excess is carefully trimmed off.
Tips for beginners
Even if you follow all the rules and technology for applying gel polish, the result may not be the best. Professional manicurists are happy to share with beginners some secrets that will help you create a beautiful manicure with gel polish even at home:
- When drying, fingers should be kept strictly horizontal in the lamp. Even with a slight tilt, unaesthetic sagging and streaking of the varnish may occur on the nails.
- Novice craftsmen often do not pay attention to the expiration date of the selected compositions. The quality of colored gel polish, top and base with an expired expiration date sharply decreases, so they should not be used for manicure.
- In order to get the colored pigment of the varnish and mix it before starting work, you do not need to actively shake the bottle - you simply roll it between your palms. Due to strong and rapid shaking, the varnish bubbles.
- Gel polish shows its durability only when thoroughly painting the entire surface of the nail, including its free edge. If you skip any area, chips and cracks will appear on it within the first days after creating the manicure.
When performing manicure with gel polish at home, masters advise beginners to take their time and apply each layer of the composition step by step and carefully.