When going to a special event, a modern girl needs to do so much to look beautiful, elegant and well-groomed. In order for the image to be harmonious, it is necessary to correctly select every detail from makeup to manicure, which plays an important role in the girl’s appearance and attracts attention. Peeling nail polish can spoil the impression of even the most luxurious dress, which is why girls spend a lot of effort and time creating the perfect manicure.
Solemn radiance
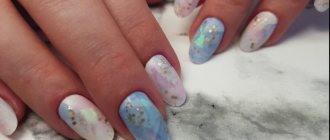
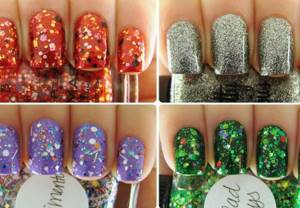
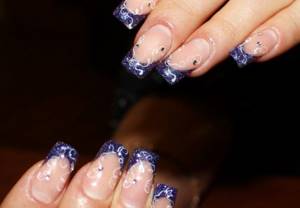
Bringing to life their desire to sparkle like a star on the red carpet, girls use various rhinestones and sparkles in their manicure, which give the manicure not only shine, but also sophistication and completeness of the design. With the help of such an affordable material, even the most ordinary manicure can be turned into an elegant and solemn one. There are many options for using them, both in combination with other decorative elements and independently. Sometimes it is enough to apply glitter on a transparent varnish and it turns out very elegant and elegant.
Combination with other types of design solutions
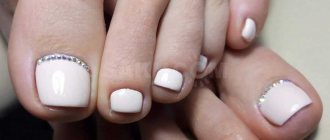
- If you have chosen a summer nail design with glitter, it is not at all necessary to repeat it in a pedicure. You can cover your toenails with a single color polish or combine different shades. But if there are also sparkles on your legs, let them match the manicure, otherwise you risk looking vulgar.
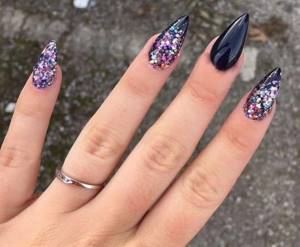
- Today, an everyday manicure with sparkles will no longer surprise anyone, but in order to to make it look harmonious, it is better to choose more delicate and neutral options. But save the bright and large sparkles for evening events. This manicure will help you become a real star of the party.
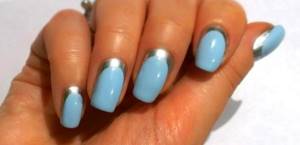
- Remember that glitter is on your nails are strictly not combined with a strict dress code and classic style in everyday wear. The maximum that ladies limited by a relaxed dress code can afford is individual “shiny” elements in the design, for example, chrome stripes with a reverse or fancy jacket.
- Do not get too carried away with massive and large jewelry, costume jewelry or jewels - they will look vulgar combined with brilliant design. One or two thin rings, a chain bracelet - this is quite enough for a stylish look.
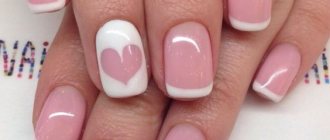
- Chrome nails not very appropriate in a romantic style, they are best left for casual lovers. But a French manicure with glitter looks very romantic and will suit almost every feminine lady.

A “brilliant” manicure almost never loses its relevance, and today there are many ways to realize the most whimsical ideas of such a design. How do you feel about glitter on your nails? Share your opinion in the comments.
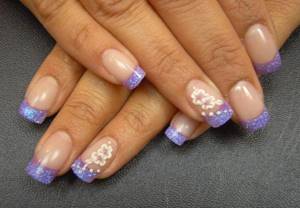
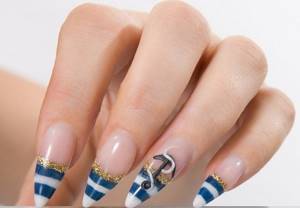
French glitter
A very popular, but at the same time accessible to any beginner, type of manicure is a French manicure using glitter. To achieve perfect execution, you need to trim your nails in advance, treat the cuticles, you can apply cream to your fingers, so that later it will be easier to remove any remaining polish and glitter that has gotten on the skin around the nail. After applying the base varnish, you can limit yourself to only transparent varnish, or you can use something brighter, you need to give it the opportunity to dry well, and then start applying glitter.
We adjust false nails
On the Internet you can find a lot of videos dedicated specifically to nail correction. It is believed that this is the most difficult thing, because you need to trim and make the appearance of the manicure as attractive as possible. Videos are usually made by professionals, so you can trust them.
- First, decide on the shape and length of the nails. The artificial plate must be cut and shortened in such a way that it evokes a feeling of aesthetic pleasure in the girl.
- Trim the plastic to length with a margin so that the nails are a little longer. Use a nail file to give the tips the required shape and length.
- When work on one finger is completed, it should be used as an example for all the others. By focusing on the same shape, it will be possible to achieve the identity of both hands.
- When the tips are cut to the required length, the border between the overhead and natural plates should be removed. To do it right, it’s better to watch the video. The process is not as complicated as it seems at first glance.
- This must be done carefully so as not to damage the natural surface of the plate. In the video, this stage is usually shown in close-up so that the girl understands how to behave when adjusting the plate.
Even if something didn’t work out the first time, you shouldn’t despair. Mastery comes to a girl gradually with regular training and constant self-improvement of technique.
Glitter application options:
- when using glitter varnish, it is clear that you need to carefully paint the tip of the nail and give it a chance to dry;
- using a brush, you need to paint the tip of the nail with transparent varnish and carefully apply glitter to the French manicure with the brush;
- using a sponge or sponge, using approximately the same technology as with a brush, you must first draw a contour along which the glitter should stick, then carefully pick up glitter on the sponge and attach it to the edge of the nail.
You can, of course, apply glitter along the edge of the nail and on the base without giving it time to dry, but this is a rather labor-intensive process, and it can be quite difficult for beginners, as a result of which the glitter can end up in places where they are not supposed to be, which will not look good. very carefully and will ruin the whole effect.
To complicate the design, you can create a two-color jacket, to do this, apply a transparent base to your nails, then either carefully apply white varnish on one side and glitter on the other side, or use a stencil for this, or you can also use tape, which will create even lines that will look doubly impressive. The result must be secured with a colorless fixing varnish, which will prevent the glitter from being peeled off on clothes for some time.
How to glue them so they don’t fall off
When you do everything at home yourself, make sure that the process itself proceeds calmly and gradually. Only pros can create a unique and beautiful manicure in 15 minutes. If you are not doing this professionally, you will need at least an hour of your time to make everything look aesthetically attractive.
- The first thing you should pay attention to is the application of glue. It should be applied to tips, and not to a natural plate.
- You need to glue the tips with a wooden stick.
- Push back the cuticle and begin applying the extensions to the natural edge of the nail plate.
What should you always remember when gluing your nails?
- There should be no distance or air bubbles between the natural surface and the overlay. Otherwise, all this will look ugly.
- If it didn’t work out beautifully the first time, there’s no need to despair and try to fix something. You just need to redo the work to make it look more attractive
- There should not be too much glue, otherwise all the beauty and visual appeal of the hands will be lost.
When we have made an attractive and truly interesting version of the plate design, we move on to a new stage.
Tips for working with glitter
In order for your manicure to turn out beautiful, original and fashionable, while causing a minimum of hassle and discomfort, you need to follow a few simple recommendations:
— Before you start applying shiny specks, you need to make sure that the background coating is completely dry, otherwise the surface will turn out uneven;
— Hands and brush should be dry so as not to cover your entire body with glitter, in addition to your nails. A dry brush needs to be dipped into the fixing varnish, and then into a container with glitter, picking up the amount necessary to apply the design;
— When you need to change the color or type of glitter, the brush must be thoroughly wiped with nail polish remover to remove all small particles that could spoil the manicure design.
Let's properly prepare nails for extensions
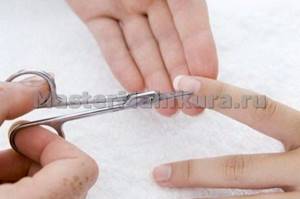
Nails are the first thing you need to take care of when creating a manicure. It is necessary to cut down the free edge of the plate according to the shape that the tips correspond to. Treat the surface with a special solution or a file, so the attachment with false nails will be better.
Having completed the preparatory work, we begin to work with the tips.
Manicure based on transfer foil and glue
If you follow the step-by-step instructions, the implementation of a beautiful manicure idea will become especially simple and fast. So, to achieve this goal you should:
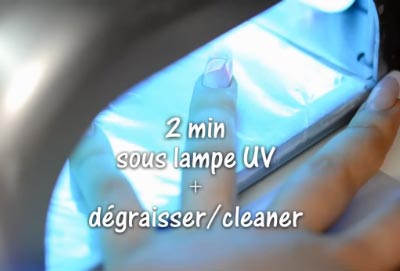
Rid the nail plate of the previous coating and do a trim, or European manicure.- Then, using a file, you should give a separate nail some shape, and also polish the nails using a buff with an abrasiveness of 300 grit, degrease them and apply a base.
- After a few minutes, dry everything thoroughly in an ultraviolet lamp, and then remove the sticky layer using a special napkin.
- Next you need to paint your nails in the color of foil or cover them with a transparent base. Don’t forget to dry everything with an ultraviolet lamp and then remove the sticky layer. (If you are using a classic (simple) varnish, then it is not necessary to repeat the previous step).
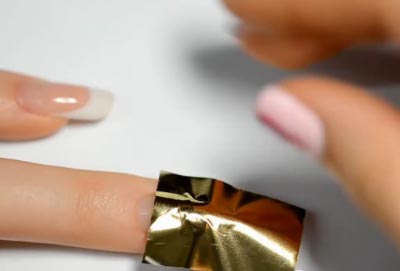
- If the polish dries completely, you should completely treat the nail plate with glue. If you intend to create any pattern, then process only a separate part of the nail.
- Wait a few minutes until the coating becomes transparent. The exact time is determined by the glue company.
- Then you should apply the inner white part of the foil to the area where the glue was applied.
- Using a cotton swab or other handy object, you should evenly distribute the foil over the surface of the nail, and after a few seconds, remove it with a sharp movement in one direction.
- After a few hours (about 2 hours), the topcoat is applied to the surface of the nail plate. Experienced craftsmen use a gel finish. If you don't wait for the right moment, the foil can easily shrink and lose its attractive appearance.
Popular ideas
The casting technique includes thousands of different designs. You can not only create a unique pattern, but also make mosaic ornaments.
Top molded designs include the following combinations.
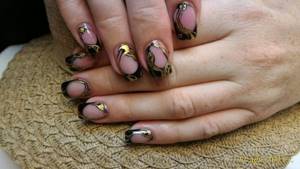
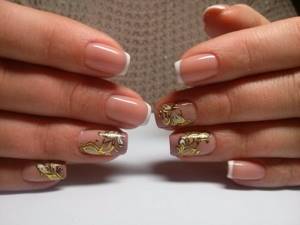
- Gold is the most popular of all, and if you combine it with a French manicure, this manicure will definitely outshine all the others.
- Metallic or silver color is suitable for lovers of discreet design. It is not as luxurious as gold glitter, but it adds its own sophistication and nobility.
- Gold and silver are always in fashion, and therefore casting with such shades has become a real breakthrough in spectacular manicure design. You can safely use these shades either alone or in combination.
- A rather original solution for nail art is a combination of precious stones and foil . This manicure design creates a complete composition that stands out due to the imitation of jewelry. By combining two directions: casting and liquid stone, you can get a unique decoration in the form of a stone framed in a gold frame.
The meaning of this design lies in the application of a polymer to the nail, which creates an imitation of stones such as emerald or sapphire. Their advantage is their light weight, unlike real stones. Liquid elements do not create discomfort.
After complete drying, the special polymer takes on the appearance of a true gemstone. It becomes more voluminous and sparkling after coating with gel. To create a complete imitation, it is better to cover the nail with a special gel for sculptures.
This way the convexity effect increases significantly, creating the illusion of a natural mineral.
Step-by-step master class
In our today's lesson we will create a manicure using the artistic casting technique. And we will make a simple butterfly on a long jacket.
We will need:
- gel paints black, white and pink;
- gold foil without additional effects;
- two brushes: thin and with a beveled edge;
- liquid to remove the sticky layer;
- finishing coating;
- directly the marigolds themselves (artificial, of course).
We will not consider the subtleties of creating a French jacket here. To do this, you can use video materials about nail extensions and manicure for beginners, which are available in abundance on our website. For our lesson we need a long jacket, made in a classic style, without unnecessary frills.
To begin with, draw butterfly wings on the French area. To do this, put white and pink gel paints on a flat brush, mix them on the palette and begin to create a pattern using the Chinese painting technique. Dry the nail in the lamp for about 15 seconds.
For a more saturated shade, we make a second layer of our pattern using the same technique. Now we immerse ourselves in the lamp for 2 minutes. At the end of polymerization, remove the sticky layer using a special alcohol liquid.
Take black gel paint and paint the lines on the wings. Bake in a UV lamp for 1.5 minutes using a power of 36 watts. Try to make your lines a little convex, so the foil will be printed better.

We apply the transfer foil in a matte layer to the image, press it well and tear it off with a sharp, confident movement. As a result, the gold will be “donated” to the design, and transparent lines will remain on the foil, repeating the pattern. If the planned lines of the drawing are not completely dressed in gold, we repeat the imprinting movements as much as necessary. When performing these manipulations, it is important not to move the foil after it comes into contact with the design, as this will negatively affect the quality of the resulting print.
Now we do the same with the body of the butterfly. We draw the contours of the body with black paint, bake it a little in a lamp, and make a foil imprint.
At the last stage, apply the finishing coat to the nail and polymerize it in a lamp for about two minutes. Many people use two coats of regular clear nail polish as a top coat. This, of course, is not prohibited, but keep in mind that such a coating lasts much less and is more susceptible to various damages. Ideally, you should use a gel finish that is designed to work with gel, shellac and acrylic. This coating reliably protects the foil pattern from abrasion and preserves it for quite a long time.
Design Features
We have already mentioned that casting is performed only on extended nails and it is advisable to use transfer-type foil for this.
The process of performing such a manicure is as follows. Extended nail plates are covered with gel and baked in a lamp. Then we glue the foil to the drawing and polymerize the nails again. At the final stage, tear off the foil with a sharp movement. As a result, the top layer of foil “gives” your drawing.
The baking time for manicure in a lamp can vary and depends, first of all, on the materials used.
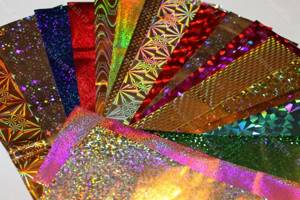
Types of foil
Before you learn about the features of using nail foil, take a detailed look at all the existing varieties of such a solution. Currently, several key types are used, which differ in texture properties and method of application to the nails.
- The leaf variety is characterized by small plates without a special adhesive layer, so it is most often used to create unique patterns and shapes. It is not difficult to stick foil to your nails - just use a special glue, which will instantly adhere the material to the nail. This variety is often used to prepare luxurious mirror or metal manicures, while it expands the possibilities of imagination and allows you to create something unique.
- Transferable - distinguished by the unique ability to transfer any pattern or texture onto the nails. Foil is sold in small rolls, which are placed in jars with a hermetically sealed lid. The main material used is tracing paper with different colored coatings or all kinds of designs and intricate hieroglyphs. The width of the roll is determined by the manufacturer, but in the classic version it is 3 cm, and the length is 1 m. The material will be a valuable find for beginning craftsmen, because it does not require much care and is very easy to use.
- Embossed - available in special sheets of small size and has a textured rough surface. Matte shades are often found on sale. Manicurists use it along with other types of foil to realize elegant design ideas.
- Thermal film is easy to use and there is no need to use additional materials. Among the distinctive properties is a unique method of application to nails. After choosing a suitable material, take it by the corner using tweezers and bring it to a UV lamp for heating. The heated film should be glued directly to the nails, without using an additional adhesive base.
- Ribbons, glitters and stickers. Double-layer strips are especially popular. The top layer is painted in different colors, and the bottom layer can be either transparent or white. At the same time, the overall color range is very extensive and delights the imagination with its colors.
Step-by-step nail casting technique
The name “casting”, although it sounds intimidating, does not represent any difficulty. In essence, casting is the application of an additional layer of gel polish in the form of a designed pattern. The only thing that can be difficult for beginners who love home nail art is mastering patterns progressively, from simple to complex. Not everyone will be able to make the perfect monogram or flower the first time.
If you have experience covering your nails with gel polish and there is a standard set for this (degreaser, primer, gel polish, top coat, etc.), then in addition you only need to purchase foil.
It can be selected by transfer type or standard type of manicure foil. The difference between them is colossal: it is enough to lean the transfer against the sticky layer of gel polish and after that a foil mark will remain in this place. Before use, regular foil must be cut to the shape of the poured pattern, which is much more difficult.
There is nothing supernatural in the casting technique, but to be sure of a successful result, it is better to follow the step-by-step instructions:
Step 1. Prepare your nails according to the classic scheme (do the required type of manicure, remove the shiny layer of the nail with a buff).
Step 2. Degrease the nail plate, apply a primer, and, if desired, apply a layer of protective gel. Polymerize it. This can be done under the radiation of a UV lamp, but as an alternative, you can dry the coating in open sunlight (if available and the time of year allows).
Step 3. Paint your nails with a layer of colored gel polish (if the design calls for it, clear polish can also be used). Polymerize. If the gel polish is of insufficient color density, you can re-apply another layer and polymerize. Remove the sticky layer.
Step 4. Using gel polish of a different shade (to make the applied pattern easier to see, ideally black gel polish) make the intended three-dimensional pattern. This can be done with a special gel paint and a thin brush. Polymerize and do not remove the dispersion after this. In principle, the casting process is complete; then you just need to highlight the design using a special transfer foil (or regular one).
Step 5. Place a piece of transfer foil against the created pattern, pat it lightly with your finger so that the spraying is transferred well to the casting, then remove it. A shiny mark will remain on the surface of the nail where the casting pattern is located. If you use regular manicure foil, then you should cut out the desired pattern in advance and place it against the sticky layer of the casting.
Step 6. Secure the resulting nail design with topcoat and polymerize. If you need to get a matte result, then select a special topcoat. You can also initially use matte foil.
Upon completion of casting on one nail, you can begin decorating on other nails, if this is provided for by the planned design. In addition, you can decorate your nails with painting and decor.
The presented step-by-step casting can be used after nail extensions, on natural nails after coating with gel polish. If you use regular varnish, then the technology for decorating nails with casting is slightly different and the effect may not be as expected.
What it is
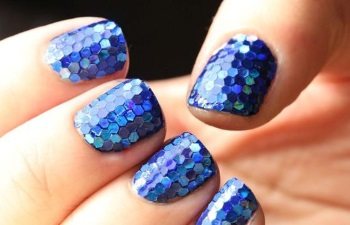
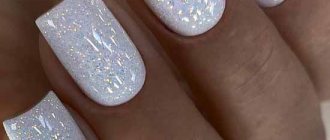
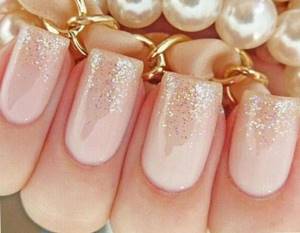
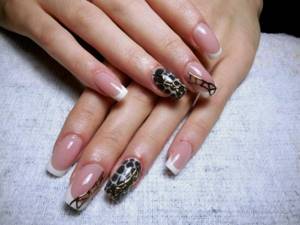
Manicure with large sparkles
Sequins (glitter, shimmer) are decorative elements designed to create a manicure.
They can be in the form of dust, sand or large elements .
Each type is good in its own way and has characteristic features.
For example, dust or sand will have to be applied to the nail plates with a sprayer.
This manicure suits everyone. It will perfectly complement your everyday look and go well with a formal evening outfit. It all depends on the chosen design.
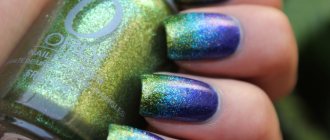
Types of glitter
- Glitter is metallized elements, usually made of foil, measuring one millimeter or more.
- Yes - the diameter of the particles does not exceed one millimeter.
The glitter base is selected depending on the desired effect. Bright colors are suitable for holidays and parties. It’s better to design a daytime manicure in calmer colors.