- August 2, 2018
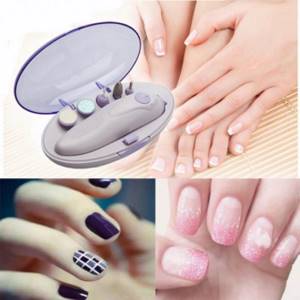
- Nail care
- Ksenia Stepanishcheva
In hardware manicure, each operation is performed using cutters. The nozzles have a specific relief designed for a specific purpose. Therefore, it is important to know which cutter to remove the cuticle? The answer to this question is presented in the article.
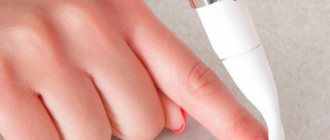
Hardware removal of cuticles is similar to the European version of manicure. During this procedure, dead skin is carefully removed, leaving the cuticle intact. This does not require pre-softening the skin. Processing is carried out dry. The essence of the procedure is that the overgrown skin is removed with a special cutter.
Required cutters
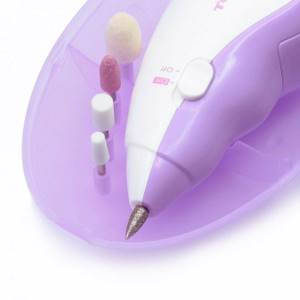
Which cutter should I use to remove cuticles? This depends on the purpose of the processing. Specialists use complex instruments that require skill and training. Home milling cutters are considered safe, and if the technology is followed, they can give excellent results.
A small set will be required. As you gain experience, you will be able to use a universal tool. Which cutter should be used to remove the cuticle if there are additional callous growths and it is necessary to treat cracks on the fingers? For this, a ball-shaped cutter is used. She delicately removes unevenness and rough areas without touching the nail. This cutter removes the stratum corneum from the cuticle.
Which cutter should I use to remove the cuticle if I also need to lift it? To do this, use a nozzle in the form of a cylindrical cone with a blunt end. It is also used for stripping nail plates to separate and remove pterygium.
Which cutter should be used to remove the cuticle and also process the nail sinuses? To do this, use a cylindrical nozzle with a narrow tip. It is also used to remove pterygium. This nozzle has 2 types - a sharp and a rounded tip.
Which cutter is better to remove cuticles in order to do the job as cleanly as possible? A nozzle with a sharp tip is ideal for this. But it is not advisable for beginners to use it. An attachment with a rounded tip is considered less traumatic and suitable for beginners who are mastering hardware manicure. The flat cylinder cutter removes dead skin from the side rolls.
What can hardware care do?
Manicure machines vary in the number of options, power, speed of rotation of the nozzles per minute, and the number of cutters. Most of them, even without advanced functionality, help in the following procedures:
- Remove and process the cuticle, including its lower layer (pterygium).
- Straighten and polish your nails.
- Remove old coating, including gel polish.
- Remove dead cells from the sides of the nail.
- Give your nails a certain shape.
The powerful equipment is also suitable for pedicures and removal of dead skin. For the first use, a machine with a cutter speed of 5-10 thousand revolutions per minute is sufficient.
Nozzle materials
Before determining which cutter to dry cuticles with, you need to consider the purpose of the treatment. The nozzles also differ in the material they are made of. They are divided into:
- Silicon and ceramic. These are the cheapest cutters. They are available in professional and home devices. The attachments have different abrasiveness and are suitable for working with rough finger surfaces and shaping nails. The products are also used to treat delicate areas.
- Diamond. Used for delicate treatment where a targeted effect is required, for example, in the area of the nail sinuses and pterygium. Such nozzles are among the most expensive, but they have a high degree of wear resistance. They are usually included with professional devices. In home devices, if there are such cutters, they have a rounded or beveled tip. This is due to security requirements.
- Silicone. They are used for grinding and polishing nails. They wear out quickly, but are also inexpensive.
Which cutter is used to lift the cuticle and remove pterygium from all of the above? Ceramic and diamond cutters are suitable for removing cuticles. The choice of nozzle depends on the hardness and thickness. Ceramic cutters are ideal for fleshy and rough cuticles.
For thin cuticles, it is better to use a fine-grained and diamond nozzle. In any situation, you need to have 2 options of cutters - ceramic or silicon to quickly eliminate keratinization. Diamonds perform excellent correction.
When you are just starting to learn hardware manicure, you should learn how to work with elementary cutters used in processing. Then you may need more complex attachments to perform various nail processing operations.
Removing the previous coating from nails
A home manicure using special machines begins with removing the old coating. It takes place in three main stages: reducing the length, carefully removing the previous coating, correcting surface unevenness and final removal of residues.
Detailed instructions for removing the coating:
- Removing the length. Choose a metal hard nozzle or a ceramic cutter with a special blue notch.
- The nozzle is installed on the arm of the device.
- The cutter rests perpendicular to the edge of the nail.
- The length is gradually reduced from side to side to the desired size.
- It is important to move from corner to corner. For a right-hander, work is done in forward mode. For left-handers, it is worth switching to reverse mode.
- RPM ranges from 20 to 30 thousand. It is unacceptable to tilt the cutter so that it does not bounce off.
If a burning sensation occurs, you must make sure that the cutter is not dull or bent. Another possible reason is a faulty handle of the device. And increased sensitivity of the nail.
- Removing old varnish and gels. The thickest layer is in the center of the nail. The layer at the cuticle and side walls is 1.5-2 times smaller. This is taken into account when pressing and the direction of movement of the nozzle. It is recommended to move along the “arch”. With strong resistance, the nozzle removes a thick layer of varnish; with a weak smoothing movement, it removes thin material. It is important to prevent damage to the nail.
- Correction, elimination of detachments, irregularities, roughness. It is recommended to remove the latter completely and remove them with a diamond cutter or a regular hand nail file. The detachment is located at the edge, in the cuticle area or at the side wall. And it will cause unevenness in the new coating. It is removed depending on the location:
- There are enough smoothing movements on the edge of the nail. They are carried out until the affected area disappears.
- Near the side walls, the detachment is eliminated in the direction of rotation of the cutter. In this case, the master's hand follows the nozzle. This is the safest option for removing thin layers of material.
- In the center or near the cuticle, irregularities are eliminated with transverse smooth movements. Right-handed people move their hand from left to right. Lefties are the opposite. It is important that no resistance is felt when the cutter slides. This indicates careful removal of thin layers.
If, after removing the detachments, there are tubercles that are noticeable upon visual inspection, they are removed with smooth movements along the arch or arc without resistance.
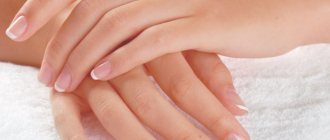
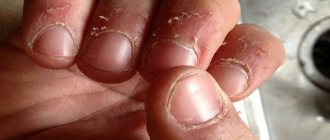
This completes the removal of the old coating. The next stage of home manicure with special machines is working with the cuticle. This is the thin skin that runs from the finger to the base of the nail. And it interferes with creating beauty and nail design.
Advantages
Removing the cuticle with a manicure machine is considered a safe procedure. It has the following advantages:
- Less time is wasted. If you have experience, all nails can be treated in half an hour. A classic edged manicure takes up to 1.5 hours.
- The device is safe, as injuries and infections are excluded. A cuticle cutter exfoliates dead skin cells, and a trimmed manicure also touches living areas, which causes small wounds, which is why infection appears.
- Hardware processing does not require preliminary preparation. In this case, there is no need to steam the skin, apply emollients or cuticle remover. Everything is done on dry skin.
- Hardware manicure is a delicate process; it is an excellent option for thin cuticles and for those who have blood vessels close to them.
- The machine allows you to treat rough areas of the skin. But edged and European manicures do this job with difficulty.
- The cuticle grows back more slowly after the procedure, and there is no risk of hangnails.
Thanks to these advantages, hardware manicure is considered popular. It gives you neat and beautiful nails.
If the cuticle is not cut: three reasons
- The first reason is that the speed is chosen incorrectly. You can vary the speed from 4000 to 8000 rpm. In this case, it is necessary to ask the client about the sensations - whether it burns or not.
- The second reason is the incorrect position of the nozzle. It should be placed in position under the skin, and remain in the same position as it moves around the nail.
- The third reason is that the cuticle is not fully opened at the stage of twisting or opening. It is not thin enough for cutting, it is not thinned.
Hardware manicure - answering frequently asked questions
Have you tried performing a hardware manicure with one cutter?
What difficulties arose during the procedure? Comment
Flaws
Although hardware manicure has many advantages, there are also disadvantages:
- Due to inept use of the cutter, there is a risk of injury to the nails.
- Not exactly a clean result. Many people have voluminous cuticles, and for the aesthetic appearance of their hands, it is advisable to cut them off.
- Expensive device. Compared to trimmed and untrimmed manicure, to perform hardware cuticle removal you need to buy an expensive device, as well as milling attachments.
- Difficulty in maintaining equipment. Cutters must be regularly cleaned and disinfected, and if handled improperly, they can be damaged.
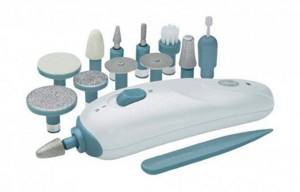
Basic Tools Required
Everything about manicure for beginners is a set of information in which you definitely need to add knowledge about the correct selection of materials and tools.
Removal Tools
Removal tool kit includes:
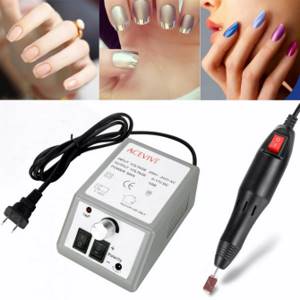
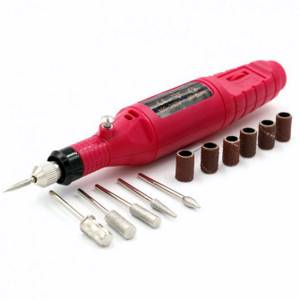
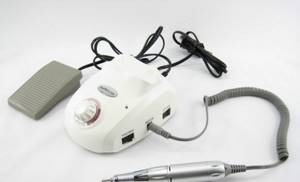
- Apparatus. Experts with extensive experience say that the best router is Strong 210/105L. It is designed for manicure, pedicure and nail extension procedures both in high-traffic salons and at home. The device has a powerful micromotor with a rotation speed of 35,000 rpm. The cost of such a tool starts from 12,000 rubles. If a novice master does not have that much money, for the first time you can buy Chinese analogues of a router for 3000-5000 rubles.
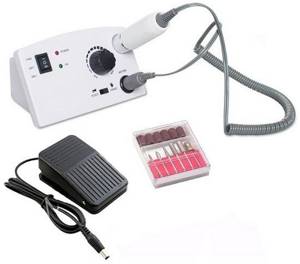
- Milling cutters. It is advisable for a novice master to take about 5 cutters of different hardness and shape for training in order to find the ideal option for himself. Then the removal process will be quick and simple.
Manicure tools
The set of manicure tools is more extensive:
- Pusher. The most necessary tool in manicure, which can be needed in any technique. With its help, the cuticle is lifted and the pterygium is cleaned. It is better to choose a pusher, at one end of which there is a blade with a thin edge.

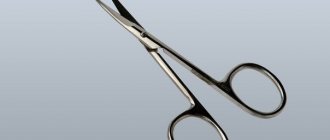
- Scissors/Nippers. It is not recommended to save on cutting tools, since cheap representatives quickly rust and become dull, which makes it difficult to create a beautiful manicure.
- Milling cutters. Here, too, each master individually selects the shape and rigidity for himself, based on personal experience and the opinions of clients.
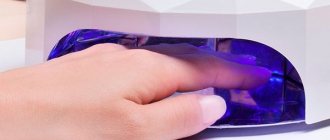
Lamp for nails
Without this tool, it will be impossible to apply gel polish, since this composition does not dry in air.
To find the perfect lamp, you need to follow a few rules:
- How more powerful lamp, the faster the material will dry. Power ranges from 9 to 90 W. The best option is a lamp with a power of 48 W.
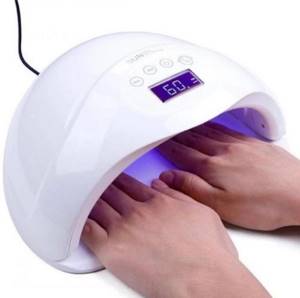
- Dimensions and weight. For novice craftsmen who want to work successfully in the future, it is best to choose medium-sized lamps, because in small representatives it is difficult to dry the varnish well, and most often they have little power. Large lamps take up a lot of space and can be quite inconvenient.
- Interface. It is better to give preference to lamps that have both a timer and a display. This way you can always track the drying time.
Rules of procedure
The work can be done not only in the salon, but also at home. How to properly remove cuticles with a cutter? Home appliance stores sell cuticle machines. Compared to professional ones, they have a small number of attachments and power. But lower power will be safer. It is important to purchase a device that has a speed of at least 2000 rpm. This will allow you to carry out the work cleanly. A minimum set of cutters will be enough, and if desired, you can purchase the necessary ones.
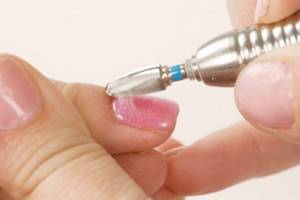
How to remove cuticles with a ball cutter? The procedure is performed according to the instructions:
- You need to lift and push the cuticle to the base of the nail bed. Then the keratinized layers of skin are removed from it using a milling cutter.
- Then the important work is performed - removal of the pterygium. Here you need to act delicately and carefully, since the work is carried out close to the nail. Pterygium should be removed carefully, moving the cutter almost parallel to the nail, without pressing on the plate.
- After cleaning the pterygium, the lateral ridges and sinuses can be treated. Grinding of burrs and microcracks is necessary.
- At the end, the fingertips are treated - keratinization and calluses around the nail and subungual part are eliminated.
If you follow these instructions, the processing will be safe and of high quality. Treated cuticles result in a beautiful manicure.
How to choose a manicure machine
The choice of devices is now especially diverse.
But this tool is not cheap, so you should approach its purchase responsibly. • Firstly, you probably already know where you will use it - only for yourself or to work with clients on-line. Devices used for home use are smaller in size, power and speed of rotation of the nozzles - 20 thousand revolutions and 35-50 W of power are enough. For salon manicure, choose machines from 25 thousand revolutions per minute and a power of 100 W.
• If you need to go to a client’s home, then pay attention to a device with a built-in battery, or one that runs on batteries. It is usually lightweight and quite compact to carry.
• If you are a beginner, then first take a machine with a set of cutters selected for it, which are not so easy to understand given their huge variety.
• The machine must have a reverse function (rotation of the attachments in both one and the other direction).
• Clamping of attachments on the handle can be manual (you need to tighten it), semi-automatic or automatic. For the interior, it is better to take the latter option - it will save time on replacing cutters, but will also cost more.
• The strength of the noise it makes depends on the engine the machine is equipped with. In expensive models it is almost inaudible.
One of the most determining factors when purchasing a device is its price. Know that a high-quality device will not be cheap. If you are looking for a balance between price and reliability of a router, then pay attention to this model.
Expert advice
While performing work, you must adhere to the following recommendations:
- The work must be done at a speed of at least 2000-5000 rpm. At this power, the keratinized layers are cleansed quickly and efficiently, and there are no unpleasant sensations. Professionals can work at a speed of 15,000-20,000 rpm.
- You should not stay in one place for more than 4 seconds; there is a risk of burns, as the nail plate heats up from friction.
- Do not press the cutter on the skin and nails, otherwise you may cause a wound.
- Each part of the processing uses its own cutter.
- When working with a cutter, you need to direct it in the opposite direction from its movement. With this technique, keratinization and dead skin cells are eliminated.
It is necessary to use different cutters to remove cuticles on the arms and legs. This is required according to hygiene rules - a lot of dirt and bacteria accumulate on the toes, which is dangerous due to infection on the fingers. In addition, the cuticle on the legs is coarser, and processing requires nozzles with greater abrasiveness, and for the hands, a fine-grained surface of the cutters is required. Rough abrasion damages the delicate areas of the fingers.
Preparing for a manicure
So, the device and attachments have been purchased, all that remains is to complete all the necessary preparations.
- Nails should be well dried. If the surface is damp, this will lead to heating and unpleasant sensations during processing. The quality of processing itself will deteriorate significantly.
- In customizable devices, you should set the speed to 10,000. If you exceed this threshold, you can damage your nail out of habit. If you have no experience with the degree of pressure during processing, it is better to work at low speeds.
- Before starting the procedure, the cuticle must be softened with a special solution.
- It is necessary to process cutters shortly before starting work.
- Before the procedure, you should completely remove the old gel polish and degrease the nail surface.
- Strong pressure or pressure with the clipper on the surface of the nail is not allowed. It is better to get silicone attachments and use them the first time.
- Before starting the procedure, make sure you have a disinfectant on hand.
- It is necessary to place all the attachments in a convenient place and think in advance about how the workspace will be cleaned and the device cleaned after the procedure is completed.
Sterilization
The cutters should be free of dirt, bacteria and infections. Sterilization of nozzles is carried out using disinfectant solutions:
- "Alaminol".
- "Optimax".
- "Gigasept."
- "Blanidas."
- "Korzolex".
These products are sold in concentrated form. For disinfection, you need to prepare a solution. The drug (3 tablespoons) is added to cold water (1 liter). When sterilizing attachments, it is necessary to take into account the hardness of the material and the depth of the notches.
What tools are used for hardware manicure?
The necessary tools can be divided into basic and additional.
The main things you will need to purchase are: • A machine or milling cutter for hardware manicure,
• Nozzles or cutters (often as accessories with the device).
Below we will talk about each of them in more detail. Additionally, it is recommended to have:
• An exhaust hood for collecting small particles that fly during operation of the device,
• Disinfector and sterilizer,
• Consumables (orange sticks, cuticle oil, brush, personal protective equipment, etc.)
Care
The soft covering deteriorates after prolonged disinfection, so it is necessary to reduce the time. The average duration is 30-40 minutes. After immersion in the solution, the nozzles must go through the remaining processing steps. Required:
- Cleaning under running water.
- Manual cleaning with a brass brush.
- Ultrasonic treatment.
- Immersion in dry heat or autoclave.
When performing a manicure, do not squeeze the handle too much or press on the nozzle. This causes the head to bend at the base of the handle, so the cutter will be unusable. The nozzle must be changed according to the instructions supplied with the device.
After sterilization, the cutters are placed in a cover that protects them from moisture, dust, and mechanical factors. The device must be adjusted and cleaned in a timely manner at a service center.
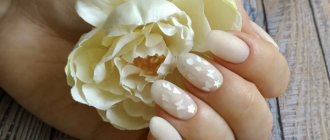
Stages of nail straightening
Let's take a closer look at how to straighten your nails. To prepare for it, you must file, remove the cuticle and the top thin film of protection, sand the nail plate, apply a primer, etc. After all this is done, you can begin the leveling process.
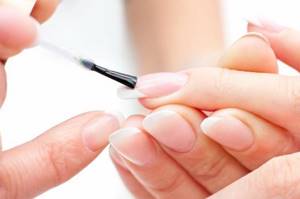
Apply a thin layer of base coat to the nails. We dry it using a special lamp. How long this process will take depends on the characteristics of the lamp.
Use a brush to place a large dot in the center. Then it is distributed to the upper edge. Due to this, the correct roundness and crescent bend are formed.
Movements with the brush should be done carefully, touching the nail only with its tip, without pressure.
Sign up for eyelash extensions at Anna Klyuchko's studios with a 15% discount until February 8
12 studios throughout Moscow, St. Petersburg, Nizhny Novgorod and Tula
223 masters for every taste
High-quality service with a 7-day guarantee
Regular promotions and gifts for clients
Full volume 1990₽ 1692₽ Double volume 2590₽ 2202₽ Triple volume 2890₽ 2457₽ Hollywood volume 3400₽ 2890₽
Book 15% discount
If for some reason it was not possible to apply the coating evenly, then this can be easily corrected - you just need to carefully turn your hands with your nails down. Gravity will allow the base to flow evenly and distribute the coating.
The last layer of base is applied to the transverse part of the nail plate, as if sealing it.