Being at the very first stage of the journey in the field of nail design, novice manicurists often make mistakes when purchasing the first basic set. This occurs due to confusion and a lack of understanding of what tools and tools will be required when working with clients.
First of all, you need to find out what sets of tools exist in the nail industry, what a novice master will need, as well as how to correctly form the first basic set and start working.
Ready-made starter kits - pros and cons
If you enter the request “Buy a starter kit for nail design” into a search engine, Google and Yandex will return thousands of relevant pages with offers to buy budget starter kits, but this is not the best idea for a novice master.
IMPORTANT! The main reason why you should not purchase a ready-made set made in China is its low quality. To attract buyers, manufacturers fill the set with cheap, low-quality goods and set an attractive price.
The right way is to independently purchase the necessary equipment and consumables according to the checklist that you will find in this article. The online store pilitte.com always has the necessary tools and consumables in stock. It is enough to decide on the direction in nail design and collect the necessary base.
Auxiliary equipment
These are those devices and interior items that do not directly participate in nail procedures, but create the general background of the establishment and provide comfort.
So, you have to buy:
- reception desk;
- furniture for storing clients' clothes;
- furniture for the waiting area;
- large TV (so that clients don’t get bored during the procedure);
- a coffee machine and a thermopot (to treat clients and pamper employees with hot drinks);
- air conditioners;
- racks for storing individual tools.
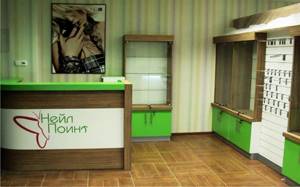
Design of the administrator area: counter and display cases
What is a starter kit for a manicurist and why is it needed?
When starting to work with your first clients, it is important to have all the necessary tools at hand, because it is almost impossible to predict what kind of design they will be asked to make and what will be required for it. However, trying to please all visitors to your manicure salon, you should not buy up all the contents of the store for masters - this approach leads to the fact that unused gels quickly expire and go into the trash.
The basic set of tools will depend on what type of manicure the master decides to do. A prerequisite is hand washing before starting work, as well as disinfection of tools - so the kit always includes disinfectants.
ON A NOTE! Three large categories of necessary tools and products are disinfectants, manicure tools and gel polishes.
Each of these points should be considered in more detail in order to create the most detailed checklist for the first purchase.
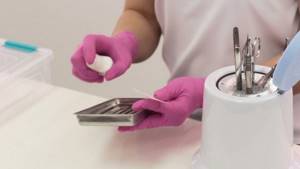
Rules for processing instruments in salons
As a rule, salons use three types of instrument processing: mechanical cleaning, disinfection, and sterilization.
There are certain rules for processing tools.
- After finishing work, you should clean the dirt from the tools with a brush under running water.
- There should be a special container near the workplace for used reusable tools.
- In the utility room there should be a disinfection bath with a sieve and a lid into which a solution of a disinfectant is poured.
- Then you should transfer the tools from the container to the bath.
- Instruments should be completely immersed in disinfectant liquid and kept in the bath for the time specified in the instructions.
- When the time is up, remove the tools from the sieve and rinse thoroughly under water.
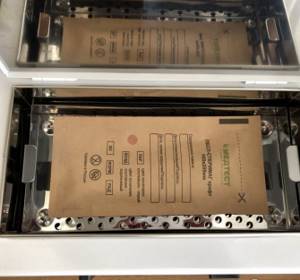
- Dry the tools and put them in disposable bags.
- The sealed bag can be stored until next use, but no more than 6 months.
- Cutting or stabbing instruments should be additionally sterilized.
- You can sterilize using an autoclave.
Many people do not understand the difference between disinfection and sterilization. Disinfection is the thorough removal of microorganisms from instruments. Disinfectants cannot completely destroy all germs, but they reduce their number.
Sterilization of manicure instruments completely destroys all bacteria and viruses. Not a single microorganism remains on the surface of the instruments. We can say that the instruments become completely sterile.
Sterilization and disinfection of instruments
The key to the health of the master and clients is the correct, high-quality processing of all tools, so this step should not be neglected. It may seem to a novice craftsman that simply treating scissors and tweezers with an alcohol-based disinfectant solution is a sufficient measure, but this is not the case.
Anyone who wants to become a professional and do manicures for clients on an occasional basis should have in their arsenal special chemical solutions, as well as a dry-heat cabinet or a UV sterilizer.
At the very beginning, it is enough to use a disinfectant like Optimax Prof.
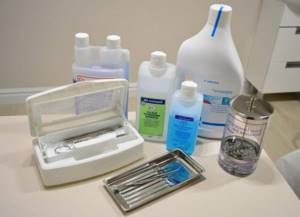
A complete set of tools and devices for high-quality sterilization of work equipment:
- disinfectant solution marked “for treating surfaces and instruments;
- hand sanitizer – the hands of the master and the client are treated before the procedure begins;
- box for pre-processing scissors and nippers;
- gloves - put on before starting processing;
- craft bags with adhesive base for sealing clean instruments;
- face masks or respirator. Protects the respiratory system from fine dust that appears when working with a router.
This may seem like an impressive list, and at the very beginning of work you can do without these devices, but this is not so. The better the master takes care of cleanliness and safety, the higher the level of service he provides, so you should set the quality bar high from the very beginning and not lower it.
What else can be useful for work?
Take a responsible approach to your appearance. You should always be neatly and neatly dressed . It is better if you wear special clothing - a work suit. But in the absence of it, you can get by with an ordinary clean apron or tunic. Also don't forget your mask and gloves.
Work clothes should be washed and stored separately from all personal items.
A manicurist is not the easiest profession, as some people think. It is worth thinking carefully before you start learning and investing money. But if you still decide, then start working hard, and then your income will very soon cover your costs and you will begin to earn good money doing what you love. Good luck in your achievements!
Manicure tools
One of the main categories of accessories is metal tools. It is important that all scissors, pliers and pliers are of high quality - it is recommended to purchase tools only from a reliable store.
Basic set includes:
- manicure cuticle scissors Staleks EXCLUSIVE;
- file with replaceable Kodi abrasives;
- cuticle shovel (pusher) Staleks Beauty.
All devices to get started are functional and ergonomic, which allows the master to quickly perform processing and hone the technique of performing a particular manicure.
IMPORTANT! The first stage of any manicure is processing the cuticle. Decide in advance what type of manicure will be the main one - trimmed or untrimmed, and depending on this decision, purchase cuticle scissors or a set of orange sticks to move it to the base of the nail without removing it.
A separate question often raises the required number of nail files. The more there are, the better. Just don’t need to purchase 10 types of the same file; it’s better to buy a set of different files according to the degree of hardness - from 200 to 1200 grit.
The most consumable option is 200-400 grit files, since they are used to work with extended nails and polish them - up to 10 such files will be required to get started, with the possibility of further purchasing.
Processing tools at home
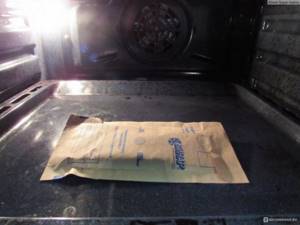
For a safe manicure, it is necessary to disinfect the instrument. Home processing of manicure tools.
- Wipe tools with alcohol or alcohol before and after each use. Instead of alcohol, you can use chlorhexidine.
- If several people use the tools, the procedure will need to be performed before and after each manicure.
- Metal tools need to be calcined for 13-15 minutes in an oven preheated to 200 degrees.
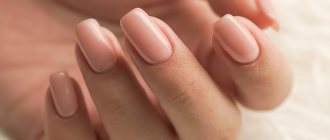
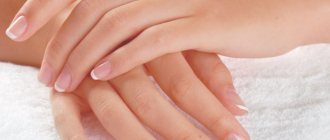
Manicure for women is not just nail care. Women want to relax and take time to take care of themselves. Try to file your nails regularly, trim your cuticles, and moisturize your plates to get rid of the problem of ugly hands forever. The art of manicure can be learned and self-care will always bring joy.
Gel polish
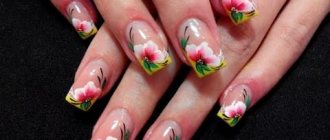
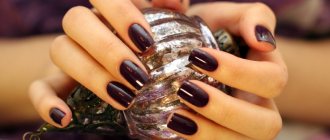
Purchasing a set of gel polishes is the most exciting part for a beginning artist, but at the same time, it is a significant expense item. In order not to accumulate extra funds at the initial stage, you need to decide on the basic shades, and also study nail design trends in order to understand what requests clients will come with.
To get started, it is recommended to purchase a set of 5-8 basic shades, for example: black, white, beige, red, pink.
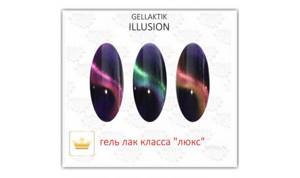
Also, to replenish the collection of gels, the master can purchase one non-standard, but popular set, for example, for performing a design using the cat's eye technique - this manicure option has remained relevant for several years. The Gellaktik illusion set contains three of the most popular shades.
In addition to the gel, you will need products to prepare nails for extensions - base, primers and bonders. The use of these products is necessary in order to ensure a good connection between the gel polish and nails and to degrease the nail well. After the nail is degreased, the extension process itself begins, which will require three main products - a base, colored gel polish and top coat (finish coat).
Colored gel polishes can be selected according to the time of year - this way you can save on purchases and not buy all the shades at once. In spring, the most popular colors are pink, green, beige and red. In winter - blue and dark blue.
What do you need to know to become a real guru?
To begin with, it is important to understand that the profession of a manicurist is a very serious type of employment. It requires increased attention, accuracy, perseverance, and creativity. Moreover, such work requires permanent investments of money in order to stay afloat and not lose clients, but only expand their base: qualifications, courses, exchange of experience, etc.
Surely, when you undergo training at a manicure school, you will be taught how to hold the tool correctly, they will “position” your hand, and they will give you models to practice. But after completing the training program, you have to move on on your own, and this is where the difficulties begin. The main thing to remember is that difficulties are temporary, and professionalism comes with experience.
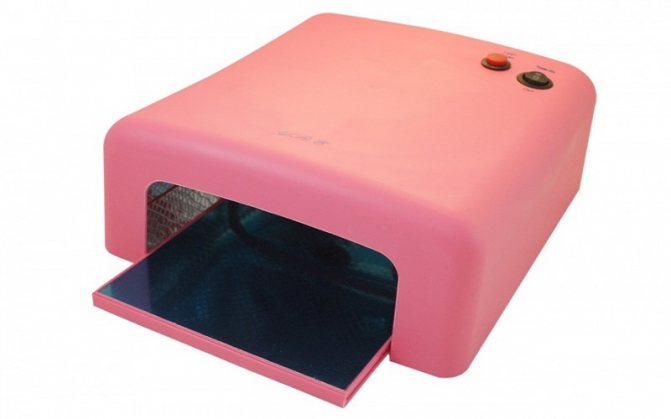
Gel polish lamp
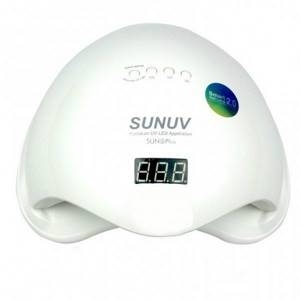
A mandatory attribute of a master in the field of nail design is a lamp for drying gel polish. It is not recommended to save on the purchase of such a lamp, so that in the future you do not have to change it every 2-3 procedures. It is best to immediately purchase a high-quality model that will last a long time and dry the varnish well.
To make the right choice of lamp, you first need to find out what devices are sold in specialized stores. There are three types of lamps - UV, LED and mixed.
For a novice master, an LED lamp is best suited - it lasts longer, does not break, and most importantly, dries nails quickly. A good option is SUN 5 plus
.
However, if you need to save money, you can also purchase a UV lamp at the very beginning.
Lamps - table and manicure
With a table lamp everything is simple. For high-quality lighting of your workspace and saving energy, buy an LED lamp. It is better if it is attached to the edge of the table, then you will not accidentally brush it off.
As for the lamp for drying gel polishes, LED equipment is again a priority for nail technicians.
It doesn’t make sense for a novice craftsman to immediately invest in a professional fancy lamp, but low-power models are not suitable for home use either. There are good inexpensive hybrid lamps (UV LED) with an average power of 20-30 W, designed for 50,000 hours of operation.
How to choose a device
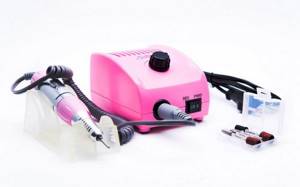
A manicure machine is a must-have tool, without which it is impossible to achieve the ideal shape of your nails. There are several types of devices, and before you buy one of them, you need to understand the features of each type.
IMPORTANT! It is very difficult to work on cheap equipment - it often jams, so the recommended option for beginners is a device in the middle or high price category. This is the only way to avoid cuts, injuries and burns, and as a result, the loss of your first clients.
When choosing a device, the master must answer three questions: will the device be used at home or in a professional office, is it planned to create only a manicure, or also a pedicure, and also, does he have experience in handling the device, or will it be used for the first time.
When choosing a device, you need to consider the following characteristics:
- Power.
This is the most important indicator on which not only the cost, but also the quality of the device depends. For a beginning master, a great option is a manicure machine with a power of at least 30 W. Such a device will work properly and will not break down at the most inopportune moment. - Rotational speed.
Depending on how fast the cutter rotates, the degree to which the top of the nail is cut changes. The optimal option for a beginner is about 30,000 rpm - this information is always indicated on the packaging with the equipment. If you choose a device with a higher speed and do not train in advance, you can make mistakes, so to begin with it is better to work more slowly, but efficiently. - Cutter clamp.
On sale you can find devices with automatic, manual and semi-automatic clamping options. For a beginner, an automatic or semi-automatic clamp is best. This is due to the fact that inserting cutters manually is quite difficult; you need to know how to do it correctly, and during one manicure session the master changes the type of cutter up to five times. However, a device with an automatic clamp also requires careful handling - if you forget to insert the plug after completing the procedure, you will have to take it for repairs. It is recommended that you carefully study the attached instructions.
To get started, high-quality Marathon brand devices are suitable, for example, Marathon 3 Champion, which has several operating modes, the ability to switch forward or reverse reverse, as well as a special compartment for storing burs and polishers.
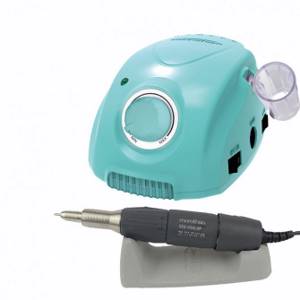
The cost of manicure machines is quite high, so to get started, you can choose an inexpensive model of average quality, but from a good manufacturer.
Technological equipment
If you are planning to open a salon that will provide a full range of services (manicure, pedicure, beauty treatments), then you will need to buy the following equipment:
- a manicure table, a chair for the master and a chair for the client;
- pedicure chair;
- ultraviolet lamp and router with various attachments;
- a set of manicure tools and consumables;
- baths for soaking hands and a device for paraffin therapy;
- sterilizers.
Manicure table, chair for the master and chair for the client
Today this piece of furniture is an indispensable assistant; it must meet the following requirements:
- Convenience. Manicure is not a quick procedure. The master should not get tired of his back while working, and the client should not have numb hands. To understand which table is exactly right, you need to focus on standard sizes. So, the length should be at least 110 cm, height – 75 cm, and depth – from 40 to 45 cm. If the master is tall or short, you can choose a model with adjustable height. To understand how comfortable the table is, it is recommended to sit down at it before purchasing and simulate the work process.
- Functionality. A good device will be equipped with shelves, niches and drawers. The latter can be stationary or mobile. A more convenient mobile version is a cabinet on stable wheels. Shelves are often installed along the outer edge of the table (it is adjacent to the wall). Their width is standard and ranges from 10 to 15 cm.
- External attractiveness. The table should be compatible in style and color with the rest of the interior. It is not recommended to choose countertops in dark shades. On such a surface it is quite difficult to discern the nuances of nail design. Calm, light shades, on the contrary, inspire confidence. This table looks clean and well-groomed.
It is worth paying attention to the presence of a second internal tabletop. It would be good if it was retractable. Typically, the distance between two tabletops is 20 cm.
In addition, the manicure table often comes with a special hand stand. It is made of the same material as the table. However, the part of it on which the client’s hands rest should be soft.
An indispensable attribute of a manicure table is a lamp. It is attached to the free edge so that the maximum amount of light falls on the client’s hands during the procedure. Often there is no need to buy a lamp separately; it is included in the kit.
Manicure tables come in different shapes. The most popular are straight, angular and T-shaped options. If the first two are suitable for the work of one employee, then the T-shaped device can be used to perform manicures by two masters at the same time. By the way, sockets are often built into a table of this shape.
The cost of manicure tables varies. Thus, the simplest models cost from 3,000 to 7,000 rubles, while the price of elite tables can reach 100,000-120,000 rubles.
For example, the Ru Comfort table No. 3 right-handed is an excellent budget option. Its main disadvantage is that the cabinet with drawers cannot be moved. However, the folding tabletop, the presence of convenient shelves and high-quality fittings make working with such a device truly comfortable. Its cost is 5,000 rubles.
Among the models in the mid-price segment, we highlight the table from the Suffix brand. This is a functional device that (for an additional cost) can be equipped with an extractor hood and a sterilizer. The surface is treated with a special coating from Rehau (Germany). Its thickness is 2 mm. Thanks to this, the table not only looks aesthetically pleasing, but also lasts a long time (it is not afraid of getting wet or scratched). Cost 17,000 rubles.
Luxury model - Italian Svaro table. It not only looks luxurious, but is also incredibly comfortable. A large number of drawers, located both around the perimeter of the table and on two cabinets, allows you to store tools and consumables in a structured manner. The dimensions are impressive: length 180 cm and depth 560 cm. The cost of the Svaro table is 102,000 rubles.
The chair for the master and the chair for the client should be comfortable. Remember that manicure is not a quick procedure; you have to sit in almost one position for a long time. To keep stress to a minimum, it is important to choose a device with an ergonomic back, soft seat and adjustable height.
The average cost of chairs for a master varies from 3,000 to 10,000 rubles. For example, a model of the domestic STK brand with artificial leather upholstery and adjustable height will cost the buyer 6,500 rubles.
Prices for chairs for clients vary and depend on the material used. So, upholstered in artificial leather, it will cost 4,000-8,000 rubles, while the cost of a chair made of natural material starts from 20,000 rubles.
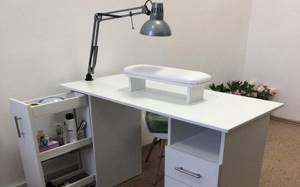
Manicure table

Manicure group: table, master’s chair and client’s chair
Pedicure chair
It would seem that spending money on this expensive piece of furniture is not at all necessary. A pedicure can be done if the client is seated in a regular chair, and for the convenience of the master, a stand is used. Indeed, it is possible. But at home it’s very clumsy. By providing services in this way, you won’t have to think about increasing the number of regular customers. If you position your salon as professional, then the equipment must be appropriate. Therefore, a good pedicure chair is essential.
When choosing a pedicure chair, you should pay attention to the following points:
- backrest adjustment function (thanks to this, the client in the chair can either sit with a straight back and watch the process, or practically lie down);
- the presence of an adjustable footrest, thanks to which you can change both the length of the chair and its position (this is especially necessary when performing foot care or massage procedures);
- the presence of a headrest with the function of its adjustment (this is necessary for the convenience of the client, and also if, in addition to manicure, you plan to provide services related to face and neck care);
- the ability to lower or raise the armrests, as well as adjust their height (this option is necessary for the convenience of the client);
- the presence of wheels (thanks to them, the chair can be moved, but before starting work, the wheels must be secured with a special stopper).
All of these options are useful. But such models are not cheap (on average from 100,000 rubles). If your budget is modest, there is no need to despair: you can find good options that include only part of the specified functions. However, they are also comfortable.
When choosing, it is important to take into account the required technical characteristics. For example, the dimensions of the chair. The dimensions of the standard model are as follows: length from 1 to 2 meters, width from 60 to 90 centimeters, height from 75 to 100 centimeters.
In this case, the optimal height of the feet is 1 meter (the master will not have to work in an incline). The chair is raised using a mechanical, hydraulic, gas lift or electronic system. Mechanical lifting is not convenient, but such models are the most affordable in cost. The most comfortable is the electronic system, but such devices are more expensive.
You also need to pay attention to the upholstery. It is worth choosing models upholstered in leatherette or genuine leather. They are easy to clean and, with proper and timely care, will last a long time.
A footrest and a small stool for the craftsman are often sold along with the chair. Luxury models (“throne chairs”) are equipped with a built-in hydromassage bath, thanks to which you can carry out not only a classic pedicure, but also full-fledged SPA treatments for your feet.
The cost of a budget chair starts at 10,000 rubles. For this price you can buy the simplest model possible. For example, the domestic Nadir-2 device. This is a pedicure group, which, in addition to the chair, includes footrests (adjustable) and bathtubs. The back and armrests are not adjustable. Such a chair costs 13,000 rubles.
Among the average in cost, the “Elite” model of the same brand “Image-Master” should be highlighted. It has an adjustable backrest and a comfortable headrest included. The electronic system understands and lowers the chair. Separate footrests, which are also movable, make the work of the master comfortable. Cost 38,000 rubles.
Chair P04 from the Silver Fox brand (Taiwan) is a full-fledged pedicure SPA complex with a master’s chair included. This is a luxury model, which is equipped with a hot tub with lighting. The client's massage chair (it has built-in vibration and roller mechanisms). It is convenient for manicure (the chair has hinged armrests equipped with rollers designed for this purpose). As a nice bonus, the manufacturer has supplemented the device with a modern electronic lifting system with an elegant remote control, built-in water supply and drainage, and a high footrest. The price of such a chair is 169,000 rubles.
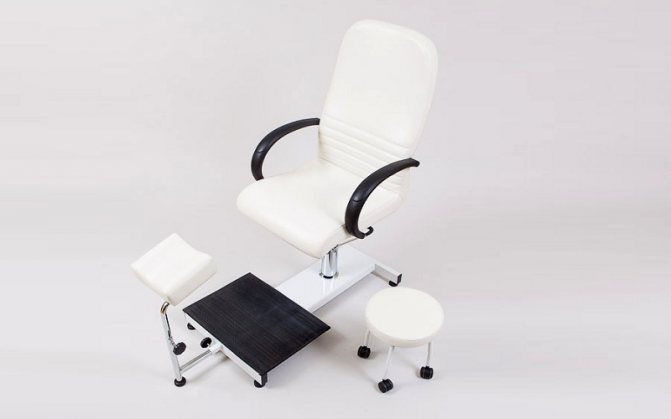
Standard pedicure chair and master chair
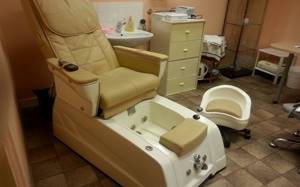
SPA chair for pedicure with hydromassage bath and chair for the master included
Milling cutter and ultraviolet lamp
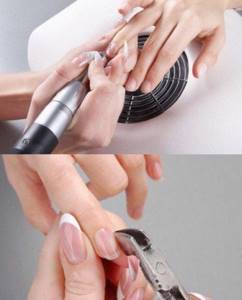
The milling cutter is a universal device for pedicure and manicure.
Thanks to it you can solve a variety of problems:
- adjust the shape of the nail;
- remove dead skin and cuticle;
- grind and polish the nail plate.
A milling cutter is a device with a handle (held by the master) and a rotating shaft. Various cutter attachments are installed on the shaft, the choice of which depends on the tasks at hand.
When purchasing, you should pay attention to the following criteria:
- Power. To work with extended nails, you will need a device with a power of at least 65 watts. If traffic in the salon is high, the technician works almost continuously during the shift, and his tasks are varied, then it is better to opt for a 100-watt device.
- Number of revolutions. For professional use, you need a router that makes at least 45,000 revolutions per minute. It is also important that the rotation speed is regulated.
- Engine's type. It can be brushed (suitable for home use) or brushless (ideal for a salon, as it can operate completely silently and uninterruptedly for a long time).
- Availability of a built-in mini vacuum cleaner. While working with a router, a large amount of dust is generated. Thanks to this element, it will be removed from the surface of the nail in a timely manner.
- Milling cutter options. They are made of ceramic (for processing cuticles), tungsten carbide (for working with artificial nails), cotton or felt (for polishing the nail plate).
Among the interesting options, we note the Nail Master ZS-602 device. Its power is 65 watts, rotation speed is 45,000 rpm. The set includes 6 nozzles. Cost 4,500 rubles.
Standard set of attachments for router
Fraser
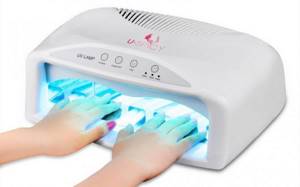
An ultraviolet lamp is needed to quickly dry gel polish. Thanks to special rays, photoinitiators are affected (they are present in any shell varnish).
When choosing a lamp, you need to consider the following characteristics:
- power (at least 40 W);
- presence of a timer and automatic or push-button shutdown;
- the presence of a retractable bottom (the option is relevant for pedicures).
The average cost of a high-quality interior lamp is from 7,000 to 20,000 rubles. For example, the Beautix LED/UV model (France) with an LCD display and three drying modes is an excellent option. Power 45 W, equipped with a non-contact sensor for automatic shutdown. Suitable for both manicure and pedicure. Price 16,000 rubles.
UV lamp with retractable bottom (suitable for pedicures)
Ultraviolet lamp
Set of manicure tools and consumables
These devices are needed constantly. Tools must be made of high-quality material. The cost of the set starts from 1,000-2,000 rubles.
Consumables include cosmetics for the care of nails, cuticles and hand skin, products for removing old coating, cotton pads, swabs, disposable napkins and diapers, gel polishes. There should be enough consumables, in addition, stocks of these materials should be replenished in a timely manner.
Set of tools
Consumables
Soaking baths and paraffin therapy device
Soaking tubs are typically plastic devices into which the client's hands (or feet) are placed before the procedure. They have an anatomical shape, so your hands are as comfortable as possible while soaking. For pedicures, there are much larger baths, while in luxury models of pedicure chairs they are included as standard.
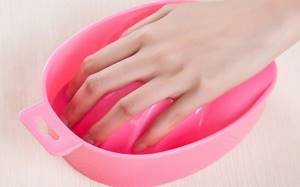
Manicure bath
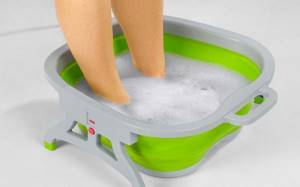
Pedicure bath
Paraffin therapy is a caring procedure that nourishes the skin of the hands and feet. Lately it has become especially popular. When choosing a bath for paraffin therapy, you should pay attention to the volume (for a salon you need a device with a volume of 2.5 to 4 liters), the presence of a thermostat and power (optimally at least 100 W). The cost of baths is from 1,000 (for the simplest devices) to 12,000 rubles.
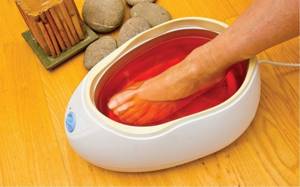
Paraffin therapy device in action
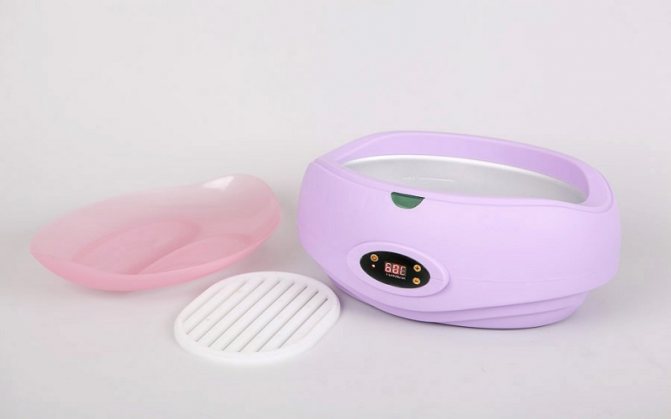
Paraffin bath with thermostat
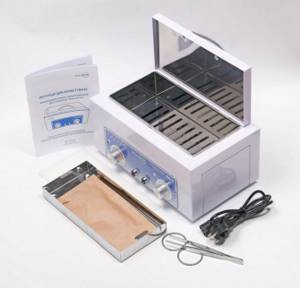
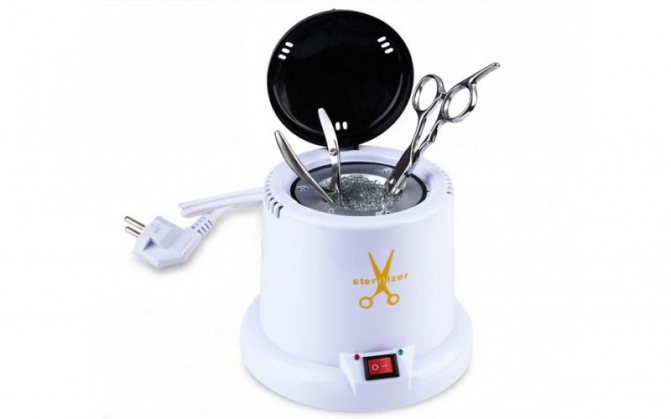
Sterilizer
This is a necessary attribute of a nail salon. Without it, it is impossible to ensure the safe execution of the procedure.
Sterilizers are:
- Ultraviolet. They powerfully disinfect and kill many dangerous microorganisms. This does not damage the instruments. The sterilization process takes 20 minutes, during which time the devices must be turned over. Disadvantage: ultraviolet light does not kill the AIDS and hepatitis viruses.
- Zharov. The so-called dry heaters are special cabinets where instruments are sterilized by exposure to high temperatures. The procedure lasts half an hour.
- Steam (autoclaves). Large devices for large salons. Tools are treated with hot steam. The operating time is even longer: from 30 minutes to 2 hours.
- Quartz. Disinfection occurs using special quartz balls. Low-power and small in size, therefore suitable for small salons.
- Ultrasonic. A special solution destroys pathogenic flora due to the effects of ultrasonic waves. They clean well, but do not protect against dangerous viruses.
For salon operation, dry heaters and autoclaves are the most optimal. However, if finances are limited and the flow of clients is small, you can purchase a quartz device for the first time.
The price for professional sterilizers starts from 5,000 rubles. On average, their cost is 10,000-25,000 rubles. For example, the Sanitizing WX-12C device is a single-chamber dry-heat oven. Temperature range from 0 to 250 degrees. Compact, at the same time ideal for sterilizing manicure accessories. Cost 11,700 rubles.
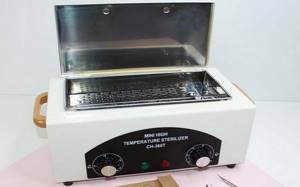
Sukhozhar
Quartz sterilizer
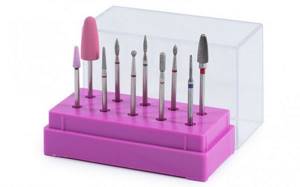
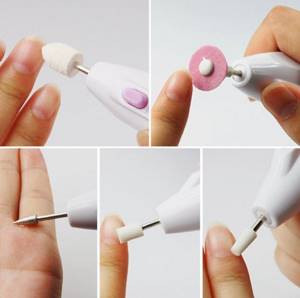
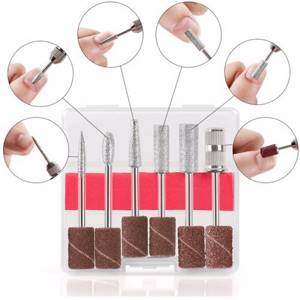
Choosing cutters for manicure
A set of cutters (attachments) of varying degrees of hardness is purchased separately for the manicure apparatus - soft, very soft, medium or very hard.
Visually, all types of cutters differ in the degree of rigidity and the color of the notches - a novice nail artist will need cutters with blue, green and red notches. For those who are doing a manicure for the first time, or are just training with tips, it is recommended to use a cutter with blue notches, for example, TBC
.
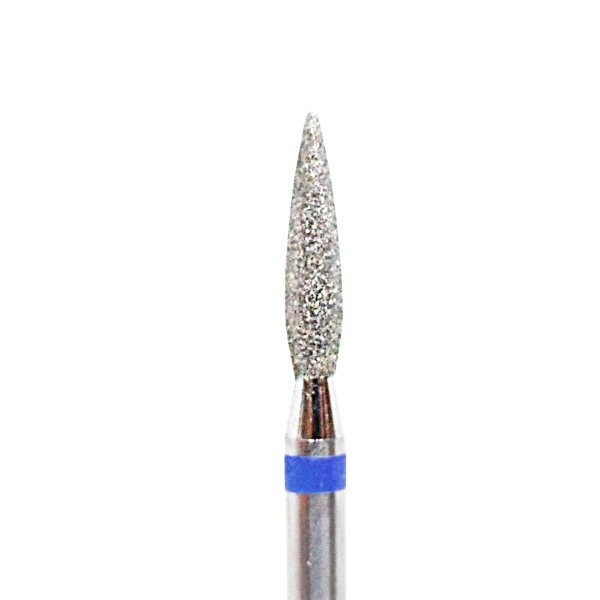
Types of cutters for different tasks: for removing coatings - fine-toothed, cone-shaped and for treating the surface of the nail and skin - diamond. It would be better if the basic set included both.
In the field of manicure, names such as “flame”, “ball” or “needle” are used - they correspond to the shape of the cutter. A “flame” cutter is used to remove the cuticle and process side ridges, a “Needle” is used to remove pterygium, and a “Ball” is used to process burrs. If you have no experience in processing rollers and nail plates, the “Ball” cutter will be suitable for the first time.
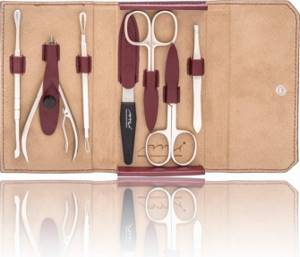
Complete list of manicure tools
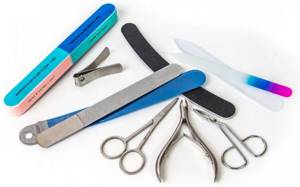
Today there are many devices, machines and other devices for professional manicure. But the classic edged manicure is not going to give up its position. Next, we will analyze in detail what professional tools are needed for a manicure, and compile a complete list of the basic set, which no woman can do without.
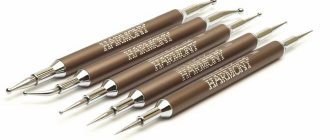
First, let's list the necessary tools for manicure (description with photo):
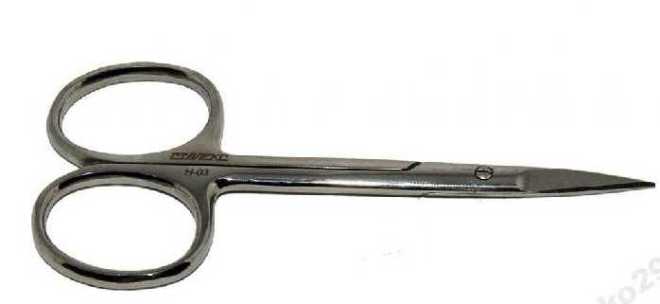
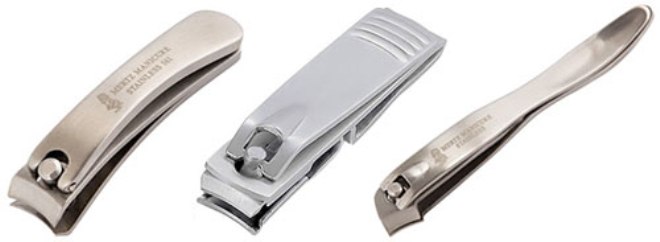
- Short straight scissors with a wide cutting part for cutting the nail.
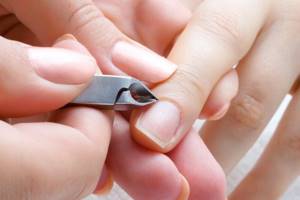
- Knipser, or manicure tweezers, for trimming nails. Compact and convenient.
- Thin scissors rounded for cutting cuticles.
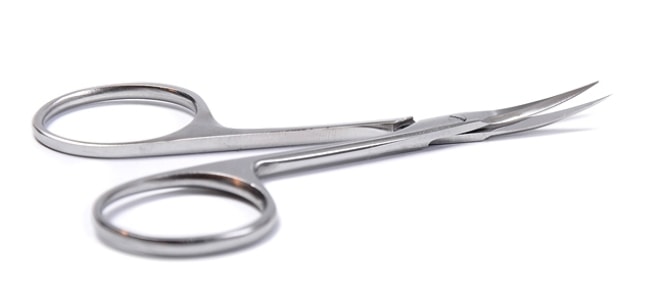
- Nail clippers for cleaning the periungual fold.
- Scraper (hatchet, spatula) – a double-sided tool for moving and cleaning cuticles.
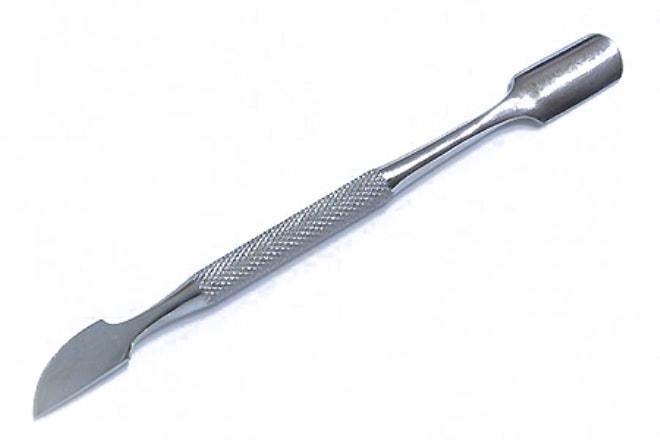
- Pusher – a spatula with a silicone tip for more gentle pushing back of the cuticle.
- Files to give shape to nails.
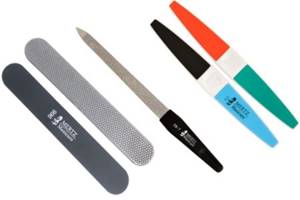
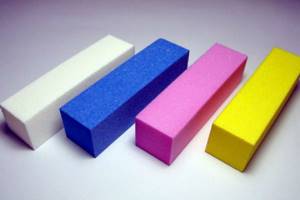
- Polishing blocks (buffs) to give the nail plate a glossy shine.
Auxiliary tools and basic consumables
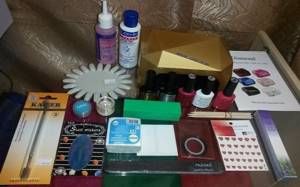
In addition to the main devices, such as a lamp, a manicure machine and gels, the master also purchases auxiliary and consumable materials - they need to be regularly updated and replenished, so at the first stage there is no need to completely fill the desk drawers, it is enough to select the essentials in the amount of 5-6 pieces per item.
Types of consumables:
- gloves – 1 box. A master who works with gloves not only ensures safety for himself, but also shows respect for the client;
- masks – 1 pack. Masks are used not only to protect against viruses - they also need to be worn when working with the device, since fine dust from the nail being filed scatters throughout the office;
- brush for removing dust. Wiping the table with a cloth will not be enough; fine dust gets clogged into the manicure machine and other areas;
- cotton pads. It is better to choose discs and, in addition to them, lint-free wipes. Before you do your first manicure, it is recommended to test them on yourself, since even the smallest particle of lint can greatly spoil the design and complicate the task;
- nail polish remover;
- acid-free primer;
- rubber base;
- cuticle oil.
Also, consumables are purchased for nail design - glitter, rubbing, rhinestones and sliders of different colors.
Advertising and customer search
Advertising is the engine of progress in the field of nail services. No one will know about even the most qualified and talented master if he does not take any steps to promote himself. Only with a large client base is a large income possible - from 30-40 thousand rubles. in the salon and 100 thousand or more, working from home. Over time, you will be able to open your own manicure studio and earn from 200 thousand rubles. per month minus rent.
But we should start with advertising. The best place where you can express yourself absolutely free is social networks. Only a lazy master has not yet created a personal page on Instagram, VKontakte or Facebook. All you have to do is fill it with beautiful photos of your work and subscribe to potential clients. It is important to display only the best photographs, ensure that the signatures are correct, and set an average price tag for your services. A too high price from a novice master may discourage those who want to sign up for a manicure with you. In turn, very low prices are also alarming, because they are subconsciously associated with poor quality.
The ideal option is to allocate a budget for paid advertising on the Internet. Your profile will be seen by a huge number of girls and women from your target audience. Many of them will definitely become interested and sign up for the session. Among the more accessible methods of advertising:
- free classifieds sites and women's forums;
- friends, colleagues and relatives. Ask them to tell their friends about you - the effectiveness of word of mouth has not been canceled;
- targeted advertising;
- contextual advertising.
The main thing is to treat each client carefully and kindly. Improve your skills, do your work conscientiously and use high-quality products - this is the best advertising.
General recommendations for beginners when purchasing a starter tool kit
To make starting work as easy as possible, the master should take care in advance of having all the necessary materials, but most importantly, check their quality. Saving is not the best option when it comes to providing nail design services, especially if you want to develop a base of regular customers.
FOR YOUR INFORMATION! Cheap gels and bases do not stick well to the nails, causing chips and cracks to form - all this contributes to customer dissatisfaction, which is best avoided. In addition, materials of the middle or high price category are much easier to work with - they “lay” on the base easier and more beautifully, dry faster and hold up well.
In addition to cost, you should pay attention to such characteristics as; expiration date, presence of markings with the batch number and manufacturer, integrity of the packaging, as well as the presence of a warranty card.
The easiest option is to purchase a complete starter kit, but this is not recommended - most often such kits are of dubious quality and are produced in cheap factories in China.
A good way is to assemble the first set yourself, taking into account the chosen direction in nail design, the season and the expected number of first clients.

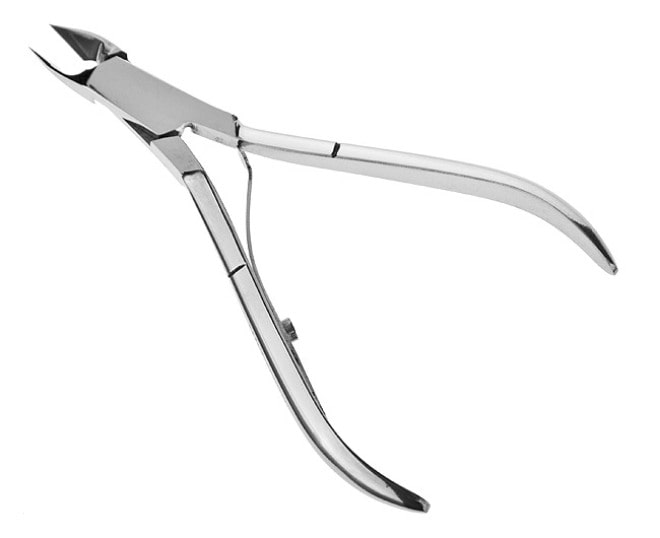
Scissors or wire cutters
The sharpening of scissors and nippers must be perfect; the quality of the manicure depends on this. There are two types of scissors: one for cutting the free edge, the other for keratinized skin around the nail. The blade must be very thin and made of medical alloy. Before buying scissors, it is important to take them in your hands and try them in action so that you feel comfortable working with them. The quality of the nippers depends on the material from which they are made, as well as on the type of sharpening. The movement of the blades can make work difficult, so it is important to buy a quality tool. The choice of cutting blade depends on your personal preferences: both scissors and wire cutters do an excellent job.
Common mistakes when purchasing a starter kit
A novice master is not familiar with the market for nail design products, and because of this, he makes a lot of mistakes, wasting time and money. To avoid this, it is recommended to choose one trusted store, for example, pilitte.com, and gradually, step by step, replenish your stock of working tools.
Mistake #1.
Buying a cheap lamp. Due to the huge list of necessary materials, beginning craftsmen save on a lamp by purchasing the cheapest option, but this often results in the need to purchase new equipment within a week or month after use. Chinese models under 1000 rubles are strictly not recommended for purchase.
Mistake #2.
Purchasing a ready-made set of gel polishes that do not match the colors for the season. For example, in winter the least popular shades are pink, yellow, blue, and if they are in the set, they will last until the weather warms up and will most likely be out of date.
Mistake #3.
Lack of necessary consumables, such as cotton wool, degreaser, files of varying degrees of hardness, orange sticks. In an effort to acquire “everything at once,” novice artists often forget about the most necessary little things, without which nail extensions become impossible. To avoid this, you should use the ready-made checklist below and purchase all consumables according to the list.
Consumables
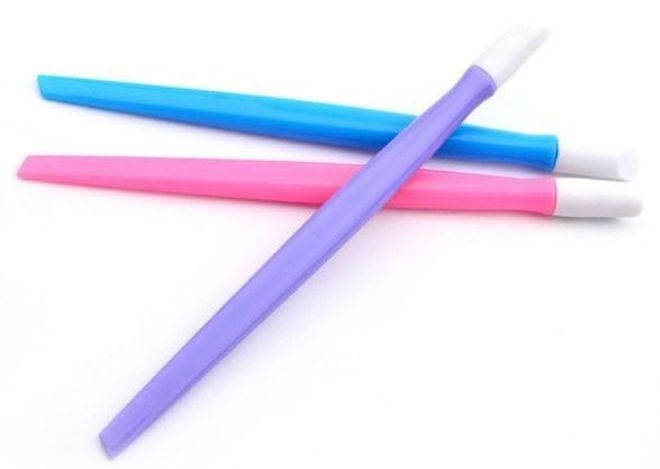
We have already talked about the benefits of orange sticks. They will be a great alternative to metal pushers. But these are far from the only assistants of a nail master. You will certainly find it useful in your work:
- lint-free wipes for cleaning and degreasing the plate, removing dust after sawdust and the sticky layer after polymerization;
- nail files. Necessary for length and architecture correction. When choosing, pay attention to the degree of abrasiveness. Hard files are suitable for artificial materials, soft and delicate files are suitable for natural nails;
- buffs. A separate type of file for grinding and polishing plates.
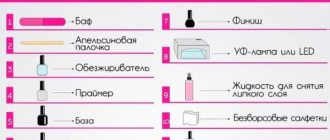
A complete checklist of tools and consumables for a beginning nail artist
To make your first purchase of material easy and quick, follow the checklist:
- Desktop. If at home or in your office there is no table that is comfortable and suitable in height, it is better to buy one before starting work.
- Desk lamp. The master must be able to clearly see the client's hands, so even when it is light outside, a lamp with white light will be required.
- A manicure machine and a set of cutters with a blue notch.
- Lamp for drying gel polish – UV or LED.
- Dry heat cabinet and/or a set of disinfectants.
- Manicure tool pre-treatment box.
- Manicure scissors for cuticles.
- Cuticle spatula.
- A set of files with different degrees of abrasiveness.
- A set of craft bags for sealing clean tools.
- A set of gel polishes of different shades, primer, base and top.
- Design brushes.
- A set of rubs, glitters and magnetic gel polishes.
- Consumables: gloves, face masks, nail polish remover, cotton pads and swabs, cuticle oil, sticker forms for nail extensions.
A novice craftsman will also need a set of tips and a stand to practice his skills. It is recommended to make several types of nail designs on tips in order to estimate the material consumption, the number of certain colors and draw conclusions about the need to purchase additional consumables.
The set for starting is impressive, therefore, if you are planning to become a nail artist, you should take care of your savings in advance, and also understand whether you want to engage in nail design on an ongoing basis.
If you really have a desire, but don’t have enough savings, you can start with one type of design and purchase the necessary consumables for it, and then, in the process of working with your first clients, make additional purchases of materials. The most important thing is not to give up and continue your business, only in this case you can become a first-class master and earn the trust and love of clients.
Liquids and antiseptics
When choosing basic products for manicure, pay special attention to products designed to prepare the nail plate for applying gel polish. At the first stage, it is necessary to treat the client’s hands with an antiseptic solution. Choose products in spray form - they are more convenient and economical to use. You will also need:
- degreaser to remove sebum, traces of cosmetics and dirt. Available in jars with a pump or bottles with a brush;
- dehydrator for restoring the natural acid-base balance and drying nails. It will eliminate 100% of moisture and minimize the risk of detachments;
- Primer is an indispensable product for long-lasting manicure. It has a liquid texture, is applied with a brush and does not require drying in a lamp. It forms a sticky film that ensures reliable adhesion of the base to the plate. It can be acidic (a universal option for healthy nails) and acid-free (suitable for extensions);
- Bonderne replaces the primer, but complements and enhances its effect. Has a thicker and stickier texture. It must be applied in a thin layer before the base.
Types of manicure, techniques
Everything about manicure for beginners is a necessary piece of information about the nail industry that will help a beginner begin practical training. It includes basic knowledge of the 3 main manicure techniques.
Classic manicure
The very first manicure technique, which appeared several centuries ago. Undoubtedly, a lot has changed in it since its inception, but the essence remains the same - cutting the cuticle with cutting tools. To perform this technique, you will need a hand bath, detergent or foaming agent (optional), a towel, a pusher or orange stick, scissors or wire cutters.
So, the manicure process begins by filling the hand bath with warm water. For a more pleasant feeling, you can add a small amount of liquid or cream soap. Now you need to dip your fingers into this bath.
Holding time 7-10 minutes.
Next, each finger is pulled out one by one and wiped dry with a towel. After this, the cuticle is carefully pushed back with a pusher or an orange stick and the pterygium is cleaned from the resulting subcuticular space.
Now you need to make a cut so that the skin can be cut easier; you can slightly stretch it with the finger of your other hand. At the end of the procedure, if gel polish is not required, it is advisable to moisturize and nourish the cuticles and hands with oil, lotion or cream.
So, this type of manicure has several advantages:
- Availability. Any girl can perform a manicure, since there is no need to buy expensive equipment.
- Thanks to preliminary soaking, even inexperienced professionals or ordinary girls will be able to cut the cuticle and get rid of rough skin without much difficulty.
Unfortunately, there are several disadvantages:
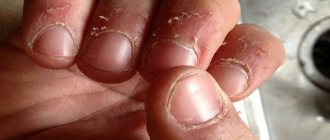
- High risk of cutting yourself. Cutting tools are dangerous even in the hands of an experienced craftsman. It's always possible to accidentally press too hard, position your hands incorrectly, or cut too deep. You can get injured in an instant.
- Lack of complete security. If a client comes to a salon or to a professional at home for the first time, you should definitely ask about how the instrument is sterilized. This is a very important aspect that definitely cannot be missed. Because we are talking about our own health.
- For some girls, the cuticle grows faster after a classic manicure.
Combined manicure
At the moment, this is the most common technique that combines the main advantages of hardware and classic manicure. For this technique you will need a manicure machine, a cutter with a “flame” shape, an orange stick or pusher, scissors or wire cutters.
The manicure process begins with pushing back the cuticle with a pusher or an orange stick. Movements at this stage should be smooth and careful so as not to go too deep and injure the nail plate.
Next, using a milling cutter, the pterygium is cleared from the subcuticular space, while lifting the skin upward for a quick cut. The movement is carried out to the middle of the nail, then the direction of the cutter is switched and the other side is processed. After this, the remaining cuticle must be carefully cut off with scissors or nippers.
Combined manicure has the following advantages:
- A variety of cutters allows you to create a quick, safe and deep manicure even for girls with sensitive skin and closely spaced capillaries.
- The combination of techniques allows you to make the most precise and even cut.
- For some girls, with the correct technique, the time for cuticle regrowth noticeably increases.
- Lower rate of cuts and wounds.
Unfortunately, there are also disadvantages:
- A wide variety of cutters is needed. For each client, it is necessary to select the ideal shape of the cutter and its degree of rigidity.
- Only with a lot of experience and knowledge can you create a truly ideal combined manicure. That is why the master will have to take a single training course.
Hardware manicure
This is the newest manicure technique that is only gaining momentum. There are many nuances in its execution that need to be worked out in practice. That is why it is better for a master who wants to learn this type of manicure to take an additional course, perhaps not even one.
To perform the hardware technique, you will need a manicure machine, a pusher or an orange stick, a flame cutter, a ball or barrel cutter, and a soft cutter for final polishing.
The article tells in detail everything about hardware manicure for beginners.
First you need to carefully push back the cuticle with a pusher or an orange stick. Now, using a “flame” cutter, you need to clean the spaces under the cuticle and lift it up, creating a so-called “skirt”.
Next, using a “ball” or “barrel” cutter, you need to make a cut. To remove short remnants of leather, most craftsmen recommend sanding with a soft milling cutter using special oil.
So, hardware manicure has the following advantages:
- Hardware manicure is the safest. Due to the absence of cutting tools, the risk of cuts and wounds is minimized.
- With constant use of this technique, the time for cuticle regrowth also increases.
- Working with dry cuticles prevents the development of fungus.
- The technique is ideal for people with dry skin and a lot of hangnails and wounds.
- The technique is ideal for diabetics as it minimizes the risk of cuts.
The hardware manicure technique has a number of disadvantages:
- It is not advisable to perform it if the cuticle is wet and thin, because removing the skin will make it more difficult and dangerous.
- Requires the purchase of expensive materials. To perform a hardware manicure, you need a device and several cutters, which cost quite a bit.
Security Products
The aesthetic component is not the most important in the manicure and pedicure procedure. The master should pay special attention to cleanliness. We are talking about people’s health and lives, so sanitary and hygienic rules cannot be neglected. Everything in the workplace must be sterile. Disposable accessories must be disposed of after each client, reusable instruments must be processed in an autoclave or dry-heat oven.
In addition to the necessary equipment for sterilization, you must purchase:
- surface disinfectant;
- ultraviolet bath for primary treatment of instruments;
- UV cabinet for storing clean products;
- Kraft bags.
It is necessary to protect not only clients, but also yourself. Disposable gloves, goggles, a cap and a mask will help you take care of your own safety. To avoid staining your clothes with gel polishes, wear a special apron. A manicure vacuum cleaner or hood should be running on the table, which collects dust particles, preventing them from entering your lungs.