Do you want to demonstrate patriotic feelings in a bright and original way? Get a manicure with the Russian flag!
This design can hardly be called everyday. Rather, it is suitable for special events: public holidays, team sports competitions, themed concerts. To create a holistic, harmonious image, the outfit for such a manicure should be carefully thought out.
Know-how
Until now, the most fashionable trend was considered to be putting the British flag on your nails.
But gradually this pedestal was occupied by manicure with Russian symbols. A special peak of his activity occurred during the Olympics in Sochi. There were no variations there. Not only fans, but also the athletes themselves sported such a manicure. To get the desired pattern, the main tool will be a thin brush. And among other things, you need to prepare:
- instruments for hygienic treatment of nails;
- orange nail stick;
- base and top coat, which can be replaced with regular clear varnish;
- three nail polishes: red, blue, white;
- the brush can be special for nail art; if you don’t have one, a regular one for painting will do.
The Russian tricolor can be depicted in various ways. Let's look at each of them.
Fast, simple, fashionable
Let's start with the easiest way. To do this you need to do the following:
- Get a hygienic manicure. Remove the cuticle and give your nails a proper and beautiful shape.
- Apply base coat to all fingers. Dry it.
- Paint your index finger and thumb black.
- Let's move on to making the tricolor: paint the index finger red; the middle one is blue and the nameless one is white.
- Cover each nail with top coat.
Stylish design for patriotic girls is ready. This was the easiest way to do it. With patience and perseverance, you can make a more complex design.
In the following form, master Alina will tell you how to make a manicure with the “Russian flag” ornament:
French tricolor
The technique is difficult to perform, but if you try, you will succeed. Prepare the following tools:
- nail strips or stencil;
- colored varnishes;
- base and top coat;
- paint brush.
Let's move on to the execution itself:
- Make the necessary preparation of the nail plate.
- Apply base coat to all fingers and dry.
- Now you need to glue the first strip and paint it red. Dry the layer.
- Next, glue the second strip and paint it with blue varnish. Let's dry it.
- Glue the last strip and paint it white. Dry it.
- To secure the design, cover the top of each nail with a top coat.
Important! To make your French manicure look neat and beautiful, try to make colored stripes of the same size. You can smooth out untidy transitions with a thin strip of dotted glitter
Russian manicure with a French accent
Everyone knows the amber technique. To make a manicure in the style of the Russian flag, prepare a regular sponge for all available tools. The manicure is simple:
- Prepare your nails hygienically.
- Apply base product. Dry it.
- Apply three colors to the sponge that replicate the tricolor.
- Press the sponge onto your nail. Repeat this with each finger. Constantly renew the varnishes on the sponge.
- Apply the fixative and get a stylish nail design.
Great tricolor
You can make a flag the entire size of your nail. To do this you need to do the following:
- Make hygiene preparations.
- Apply the base coat.
- First, paint all the fingers white. Let's dry it.
- Visually divide the nail into three equal stripes, which should be diagonal.
- The lower part at the base remains white; Color the middle one blue and the top one red.
- We fix everything with a top product.
If you want a more shocking manicure in the style of the Russian tricolor, then in stores you can find heat-resistant stickers with the image of the state emblem and even the president himself. They can be combined with any of the flag options above. We do the nail design as follows:
- Prepare your nails.
- Apply base coat.
- Draw a tricolor on all fingers except the ring finger.
- Cover the nail on your ring finger with a solid color, such as white, blue or red. Dry it.
- Transfer the sticker of your choice to your finger.
- Cover each finger with top coat.
If you have good drawing skills, you can draw the coat of arms yourself.
Important! Since the chosen nail design has such serious symbolism, it should not look neat, but impeccable. There should be no blots or inaccuracies
Now you know how to make a patriotic manicure that will reflect your attitude towards your country and emphasize your individuality.
https://youtu.be/https://www.youtube.com/watch?v=Qwioj8PQe3A
Proper care for the health of your nails
Before moving on to the cherished point of how to do a “Russian flag” manicure on your nails, you should talk about the health of the nails themselves and how to properly care for them. Otherwise, no matter how you cover up or paint your unhealthy nails, they will not become beautiful. Don't deceive yourself. Therefore, before doing a Russian flag manicure, make your nails healthy.
To do this, you need to stock up on nourishing and moisturizing oils for nail care. These can be purchased at almost any cosmetic supermarket, and can also be ordered online. In addition to oil, purchase hand moisturizer. They need to lubricate the area around the nail and the cuticle.
Other implementation options
What kind of manicure can be for nails?
If it is difficult for you to draw a flag by hand, then you can do it with the help of manicure tape. This method is only suitable for the British flag; you cannot create a Russian or American flag manicure with it. The first - due to the large width of the stripes, the second - due to the great complexity of the design and the presence of stars. This is not to say that this method is easier than drawing by hand, but for many it is easier to stick tape than to draw a straight line. The design is made using tape as follows:
- As in the previous version, a protective base is applied to the nail and dried. After which blue varnish is applied as the first layer and also dried;
- Then the differences begin. Apply a second coat of blue polish and let it dry for a few seconds;
- Cut two strips of red and white tape and place one of them on the sticky polish. The length of the strip should be sufficient so that you can stretch it by pressing it on both sides of the nail;
- Immediately place a stripe of the second color next to it, forming one of the diagonals. The strips should be adjacent to each other closely, but without overlaps, since it is in these areas that peeling usually begins. The order in which the color bars are applied is also not important, since they are of equal width;
- Ideally, you need to have time to form a second diagonal before the varnish dries, but if this does not work out, then apply a thin layer of transparent varnish to the nail and form a second one. If you are lucky enough to purchase manicure tape with a sticky base, then all work should be done on a dry coating;
- After this, form the central cross in the same way;
- After the flag is formed, cut off the excess parts and cover the nail with a top coat.
This design has a significant disadvantage - all the strips turn out to be almost the same width, because it will not be possible to overlap them. Therefore, such a flag will not look realistic enough. However, it will remain quite recognizable due to the high popularity of the print and color combination.
In addition, the flag of Russia or Britain on nails, like almost any other, can be created using stickers - films. When ordering online, you can find a fairly large selection of flags from a variety of countries, as well as flags of communities and subcultures, for example, the rainbow one. Their application cannot be called simple, since they are heated under a lamp, and then placed on the nail and, as they cool, they shrink, adjacent to the plate. The difficulty is that they often produce bubbles and detachments, and cutting them to size is not very easy.
Stencils are only good for creating a Russian flag manicure, like in the photo, on your nails. The complex pattern of the British flag in this case involves the use of a huge number of stencils and their constant re-gluing. So it will not speed up the process at all.
We create a design taking into account the shape of the nail
The science of vexillology studies the prerequisites for the appearance and meaning of various symbols and colors on the flags of different countries, thanks to which we know what constituent elements these images consist of. Most often, the design on the flag consists of stripes, squares, circles, stars, images of birds, animals and other special symbols.
When creating a manicure with a flag, it is not enough to simply draw stripes or dots in certain places on the nail plate; you need to take into account the fact that different geometric shapes transform nails of different shapes in different ways. So, when drawing symbols and signs on your nails, you need to remember that:
- horizontal stripes visually stretch the nail and make it more elegant and attractive, vertical stripes, on the contrary, flatten it, and oblique stripes perfectly hide nail imperfections (asymmetrical shape, unevenness, etc.);
- stripes can be clear and blurry, thin and thick, and the density of the pattern depends on this. The thinner and more precise the lines, the more elegant and “slender” the nail will be. Blurred and wide lines will make it look “voluminous”;
- You shouldn’t overload a manicure with a flag with details, especially if your nails are short. It is better to make it stylized and schematic, made in the right colors.
It is important to remember that only on well-groomed hands with neat nails, a manicure with flags, like any other design, will look beautiful, so do not neglect a hygienic manicure. Nails should be the same length and shape, there should be no hangnails, overgrown skin or cuticles.
Preparing nails for manicure
Holiday in the shower and manicure
To make your hands look beautiful and well-groomed, it is not enough just to create a manicure. To do this, you still need to monitor their appearance, health, shape and condition of the cuticle. All this is done in fifteen minutes.
How to make your nails look beautiful:
- Remove old nail polish with a special product (it is advisable to use one that has a positive effect on the condition of the nails and will not cause them to become brittle).
- Align the length of the nails on all fingers with several types of manicure files and scissors, giving them the desired shape.
- Soften the cuticle in water together with a special product before proceeding with removal, this will ensure that cutting the cuticle will not be such an unpleasant process.
- Wipe your hands dry, apply cream and begin removing the cuticle.
Only after all these procedures proceed to work on nail design.
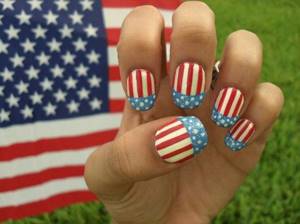
How to do an American flag manicure
Nail design online lesson
For this type of manicure you will need:
- clear nail polish;
- fixative;
- red varnish with a long brush;
- blue and white varnishes with a long brush;
- thin brush for applying varnish.
Option 1. First, apply a base coat (can be transparent). Be sure to treat the end area, because this is where chipping may appear. Wait for the base to dry and then apply any red polish to the entire surface of the nails.
There is nothing wrong with the fact that some unevenness may appear, since with the 2nd overlap everything can be corrected and leveled, so special attention should be paid to the 2nd layer of white varnish. When 2 layers are dry (one after the other), take white varnish and a thin needle to draw lines
Using a special brush, make 3 thin white vertical stripes on the red. Then apply bright blue polish to the tips of your nails, then apply white dots on the blue surface using a brush. The final accent is a sealer for durability.
Option 2. Do the same thing, only apply stars on the blue surface on several fingers. For example, put the US flag on the big, ring and little fingers, and make stars on the rest.
Option 3. Everything is the same as in option 1 (apply red, make white stripes), but paint only half of the tip of the nails blue and make small white dots (or stars) on the same half.
Option 4. Paint several fingers red with a white stripe, and the rest blue, on which you will need to apply white stars.
Option 5. Paint all fingers, except the ring finger, dark blue twice under the base. On the ring finger, do an American manicure: paint the finger red, cover it with a white line and make a blue square on top of half the nail, which is filled with white dots.
Option 6. Paint all your nails scarlet. Select 1 finger on which the US flag will be depicted (for example, the middle one). On the red layer of this finger, white lines are applied along the length of the nail and a blue square is drawn on top in the right corner, which is filled with either dots or stars.
So, nail designs depicting country flags can be done in any way you like and approach it creatively, without limiting yourself to just one option. In any case, such a manicure will look very impressive and fashionable. Well, being creative during the manicure process will bring great pleasure and only positive emotions.
Manicure with flags of countries - Britain and Russia photo and video
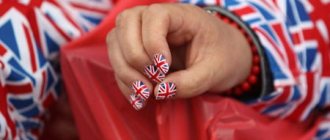
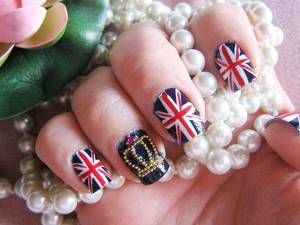
The British flag has occupied a good position relative to other fashion trends for quite some time. Today, the flag of this country can be found anywhere: on clothes, shoes, souvenirs, handbags, curtains, towels, notebooks and many other things. This symbolism is especially common on T-shirts. Nail art is also not spared from this image; on the contrary, the “British flag” manicure is considered one of the most popular and striking images in nail design.
The symbol of Britain has become the most popular in the world compared to the symbols of other countries, and everything that is popular can be considered fashionable.
Who is this nail art suitable for?
Nail designs with the British flag have gained particular popularity among young girls. This option looks great not only in light of festive events, but also in everyday bustle. One of the nicest things about the design is that it not only looks impressive, but is also quite easy to apply. Another feature: the “British flag” manicure looks great both on long extended nails and on short ones.
If you are going to a party and want to be the center of attention, choose a flag manicure. And this does not necessarily have to be the symbols of Britain; you can apply drawings of the flags of other countries, for example Russia. The French symbol looks no less impressive on nails. The Russian flag will be especially relevant on the fingers during some significant public holidays. It could be Independence Day or some kind of competition where Russian athletes will play with a team from another country. With this manicure you will not only show your patriotic spirit, but also stand out from the crowd of other fans. Moreover, the Russian flag looks bright and stylish on a girl’s nails.
Doing a flag manicure
Since this article is focused more on the British flag, here we will talk about how to apply the British flag to your nails.
We will need:
- Manicure set
- Flat brush
- Varnish base
- Finish varnish
- Acrylic dyes (blue, white and red)
First of all, you need to get your nails in order. To do this, we use a manicure set. Remove the old varnish and then apply the base varnish. Now we begin to turn the image of the flag into reality. We cover the plate with blue acrylic varnish and wait 5-10 minutes for the layer to dry.
Take a flat brush and draw a cross-shaped figure on the nail in white. Dry again. Now, focusing on the British flag, we draw red lines. That's it - the flag is ready. All that remains is to cover the drawing with varnish fixer. If you want, you can coat the cuticles with a layer of oil.
At the beginning of the article, we said that the symbolism of Foggy Albion is applied very simply. And indeed it is. In fact, you don’t have to do everything manually - there are special stencils that will make the work much easier. This is what we meant when we talked about simplicity.
You can buy this useful tool in a specialized store that sells everything for nail design. Using stencils, applying country flags to your nails will not only be faster, but also more accurate.
In addition to stencils, there are also so-called applications. They are divided into water-based and self-adhesive. Initially, the image is located on the thinnest film. It must be applied to the surface of the nail, which has already been prepared with a base varnish, then secured with a finishing varnish.
Experiment!
Do not forget that nail art is first and foremost an art, and art requires new approaches and experiments. Therefore, you should not overuse stencils and applications, although sometimes they are necessary.
You can cover your French manicure with a flag. It could even be the flag of France. Perhaps one of my friends will appreciate it.
We also recommend trying to make some kind of “mix” by putting flags of different countries on your nails. Firstly, it is unusual for each finger to have its own symbolism. Secondly, this will allow you to play a mini-game with your friends - let them guess which country the symbolism of each of the fingers belongs to. Don't forget about the Russian flag!
Why do they do this type of nail design?
The motivation for creating a similar design on your nails can be different. A manicure with flags can be a manifestation of patriotism or a symbol of love for a certain country where a person dreams of going on vacation. This nail design is often chosen by those girls who go to any competitions as a participant or fan, as well as those who simply want to emphasize their individuality and draw the attention of others to their extraordinary nature.
In most cases, a manicure with flags is not intended for everyday wear, since the colors and their combinations used to create it are most often very bright and contrasting. If you really want to decorate your hands with a manicure with a flag and wear it in everyday life, then you can paint such a patriotic image on only 1-2 nails, and cover the rest with a calmer, neutral varnish.
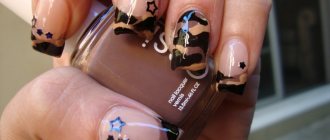
In addition to depicting the flags of their country on their nails, modern youth often decorate their pens and wardrobes with stylized drawings of the symbols of other countries. The most popular among young people today is nail designs with the flags of Great Britain and the USA, which, thanks to the bright contrasting colors in their composition, look very stylish. You can also often see the European Union flag on the nails and accessories of fashionistas. Football fans often draw flags of national football teams, as well as the flags of Brazil and Argentina.
Application
An English flag manicure is easy to draw by hand. This can be done using a dots or a thin “one” brush. It looks more impressive on short nails, but it is more difficult to do on them due to the small area to work with. The print is applied as follows:
The nail is covered with a protective base for varnish, which is dried; A layer of blue varnish is applied and also dried. If the coating is not too dense, you can apply another layer; After this layer has dried, two white diagonals are applied to the nail, intersecting in the center of the plate.
When applying a print, pay close attention to the width of the lines, as it varies depending on the area of the design, and therefore such a manicure is not as easy to perform as, for example, a Russian flag nail design. This can be done with a thin brush; After the white varnish has dried, a thin red stripe is applied on top of it, for example, using a dots
Wait for the red coating to dry; We proceed to drawing a central cross, which should overlap the diagonals. First, draw a cross with white varnish and wait for it to dry; Now we apply a red cross on top of the white one, dry it and the manicure is ready.
It seems that to obtain such a design you have to purchase quite a lot of varnishes, and therefore it is easier to buy, for example, stickers. However, these shades can be used to create many prints, including manicures with the flag of the USA, Russia, Serbia, Japan and many other countries. The combination of red and white looks good in New Year’s nail art, and white and blue looks good in nautical nail art.
With rhinestones
At first glance, crystals do not look good with military nail designs. But when executed correctly, stylists create unusual combinations. Rhinestones separate the boundaries of the pattern and the plain gel polish.
In addition, shiny stones will add femininity and soften the daring militaristic image.
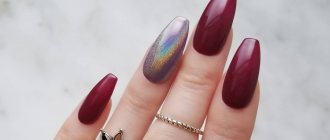
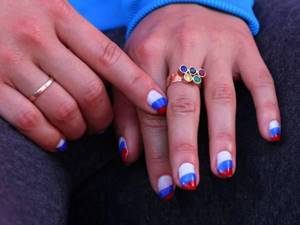
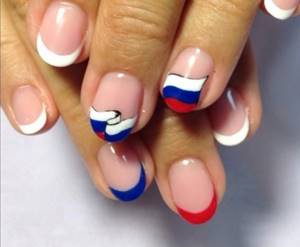
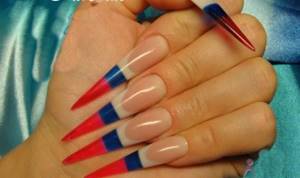
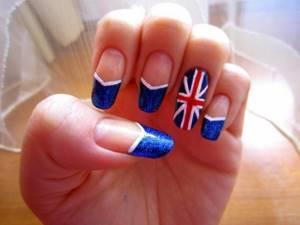
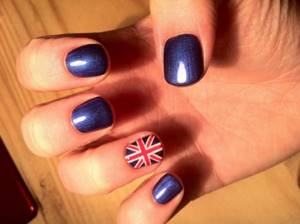
Manicure with the Russian flag - best ideas and options
Do you want to demonstrate patriotic feelings in a bright and original way? Get a manicure with the Russian flag!
This design can hardly be called everyday. Rather, it is suitable for special events: public holidays, team sports competitions, themed concerts. To create a holistic, harmonious image, the outfit for such a manicure should be carefully thought out.
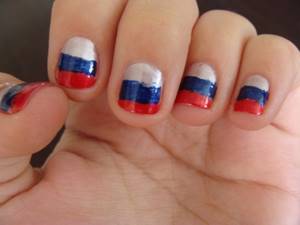
How to make a Russian flag on your nails?
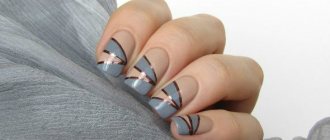
To depict the Russian tricolor, you will need varnishes of three colors: white, blue and red. Stripes can be placed in different ways: diagonally, vertically or horizontally. You can use different tools to draw lines.
Masters paint stripes with a brush. But specialists have many years of experience working with manicure tools and products. Lovers of home manicure use improvised means: tape, French stripes. It is convenient to draw thin lines with a dots - a manicure pen that has a metal tip.
Do you have enough time for yourself?
Yes, of course! No, it's just a problem!
Manicure in the style of the Russian flag: ideas and options
Vertical or horizontal stripes. They occupy the entire area of the nails. This design is the most expressive. Make perfectly straight lines using French tape or tape.
Tricolor diagonally. They can occupy the entire surface or extend slightly onto the plate.
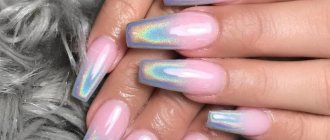
Ombre. Soft, blurry color transitions can be made using an ordinary sponge. First, coat your nails with a clear base coat. Apply three strips of varnish to a piece of sponge in the desired sequence. Immediately press the sponge onto your nail. Apply sealer.
French manicure. The smile line will consist of three thin stripes of corresponding colors. Making this option is more difficult, but quite possible.
Multicolored nails. Each plate is painted in different colors: white, blue, red. Of course, such a manicure will only vaguely resemble a flag, but you shouldn’t exclude it from the list of options.
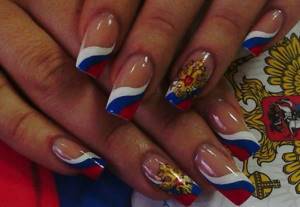
Manicure with the Russian flag and coat of arms. Experts recommend doing a manicure on all nails using one of the above options. Paint one finger a solid red or white color and draw a coat of arms on it. If you are not sure that you will be able to depict the symbol of the country beautifully, then it is better to abandon this option or use the services of a master. You can find stickers with the coat of arms in stores, but your search may be fruitless.
In the photo, a manicure in the shape of the Russian flag is presented in only a few options. The reason for this is that the idea to create such a design appeared quite recently. Therefore, you can come up with your own original version.
Let us remind you that a manicure in the tricolor style requires special treatment, because you are depicting a state symbol on your nails. So make sure your drawing looks perfect!
How to paint the Russian flag on your nails?
How to paint the Russian flag on your nails?
A manicure with the Russian flag looks very patriotic, and you can do it yourself at home.
The main thing is that the colors of the varnish are available that correspond to the colors of the Russian flag: white, blue, red, and that the arrangement of the colors is in that order so as not to be confused with the symbols of the flags of other states.
The rules for applying a manicure with a Russian flag pattern are the same as for a regular manicure.
Apply the base and let it dry.
You can sketch out an idea for a manicure on a piece of paper, then begin applying the design color by color, allowing each color to dry thoroughly.
Fix with a layer or two of fixative.
Instead of colored varnish, you can use acrylic.
You can also decoupage your nails with a portrait of Vladimir Putin or the coat of arms of Russia, or find such stickers and use them in a manicure design with the Russian flag.
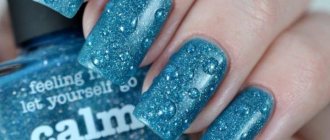
You can add a little glamor to your manicure by making one nail a shiny version with sparkles or rhinestones.
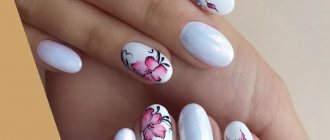
Below are several manicure design options with the Russian flag, get inspired:
Drawing the Russian flag on your nails is quite simple - we paint each nail with stripes (horizontal or vertical - to your taste) in traditional colors = white, blue, red. I love this manicure - it's very patriotic these days.
Here are some nice options in pictures:
On various holidays, such as Russian Flag Day, Russian Independence Day, during competitions, etc., it is important to perform a manicure on your nails with the symbols of the Russian flag.
To represent the Russian flag , you need to sequentially apply three strips of multi-colored varnish: white, blue, red, carefully so that they do not merge together. The stripes can be thinner or denser, which changes the result.
Stripes can be applied with a thin brush or sponge. First, the varnish is applied to a sponge, and it is applied to create a design.
First of all, the nails are prepared for manicure, then you can apply a base of clear varnish or matte/glossy white varnish or not, then apply multi-colored stripes with the Russian flag.
It should be remembered that if the stripes are applied vertically, it visually lengthens the nail, and if horizontally, it shortens it, so with a short nail this pattern does not always look ideal. In addition, if your nails are short, then you should not overload them with various designs against the background of the flag, such as a portrait of Putin or a coat of arms, etc.
You can also make stripes diagonally, it always looks beautiful.
To draw Vladimir Putin, you will need ready-made stickers.
You can decorate it by additionally making a design on your nails in the form of sparkles, rhinestones, and sequins.
A manicure with a flag can be done on only one of the nails, and the others can be painted the same color, for example, white.
How to create a British flag manicure
British flag manicure is very popular now. It is very easy to make, and it always looks beautiful and fashionable.
What you will need for the design:
- transparent varnish (will serve as a fixative base);
- rich blue varnish;
- white coating with a long brush;
- scarlet acrylic paint;
- a piece of foil where we will stir the paint;
- container with water;
- long bristled brush;
- a cloth to clean the brush from moisture.
First, a base coat is applied to all nails - a clear varnish, then dried. After this, all nails are covered with blue varnish. When the first layer has dried, you need to coat your nails again with blue so that the tone is more saturated and lasts better. Dry the second layer. Several fingers of the hand are selected on which the British flag will be depicted. On the selected fingers, vertical white stripes are drawn in the middle of the nail using a long-bristled brush.
Then, when the first line is dry, draw another one, only this time in the middle, across the width of the nail, to create a kind of white cross. When they are dry, four more white stripes are drawn, which go from the center of the cross (like on the British flag). A little red acrylic paint is poured onto the foil. There is no need to cover the polish layer by layer, because as a result the manicure may smear and lose its attractiveness.
Wipe the brush, previously soaked in water, on a napkin to remove moisture. Take acrylic paint on a brush and complement the design with a red line on all the whites (it should be much thinner than the main white). Dry the paint and apply fixative to all nails.
The result should be a very beautiful, bright and stylish manicure. It looks especially good in the summer, when the skin is tanned and there are more brightly colored items in the wardrobe.
Total information
The British flag has a fairly catchy and bright combination of colors. On a blue background there is a red and white cross, the straight lines of which stretch across the entire area of the flag. Red and white diagonals also stretch from the corners to the center of the cross. Often such a print can be found in other colors, when the British flag on the nails is done either in completely different shades, or the three main shades are swapped. Thanks to the great popularity of the print, even if done in other colors, this manicure remains recognizable.
To achieve this design, it is very important to choose the right varnishes. All coatings must have good density, especially for white varnish, which is supposed to be applied over a darker blue. In addition, this manicure is usually performed with matte varnishes, since the lack of gloss dictates the grunge style from which this print came into mainstream fashion.
There are other ways to implement this design. It is not necessary to draw it by hand at all. Thanks to the simple shapes and outlines, the British flag on the nails, as in the photo, can be created using, for example, manicure tape. In addition, the most complicated design, supplemented by any elements, can be obtained by placing stickers - films - on the nails.
Decorating such a manicure can be called quite complicated, since traditional sparkles in its decor may not be entirely appropriate. As mentioned above, the grunge style does not imply glamor and shine, and therefore this manicure can be complemented, for example, with small opaque rhinestones imitating rivets, etc. A variety of blots, letters of the English alphabet, etc. look good. This manicure, in principle, is much more suitable for young girls and teenagers who prefer a casual style.
[yandex2] [google2]
Flag origins and symbolism
There are many theories about why the rainbow became a symbol of the gay movement. Here is the most beautiful of them. The so-called “Stonewall riots” - riots and clashes with police in the New York gay bar Stonewall, considered the beginning of the organized struggle of homosexuals for their rights - occurred at the end of June 1969. On June 22 of the same year, the famous Hollywood actress and singer Judy Garland, best known for her role as the girl Dorothy in the film “The Wizard of Oz” and the song from this film “Over the Rainbow,” died. Garland was one of the first “icons” of the gay movement, the “Elvis of homosexuals,” and many who gathered at the Stonewall bar on the night of June 28 came straight from the funeral of their favorite artist.

According to legend, the inspiration for the rainbow flag of the gay movement was the song "Over the Rainbow", performed in the film "The Wizard of Oz" by actress and singer Judy Garland, who became one of the first gay icons.
Another theory is that Baker borrowed his idea from the so-called “race flags”—five horizontal stripes (red, white, brown, yellow and black) that were popular in the 60s during anti-war demonstrations on university campuses. This flag was popular among hippies, one of whose heroes was the famous poet and pioneer of the gay movement Allen Ginsberg. Under the influence of Ginsberg, Baker decided to use just such an idea. Be that as it may, Baker’s flag already consisted of eight horizontal stripes, and each color, according to the author’s idea, was a symbol of one or another important component of human existence:
- Pink - sexy;
- Red - life;
- Orange - healing;
- Yellow - Sun;
- Green - nature;
- Turquoise - art;
- Dark blue - harmony;
- Purple is the human spirit.
Subsequently, however, he explained his choice much more simply: “We needed something beautiful, something of ours. The rainbow is great because it reflects our diversity in terms of race, gender, age, etc.”