Posted date: July 12, 2017
Sugar manicure confidently takes a leading position in nail art and is becoming a favorite of modern fashionistas. Ideal for creating solid colors, gradients or three-dimensional designs. With this material, a sea of ideas and opportunities to express yourself opens up.
From the very beginning, “sugar effect” manicures were done using ordinary sugar particles. But this material turned out to be not universal, because the sugar grains are too large, and besides, the manicure does not last long due to the fact that the sugar melts quickly - it dissolves the first time you wash your hands.
However, manufacturers of materials for nail services were not long in coming; they offered the masters a special powder called melange, which allows them to create the effect of sugar on nails. It is suitable for both gel coating and regular varnish.
The special composition of the powder resembles colored dust. It is applied to wet gel paint or colored polish, creating an incredible marmalade manicure. Small grains of sand lie smoothly and quickly on the nail plate and suit any look.
Velvet sand (melange powder) can be found in any specialty store or ordered online. The grains of sand have a beautiful shimmer, so the sugar manicure turns out amazing and easy to do.
Benefits of sugar manicure
Girls and women around the world increasingly prefer this type of manicure because:
- in this design, nails look stylish and attract the attention of others;
- Using this technique, you can cover all your nails, or you can only cover individual parts of them, which will make the design even more original;
- the procedure does not take long and can be easily performed at home;
- the material used in the work is quite durable: it will stick to the nails when doing household chores and frequent contact with water;
- If you don’t do a sugar manicure yourself, but go to a professional, it can last about three weeks.
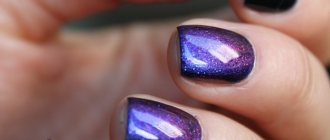
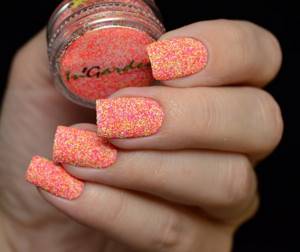
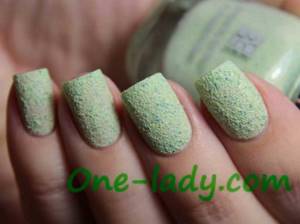
Stylish sand nail art ideas
After the long-awaited purchase, you can move on to the creative part and bring your ideas to life. A colorful collection of photos will inspire you to new experiments and unleash your imagination. Try to start with a solid color, because sandy nail designs look perfect with light and delicate shades of white, pink and peach. Sugar nail art also looks very impressive in black. If you want to choose bright, variegated tones like blue, green or red, you should keep in mind that such contrast is not always beneficial for a textured manicure. To make the sand nail design look new, you can apply a top coat, and the nail art will look very mysterious and alluring. The photo shows several variations of the original manicure.
Sugar nail design is not limited to just a monotonous finish. To create patterns, you can use sand varnishes of various shades. Try, for example, painting each finger in a different tone or focusing attention on two nails by making. You can very successfully combine a sand coating of the same shade with or without glitter. In addition, sugar polish can complement the patterns and pictures of regular nail designs. Look at the photo and choose the right nail art for yourself.
Cons of sugar manicure
Fortunately, there are fewer disadvantages of sugar nail art:
- If you turn to a beauty salon for help, the new product is expensive.
- A manicure with sand requires scrupulousness; negligence leads to the material falling off within a few days.
- To maximize the period of wearing decorative elements, you need to wear rubber gloves on your hands when doing household chores.

Interesting ideas
Sugar effect varnishes allow you to show your creativity and create absolutely any design.
Black manicure
Manicure is suitable for strong and bright girls who prefer to emphasize their individuality.
To create it, it is better to use gel polish. Application stages:
- Coat the plate with the main product and dry it in a lamp.
- Apply two layers of black varnish and dry.
- Draw a skull on several nails and cover with silver acrylic powder.
- Dry your nails and consolidate the result.
Red design
A simple velvety manicure that will impress others.
Technique:
- Apply and dry the base.
- Apply two layers of red polish to your nails and dry.
- Mix burgundy and golden melange in a separate container.
- Apply another layer of varnish and cover it with melange. Beat in the grains of sand after drying.
- Remove excess.
Marmalade design
A bright and rich manicure with multi-colored sand is suitable for meetings with friends, themed holidays, and ordinary everyday life.

Technique:
- Mix several different colors of melange in a prepared container. It is better to choose bright shades.
- Apply several layers of gel polish, and cover the last one with melange.
- Carefully process the ends and remove excess.
With the help of powdered sugar effect design, every girl can feel confident and stunning, impressing others with her creativity.
Sugar candies
Nowadays, many products have appeared on the nail design market, thanks to which you can achieve the effect of sugar on your nails. You can choose any colors: plain, neon or melange.
You can create a sweet surface using acrylic powder with small glitter.
- Each nail needs to be covered with a base, two layers of colored varnish and polymerized in a lamp.
- Apply a thin layer of top.
- Immediately, gently sprinkle acrylic dust using a pusher over the entire surface of the nail.
- Dry in a lamp and remove all excess with a brush.
To prevent excess powder from spilling, it is recommended to hold the nail over the jar and sprinkle glitter on top.

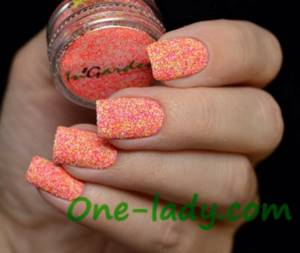
Small confetti
A sugar effect manicure can be done using regular glitter. They are applied to the top coating in the same way as acrylic powder and melange. As a base tone, you can use any suitable color that matches the glitter.
Unfortunately, this design has one drawback - the surface of the nails is rough. After drying, it is necessary to lightly sand with a soft buff and brush away any remaining residue with a brush.
Using glitter, you can simultaneously create a sugar gradient effect on your nails. It is necessary to sprinkle a light shade of glitter on part of the nail, and a darker shade on the other.
Sugar manicure with gel polish
This design looks better on extended nails or gel polish. It is in these cases that you can create not just a marmalade coating, but also make various designs and patterns that imitate a sugar coating.
Step-by-step instructions for performing the sugar effect on nails:
- The first thing you need to do is perform a standard manicure procedure, give your nails a shape, use a buff to remove the gloss, degrease your nails and apply bonding agent to them.
- Next, the nail plate needs to be covered with a base and sent to the lamp. After this, you need to apply gel polish of the main color to your nails in two layers, polymerizing each of them in a lamp.
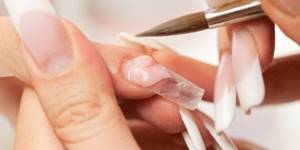
- Melange powder is applied to the residual stickiness of the varnish using a pusher or brush. It is best to do this procedure over a jar of material, this way you will save decorative rubbing.
- After this, you need to pour a little finish onto the foil (this is done so that the powder does not get into the bottle along with the brush) and cover your nails with it using a brush from the old bottle. The nails are put into a lamp and dried longer than usual.
- To make a sugar manicure with gel polish look more natural and believable, after drying the nails are covered with a second layer of top coat. Without drying it, the nail plate is re-sprinkled with melange and sent to dry. Finally, remove the residue using a fan brush and rub in any protruding particles using a stiff brush.

Jelly beans
Sugar manicure with gel polish is very versatile and suitable for any season. During the cold season, on the eve of the New Year holidays, your nails can be decorated with multi-colored confetti. For spring and summer designs, choosing light yoghurt shades, curly melange sparkles will flaunt on your nails, reminiscent of sweet ice cream. In any weather, the manicure will look stylish and gentle.
Melange is a special material with a multi-color effect of small particles that helps create a sweet design.
- Melange can be poured onto a colored base or a regular base.
- The top is applied in a thick layer so that the glitter adheres well.
- The glitter should cover the nail on all sides. You need to wait a minute so that they are well fixed in the top.
- Do not forget to organize the melange at the end, removing excess and protruding pieces so that it does not catch hair and clothes.
- You need to dry it 2 times longer than usual. Afterwards, brush off excess glitter with a fan brush.
You can also rub in melange and get a completely different effect. With this design, your nails will be smooth and will not cling to clothes.
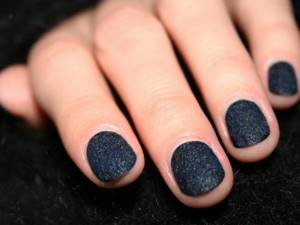
Sand effect varnish
A pleasant novelty in the world of manicure is sand nail polish. Sugar-effect varnishes contain small particles (often silicone grains of different sizes). They are the ones who create the effect of a rough surface on the nail plate. In addition, small sparkles are often included in the composition, thanks to which the manicure is obtained with a gentle shimmer.
Using this varnish is as easy as using varnish for a regular glossy manicure. Additionally, you will need a base for the varnish - the first thing to do is apply it to the nails. After this, shake the bottle of sugar polish so that the grains of sand are evenly distributed throughout the jar, and only then apply the polish to the nail plate.
To make your manicure look richer and more textured, apply sand polish in two layers. And in order to slightly smooth out the rough surface and further secure the manicure, the nails can be coated with a fixative varnish.
Sugar manicure allows you to create a unique structure on your nails, and the design looks bold and attractive. In this case, decorative sand can not be applied to the entire surface of the nail. The patterns covered with sand look stunning.
Stylish sand nail art ideas
After the long-awaited purchase, you can move on to the creative part and bring your ideas to life. A colorful collection of photos will inspire you to new experiments and unleash your imagination. Try to start with a solid color, because sandy nail designs look perfect with light and delicate shades of white, pink and peach. Sugar nail art also looks very impressive in black. If you want to choose bright, variegated tones like blue, green or red, you should keep in mind that such contrast is not always beneficial for a textured manicure. To make the sand nail design look new, you can apply a top coat, and the nail art will look very mysterious and alluring. The photo shows several variations of the original manicure.
Sugar nail design is not limited to just a monotonous finish. To create patterns, you can use sand varnishes of various shades. Try, for example, painting each finger in a different tone or focusing attention on two nails by making. You can very successfully combine a sand coating of the same shade with or without glitter. In addition, sugar polish can complement the patterns and pictures of regular nail designs. Look at the photo and choose the right nail art for yourself.
Ease of use makes sand nail polishes accessible to girls with different skill levels. Thanks to its original and attractive appearance, sugar manicure is becoming increasingly popular, and manufacturers are expanding their product range every year. In the final video, beauty blogger VashaNedasha will show you 2 luxurious shades of sandy Sahara Crystal nail polishes from. Experiment and always remain beautiful!
Sugar manicure at home
There are several techniques for applying manicure, it is better to familiarize yourself with each and then choose the most suitable option. The first way is as follows:
- Do a regular trimmed manicure, be sure to steam your hands in a warm herbal bath, push back and trim the cuticles, use a nail file to give them a better shape, and dry each nail plate well with a towel.
- Apply a protective base to your nails.
- Now scoop up a small amount of colored dye and make a couple of strokes on each nail. Most often, calm pastel colors are chosen - sand, beige, milky, soft plum, soft pink. Sometimes, on the contrary, strongly contrasting shades are selected.
- While the composition has not yet dried, quickly but carefully sprinkle granulated sugar on the nail and wait until it sticks completely. According to nail art masters, 10-15 minutes is enough for this.
- Next, use a hard miniature brush designed for working with nails to sweep away any loose grains of sand; if you need to make a pattern, form it.
- To make a sugar manicure last longer, it is advisable to seal the result with shellac, but this technique will not work if you want a 100% velvet feeling.
How to remove sand varnish?
Removing sand varnish is not an easy task. To avoid damaging the nail plate with prolonged friction, manufacturers suggest generously moistening a cotton pad with nail polish remover and pressing it firmly against the nail for a minute or two.
After this procedure, the sand nail polish should be soaked and removed from the surface without any problems.
How is the sugar coating removed?
The melange powder applied to the gel polish is removed like a regular gel polish coating. But it is better not to remove sugar varnish or regular varnish with a melange rub by simply wiping it off the nail, because grains of sand can scratch the nail plate.
Editor's choice: Nail design with design tape: ideas and recommendations for creating at home
To more carefully remove sugar polish from nails, remember how to remove gel polish. Soak pieces of cotton pads in nail polish remover and apply to your nails, wrapping them in foil. Keep the solvent for about 5 minutes, the varnish will soften well, and you can wipe it off with a light movement without causing injury to the nail plate.
Sugar manicure design is loved not only by fashionistas for its beauty and originality, but also by craftsmen for its ease of implementation. And many nail artists collect a portfolio of their own work, and it is this design that always looks great and is very clearly visible in the photo, without creating bright shimmers.
Creating an original sugar nail design
If you are bored with the traditional technology of creating velvet nail art, then use one of the tips from beauty specialists:
- The grains can be attached not to the entire nail plate, but to capture only part of it, for example, highlight the hole of the nail bed with velvet or apply it to the tip. Don’t be afraid to decorate with rhinestones - French and moon manicures require additional elegant framing.
- Saving material can lead to a result that you are clearly not happy with. When working with velvet sand, you need to understand - either sprinkle it generously, or not use it at all. Don't be afraid to get your fingers dirty - the particles can be easily rubbed off and fall off.
- Uneven lines, ornate patterns, monograms drawn using several colorful shades at once look very stylish and expensive.

Velvet Sand Stardust
Acrylic powder with glitter is rarely found on sale. But it's not difficult to add the desired shine yourself. It is enough to mix the powder with glitter of the desired shades and fractions. This velvet sand nail design looks organic if the main tone matches the tone of the glitter. But this is not important, it all depends on personal preferences. The step-by-step instructions are almost completely identical to the previous one:
- clean the cuticles and prepare the nail plate by treating with a buff;
- degrease nails and let dry;
- apply a base coat, dry under a lamp;
- coat your nails with gel polish of the desired shade, dry the first layer, do not dry the second;
- Sprinkling evenly, cover one or all nails with glitter powder;
- remove excess with a brush;
- dry your nails under the lamp, leaving the time twice as long as usual;
- There is no need to cover with the final layer or sealer.
Just a few minutes and the stardust on your nails will sparkle with a mysterious sparkle. The manicure will last at least two weeks.
Design with acrylic powder
The method is suitable for gel polish lovers. The procedure is simple and does not take much time.
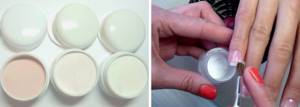
You will need:
- ultraviolet lamp;
- gel polish (color chosen at will);
- acrylic Powder;
- base and fixative;
- tassels.
The design is created in several stages:
- Upon completion of the hygienic manicure, apply a base coat, and then apply gel polish in 2 layers. Dry in a lamp between procedures.
- The last layer does not dry immediately. First, sprinkle the nail plate with acrylic powder.
- After drying, the final result is corrected with a brush, carefully removing excess grains.
- Apply a fixing layer.
Using this method of creating a sugar manicure, you can achieve a velvet effect. To do this, the patterns are first drawn with gel polish, and then the contours are sprinkled with powder, and all excess is removed with a brush.
Marmalade design
We will not deny that a marmalade manicure done with a gradient looks great. A smooth transition with a beautiful change of shades is perfect for the spring-summer period. Many girls like juicy, bright combinations, especially if lemon-orange tones are used.
How to apply melange?
I offer you a short video tutorial on how to perform this nail design:
Well, if you are interested in the intricacies of technology, I recommend that you read them below.
- We prepare nails for coating according to the standard scheme: we push back and remove the cuticle, remove the natural gloss with a buff and degrease with a special product.
- We cover the nails with a base for gel polish and polymerize in a lamp.
- Apply colored gel polish in two layers, dry each of them in an ultraviolet lamp for 2 minutes (in LED – 30 seconds).
- We cover the nails with top coat. On the nameless top, place pink pearls in a line in the center on an undried top, and then sprinkle generously with melange. It is convenient to do this either with tips with a stem over a jar of sugar to minimize its scattering. I also recommend putting a sheet of paper down first so that you can easily collect the spilled particles from it into a jar. On the middle nail, apply the top not to the entire surface, but in the form of a triangle near the cuticle with a design brush. We place the same pearls along its edges, and sprinkle melange inside. Now we send it to dry in the lamp.
- We shake off the particles that have not set in with a stiff brush and get the most interesting relief nail design.
Decorative elements and possibilities: how to use acrylic powder for nails
Modern manufacturers offer such a wide range of acrylic powder, ranging from grain size to colors and transparency, that it’s easy for even an experienced nail technician to get confused. They can have varying degrees of polymerization, contain glitter and neon particles, and have a matte or translucent texture. In order to finally understand how to use nail powder, you should first classify it for yourself and only then move on to more detailed instructions.
Matte or transparent powder
Both options are just right for modeling the shape and length of nails, that is, they are the optimal and widely used material for extensions. The powder will create the perfect base layer, which can then be supplemented with coloring pigment, glitter and other decorative elements. Acrylic powder of this type perfectly hides all the imperfections of the nail plate, is best suited for sculpting and creating an ideal tip, is quite easy to apply and dries quite quickly.
This type of acrylic powder consists of finely ground particles, which is why it allows you to create a nail that is practically indistinguishable from a natural one, neither in color, nor in texture, nor in thickness. True, you need to have some experience and skill here, but after doing a few experiments, anyone can learn this.
Acrylic camouflage or camouflage powder
If you need to slightly lengthen the nail bed or correct any nail defects, then experienced professional nail technicians prefer acrylic powder, which is not only easy to work with, but also has the highest quality results. Acrylic camouflage powder has a denser texture than regular matte or transparent powder, but its shade is closer to a real nail.

It is thanks to the beige, natural color of the powder that it is easy to disguise all sorts of flaws, thereby ensuring an ideal appearance. This powder will be indispensable for smoothing out unevenness, chips, broken and short nails, hiding white spots and any other defects.
Colored acrylic powder: how to use and why
Artistic manicurists know exactly how wide and varied the color palette of acrylic powder is on the market. If you really want, you can find almost any shade to create an original pattern, ornament, and even paint a whole picture on your nails.

Using colored acrylic powder, you can easily create any design you want to make your hands look unusual and stylish. This material is extremely flexible and easy to use. After drying, it is distinguished by enviable strength and durability. The technique of using colored acrylic powder does not require an additional fixing layer, since it is already quite “viable” in itself. Therefore, it does not weigh down the nail and does not make it excessively rough and thick.
Glitter and neon: how to use gel polish powder
In order to tint extended or corrected nails in an unusual and stylish way, acrylic powder with the addition of glitter, or, more simply, with sparkles, is very successful. They can have absolutely any color, and also come in different sizes, which is why the appearance of the finished nail changes significantly. With this powder you can create the effect of depth and shimmer, which looks extremely attractive and fashionable.

Another new product of the season is neon acrylic powder, which is based on an opaque substance that can glow beautifully in a certain light (ultraviolet) spectrum. This manicure looks simply amazing, but you don’t need anything special to work with it; the same monomers are suitable as for regular acrylic powder.
Application secrets
To make a manicure with sand polish stylish and durable, you should adhere to certain rules:

Always use a base coat, and before applying it, thoroughly treat and degrease your nails - this will make your sand manicure last much longer.- Choose only high-quality materials. Try to buy varnishes from trusted companies and be sure to pay attention to factors such as production date, expiration date, texture and amount of filler in the bottle.
- If you use sand, do not skimp on it - the product should be sprinkled on the nail plates in a thick layer. In addition, the powder should be lightly pressed onto the nail to better fix it.
- Always wait until the sugar nail polish is completely dry before applying sealer if you are working with regular polishes, and dry each coat thoroughly in a lamp if you prefer shellac.
- Experiment and give free rein to your imagination - combine several shades of varnish in your manicure, decorate one or more nails with sand, draw uneven lines.
Advantages of sand nail polish
- Quite easy to do
.
Painting a house is quite easy. If you resorted to combining sand with varnish, without buying a ready-made mixture in advance, then to cover the nail you will only need a napkin on which you place a small handful of sand and then carefully place each finger in it.
- Suitable for any age.
This is actually true! As we said earlier, sand gives the varnish a matte finish. Any color looks calm and expensive. Who doesn't love velvet? From one glance at it you get a feeling of softness, luxury and tenderness. It is these qualities that are adopted by those who use sand for manicure, or purchase sand varnishes right away.
- Durable.
Some will argue here. But in truth, if you sanded your nail well before polishing, your base was applied in 2-3 layers, which completely evened out your nail, then the sand will not want to fall off on its own. It all depends on you and on the remedies available at home.
- Enjoys versatility
.
This is undoubtedly true. With this manicure you can go out into the world, as well as go to work, take a walk with your child on the street, go shopping, or go on a date. Your fingers will look equally suitable in any situation. All you have to do is choose the right color!
- Available
.
On Aliexpress you can purchase 18 colors of 10 grams for only 2-3 dollars. In Moscow, the cost of one box of 10 grams will cost from 50 to 100 rubles. I don't want to take it.
How to remove sand varnish
Removing a coating that contains acrylic powder is much more difficult than regular varnish with abrasive particles. To remove it, you will need a manicure machine with cutters that will remove the top, hardened layer of acrylic powder.
In other cases, a special shellac remover will do the job. You will need foil, cotton pads and a little patience. Soak a small piece of cotton pad in the product, place it on the plate and wrap it in foil. You need to sit with this compress for more than 10 minutes for the material to completely move away from the natural nail. Then proceed to removal - remove the remaining material with an orange stick or pusher.
How to remove gel polish? EASY) Revealing secrets!
Powder for strengthening nails: indications for the procedure
So, who is recommended for the procedure of strengthening nails with acrylic powder?
- Firstly, for those with fragile nails that are prone to splitting. The thing is that acrylic, penetrating into the microcracks of the plates, polymerizes under the influence of UF radiation, and like cement, it holds together all the damage. As a result, nails not only become stronger, but also even correct serious “breakages.”
- Secondly, the procedure for strengthening nails with acrylic powder is a real salvation for girls with naturally thin plates. After all, long nails are simply contraindicated for them. They won’t necessarily break, but as they grow, they will definitely curl into a cone, thus spoiling the shape given to them during the manicure. And even gel polish cannot save this situation, but acrylic will create an additional layer of nail on the surface of such nails and thus it will become denser and harder.
Strengthening nails with acrylic powder, like any procedure, has its advantages and disadvantages. Let's consider each of them in detail, and you decide whether you should use such a procedure or not.
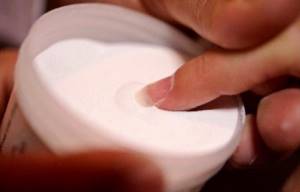
Photo from website: haiiro.info
The positive aspects of acrylic powder for strengthening nails:
- Strengthens nails.
- The plates look natural, without excess volume, as happens with extensions.
- Eliminates microdamage and cracks.
- Easy to correct.
- Simplicity of the procedure.
Cons of strengthening natural nails with acrylic powder
- Occasionally, acrylic also chips off the nail plate.
- A very complex process of removing material from the nail plate. It comes off only when cut down.
Important
Acrylic is difficult to remove in the usual way - using acetone-containing products. The material will need to be cut down. However, if handled improperly, this can lead to trauma to the nail plate with its subsequent separation from the nail bed. Therefore, when removing acrylic from nails, be extremely careful, and the closer the removed layer is to the natural plate, the softer the abrasive of the nail file should be.
Fashion trends
Fashion dictates its own rules and in order to be “in style”, it is advisable to follow its trends. This also applies to the nail industry. There are certain recommendations for implementing a particular design, although, of course, no one can stop you from experimenting. Here's how to best perform a knitted manicure:
- Use soft pastel shades; the pattern will be lost on a dark background;
- If you are not attracted to plain nails, knit in a different color - you will get a “sweater” in the Scandinavian style;
- It is absolutely not necessary to apply the same pattern to all the nails - you can decorate them with different knitted patterns;
- It is also not forbidden to paint your nails with gel polishes of different shades; the main requirement is their harmonious combination with each other;
- A knitted manicure on a matte surface looks very beautiful.