Joint creativity with children is a wonderful way to spend family time and engage in activities with loved ones. Making crafts, preparing costumes for creative evenings or games helps parents and children get closer and find a common language.
The origami technique can be used as a means of making crafts and organizing children's games. It does not require any special expenses. To make the figures you will need paper and a little patience. This technique of working with paper will allow the child to develop fine motor skills. It does not require scissors, which means the risk of injury to the child is minimal.
Adviсe
- Make the folds as precisely as possible. Consider using a scoring stick or ruler. Straight, precise folds are the key to success in any origami project.
- It's difficult. With practice, your claws will get better and better.
- Practice on thin, cheap paper before using any expensive materials.
- Some people may have very large or very small fingers. You can always use more or less paper, just follow the proportions.
- Buy black gloves at a thrift store or find old ones around your house. Cut off the ends on the fingers and place the claws on top of these gloves for a more dramatic look.
- You can change the color using black paper or even paints. Thick paper is harder to work with, but the claws will be stronger, and you will also have a wide range of color choices.
- Young children are more likely to need help.
Stages
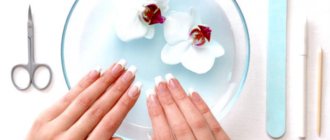
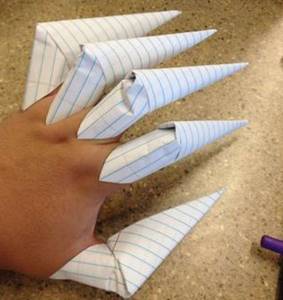
Using a manicure set, fingernails are prepared: they are trimmed, filed, and the remnants of old varnish are removed, if any. Then each individual nail is drawn on good quality paper, even with a margin of size, so that later it won’t be a shame if it turns out smaller than needed. The drawn designs are cut out very carefully. Finger nails are coated with transparent varnish. It can be easily removed later if necessary. The long-awaited moment has arrived: the prepared paper nails are applied one by one to the prepared girl’s hands. They need to be held for 15 seconds, pressed against the surface of the fingers. Here's how to make paper nails. For girls, this is not only a fun activity, but also a source of pride. You can show your work to a friend or mother.
Manicure technique with tape
Prepare your hands for a manicure using tape in the classic way. Next, follow the following steps step by step:
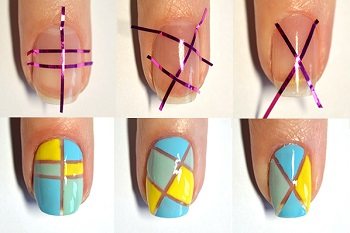
Manicure process with tape
- Apply a base colorless composition under the varnish . Let it dry completely.
- Next comes the main color varnish . Make sure this layer is thoroughly dry. To speed up the process and ensure reliability, use a hair dryer.
- Use tape to create your design on the plate . Avoid applying tape to the nail edges and cuticles. In these places the strips do not adhere well to the surface.
- Paint the open part of the plate with another varnish . Give the varnish time to dry completely.
- If you perform a manicure with gel polishes, then initially the nails with tape are dried in a lamp for about 10 seconds, then the tape is removed from the nails, and the coating is polymerized in the lamp for the remaining prescribed time.
- Carefully peel off the self-adhesive strip and secure the design with a fastening base.
Beautiful manicure done with tape
A manicure using tape is ideal if more than two hours pass between the first and last stages of applying traditional varnish.
If you want to not only make, but also decorate a manicure using tape, pay attention to the video tutorial:
Progress
Below is a description of how to make nails out of paper:
- A sheet is taken.
- On the left corner it folds diagonally.
- Then the same must be done on the right side.
- Once again, the sheet is folded diagonally from the same corner.
- On the right side, the figure bends in half and begins to resemble a house.
- The bottom left corner is bent.
- The same is done on the right.
- The result is a rhombus that needs to be folded in half.
- Now the task is to give the nail a shape, for which an angle of 30° is bent in a circle. This is done 3 times in a row.
- The last corner is wrapped and inserted inside, fixed.
- The nail is given a voluminous appearance and a pocket is made directly for the desired finger.
Preparation
To develop curiosity, imagination and independence, mothers can tell their daughters how to make paper nails with their own hands. You need to prepare the necessary material and help the child in the process. Girls absorb such lessons quickly. But I must say that such an activity can be interesting for boys too. If you also consider how they like to imitate their favorite fairy-tale characters, then the desire to learn how to make nails out of paper is completely justified.
How to remove tips
The overlays must not be torn off, otherwise the nail plate will be injured. To remove tips, use a warm bath. Under the influence of water, the glue quickly dissolves, and the plastic plates easily come off the nail.
To remove tips from a child’s fingers, you need to:
- Immerse your hands in warm water for a quarter of an hour. If the tips have not come off, then drip nail polish remover under the top of the artificial nail.
- Carefully, without making sudden movements, pry the plastic plate off the cuticle and separate it from the natural nail.
- Remove any remaining adhesive with nail polish remover.
To restore and strengthen the child’s nail plate, you need to rub nourishing oil, which contains vitamin E and A, into the surface.
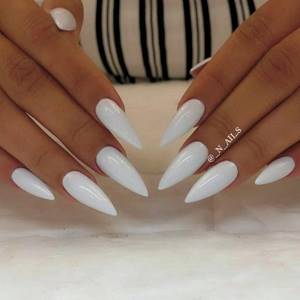
Types of artificial nails
There are several types of artificial nails - acrylic or gel extensions, as well as plastic false “claws”. However, for many young girls, all these types of nails are not available due to the high price of the procedure, and some simply do not have enough time to go to salons.
What to do if you want to have beautiful, well-groomed hands, but for some reason it is not possible to visit a specialist? There is always a way out, don’t despair. So, today we will tell you how, using simple steps, you can make artificial nails out of paper at home.
Yes, yes, exactly from paper, this is not a typo. Believe me, this type of nail art will have its young fans, for whom the procedure of creating nails from paper will be a most exciting activity.
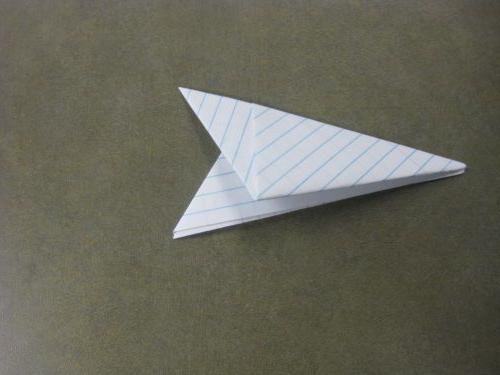
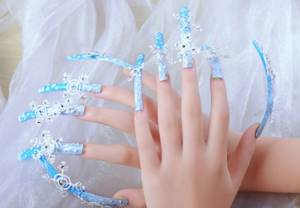
Sophisticated claws
This type of false nails requires a lot of effort, time and material. One sheet is needed per element, but in the end the claws look incredibly realistic.
Manufacturing:
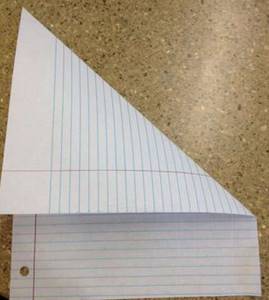
- Place the sheet horizontally towards you. Bend the lower right corner of the sheet so that its lower part is in contact with the side. You will get a corner that needs to be bent so that it touches the top corner.
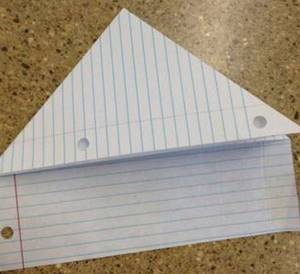
- You should end up with a square with an uneven side. It must be folded so that the workpiece lies flat. Fold both upper corners diagonally towards the center to form a triangle.
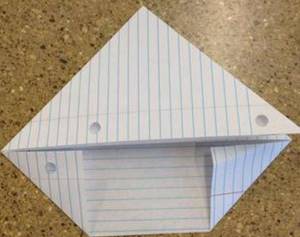
- The workpiece should be turned over and the center line should be roughly determined. The right part should be folded in half so that its edge is on the fold, after which we wrap it to the left.
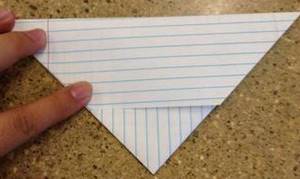
- We fold the side that is on the left as well, but its corner must be hidden in the pocket that has formed. Now the fake can be straightened and it is ready.
What will you need?
First of all, you need to prepare the necessary tools:
- desired set of false nails;
- glue;
- orange stick;
- alcohol wipe or nail degreaser;
- dry wipes and cotton swabs;
- regular base varnish of any color;
- buff;
- medium hard nail file;
- bath with hot water.
top_master_krd
_n_ail.s
_n_ail.s
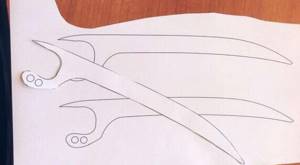
"Glove"
This is a rather original way to make nails out of paper. On colored sheets, hands are outlined 2 times each with sufficient allowance: on the sides and in the area of the fingers. You need to remember that after the parts are glued together, you will need to squeeze your hand in there without the form breaking. The resulting workpiece must be cut carefully. Using glue we connect the parts. If desired, you can make a cuff prepared in advance according to the size of the hand above the palm, so that the glove looks like a real one. After complete production, the craft is decorated as desired: multi-colored parts are glued on, all kinds of appliqués are applied, you can use a geometric composition, or a floral one. Someone might want to paint their paper product. Here everyone turns on their imagination and ingenuity. You can add beaded decorations or stick on a finished design. Whatever option is chosen, the main thing is that it is chosen independently, to your liking. So, imperceptibly, by actually playing, you can lead your child to mastering how to make nails out of paper.
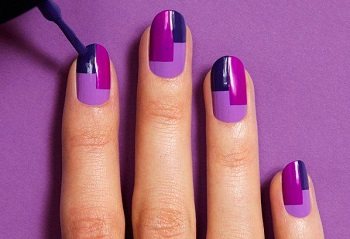
Execution technique
Performing a manicure is no different from traditional approaches. First you will need to remove the old coating, file and polish your nails, soften and remove the cuticle.
Features begin at the plate design stage:
- Apply base coat.
- For the chosen design, place tape on the index and ring fingers just above the center line of the nail. Carefully attach the ribbon along the edges so that the enamel does not spread during application. Do not cut the tape too close to your finger, leave a piece that will be easy to pull.
- Apply colored polish flush to the cuticle, without extending beyond the edges of the sticker. It's okay if the color gets on the tape. It precisely serves to ensure that the area underneath remains untouched.
- With a quick and precise movement, peel off the ribbon before the varnish has time to dry.
- Paint the remaining empty space with a different color.
- After the enamels have completely dried, carefully apply tape at the junction of the two paints.
- Cover the result with two coats of sealer varnish.
The detailed process is shown in the video. This work looks stylish and elegant. Brilliant ribbons add a “zest” to the creation; without them, nail art would be too boring.
Tapes can be attached in any order and direction. We have presented the simplest option, having mastered which you will be able to create complex geometric patterns, turning any fantasies into reality.
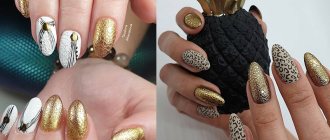
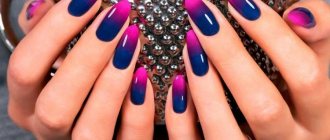
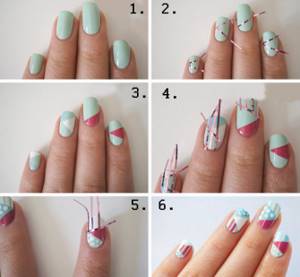
A few photo instructions:
Number 1
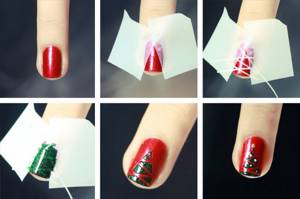
Number 2

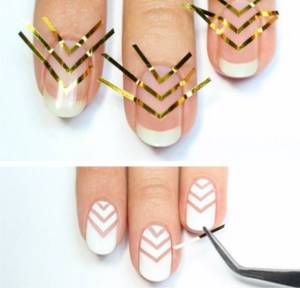
Number 3
Current design trends
The most current trend this season continues to be minimalism. Plain plates without unnecessary decoration are considered a classic solution. Successfully fitting into any image, they do not draw attention to themselves and look laconic and elegant.

Another popular trend in manicure is tattoo pictures. They are placed not on the ring finger, as they did a couple of seasons ago, but on the thumb. It looks more trendy and interesting.
The latest trend is neon. Originating on the Milanese catwalks, it smoothly flowed into the nail industry. Bright neon polishes are perfect for summer.
Subsequence
A child’s desire to learn how to make nails out of paper will intensify if he has already seen them from someone before or watched some favorite children’s film with a monster who had huge claws, or a princess with neat and well-groomed hands. Depending on the desired shape of the craft, the manufacturing method is also selected. If you want to have very long nails, they are simply connected to each other using glue. The material will be a regular sheet of medium density (for example, notebook paper). You can take white, or you can take colored. Children who love to play vampires also get black nails. However, this is a matter of taste and momentary preferences.
brief information
Origami is a technique for children of any age and even adults. She is so captivating that anyone, even the most restless child, will definitely become interested in her. After all, with the help of this technique you can quickly make your favorite toy and play with it. Origami is known all over the world and used from various angles. Using this technique, with a minimum set of tools and materials, you can make not only toys, but also other items, original crafts, etc. How to make nails from paper? Further in the article there will be small master classes.
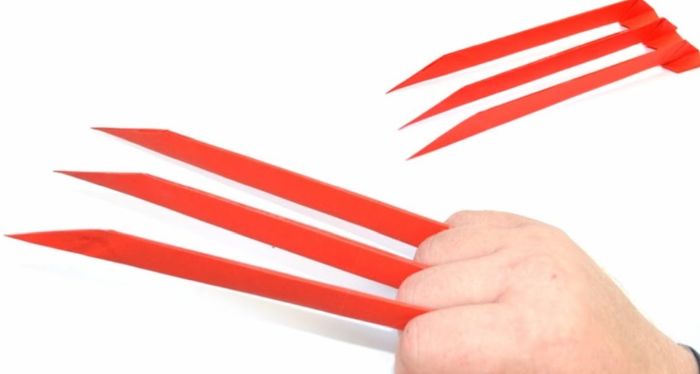
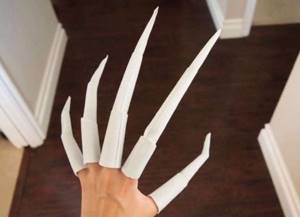
How to make long claws out of paper?
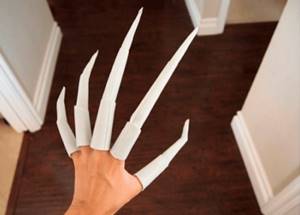
Such claws turn out to be thin and long. They are perfect for an animal image or creating a monster costume, Baba Yaga.
Required details
To create claws you need to prepare:
- paper, it should be large so that you get really long claws;
- scissors;
- a simple pencil for drawing.
Stages of working on claws
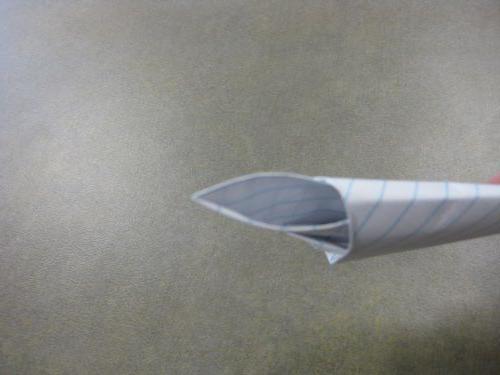
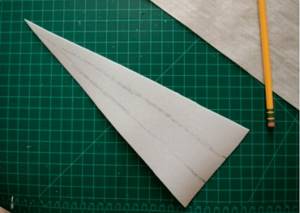
A sharp triangle is drawn on the sheet, as in the photo. Afterwards, it should be cut out. When calculating the base of the workpiece, focus on the diameter of the finger for which you are making the claw.
Roll the workpiece into a cone and seal the edge. This is done carefully so that the final result is more naturalistic.
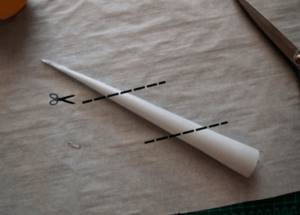
When the glue dries, you need to divide the claw into three parts in order to bend it. Use glue to assemble these parts.
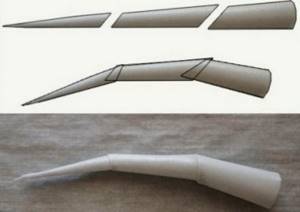
Do this with all the claws. The result is such a terrifying paw.
Cube assembly
Once the development is ready, it must be cut with scissors. The connection can be made with any glue or double-sided tape. To ensure that the edges of the square are even, each fold line must be bent several times before gluing. Now the pencil drawing can be erased so that the cube has an aesthetic appearance. Depending on the purpose for which the craft is being made, it can be decorated in different ways: covering it with shiny glossy film or colored paper, painting it with watercolors or gluing bright stickers.
DIY wolverine claws made of paper: turning into a superhero
Perhaps, one of the favorite characters of all guys is Wolverine. He is brave, strong-willed and most importantly, he cannot die. Who wouldn't want to feel like such a superhero? Unlike Freddy Krueger, Wolverine has only 3 pairs of claws, so you will have half as much work. Now we will analyze a small master class and, finally, learn how to make Wolverine’s claws from paper.
If you like watching movies and reading various comics about Wolverine, then you probably know that he is considered to have a very cool “manicure”. So we will create spectacular and strong claws from high-quality paper.
For work we will need the following materials:
- Ten sheets of A4 paper.
- Long ruler.
- Bending tool
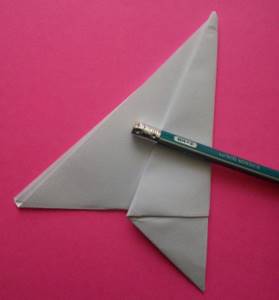
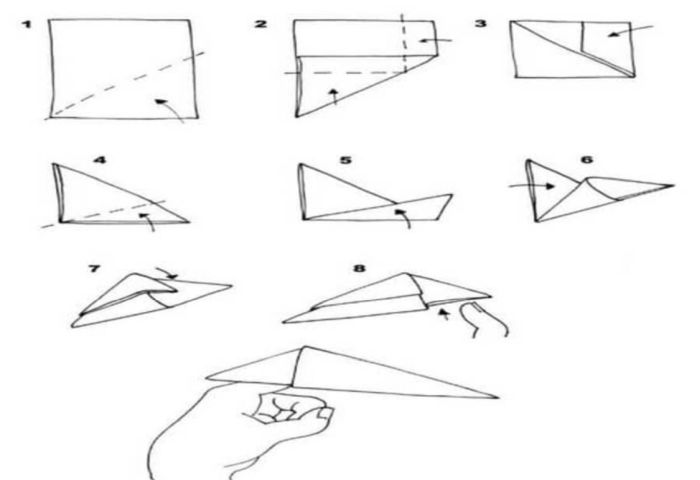
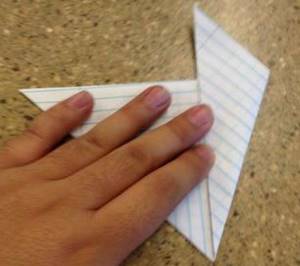
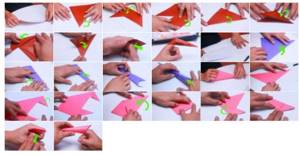
Description of creating origami:
- Place a piece of paper vertically on a flat surface and bend the top right corner to the left until you get a sharp corner and the top edge of the sheet is level with the left.
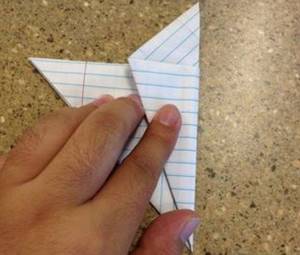
- Fold a sharp corner to the main part of the leaf (the left corner of your leaf should coincide with the lower left corner). We will bend the uneven edge that will peek out into the middle. You can roll it into a square shape.
- Let's fold the created square diagonally so that we get a triangle. The right corner of such a triangle should float upwards away from you.
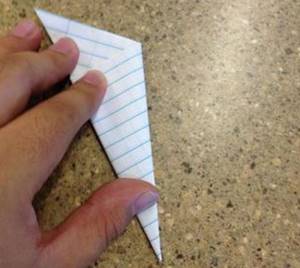
- Let's find two combined faces of the triangle; we don't touch the separate four layers of the leaf for now.
- Let's add a vertical line created from the tip to the middle of the base of the triangle.
- Let's expand the triangle, and fold the edges into the center, aligning them along the folds. The folded corner should extend beyond the edges of the base of the triangle.
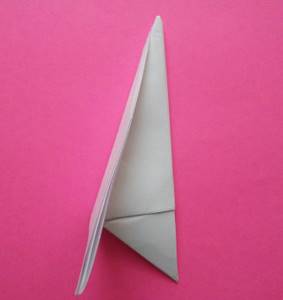
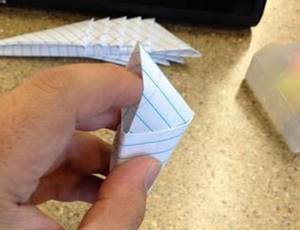
- Fold the created figure in half lengthwise, without losing the line of the claws.
- Let's fix the shape by turning the extreme corner inward of the product and try on the finished claw.
- For a more visual example of creating a craft, it is best to watch the video materials.
First, the blogger developed a drawing of the claws using a 3D modeling program, suggesting that the length of the product should not exceed 20 centimeters. In the diagram, the guy even made small indentations so that they resemble the phalanges of the fingers.
Origami. Paper claws
Using the origami technique, Wolverine's claws are not difficult to make. It’s convenient to make the first preparations together with your child. If origami claws are made for all 10 fingers, then you need 10 sheets of A4 paper. A child can, together with an adult, fold all the sheets for the first time, and then observe and participate in the process of adding the parts.
Using the origami technique is possible using cardboard, but for beginners it can cause some difficulties, since cardboard is much more difficult to fold.
Children can prepare the simplest crafts themselves.
You need to take several sheets of paper, scissors and tape. Small paper squares are rolled into a cone and secured with tape.
Using scissors, the resulting cones are cut diagonally so that they fit each finger.
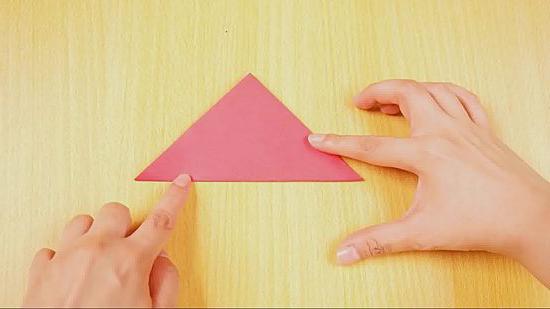
Stage-by-stage execution
A sheet of paper is folded from the right corner to the opposite so that there is free space on the edge. You should get a triangle. From the remaining free sheet, each corner is folded again so as to form triangles.
Then the sheet is folded up to 2/3 of the sheet so that the upper part of the large triangle is free. Then the sheet is turned upside down with the resulting triangles.
The sheet on the right side is folded to the middle. The resulting section is folded twice more, and then the free corner of the triangle is tucked into the resulting pocket and folded over.
The resulting valve is a place for putting the resulting product on the finger. If desired, they can be painted or varnished.
The considered method is the simplest. There are several other ways to make these claws with your own hands. To make it you need: paper, scissors, glue or glue gun, pencil.
If desired, you can use special origami paper - kami - as a base. It differs in density, size, color: one side is white and the other is colored. More dense - suitable for the “wet” folding technique. A glove can be considered as the basis for fastening. The claws are glued to it for more secure attachment.
A triangle is drawn on paper of the same height as the claws are planned to be made. The width should correspond to the circumference of the fingers. Each finger is measured separately. 5 mm is added to the result obtained, which is used to secure the edges.
The resulting figure needs to be cut out and projected onto hard paper and cut out again. And roll the resulting triangle into a cone and glue it together. A glue gun is best suited for this process.
You need to try the cone on your fingers, make diagonal marks along which to cut the cone and glue the edges inside the product. You can put them on your fingers or glue them to your glove. It all depends on the costume and the desire of the child.
Wolverine has special claw designs. You can also make them using the origami technique. Their main difference is the length, number and fastening to each other.
The technique is quite simple. A sheet of paper is folded in the center and unbent. The lower part of the sheet is folded in such a way that there is an indent of 5 mm to the resulting center line. You need to fold the remaining half of the sheet like this. We do the same with the top half of the sheet. We fold like an accordion, starting with an indentation of 5 mm.
In a rectangle, the outer ends are folded into the center to form a triangle. You can tuck this number of times. To get the sharpest “blade”. When performing work, be sure to work out the edges well. The resulting claws are glued to the base and you can go into the game.

For girls, you can also prepare nails from paper. To do this you will need a sheet of paper, office glue, small scissors, varnish, and glitter if desired.
First you need to take measurements from each nail. Then prepare the templates. You can do your nails in three or four layers. The more layers, the denser the coating you get. Having prepared all the layers, we proceed to gluing.
The paper template is glued to the nail plate itself in the same way as each subsequent layer. It is advisable to leave them until completely dry and only then cover them with varnish and fixative.
The hardness of the coating is formed due to multi-layering. You can attach four layers of paper to one nail, which are glued on top of each other and, due to impregnation with glue, become harder, and the nail is secured by coating it with varnish. Such nails can withstand a noisy children's game or holiday.
If desired, such nails are covered with sparkles, beads, stars or other decorations.
French manicure using tape: an elegant classic style!
The always fashionable French manicure - French - can also be done using tape. It's not easy to do accurately. But if you practice a little, you will definitely succeed!
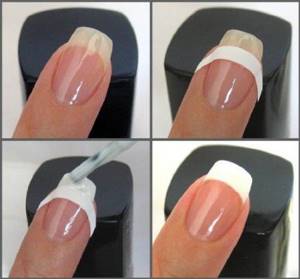
Special white stripes for French jackets are not always available at home. And tape will help out at any time! It will be more difficult to make the tips of your nails in the shape of a smile, but a straight line looks very good, especially on short nails.
Read also: Vaccination against measles, rubella, mumps
The technology for performing a French manicure is not much different from the classic version:
- apply base coat;
- cover the nail with the main color;
- stick the tape on the nail, leaving a thin line from the edge;
- paint the tip of the nail with white polish;
- carefully remove the tape;
- cover the nail with a transparent fixative;
- You can use decor: small shiny details.
Do not forget that each layer of coating must dry thoroughly. The tape must be glued tightly so that the varnish cannot get under it.
Some girls prefer to do the reverse French, when the tip of the nail is sealed with tape, and the lunula, the part of the nail close to the cuticle, is covered with a different color of varnish.
In order to make the edge of the nail in the shape of a smile, women have come up with a secret method. You need to take a small round lid, for example, from a varnish. Place tape on it. Use scissors to cut the tape along the contour to create a semicircle. Make the same pieces for all nails. Apply semicircles of tape to nails coated with the base color so that the tips remain open. Paint the tips of your nails with white polish, wait until completely dry and remove the tape. The result is a smooth and neat French manicure!
At what age are false nails acceptable?
False nails for little ones
The later a girl starts using nail polish, the better. It’s good if the mother controls the composition of the product that her daughter applies to her nails. Children's varnish should not contain formaldehyde and toluene.
False nails for children are a good alternative to polish, but they have their drawbacks. This is fashionable, you can choose them for any event: for the holidays, for the time of year, for your mood. They can be long, short, round or straight. But, in order not to harm the nail plate of children, it is better to wear them for a short time, not constantly.
The false nail and the natural nail are firmly attached to each other with glue. In case of damage to the upper artificial nail, a moist environment is formed in the layer between them, favorable for the development of infection. When wearing false nails for a long time, the infection is invisible, but can lead to serious consequences (fungus, etc.).
Artificial plates dry out natural ones, thinning them and making them brittle, which is not beneficial. In addition, gel and glue can cause an allergic reaction, which leads to various types of inflammation of the nail bed. The time when false nails will cause less harm comes at the age of 14-15 years.
Advice. Nails for girls 12 years old can be decorated with thrips of different types. Fortunately, there are entire sets on sale, complete with glue and false nails.
Thrips of different sizes
Caring for children's nails
Manicure for the little ones is limited only to cutting nails and removing hangnails. In this case, you need to not make the edges too small and cut your nails in a rounded shape so that sharp corners do not form.
When performing the procedure, you should be careful and not cause pain to the child. If it happens that blood starts to flow, then a very small child needs to apply a bandage soaked in hydrogen peroxide to the finger, and for an older child, apply a bandage. Keeping the bandage on the wound is enough until the bleeding stops completely.

Caring for children's nails
If an abscess appears on the nail, apply Levomekol and secure the bandage. When it happens that the nail was not cut quite correctly, ingrowth into the skin can occur. In this case, the best remedy would be a bath with furatsilin (1 tablet = 1 glass of water), in this solution you need to keep the ingrown nail a little. If inflammation occurs, brilliant green will help. If the ingrowth turns out to be deep, then it is better to visit a doctor.
Important! Cuticles should not be cut on children. The maximum is to push it away with an orange stick if there is a strong build-up.
Basically, active interest in manicure appears after 4 years. It is better to push back the cuticle while taking a bath, when the fingers are best prepared for this; steamed skin yields more easily and does not cause discomfort to the child. This will help save you from a lot of hangnails, when the nails begin to grow faster, the skin does not have time and reaches for them.
The child must understand exactly how to cut and care for nails, be able to use scissors and a nail file, and regularly use cuticle and nail oil. The oil is useful from the age of 4 years - it nourishes the nail and helps it grow beautiful and healthy. Home treatments are no less useful than salon treatments.