Rating: 5/5 (8)
The life of a modern representative of the fair sex consists of a constant search for an original, new and unforgettable image. A manicure is at first glance an insignificant, but in reality a very important detail that can highlight your beauty, add the finishing touch to your look and complete your look . Ordinary standard varnishes are almost a thing of the past, as the modern nail industry has offered us a more effective and durable product - gel polish.
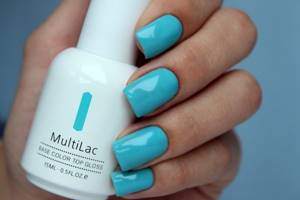
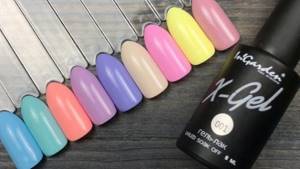
Gel polish is an undeniable favorite in nail care - keeping your hands well-groomed and tidy has become much easier and simpler, and its unique strength allows you to maintain the original attractive and fresh appearance of your manicure for up to three to five weeks . In addition, the gel polish has a multifaceted palette of color shades, which allows you to create absolutely any fashionable design on your nails. Also, which is important, various decorations in the form of rhinestones, beads, patterns, and so on are glued to the gel polish very firmly and for a long time.
Manicure with gel polish gives your nails a neat appearance, strengthens them, prevents delamination and, most importantly, has high durability. At one time, I couldn’t get enough of the appearance of such a unique product, and today I decided to share my knowledge about it with beginners. I propose to jointly consider all the pros and cons, as well as analyze in detail the basics of manicure done with gel polish, including training lessons on video.
Application technology
Compliance with the rules is mandatory. Failure to follow this procedure will cause the varnish to chip, become stained, or lose its shine. The technology has been thoroughly developed for a long time - you just need to carry out the required manipulations step by step. The procedure can be carried out at home - if you have the necessary materials and tools.
Completion takes at least 30 minutes. This is the case if one color is applied. If you need to apply a lot of tones, create a jacket, a pattern, attach rhinestones or sequins, the process will take about an hour (plus or minus 20 minutes). The cost of a complete set of items for application is about 4 thousand rubles.
Application
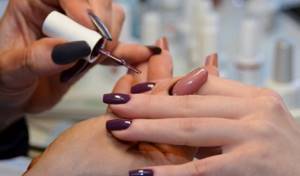
Below is a video tutorial on how to apply gel polish to your nails; the instructions essentially duplicate it and streamline it a little. Let's say right away that the manicure may not be perfect the first time, but after several training sessions it will be as easy for you as painting your nails normally. Except that, due to the many stages, it will take longer.
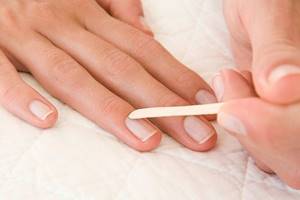
- Do a manicure in the usual way - push back the cuticle, trim the free edge of the nail, etc. After this, it is advisable to wait a couple of hours. During this time, excess moisture will leave the nails;
- Sand the plate thoroughly. For this purpose, a buffer of medium abrasiveness should be used. You should not make the plate too thin, but you should also not leave it uneven - the gel will not adhere well. It is better to carry out movements from top to bottom, perpendicular to the free edge;
- Degrease your nails;
- Apply a drying agent (primer). Wait a little (no more than 5 seconds);
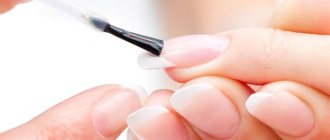
- Apply clear gel. There are no specific instructions on how to properly paint your nails with gel polish. We apply it like an ordinary varnish, retreating about one millimeter from the edges of the plate and cuticle. This will make your manicure look neater and last longer;
- Place your hands under the lamp. It is necessary to keep them there for no less than the time specified in the documentation for the coating. Also, this time will depend on the thickness of the layer you applied. It is recommended to apply the base quite thinly, and therefore 60 seconds is usually enough, however, we recommend increasing the exposure to 2 minutes;
- Remove the sticky layer with a lint-free cloth. Just erase it;
- Apply colored gel. Usually one coat is not enough. The color may appear faded and unsaturated. It is recommended to first apply one thin layer, which must be dried under a lamp for 1 to 2 minutes;
- Remove the sticky layer;
- As the video tutorial on manicure with gel polish shows, apply a second layer. Dry it similarly to the previous one and also wipe off the sticky layer;
- Apply topcoat. This coating is a clear and liquid gel. An ordinary top will not work here. You need to apply a thin layer, and then put it under the lamp for 1 - 2 minutes.
Now the manicure is ready. Let us remind you that when painting it is important to seal the tip of the nail. If you neglect this rule, the manicure will last less.
[yandex2] [google2]
Step-by-step instruction
- Treatment of nail plates. The cuticle is removed and given the required shape. You can do a manicure first, then the plate will need to be thoroughly dried, treated with a dehydrator (degreased), and treated with a disinfectant.
- Formation of a free edge. The upper part is given the selected shape using a nail file. Gel polish is applied to nails of any length - short, medium and long.
- Grinding (sawing). The upper part of the plate is cut off with a grinder to ensure adhesion of the gel coating to it.
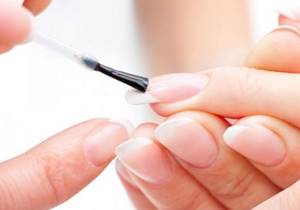
- Applying the base. The base gel is sold separately or together with the top coat. Apply the base in a very thin layer, as if rubbing it in. The end part is carefully processed.
- Hands are dried in a UV lamp. Average time 1.5-2 minutes.
The optimal period of ultraviolet treatment should be determined according to the recommendations of the product manufacturer for each specific brand individually. Finally, remove excess moisture with a brush or woven napkins. Gel polish is applied carefully with careful up and down movements. The end part must be painted over to avoid chipping in the future. The product is applied in two layers, each layer needs to be dried in a lamp for 1.5-3 minutes. Usually one hand is placed in the lamp, while the artist paints the second hand. - Finish coating. The top (finishing) layer completes the procedure. The fixative is applied to the entire surface, including the end part. The top layer is also dried in a UV lamp for about 2 minutes.
What is gel polish, its types
Gel polish is a unique cosmetic product designed to cover nails. It is a hybrid combination of classic nail polish with modeling gel. At the same time, it retains only the best properties of the above-mentioned components.
Covering nails with gel polish provides their owners with the long-term effect of a beautiful and well-groomed manicure.
Color and design can last up to 4 weeks. This is explained by the presence of a dispersion medium in the composition of the drug, which forms a checkered film on the nails. Thanks to it, the gel polish adheres to the surface of the nail as well as possible and lasts for a long time. The uniqueness of gel polish coating is that it is great for natural nails and artificial nails (extensions).
Gel polish coating for beginners is one of the best developments in the beauty industry for nail care in recent years. Residents of Europe were the first to appreciate this product 15 years ago.
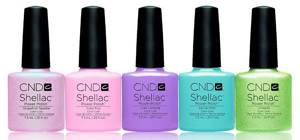
Nowadays gel polish is very popular both among famous beauty salon masters and among ordinary girls who want to get a beautiful manicure at home. In the popular environment, gel polish is called “shellac”. Since the pioneers in Russia were the Shellak CND brand.
Distinctive properties of gel polish:
- High durability. It can stay on nails for 2 to 4 weeks. This is why it attracts a large number of fashionistas who want to wear a fresh manicure for a long time.
- Nice composition. Most often, it contains hypoallergenic substances that reduce the risk of harm to the nail plate. Many brands take care of their customers and add useful strengthening and nourishing components to their composition.
- Color saturation. Unlike regular polish, gel polish does not lose its pigmentation. When properly applied, the coating does not become cloudy, does not wear off, and is resistant to chips and scratches.
- Ability to withstand household loads. Any girl has frequent contact with water, various detergents and household products. Gel polish, hardening upon application, creates a dense film on the nails that does not destroy the manicure.
- Simple application technology. Gel polish is applied quickly, painlessly and dries for a short time under a special lamp. Anyone can create the perfect coating using gel polish.
Gel polish composition:
- A photoinitiator is a molecular compound that absorbs UV radiation. Thanks to it, the gel polish dries quickly under the influence of ultraviolet rays.
- A film former is a chemical component that provides a durable coating and prevents its destruction.
- Thinners are esters, monomers that are used to maintain optimal consistency. So that the texture of the gel polish is moderately viscous and ensures tight adhesion to the nail plate.
- Coloring pigments are organic or inorganic components. The density of the coating and the saturation of shades depend on them.
- Various additives and fillers allow gel polish to strengthen and nourish nails.
According to the application system, there are three types of this product:
- Single phase. To create a manicure, you only need a tube of colored pigment and nothing else. The coating is not permanent, great for strong natural nails. With the help of a single-phase gel polish coating, novice nail technicians can easily create a manicure.
Single-phase gel polish coating is great for beginners. - A two-phase product implies the application of a top (fixing) coating after applying the color. Two-phase products are rarely found in beauty salons, as the effect leaves much to be desired.
- Three-phase gel polish involves three stages of application. The first is the base coat, followed by the color pigment, and the final stage is the top coat. This system is the most reliable and in demand. Because the result is the most durable and practical manicure.
How to remove?
The easiest way to remove the product is in the salon with a specialist. A master can remove a “tired” manicure without injuring the plate. The procedure will take 30 minutes.
Quite often situations arise when you urgently need to get rid of the gel and there is no way to get to the salon. You can remove it at home. The main thing to remember is no rush. It is impossible to remove it quickly. Even acetone liquid takes it with difficulty. It’s good when someone helps during the procedure - it’s difficult to wrap your fingertips in foil yourself.
Tools and materials
- Acetone-containing liquid.
- Cotton wool or cosmetic sponges.
- Orange stick.
- File.
- Grinder.
- Pieces of thin foil measuring approximately 5*5 cm.
You can ask the salon what product was used and purchase a remover to remove it from the same manufacturer. There’s no need to worry too much – regular liquid will do.
First you need to apply nail polish remover. To do this, you need to make circles of cotton wool or sponges and generously moisten them with liquid. Some people immerse their fingertips in a glass of liquid for 15 minutes. “Lotions” are applied to each finger in turn and immediately wrap the nail with foil. Keep the compress for 15 minutes.
After compresses, gel polish softens and hangs in rags. It must be carefully scraped off with an orange stick or the blunt end of a nail file. The hardest part is to remove the base - you will have to remove it with a sander. After this, you need to treat the cuticle with oil and massage each finger.
What is required for a manicure besides gel polish?
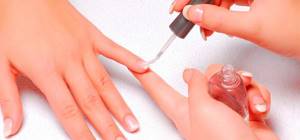
To apply gel polish to your nails, beginners need the following tools:
- Hand sanitizer. It disinfects hands, nails and cuticles.
- Primer (base) – it degreases the nail plate, ensures tight adhesion of the natural surface of the nail to the gel polish, thereby extending the life of the manicure.
- Base coat (first layer) – evens out the nails and hides their minor imperfections. It also prepares the surface of the nails for applying the main color.
- Colored gel polish.
- Top coat is the final stage in manicure. The top protects nails from external environmental influences, from chips and scratches.
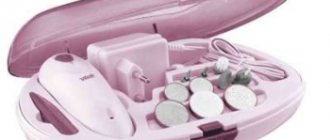
- Special lamp for drying. The main task of the lamp is to dry the gel polish as quickly as possible. It all depends on its power and variety.
| Type | Characteristic |
| UV lamp | Budget price, ability to dry not only one hand, but two at once. Maximum power – 36 W. Drying time is over two minutes. |
| LED lamp | LED lamp. Drying time: 1 minute. |
| Hybrid | Combines only the best qualities of the two previous lamps. |
- Matching nail files. They allow you to carefully process your nails and create the desired shape (almond, oval, square, soft square and others).
- Buff is one of the types of nail files. It is used at the initial stage of manicure and for removing gel polish.
- Tools for removing cuticles. These include: special gels for softening and removing cuticles, orange sticks, tweezers, manicure scissors.
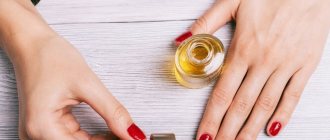
- Cuticle oil. To make the skin along the nail look well-groomed and neat, cuticle oil must be used during the manicure process. It should be rubbed in with massage movements until completely absorbed.
- Nail degreaser. It removes the sticky layer after using gel polish.
- Gel polish remover, foil and cotton pads. With the help of these media, gel polish is removed quickly and painlessly. The solution is applied to a cotton pad, which must be pressed tightly to the nail and wrapped with foil on top. After 10-15 minutes, the old layer of gel polish can be easily removed from the nails with an orange stick.
Advice from professional craftsmen
- During the first two days you need to be careful, especially during procedures with hot water - the product still dries out.
- Gel polish can withstand exposure to water, household chemicals and even nail polish remover. The only thing is that a long stay in hot water causes the top layer to soften and a specific smell appears.
- You cannot cut or file your nails, but you can remove cuticles and growths and perform normal hand care.
- It is not safe to use this design continuously. The optimal ratio of using gel polish and “rest”: 3 months of use (apply the product 4 times for a period of 3 weeks) and your hands need a month of rest. During the recovery period, it is recommended to use care products to saturate the nail with nutrients.
Masters and those who have been using gel polishes for a long time recommend “wearing” it for 3 weeks, after which it is better to change it!
How to choose gel polish
To cover nails with gel polish, beginners should focus on the following points when choosing a product:
- Professional grade compounds. Such products contain fewer chemical components and more natural ones, which have a beneficial effect on nails.
- A large number of professionals (beginners and professionals) give preference to well-known brands on the world market (Shellak CND, Beautix UV Gel, BOHEMIA APEX GEL), which have long been able to win the trust of girls. There is no doubt about their quality.
- Price. Low price is not a guarantee of good quality. Most likely, this coating using gel polishes is suitable for beginners. Craftsmen interested in providing high-level services should pay attention to more expensive materials.
- Color palette. It should be varied. So that you have plenty to choose the right shade from. But remember that bright colors require 2-3 layers. Accordingly, the product consumption will be greater.
- Easy to apply gel polish and easy to remove from nails. A high-quality product will be evenly distributed over the entire surface of the nail and dry quickly under the influence of UV radiation. In addition, it should be removed even faster after its life cycle (from 2 to 4 weeks) using a special liquid.
Where can I buy?
You can purchase the product in specialized stores that sell products for beauty salons. There is a sufficient number of high-quality products that beauty salons use: CND, KODI, Masura, Bluesky, ruNail.
Among the best, manicurists call professional gel polishes Shellac and KODI.
Shellac is produced by CND. Shellac not only creates a professional finish, but also strengthens thin, brittle nails. The composition of the product includes a moisturizer, vitamins, minerals and caring substances. Shellac retains its plasticity despite its durability. For removal, a harmless product is used that safely removes it within 10 minutes.
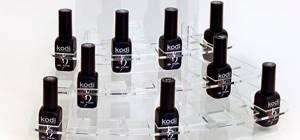
KODI gel polishes are becoming increasingly popular due to their high durability, aesthetics and a huge variety of varnish colors. When using KODI, there is no need to file the nail plate.
This video demonstrates in great detail how to properly apply KODI Professional gel polish:
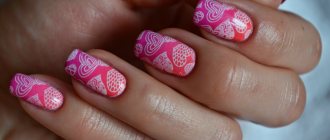
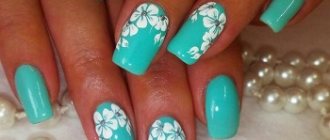
How to apply decor to a manicure with gel polish
Popular techniques for performing nail designs:
- Rhinestone inlay is part of the image of a charming and gentle girl. Rhinestones are glued in a chaotic manner naturally onto the uncured surface of the nail, coated with gel polish. The decor hardens under a UV lamp and at the final stage is filled with a finishing coat to ensure the durability of the manicure. Rhinestones can be complemented with patterns and designs.

- Rubbing. This is a special finely ground powder for nail art. It is rubbed onto the already lamp-dried nail surface. The result is a natural shine effect. A manicure with this design will fit perfectly into a festive look.
- Broken glass. The effect is created using a small piece of multi-colored foil, which must first be cut into small pieces of the desired shape. They should be carefully distributed over the nail plate. You can make an unusual pattern or mosaic out of them. This design is suitable for everyday life.
Gel polish coating for beginners has a lot of advantages. These include: attractive appearance, durability and protection from household defects. In order for the coating to be perfect, you need to choose only high-quality tools and materials, as well as a good, powerful lamp. In this case, a manicure will always please the eye.
Cost of the procedure
The cost of applying a gel manicure in a salon is one of its few disadvantages. Applying a gel polish coating in a salon costs around 500 rubles. It is cheaper to apply a single-color coating. Creating a pattern, combining several colors and a French manicure cost 200-300 rubles more. Nail pre-treatment, manicure and gel manicure removal are charged separately.
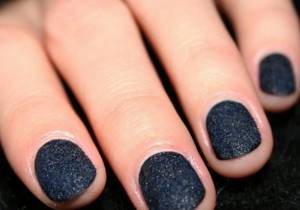
Liquid stones on nails look amazing. Do you agree?
Review of hair dye from Matrix: https://pro-cosmetic.net/volosy/kraska/matrix-opisanie-palitry-tsvetov.html
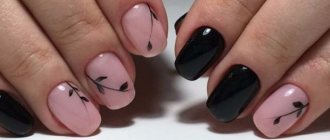
How to apply simple patterns and designs to gel polish
The main tool for creating designs on nails are special brushes.
They are:
- in the form of a fan;
- wide flat with an even or oblique cut;
- thin with different lengths of pile;
- dots;
Popular ideas:
- Web. After coating with colored gel polish, beginners should polish the nail and using a thin brush, you can safely draw patterns that represent a spider’s web. The main thing is to initially collect a minimum amount of material, and then add little by little as you go.
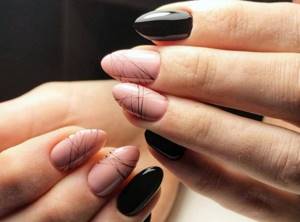
- Monograms. The design is created using a single-color gel polish and a brush, convenient for a beginner in size. After the base, you need to put a little dark gel polish on your brush, black will look most expressive, and draw monograms in the shape of semicircles. To get an elegant design on each nail, you can make monograms in different colors rather than one. If desired and in the mood, you can add rhinestones, sparkles, and stickers.
- To create roses on your nails you will need: dots, several colored gel polishes and a thin brush. After drying the base layer, you need to cover your nails with the main color of gel polish and seal the result under the lamp. When it dries, you can draw roses.
Gel polish coating for beginners with designs and patterns is always relevant. Roses will lift your spirits in the spring and summer. And cobwebs and monograms will add zest in winter and autumn.
Briefly about the main thing
Gel polish is an innovative product for applying a high-strength color coating to nails. It remains on the nail for 2-3 weeks without chipping or loss of shine. After 3 weeks, the grown part of the nail gives the manicure a sloppy appearance.
You can apply the gel coating in the salon and at home. You will need the product itself and an ultraviolet lamp.
This type of manicure is removed in a salon. With some effort and spending 30-40 minutes, you can remove the gel coating from your nails yourself.
Resistant to external influences, colorful and shiny manicure is loved by many women, allowing their nails to maintain a flawless, well-groomed appearance for a long time.
Training on how to create a manicure and apply gel polish through video tutorials
Visual perception plays a very important role in our daily lives, helping in learning and making it possible to convey important information quickly and clearly. First we look, then we process what we see and in a matter of minutes we understand what needs to be done.
In the modern world, most women perceive visual information much better than huge canvases with many letters. Therefore, I suggest you watch a few video tutorials on how to create a manicure with gel polish . I tried to make for you a selection of the most useful video materials, which at one time helped me a lot in becoming a professional in the field of creating gel polish manicure.
Videos for beginners
Video tutorial No. 1 “Full review: starter kit for gel polish. Part 1"
Video tutorial No. 2 “Full review: starter kit for gel polish. Part 2"
Video lesson No. 3 “Removing the old coating and making a new one”
Video tutorial No. 4 “Gel polish manicure at home with a detailed discussion of all sorts of subtleties”
Video tutorial No. 5 “How to apply/remove gel polish”
Video master class from professional cosmetologists
Video No. 1 “Step-by-step instructions for applying gel polish”
Video No. 2 “Three effective ways to remove gel polish”
Video No. 3 “Removing gel polish with a cutter + hardware manicure. Part 1"
Video No. 4 “Complicated repair, extension and straightening of nails. Part 2"
Video No. 5 “Gel polish correction. Combined manicure for beginners with one cutter. Part 1"
Video No. 6 “Applying gel polish under the cuticle: leveling + strengthening + highlights. Part 2"
Fashionable short nail designs
Plain coating
An excellent manicure option for every day. It is best to use transparent, delicate tones that create a natural effect or, on the contrary, dark colors that visually lengthen the fingers. Light colors look impressive on matte nails.
Lace
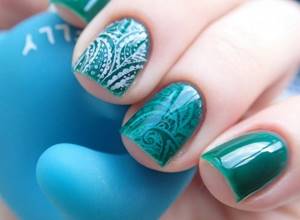
Vertical and diagonal lace patterns on nails have the same visual effect.
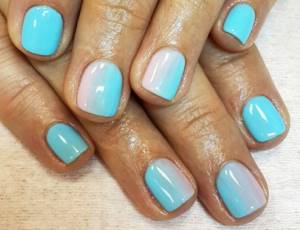
Gradient
A smooth transition from light to dark can also visually lengthen short nails, especially if it is made using the technique of vertical color stretching. For those with narrow, graceful nails, a horizontal gradient is also suitable.
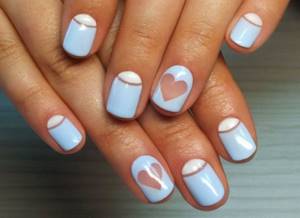
Lunar manicure
It is not recommended to do French on short nails. Replace it with a moon manicure or combine these two designs together. You can also change the usual color scheme to a brighter one.
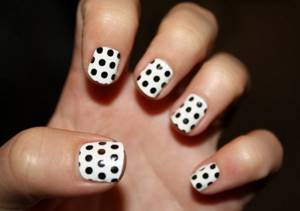
Polka dots on nails
Light polka dots on a dark base will look very elegant. To enhance the visual effect, make circles of different sizes: large ones at the end of the plate, small ones at the base.
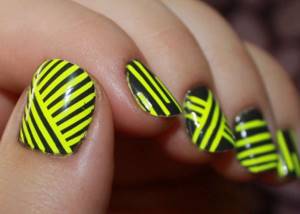
Geometry in manicure
A bright geometric manicure consisting of rectangles and squares will add originality to short nails.
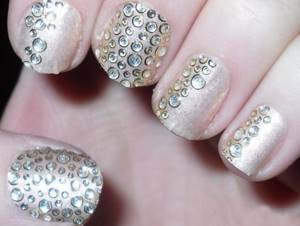
Sequins and rhinestones
For designs on short nails, rhinestones, bouillons, water stickers or glitter are best suited.
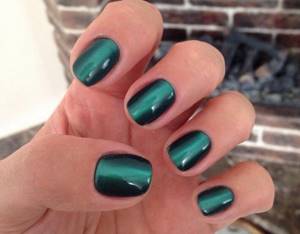
cat's eye
The cat eye nail design has incredible depth of coverage and a light highlight that can be used to visually narrow and lengthen the nail. This is why cat eye manicure is ideal for those with short nails.
There are many options for short nail designs. Another idea - floral manicure - is presented in the video:
Gel polish is an excellent product for short nails. This coating will allow them to grow, strengthen the nail plate and eliminate the need for daily hand care. To make short nails appear longer, apply a dark color coat, and flesh tones will add natural beauty to them. Take advantage of nail design ideas, but do not overload short nails with voluminous decorative elements.
More interesting articles: