The strips should be glued onto gel polish after removing the sticky layer or onto a top coat, but treated with a buffer and degreased. In the process, tweezers, scissors or nippers are used to trim the ends, and an orange stick for smoothing.
Ribbons can be smooth and rough, straight and wavy, bendable, shiny and matte, colored and transparent. Therefore, many types of designs are available with them: classic and reverse French, lunar manicure, geometry, marine style, abstract, gradient, striped. Ribbons look good in combination with glitter, rhinestones, and velvet sand.
How to glue strips onto gel polish: basic techniques
There are several ways to glue strips onto gel polish and for different purposes, but the most popular is the use of shiny strips as a design element:
- First, prepare the nails for coating. It is necessary to file them to give shape, remove excess cuticle, and sand the skin around the plates.

- The surfaces of the nails are treated with a buff to remove the sticky layer. Then they are wiped with a degreaser and a primer is applied, which is air dried for a couple of minutes.
- The first layer of coating is the base. It is polymerized until it dries, and then the stickiness is removed with a cleaner.
- Nails are covered with colored gel polish, preferably in 2 layers. Each one is dried after application. It is also better to remove the sticky layer, otherwise it will not be possible to carefully glue the decorative tape.
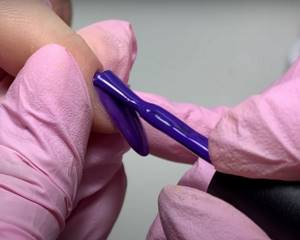
- The strip is removed from the base on which it is attached using tweezers. You need to grab the tip of the tool and pull it towards you.
- The first edge of the strip is placed on the plate in the selected location. The second tip is held with tweezers. And press the tape, gradually turning it so that it bends. For a tighter fit, the decor is smoothed with an orange stick, and the excess part is cut off with scissors.
- A top coating is applied, which will secure the tape more reliably. All that's left is to dry it.
The strips can be laid evenly, without bends, and can be used to create patterns and different shapes. For simpler designs, another technique is used:
- A base is applied to prepared nails and polymerized. Then the flower bed is painted in 2 layers, both of them are dried in turn.
- Top coat is applied next. After its polymerization, remove the sticky layer using a cleanser and treat the nails with a buff to remove shine.
- The dust is removed with a degreaser and, using tweezers, separated from the base, and then the tape is applied. It is carefully smoothed and the excess is cut off.
- The edges of the glued strip are coated with base and dried in a lamp. Then the same product is applied to the entire nail and polymerized again.
- The last layer is the finishing coat. After drying it, the design is ready.
Lunar manicure
Fashion trends are constantly changing, but every woman wants to be in trend from the top of her head to the tips of her nails. One of the fashionable trends in nail art is moon manicure.
What is a moon manicure? It is quite easy to recognize; the base in the form of a “crescent” stands out on the nails, but some create a square or triangular, double highlight with ribbons, in combination with a jacket. There are many ideas, everyone chooses according to the event: for everyday or special occasions.
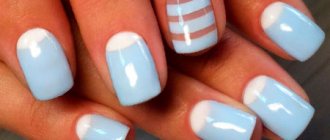
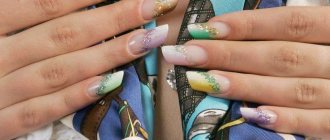
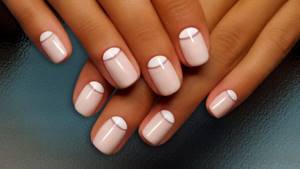
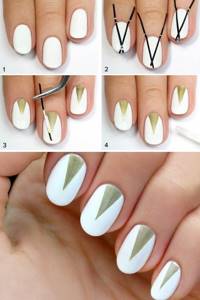
For an everyday lunar manicure, a design in white and pink tones with a gold or silver ribbon, as in the first photo, is suitable:
- Prepare hands and nails for manicure;
- Apply the base as a white varnish;
- Dry the white varnish;
- Apply pink polish to the top of the nail and dry;
- Secure with gold ribbon;
- Apply clear varnish on top of the manicure.
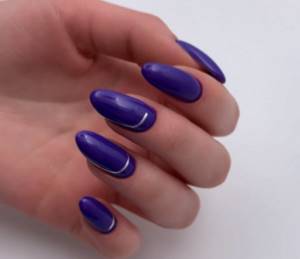
It is possible to create such a manicure with one color of varnish (second photo):
- Apply colorless varnish to your nails and dry it;
- Fasten the tape;
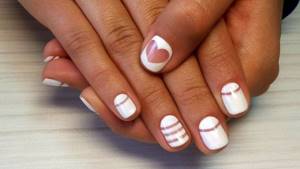
- Apply white varnish to the top of the nail and dry;
- Apply a transparent sealer on top.
Types for shellac with stripes and gel
Shellac with stripes or gel polish with the same decor are made using several types:
- wide or narrow ribbons;
- straight or wavy, with sharp bends;
- bending;
- shiny, matte;
- single-color, with iridescent shades or classic silver, golden;
- with a smooth surface or textured with spraying.
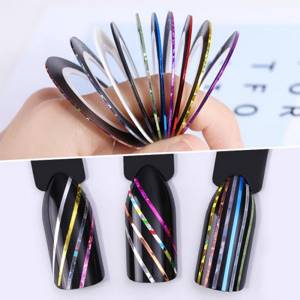
The decor can be attached to a paper base or wound into a reel. The surface that should be in contact with the nail is sticky. This makes the connection stronger, but sometimes makes the strips more difficult to work with if they bunch up.
Striped frappe
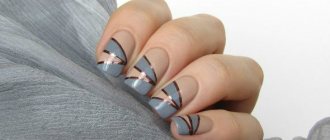
Women who love the taste of coffee or coffee drinks can please themselves with one of the most fashionable, stylish, discreet designs in the Striped Frappe style. It perfectly combines shades of beige and brown.
You can combine these colors and their shades using water and liquid tape, then a design in the form of intricate patterns is formed on the nails, similar to coffee foam (design photo).
Smooth, straight lines are made using regular nail design tapes. Dividing the nail along, across, diagonally, in the form of geometric shapes. Adding touches of black varnish, rhinestones, beads, seed beads and additional designs as decoration.
Nail art ideas for gel polish with stripes
Gel polish with stripes offers many options for nail art:
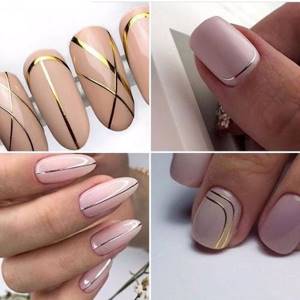
- French manicure. You can make a classic French jacket with a white free edge and a nude base color. Flexible strips are glued to the border of shades. Or for a French jacket they choose contrasting colors and make it reverse. But the lines between tones are always marked with tape.
- Geometric nail design with tape on gel polish. The strips are laid parallel to each other or intersecting. You can move them to the free edge or closer to the cuticle, to the center, or connect them into shapes or broken lines. This design uses one or several coating colors. In the second case, you can separate the shades into stripes.
- Shellac with checkered design ribbon. Here you can use only one flower bed and different shades of stripes. Or take a silver ribbon and use 2-3 shades of gel polish for the cells. The mesh pattern is made on the entire nail or shifted to the edge, the side roller.
- Marine design with tape on gel polish. The main background of the nails is made white. And the stripes are blue or light blue, or matte. 2 pieces are glued along the side rollers and 2 more tapes are glued parallel to each other on the free edge. They should be perpendicular to the first stripes. But you can make it simpler - stick on parallel strips, like on a vest.
- Chaotic striped manicure with gel polish. Nails are covered with the color you like, using only 1 shade. Thin intersecting lines are depicted in white or black web gel. And some of them are distinguished by narrow shiny stripes.
- Lunar manicure with negative space. You can use any color as the main color. But the holes leave a natural shade. Their border can be made natural or angular. And it is emphasized with stripes of contrasting color.
- With drawings of geometric shapes. Here they use 2 tones of gel polish - the main one and for making rhombuses, triangles, squares. Their edges are outlined with tape. If you draw 3-4 small figures, the work is painstaking, but the effect is worth the effort.
- With highlighting of the cuticle line. Flexible tape must be used. It is placed tightly to the cuticle and along one of the side ridges.
- With a combination of wide, narrow and wavy stripes. As a basis, you need a monochromatic manicure. And ribbons can be used in bright colors. Narrow and wavy tapes are attached diagonally to the nail plate parallel to each other. They should be crossed by a wide strip. Another option is to stick all the strips parallel to each other along or across the nail.
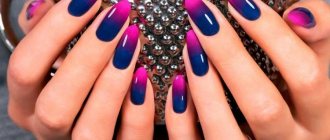
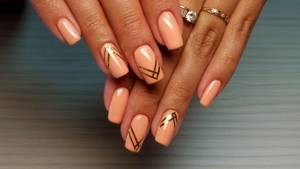
- With sparkles. For this design, dark gel polish is more suitable - blueberry, black, burgundy. Tapes are used for 1 plate, gluing them in a zigzag pattern. The edges of the strips should be secured to the side rollers. The adjacent nail is completely covered with glitter.
- With rhinestones. The pebbles and flexible tape should be the same color, and it is better to choose an unobtrusive shade of the colored coating - pink, beige, white, cream. The strips on the nail of the middle finger are glued so that an arch is formed, that is, from the beginning of the side ridges and to the middle of the free edge.
A medium-sized rhinestone is attached to the cuticle. On the index and middle, a pattern is made of 2 parallel curved ribbons, repeating the line of the base of the marigold and the side roller. On the thumb, the stripes are glued so that they repeat the shape of the nail, except for the end part. 2 pebbles are attached in the center and slightly above.
The simplest thing is to glue 1 strip to each plate. The decor looks good if it is in the center and along the nails. No less attractive are the transverse “belts” made of adhesive tape. You can use decor of different colors. On a dark surface it will be especially appropriate, reviving the main color. And the light one will become even more festive.
Watch the video about 5 simple manicure ideas with ribbons:
Errors when working with tape
- In order for the tape to last long, there should be no air bubbles under it, and it should not form folds or bunch up like an accordion. After gluing, be sure to press it firmly with tweezers or your finger, especially in the cuticle area and on the free edge.
- Keep a sense of proportion, especially if you are planning a design for short nails. When combining different techniques in one design, remember, simplicity is the sister of talent! Do not overdo it.
- If you want to experiment with the thickness of the tape, then pay attention to the shape and length of your nails. For example, for square and round ones it is best to use the thinnest one - 1-1.5 mm, and absolutely any width is suitable for an almond-shaped plate.
Adhesive tape allows you to create strict parallel stripes, as well as various geometric shapes. Don’t forget that this season both are in trend, come up with patterns, use your imagination, and we will help you!
Master class on adhesive tape on nails
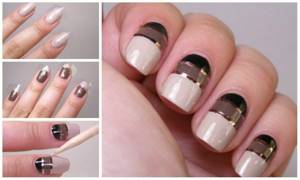
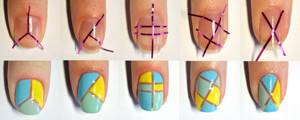
It is quite difficult to glue tape onto gel polish in the form of an abstraction, but the design turns out very bright and memorable:
- Nails are properly prepared by filing the ends and treating the cuticle.
- You need to go over the surface of the plates with a buff to give it a slight roughness.
- Dust and excess moisture should be removed using a degreaser.
- The base is applied first - a thin layer and leveling, with the ends “sealed”.
- The product is polymerized in an ultraviolet lamp for 2 minutes, in an LED lamp for 30 seconds.
- Using a thin brush and a bright color of gel polish, draw squares on 1/4 of each nail; they should be located in different places and may vary in size.
- This layer is dried in a lamp.
- With the second shade, which should be lighter, squares and rectangles are also drawn on another 1/4 or 1/3 of the nails, and this coating is also polymerized.
- Then the fourth color is used - the darkest one; the same shapes are drawn with it, leaving part of the surface unpainted (about 1/4).
- Small sparkles are applied to areas of the plates in a natural shade, matching the tone of one of the gel polishes (special glue or a transparent base is used for this).
- After drying, a finishing coating is used, which also needs to be polymerized.
- Remove the sticky layer from the nails with a clinser.
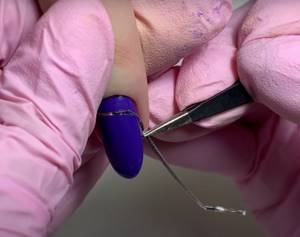
- The silver tape is glued at the border of the flowers, first along the nails, then across.
- Each piece of decor is carefully smoothed out and the excess part is cut off.
- The final steps are to cover the design with a finishing agent and dry it in a lamp.
Recommendations for selection
Recommendations to follow when choosing a product:

- buy products with a maximum thickness of 1 mm;
- if you want to combine ribbons with rhinestones, buy tiny stones, otherwise they will look pretentious;
- take into account the shape and length: for almond-shaped nails, medium or thin options are selected; if the nail plate is square, semicircular, then a shiny but very thin ribbon is used;
- thick options are designed for making large patterns, while thin ones allow you to apply small strokes.
How to make stripes on nails with gel polish
To make stripes on your nails with gel polish, you can also use self-adhesive tape:
- After a hygienic manicure, the nail plates are covered with a base and dried.
- Next, use gel polish of the main shade on each of them entirely, maybe in 2 layers for brightness.
- Both times the coating is dried in a lamp.
- Surfaces must be degreased to remove stickiness.
- Tape is attached to the nails, making sure that the strips are parallel and the spaces between them are the same.
- The space between the decor is painted with a second color of gel polish; you can use a thin brush for this.
- Next comes drying in a lamp.
- After this, the adhesive tapes are carefully removed using tweezers.
- The nails are covered with a finish and polymerized.

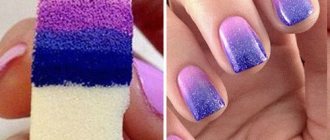
A similar design, but even more original, can be made using airpoofing and gel paint:
- Nails are coated with gel polish of the main color and dried.
- Wipe with a cleaner to remove the sticky layer.
- The next stage is gluing the strips, as in the previous case.
- The airpoofing is dipped into gel paint and tapped on the nails where the tapes are glued, but the last gap between the pieces should remain clean.
- The hand is placed in a lamp to dry the layer.
- The strips must be removed.
- The last layer is the finishing coat.
- It is also dried in a lamp.
This creates a combination of striped design and ombre. You can use contrasting colors of gel polish and paint or shades that are similar in intensity.
Varieties
Tapes vary in thickness and color. This allows you to create an interesting manicure and make the image original.
The products have the following characteristics:
- presence of textured rough coating;
- transparent;
- rainbow tints;
- flexible options.
Decorative adhesive tape is supplied in reels.
Liquid tapes are commercially available. They are not used to create a nail design, but as an auxiliary material that protects the periungual tissues from varnish. This product is sold in bottles equipped with a brush.
Useful tips on how to glue correctly
To carefully glue decorative tapes, you should use a few secrets of the masters:
- It is always better to measure strip pieces exactly to the size of your nail. But if due to inexperience it is not possible, you should cut off a little more than necessary. And after smoothing, the excess is removed with nail scissors.
- Long pieces of tape are used to create a striped design. The tips sticking out outside the nails are needed to quickly and without damaging the coating to remove the parts that have served their role.
- To prevent the decor from slipping off the coating, it is necessary to wash off the sticky layer of gel polish. Or before gluing it, apply a non-sticky top coat to the flower bed. But when the stripes are on the nails, use the finish on top again.
- It is best to smooth out the tape using an orange stick or a silicone applicator. If you do this with your finger, the decor will not fit tightly and may fall off long before correction.
- To avoid bubbles under the tape, apply it with light tension. That is, press one edge tightly to the surface, pull it, press it at the most convex point of the nail, then at the other end.
- When cutting strips, it is more convenient to use tweezers. Nail scissors can bend the ends of the tapes, and they will stick up, risking quickly coming off.
- The gel polish under the tape must be well dried. If this is not the case, detachments on the coating will be revealed very quickly, and the decor will contribute to their appearance.
Not everyone can immediately stick strips neatly and beautifully, but even non-professionals learn this quite quickly. Decor has never gone out of fashion since its inception. It is inexpensive and allows you to make unique designs.
Terms of use
Gluing tape at home is quite simple. The main thing is to properly prepare the nail plates, after which you can start doing the manicure.
Preparatory work
At the preparatory stage, the following manipulations are performed:
- The surface is cleaned of old coating.
- The nails are given the desired length and shape.
- Using an orange stick, cuticles are pushed back.
- Nourishing cream is applied to the hands.
- The surface of the plates is degreased. For this purpose, nail polish remover, alcohol or a special degreaser are used.
Gluing rules
When your nails are prepared, you can apply the tape:
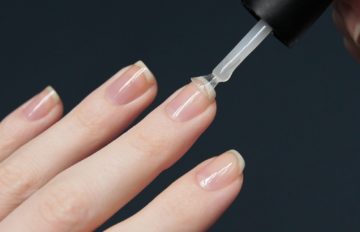
- A base layer of varnish is applied to the surface.
- The coating is dried.
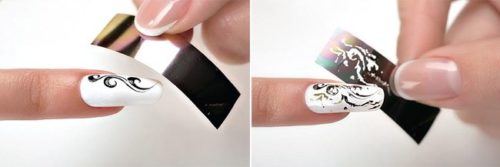
- A ribbon is glued on top according to the selected pattern, and the desired design is created.
- A layer of varnish of a different shade is applied on top.
- The manicure tape is removed.
- The coating is drying.
What can be replaced
One replacement option is regular stationery tape, but only as a stencil. It makes it possible to draw even stripes and perform a moon or French manicure. Figures are cut out of it, for example, hearts, stars.
Foil is also used. When using it, you need to take into account that the absence of a sticky layer leads to difficulties when performing nail design.
Liquid tapes can be replaced with PVA glue. Simply spread it around the nail and wait until it dries completely. In this case, a film is formed that protects the skin from contamination that is inevitable when performing a manicure.
Upon completion of the procedure, the dried glue is removed with tweezers.
Another replacement option is Vaseline. However, when lubricating the periungual tissues, the protection is not very reliable, and getting the product on the nails leads to poor fixation of the varnish coating.