A good manicure is a great addition to any look. We are accustomed to the fact that you can do it yourself at home. You can find many articles and videos about removing cuticles, filing nails to achieve the desired shape, and applying gel polish, but how often do we think about the cleanliness and sterility of our tools?
When we come to a manicure specialist, everything is already prepared, disinfected and sterilized in advance. This part of the procedure remains behind the scenes for us, but this does not mean that it is not important. Not only particles of nails and skin get on the instruments, but also microorganisms from them that live everywhere, so it is necessary to treat the instruments both in the salon and at home. Neglect of sanitary standards can lead to unpleasant diseases such as various fungi and mycoses. Also, with the slightest wounds or scratches, you can get an infection.
In this article, we will look at ways to process tools, thanks to which your manicure will always be clean and safe.
When performing a home manicure, it is necessary to disinfect the materials after each use. If only one person uses the tools, minimal handling is sufficient. If you do manicures for friends or clients, you need a more thorough method. Let's start with the first case.
Processing of individual tools
If you are the only one using the tool, start with minimal processing, which includes two simple steps.
Step 1. Mechanical cleaning of contaminants
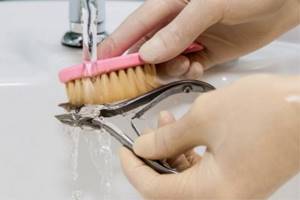
Use regular soapy water and rinse all tools with water.
|
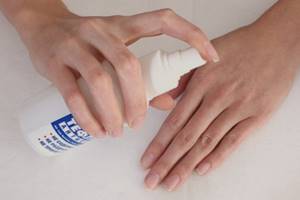
Step 2. Disinfection of instruments with an antiseptic
A regular antiseptic from the cosmetics department will do. Be sure to disinfect your hands and your work area. Before a manicure, professional nail technicians treat clients’ hands with a special alcohol-based disinfectant. At home, you can use vodka, cologne, boric acid, etc. You can also wash your hands with antibacterial soap before a manicure.
|
ATTENTION!
It is not recommended to use antibacterial soap regularly, as it destroys not only harmful but also beneficial bacteria.
The main stages of processing manicure tools
Processing a nail technician's tool includes 5 stages, none of which can be excluded or interchanged with others:
- Disinfection
- Pre-sterilization cleaning (PSC)
- Drying
- Sterilization
- Storage
Sometimes this scheme is simplified and only 3 stages are called: disinfection, PSO and sterilization, since these are really the main stages, it is at them that most mistakes are made, and drying and storage often do not raise questions from the masters.
So, let's look at each stage in detail.
Hygienic care of manicure cutters according to salon rules
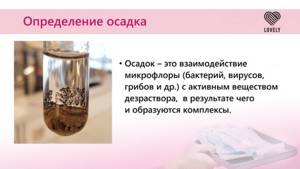
No matter how careful the manicure is, skin particles, nail dust, and grease remain on the instruments. This is an excellent breeding ground for bacteria and spores of causative agents of dermatological diseases. The longer dirty instruments are stored, the more luxuriantly the “infectious bouquet” blooms. That's why treatment of cutters is necessary immediately after a manicure .
Sanitary standards 2.1.2.1199-03 (approved by the Ministry of Health) allow the use of rotating and cutting instruments in salons after four-stage treatment according to the viral hepatitis regime. The process includes:
- treatment of cutters from biological dirt;
- disinfection;
- pre-sterilization cleansing;
- sterilization
After this, the cutters are sealed until next use. This is the order that salon masters follow. You should also adhere to it at home, especially if several people use the manicure set.
Disinfection of manicure tools
Why is disinfection needed?
At this stage, most viruses, bacteria and fungi in the “active” state are destroyed. Absolutely all tools used in work are disinfected , even disposable files for files and pedicure caps before disposal, as well as individual client kits.
How is disinfection done in manicure?
Nail technicians most often use special disinfectant solutions prepared from concentrate and water according to the instructions for a specific disinfectant.
For example, for Optimax Prof concentrate there are several dilution options. For disinfection in combination with PSO (in an ultrasonic cleaner), a choice of 1, 2 and 3 percent solutions is offered with a holding time of 60, 30 and 15 minutes, respectively. It would seem that it is best to choose a 3% solution, because it allows you to disinfect faster. But not everything is so simple - the higher the concentration, the more aggressive the solution is towards the instrument. Therefore, to avoid damage, it is important not to overexpose it in the solution, to note the exact time, or even set an alarm clock for yourself. If the technician is not sure that he will be able to remove and wash the instrument from the solution in time, then it is better to choose a lower concentration.
How to choose a concentrate for disinfection
The composition and pH of the disinfectant plays a role. Some manufacturers add non-foaming surfactants to the concentrate, which allows disinfection to be combined with PSO. Anti-corrosion additives are also common.
Optimax Prof, for example, like many others, contains anti-corrosion additives and has an alkaline pH from 9 to 12. But Alaminol with an acidic pH of 2.6 - 5, in contrast to Optimax, kills the tool (but not the fact that microbes) in one usage. Therefore, if the manicure instrument is quite expensive, then the disinfectant should be selected at the appropriate level.
How long can the disinfectant solution be stored?
The prepared solution can be stored for the time specified in the instructions only unused. You can use it only until it becomes cloudy/changes color/precipitate appears - again, see the specific instructions for the purchased concentrate. It is convenient to prepare a large container of solution and pour it into a smaller container for disinfection as needed. We work with the solution wearing gloves.
Disinfection algorithm
- all the tools, cutters and scissors in an open form, in a container, there should be at least 1 cm of solution on top of the objects; We place the cutters in a separate small container in the Us-washer so that they are not damaged;
- close the container with a lid and note the time/set an alarm;
- the exposure time depends on the concentration (see instructions);
- if during the process it becomes necessary to add another item to the solution, then we measure the holding time again;
- After the exposure time has expired, we proceed to the next stage - PSO.
disinfection combined with PSO in a washing machine
When is it necessary to replace the disinfectant solution?
There are 4 states of solution deterioration:
— the expiration date has expired;
- the color of the solution has changed;
— turbidity of the solution appeared;
- flakes and sediment appeared.
After such conditions appear, the solution must be replaced, even if the expiration date has not expired.
Pre-sterilization cleaning of manicure instruments (PSC)
First stage of PSO
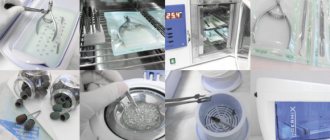
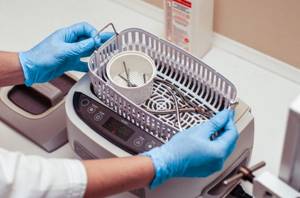
1. We wash metal and plastic products with a brush in a disinfectant solution or use an ultrasonic cleaner and a disinfectant suitable for the disinfection regime combined with PSO;
For the first part of the PSO, you can use a nylon brush (not metal, as it severely damages the surfaces) or an ultrasonic cleaner. Here it is important to “loose” biological residues while they are still in the disinfectant solution.
Second stage of PSO
2. We wash everything with a brush under running water from disinfectant and protein residues; The washing time can be found in the instructions for the specific disinfectant.
The second stage requires running water, so an ultrasonic cleaner cannot be used here. The disinfectant solution takes quite a long time to wash off the instrument and many craftsmen, saving time, do not wash it off, as a result of which the aggressive substance remains on the surface and during subsequent sterilization causes very rapid corrosion. Therefore, it is recommended to add a little regular soap to the brush - it significantly speeds up washing.
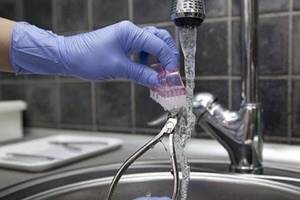
rinsing the cutter clippers under running water with a brush
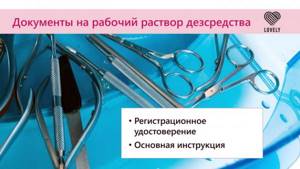
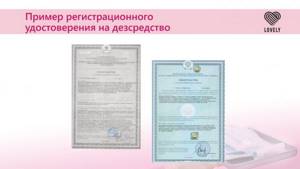
What documents should there be?
For disinfectants you need: a registration certificate and basic instructions. You must ask for them in the places where you purchase disinfectants. You don't need to request it all the time if you use the same tool. If you were not provided with it or you forgot to ask, you can find it on the Internet. If you have a check at the salon, this document must be available.
In the document you will find information such as the concentration of the product and much more.
Treat your tools according to all the rules, and your clients will appreciate it!
Drying manicure tools
After making sure that the instrument is completely washed, take it out and wipe it dry with a clean cloth so that there are no water stains left. Then we lay it open on another clean napkin, cover it with a clean napkin on top and dry it completely.
Drying is especially important for cutters, since tiny droplets of water remain in their abrasive. Drying can be carried out at room temperature for about 12 hours or in a dry heater using a special drying mode (if available) . After the first sterilization of wet metal products, you can see how much they oxidize - rusty spots and yellow stains appear. Therefore, you should not neglect drying; thanks to it, any metal tool will last a long time and will not require cleaning.
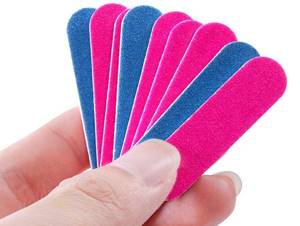
How to sterilize files and buffs
The choice depends on the material of the products. Files with a hard abrasive coating can generally be reused multiple times and can be sterilized at high temperatures. They are designed for correcting the length of nails, cutting down artificial material and other manipulations that are considered “heavy artillery”. For delicate procedures, such as plate grinding, soft buffs are used. They should not be placed in a dry heater, autoclave or glasperlene sterilizer, as they may simply melt. Treatment is limited to disinfection using running water, antiseptics, and an ultrasonic bath. The ideal option is to use disposable files and buffs.
Sterilization of manicure instruments
Aimed at destroying the hepatitis C virus, fungal spores and bacteria that are inactive but did not die during disinfection.
Methods for sterilizing manicure instruments: what for what
Below is a table that shows the most popular methods of sterilizing manicure instruments and, directly depending on the chosen method, the conditions for its storage.
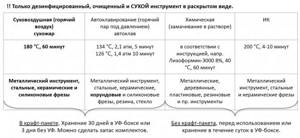
Methods for sterilizing manicure instruments
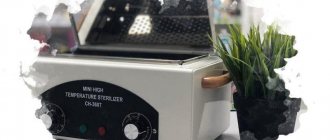
The most affordable way is to use a dry-heat oven. The only caveat: corundum cutters, due to their porosity, cannot be effectively sterilized in dry heat. Naturally, plastic and wood are not subject to sterilization at 180° - that is, ordinary reusable files, brushes and brushes. Therefore, it is recommended to choose disposable ones or choose chemical sterilization for them.
One of the students in a manicure course for beginners put a plastic brush in a craft bag with cutters. It was fun, but I had to throw away the completely new cutter along with the brush.
Sterilization algorithm
- We place the instruments in a craft bag specially designed for sterilization and sign the date. Nippers and scissors, of course, in the open form. You can also put a class 4 sterilization indicator inside the bag. It is advisable that each item have its own separate package. It is allowed to assemble sets, but in such a way that the instruments inside the package do not rest against each other and can be heated evenly. Close the bag along the fold line and seal it.
- Depending on the volume of the sterilization chamber of the dry heater, we place craft bags inside so that each of them is blown with air from all sides. If the dry heat is small, you may have to add 1 packet at a time. Close the camera door.
- We set the sterilization mode to 180°C, 60 minutes. It is under this regime that the hepatitis C virus, fungal spores and some bacteria die. The GP-10 dry heater, for example, has this mode by default. Let's start the process.
- The dry heat will take some time to heat up. Only from the moment of complete heating to 180°C does the 60-minute countdown begin.
- After sterilization is completed, the dry heat will take some time to cool down. So, GP-10, for example, lowers the temperature to 75°C and only then emits an end-of-work signal. This is also an important point for the master, allowing him to preserve the tool for as long as possible, because with a sharp change in temperature, its sharp edge quickly becomes dull.
- It is convenient to remove packages with hot instruments using tweezers onto a tray provided for this purpose to avoid burns.
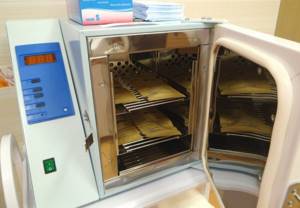
tool placement in GP-10
Where to buy disposable nail files that do not require disinfection
Disposable nail files that do not require disinfection are disposed of after each client (an improved type of such a tool requires the presence of a plastic case and disposable, replaceable file inserts).
The advantages of this type of tool are:
- no risk of contracting a fungal or infectious disease, even in contact with a site where the integrity of the client’s skin is damaged;
- speeding up the process of preparing a nail artist for the upcoming procedure;
- do not require compliance with special recommendations related to their storage.
You can purchase them at a professional manicure tool store or order online from a trusted supplier. The average cost of individual files varies from 300 to 500 rubles. for 1 package (1 package contains 50 – 70 pcs.).
All disinfectants used by masters to clean manicure instruments must not only meet the standards and requirements of SanPin, but also be invisible to clients.
They should have no pungent odor and no tendency to form deposits on the metal surface. To increase the chances of purchasing a quality product, the manicurist is recommended to have cleaning compounds of various release forms and compositions in stock.
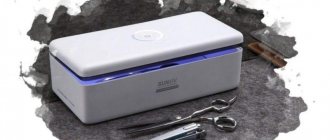
Storing manicure tools
- In a craft bag, the tool is stored outdoors for 3 days, in a UV box for 30 days. That is, all this time the contents of the package are considered sterile, but after this period they are no longer sterile. Now there are white craft bags that promise to maintain sterility for one year after sterilization in dry heat and two years after autoclaving.
- Without a craft bag, the tool is stored only in a UV box and only for one working day before use. The next day or in the open air it loses its sterility. Therefore, if you sterilize an instrument without craft bags, you must understand that after the previous client it was sterilized, but its sterility is not maintained.
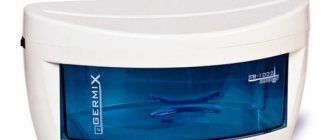
The UV box must be constantly on
Attention! Ultraviolet cabinets, Germix-type boxes and simply UV lamps built into the table are not sterilizers! Contrary to what is written on the packaging or lid. It is simply a tool storage container that maintains an environment in which microorganisms cannot grow. Real UV sterilizers exist and are actively used in medicine, but they look completely different and the power of their lamps is much higher.
Glasperlene sterilizers are only suitable for emergency sterilization of work surfaces. BUT! Firstly, the instrument is heated by contact from the surface of the glass beads, as a result of which the surface of the sharpened edge of the instrument, being very thin, is deformed and dulled. Secondly, a sharp change in temperature when taken out into the air contributes to dulling. Therefore, often after the first sterilization in Glasperlen, cutters and pushers require sharpening or even replacement if they were made of low-quality mild steel.
Please note that correct step-by-step processing of manicure tools is necessary in order to work calmly with any client. The master does not need to know whether or not the client has any infectious disease, because with proper treatment, both the master and his other clients are protected from the transmission of infection.
How to choose a sterilizer
When choosing a sterilizer for a salon or home use, you should pay attention to a number of important factors:
- Manufacturer. We recommend trusting companies that have proven themselves in the nail service market. Cheap Chinese homemade devices may not live up to your expectations. You cannot skimp on safety - consider buying a sterilizer as an investment in your own reputation and health. Pay attention to certification.
- Time of processing. The greater the flow of clients, the less time is left for cleaning tools. It is important to be able to sterilize them during the working day on an ongoing basis and immediately before the procedure. In new generation devices, the shortest program lasts only seven minutes.
- Operation volume. Due to space constraints, sterilizers are often located in the same areas where clients are received. It is worth choosing equipment that is as quiet as possible.
- Dimensions. If you don't have a lot of space, pay attention to the dimensions of the device when purchasing. The stores offer a wide range of devices that will fit on a standard work surface.
- Appearance. Gone are the days when sterilizers were not a very attractive element of the interior of the salon. Today they feature a modern design and are available in many colors.
- Guarantee. When choosing equipment for a salon or home use, pay attention to the warranty period provided by the manufacturer and the store. In the event of a sudden failure, you will have to act very quickly.
Remember that manicure should be safe. It doesn’t matter whether you are a master or a client, following our recommendations will save your health and even life.
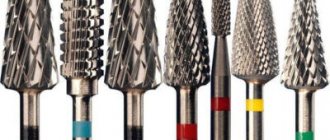
Top 5 indispensable attachments for beginning craftsmen
With all the variety of attachments for a router, it is impossible to make a hardware manicure without the following cutters:
- A cone-shaped or corn-shaped attachment for cuticles and ingrown nails is the basis of a manicure, because without it it is impossible to give a neat look to the work.
- Kidney-shaped attachment for the side surfaces of the nail. It cleans hard-to-reach areas of the nail bed.
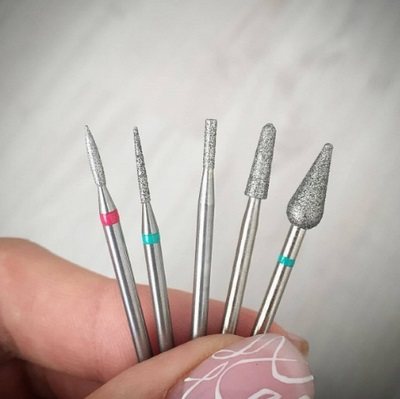
- A cylinder will be needed to file nails to the same length, shape them, and create a design. It can be used to remove gel polish.
- The ball-shaped nozzle helps to remove calluses carefully and painlessly.
- A polishing attachment is necessary for polishing the surface of the nail.
Classification by hardness
The rigidity of the cutters is easily determined by the color designation. The color of hard cutters is always darker than that of delicate bits.
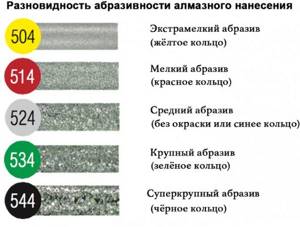
It is customary to distinguish cutters by shade:
- Black and blue highly abrasive attachments are used to treat rough and thick areas of skin, remove calluses, and also to shorten dense nail plates.
- Green and red medium abrasive attachments can be used to work on side rollers and medium-density nails.
- Yellow low abrasive nozzles are designed for thin, sensitive skin with nearby blood vessels. They are used to correct thin and brittle nails.
Varieties of cutter shapes
According to their shape, cutters are divided into categories:
- Ball-shaped devices are required for delicate removal of excess skin. This form allows you to remove rough skin in hard-to-reach areas of the nail bed.
- Cylindrical cutters are used to correct the shape of the nail. Their narrowed body allows you to form nails of the same shape and length.
- Fissure cutters are indispensable when working with side rollers. They adapt to the skin texture, which allows you to get a smooth surface without peeling.
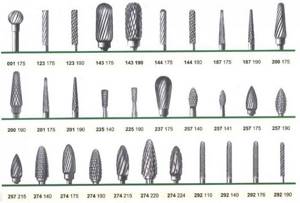
- Needle cutters are necessary for working with cuticles. They allow you to accurately perform precise work, working out small details.
Nozzles
Attachments for manicure performed using the device are not the same in size:
- Large attachments are useful for softening wide areas of skin covered with a thick, rough layer of dry particles. Most often they are necessary when performing a pedicure.
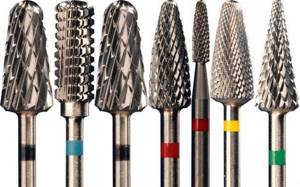
- Medium sized attachments can be used to treat the skin around the nail plate and ingrown toenails.
- Miniature nozzles are indispensable for precision work and processing sensitive skin. They can be used on brittle nails.
Tips for using manicure machines at home
Cutters for hardware manicure for home use should be used according to the recommendations:
- It is necessary to use an antiseptic to ensure that the instruments and treatment area are sterile.
- Do not use devices with high rotation speed. This will help avoid injuries and cuts.
- To shorten the length, it is convenient to use disc cutters.
- Treatment of the cuticle and side ridges is carried out with movements from left to right.
- The cutter must be held parallel to the nail.
- When treating the sinuses of the nail, do not touch the nail plate.
- You can only work on the nail with polishing cutters.