From this material you will learn:
- 3 types of nail correction
- Preparing for nail correction
- Materials for nail correction
- Stages of correction of extended nails with gel
- Nail correction with acrylic
- Nail correction with shellac
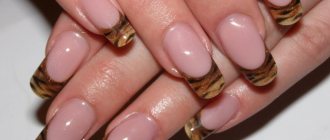
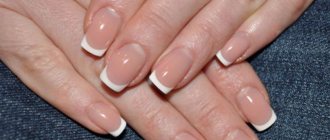
- 6 steps of French manicure correction
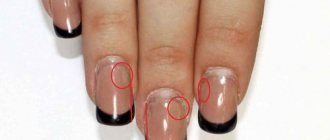
- Secrets of disguising an overgrown nail
- 10 rules for nail care after correction
When taking care of your appearance, don't forget about your nails. A well-executed manicure gives hands a well-groomed appearance and gives its owner self-confidence. But nails are not always pleasing with their beauty and health. Extensions come to the rescue, as does the use of gel polish. After these procedures, your hands look flawless for several weeks. But over time, correction of nails is required, which have grown and no longer look as ideal as after visiting the salon.
Nail correction is carried out if the manicure begins to look sloppy. Perhaps you did not have time to visit the master again, or an “accident” simply occurred - for some reason the material peeled off. In any case, it is unsightly and even causes discomfort. Therefore, it is very important to carry out corrective measures in a timely manner so that the manicure always looks perfect.
Preparing for nail correction
Two days before the nail correction procedure, you should get rid of overgrown cuticles and remove growths from the periungual ridges. This is necessary because even with minor cuts and irritations of the skin, it will take time for tissue regeneration. Before correction, stop using creams, reduce the number of water procedures, because they have a bad effect on the strength of the coating.
If the nail itself is damaged, suppuration or fungal infection occurs, you need to remove all layers of coating from the sore finger and treat the injured areas with hydrogen peroxide. Any actions related to extensions are excluded until the nail plate and cuticle are completely restored.

Materials for nail correction
When correcting nails, different materials are used, and therefore the methods and duration of the procedure may vary. Working with gel and acrylic coatings takes more time than shellac.
In the process of nail correction, special products and instruments are used. The master prepares kits with acrylic or gel composition, brushes and other necessary accessories. Here's what you might need for a manicure:
- UV or LED lamp;
- nail files;
- buff – a small polishing block;
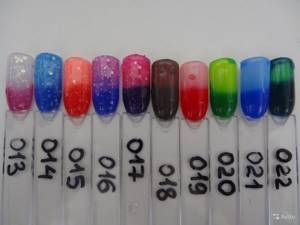
- multi-colored gel polishes;
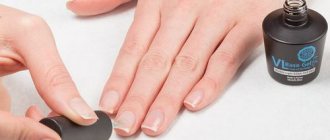
- coating base;
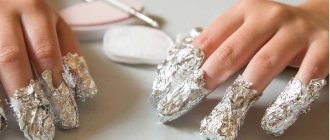
- foil;
- composition for removing gel polish;
- lint-free fabric;
- manicure brushes;
- disinfectants;
- small manicure scissors;
- oil for restoring, strengthening and softening cuticles.
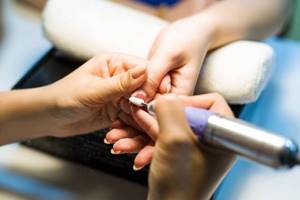
It would be very good if this list includes a manicure milling machine.
If acrylic or gel is used to correct nails, the same composition that was originally used is applied to the regrown nails.
Most often, one visit to the specialist every 3-4 weeks is enough, but it happens that correction is required more often than once every two weeks. What matters is the rate of nail growth, your care for them, as well as the quality of the product that was used at the previous visit.
The number of corrections is generally limited; for example, with gel extensions, no more than five are allowed. Then, based on the reviews and recommendations of experts, the gel coating begins to deteriorate, and it is worth replacing, or better yet, removing it altogether and taking a break.
Stages of correction of extended nails with gel
Nail correction with gel occurs step by step as follows:
- Disinfect and degrease your hands and tools. Remove nail polish with an acetone-free product. Use an orange stick to push back the cuticle.
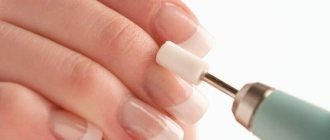
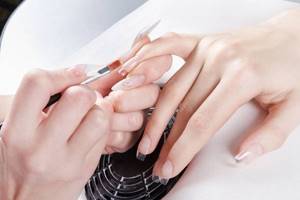
- Use a file to shape it, removing the exfoliated part of the gel. Remove it completely near the cuticle. You will see an almost imperceptible transition to your own nail from the old coating.
- To prevent infection under your nails, coat them with primer and then blot off any excess with a tissue. Correct the even regrown part with a buff. Immediately fill the cavity with gel and allow to dry under ultraviolet light.
- After the gel has hardened, remove the sticky top and give your nails the desired shape. Correct existing surface unevenness with a file. Apply the main layer of gel evenly over the entire nail. For the part of the nail that is just slightly above the middle, you will often need to apply a little more gel, but try not to overdo it. Then dry it again in the lamp.
- Repeat the shape correction with a file, eliminate roughness and defects. Be careful not to accidentally brush the base layer back to its original level. Monitor this moment by constantly removing dust from the nail with a brush.
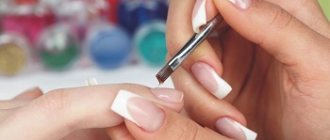
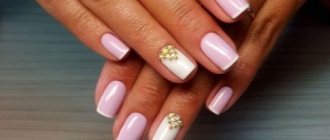
- Before the last coat, apply the desired design to your nails - French or design. Dry the top layer under ultraviolet light. Polish with a buff.
- The final touch is to apply the oil to the skin around the nail and cuticle, and then massage it into the skin.
If nail correction is carried out after single-phase gel polish, then you need to use the same one. After the three-phase procedure, any system can be used.
Operating rules
There are a number of simple rules on how to maximize the life of your manicure. However, they apply not only to extensions, but also to gel polish and even simple polish. Regardless? Whether your nails are natural, extended or strengthened with gel, these simple rules should be followed to maintain their health and attractive appearance.
- Do not expose your nails to heavy mechanical stress (do not knock them, do not click against each other, type carefully, avoiding getting your nails stuck in the keyboard);
- Do not forget to take care of your nails and hands in the same way that you used before extensions, then new nails will grow beautiful and healthy;
- In the first days after extensions, be especially careful - reduce the amount of work on the computer, since printing is very harmful to nails, and in the first days they are especially weak and vulnerable;
- Dress and use your nails carefully, avoiding scratching the plate, which can occur even as a result of simply running a jeans zipper over them;
- Humidity is detrimental to manicure - cancel saunas, wash dishes using rubber gloves;
- High temperatures may cause the gel to crack;
- However, low temperatures will also lead to the same thing, and therefore, if you got your nails done when the outside temperature is below zero, wear mittens;
- Exposure to harsh chemicals in cleaning products also significantly affects how your nail extensions will look and how long they can be worn, so wear rubber gloves when doing all housework;
- If you have extended nails under varnish, then do not use acetone-containing liquids to remove them, they will cause tarnishing of both gel and acrylic.
https://youtu.be/r52FPK0FWWE
These simple rules will help extend the life of the coating from three weeks to four. Some of them are quite applicable for natural nails. Thus, if you follow them, your natural nails will become strong and strong and will hold extensions well if you need them.
There are different opinions about how long you can wear extended nails until they begin to harm your own. This period is extremely short. Extended plates harm the nails immediately, as they deprive them of oxygen and also do not allow them to produce a natural protective layer.
Nail correction with acrylic
If you correct your nails with acrylic, the steps will be the same. The main difference is the materials used in this case.
- Apply antiseptic to hands, nails and periungual area. Remove polish from nail plates with an acetone-free solution. Rub the oil into the cuticle to soften it. After a couple of minutes, pull the cuticle away from the nail itself with a wooden stick.
- Wipe off excess oil with a lint-free cloth. Treat the tips of the nails with a nail file, removing 2/3 of the coating thickness, and create the required outline. Remove shine from the nail itself so that the acrylic sticks to it better.
- Go over the exfoliated areas with a fine-grained nail file. After this, apply the grease-dissolving compound to the acrylic-free area. Then smear the plate with a primer for better adhesion of the keratin of the nail itself to the acrylic.
- Give it the desired shape. Make sure that the acrylic lays down in an even layer over the entire nail and does not get on the skin and the periungual area. To do this, use brushes only made from natural materials, avoiding strong pressure on the coating.
- At the final stage, rub special oil into the cuticle.
- Record the result by holding your fingers under ultraviolet light for two and a half minutes.
Decide for yourself
The applied varnish on natural nails does not last very long. It constantly needs to be removed and the plate covered again. The same cannot be said if you have extended nails. You already know how long they last. Rich colors and beautiful shape please the eye of its owner for a long time. But it’s very difficult to give natural, even long nails the shape you want. But this seems like a very simple task.
Delicious recipe! How to make an omelette with sausage in a frying pan
After the extension procedure, natural nails do not become weaker, but on the contrary: under the applied layer of acrylic, gel, or glue, they are not subject to external influences of environmental conditions: they do not freeze, interact well with chemicals, do not scratch, are not afraid of water, and do not lose their color. In addition, most of the materials used for nail extensions contain strengthening and healing substances.
Dear representatives of the fair sex, let's delight ourselves and our stronger half of humanity with our charming fingers!
Today, one of the most popular nail design techniques is nail extensions. It allows you to give shape and length to deformed and short nail plates, making your hands well-groomed and beautiful. Before you decide to get extensions, you should know that this is a fairly long process, after which you need to periodically make corrections. Timely correction and design of nails allows you to prolong their service and maintain a tidy condition.
Nail correction with shellac
Shellac can also be adjusted, but wearing it for more than two weeks in a row is not recommended. The procedure is simple: only the regrown area of the nail is corrected. The top layer is modeled in the same way as traditional varnish is applied. There is no need to do additional processing, since shellac covers the entire surface of the nail with the same thin layer. This method of nail correction is accessible even to beginners.
Recommended articles on the topic:
- Eyelash restoration at home and in a beauty salon
- Rejuvenation of the area under the eyes: age away!
- Nail modeling: features of the procedure
Correction of nails with shellac can be carried out in two ways: by removing the varnish completely or by maintaining it. The set of tools is standard. The procedure follows the following algorithm:
1. Apply an activator of essential oils and water to the sides of the nail and hold for 5 minutes. Using a tool for removing cuticles and skin growing on the nail plate, pry up the previous layer of shellac and carefully remove it. The procedure will require less effort if you use the same activator.
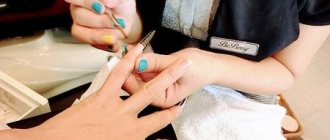
2. Using a file, give the desired look to the overgrown nail, apply a traditional manicure and, using a special gel, soften the cuticle and move it.
3. Buff your nail to a shine with a nail polisher. This important step will make the coating easier to remove. Degrease the nail plate, apply a coating instead of a base and finish, and let dry under the lamp.
4. Cover the nail with one layer of the selected shellac tone and fix it under the lamp. Repeat the steps. Apply the finishing coat on top and dry again.
5. At the end of the procedure, rub the restorative composition into the cuticle.
At home, nail correction with acrylic, gel, and shellac is carried out according to the same schemes.
Causes of detachments
But not everyone’s nails last as long as stated. What nail extensions look like and how long they last can vary from one person to the next, even if they have the same artist perform the procedure. If you notice that your nails begin to peel off or crack and become dull within seven to ten days after extensions, then this can happen for several reasons.
- Error or negligence of the master. Skipping any important stage and other simplifications (reducing the cost) of the technology always harm the appearance and sustainability of the manicure. However, the effect will be the same if any of the stages are performed poorly. For example, the plate is unevenly sanded, the bond, primer or gel is poorly applied, there are errors in calculating the nail architecture;
- Various violations of the rules of operation on your part also affect how long you can wear extended nails. More details about the operating rules will be written below;
- The presence of infectious or inflammatory diseases leads to the fact that the material begins to be perceived as foreign and is rejected by the body. As a result of this process, detachments and chips occur in the gel;
- The presence of nail diseases, fungus, psoriasis or other deviations from the norm leads to the fact that the lifespan of the extension will be minimal. The same applies to brittle, thin, weakened and peeling plates. With such nails, extensions are not recommended at all;
- Performing a manicure immediately before extensions can also cause early detachments or cracks. It is better to cut the cuticle and do similar procedures at least a day or two before extensions. During this time, the nail will have time to adapt and recover from the process;
- Taking antibiotics and medications of certain pharmacological groups also leads to the fact that the nails peel off, or even completely, the gel completely comes away from the nail. In this case, the gel is also perceived as a foreign material and is rejected. Particular difficulties in this regard can be presented by drugs that accumulate in the nails;
- How long you can wear extended nails also depends on your hormonal status, both during the extension and while wearing it. That is why many specialists do not recommend performing the procedure during menstruation, as well as in the early and late stages of pregnancy and immediately after childbirth. With sudden jumps in hormonal levels, a phenomenon similar to what occurs when taking antibiotics is observed.

Thus, there is no exact time limit for how long you can wear extended nails.
The duration of this period depends on many factors. And sometimes, you yourself can become the reason for the short life of your manicure. [yandex3] [google3]