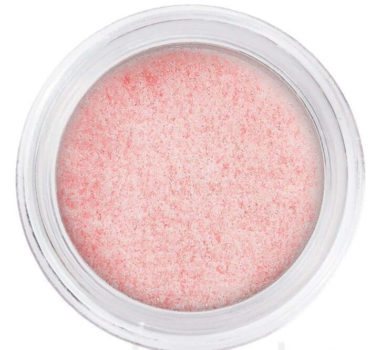
Velvet sand on nails makes them more durable and gives the effect of roughness, dullness, “fluffiness”, and an unusual surface texture. It comes in clear, mono-color, multi-color, glitter, gold and silver.
The size of the decor particles may also differ: there are powders with small, medium and large fragments. But still, it is a powder that is used to cover the entire nail, French, finishing designs, creating “lace”, knitted designs. It looks good on wedding manicure, gradient, any colors of gel polish. “Sugar” is poured onto a damp top with a spatula or a pusher, after which it is polymerized, the excess is removed with a brush and the design is worn for 2-3 weeks.
Strengthening nails with acrylic powder for gel polish
You can strengthen your nails with acrylic powder to give them a healthy, natural look, or you can strengthen them with acrylic powder under gel polish. These two techniques do not have any fundamental differences, just a few nuances. The procedure itself is so simple that anyone who has the skills to create a gel manicure can handle it without any problems.
Photo from website: mailbusiness.ru
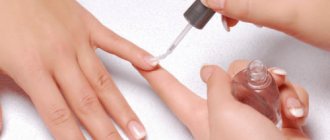
Let's look at how to properly strengthen your nails with acrylic powder step by step:
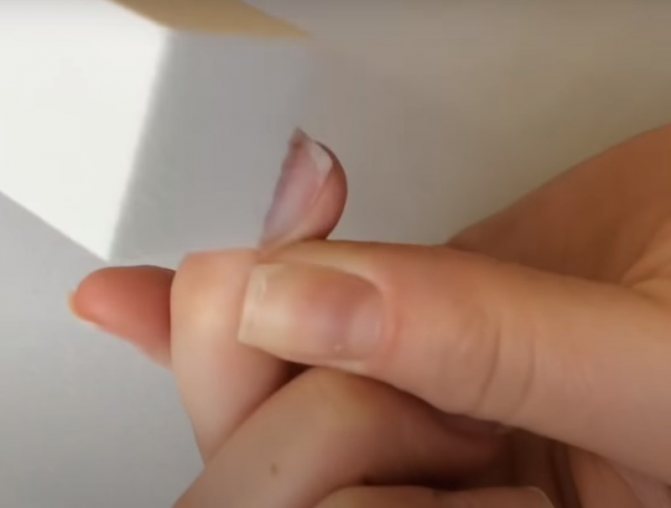
- As always, at the beginning of any procedure it is necessary to carry out a hygienic manicure and shape the nails.
- The nail plate should be thoroughly cleaned of pterygium (neglecting this point is the most common reason for any coating to peel off from the nails)
- Next, you need to thoroughly sand the nail plate (but without fanaticism, you only need to remove the gloss) and clean the nails from any dust that has formed.
- It is necessary to treat your nails with an antiseptic.
Important
Never neglect antiseptic measures! Gel coating, or strengthening nails with artificial materials, stays on the nails for a long time, and any infection in the form of a fungus that is locked for a long time with a dense coating is an excellent environment for the development of pathogenic microorganisms.
Application of primer. It will make the surface of the nails more porous and improve the adhesion of natural keratin to the artificial material. Applying base gel. For the procedure for strengthening nails with acrylic powder, it is advisable to choose thick silicone consistencies, for example, such as the KODI base. Acrylic powder is applied to the wet base. The powder can be colorless (if a decorative coating is not applied to the nails), or colored powder can be used (if the nails are strengthened with acrylic powder under the gel, the color of the acrylic powder is not important, it will still be covered by the pigment of the selected varnish )
It is important to cover the nail with a thick layer of acrylic so that there are no voids left. After covering the nails with acrylic, they should be dried in a UF lamp for 2 - 3 minutes. After polymerization, you should carefully remove the remaining acrylic powder from the nails using a nail brush. If the acrylic was applied unevenly and bumps or grooves formed in places, the plate should be sanded until an even layer is formed. Next, if no further nail decoration is planned, a top layer of gel is applied over the acrylic. It is necessary to give nails a smooth surface and a beautiful gloss.
The top is dried in a lamp, and then the sticky layer is removed. If a decorative coating will be applied on top of the acrylic, then it is better not to apply the top or base, but to immediately cover them with colored gel polish. Due to the rough surface of acrylic, colored gel polish will better adhere to the surface of the plate. Colored layers of gel polish must be dried in a lamp. After all layers of colored gel polish have been applied and all decorative work has been completed, the finishing coat is applied and dried in a lamp. At the final stage, remove the sticky layer and apply cuticle oil or cream.
Photo from the site: manikurpro.ru
By the way, it is not at all necessary to cover the entire nail plate with acrylic powder. It is enough to strengthen only the stress areas - the free edge of the nail and the side edges near the nail bed. Then, using a nail file, all that remains is to level the boundaries of the acrylic layer, and smooth out the transitions with an additional base layer.
Naturally, as the nails grow, the border of the plate reinforced with acrylic will clearly be evident. However, its correction is simpler than with gel nail extensions. It is enough to remove the top layers of gel polish in the usual way. Then you should carefully sand the acrylic coating without removing it completely and level out those areas where the acrylic was not applied or has come off. Apply the base gel again to the nails, including those areas where it was not applied, and cover evenly with acrylic powder. That's it - your nails are strong again and ready for a new decorative coating.
Pros and cons of plush nails
Let's take a look at the positive and negative qualities of velvet nail coating. Once you know these aspects, you will clearly decide whether to resort to this type of manicure.
pros
- Velor manicure is ideal for those occasions when you want to be the center of attention.
- The procedure for applying a velvet coating only takes half an hour and does not require special skills.
- If you did velvet nails not on your own, but in a salon, then this coating will last as long as 20 days, without requiring special attention and care.
- This coating has no analogues; it is unique and stylish.
- Small pieces of flock can not only create a seamless coating, but also help create an interesting pattern even with small details.
Minuses
- The considerable cost of the procedure when going to the salon and materials for use at home. This is explained by the fact that this product is new on the nail market.
- If you created velvet nails at home, then be prepared for the fact that your suede coating will only last a couple of days.

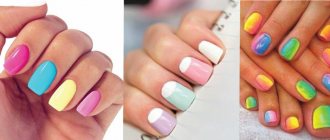
The best color combinations in velvet manicure – 2022
Velor manicure looks much better when a woman's nail is not too long. Velvet manicure in various fashionable shades is very soft and pleasant to the touch. Dark shades of velvet coating go well with pastel shades. Pink this year can highlight light pink, and blue can be combined with brown. When choosing a shade of velvet manicure, it is very important to take into account the colors in your clothes.
Pros and cons of this type of manicure
All types of decorative nail coatings have pros and cons, velvet sand is no exception.
Among the advantages:
- simple technology
- minimum material
- time saving
- Suitable for your own and artificial nails
- originality and solemnity
- for different age categories
- durability (salon procedure)
- interchangeability
Even a beginner can master the technique of applying velvet powder after watching the instructional video and following the sequence of actions. The procedure is quite quick if you don’t get carried away with a complex pattern and cover your nails with one color. The sand lasts for a long time if you cover not the entire nail, but part of it in the form of a pattern.
If velvet sand is not enough, it can be successfully replaced with acrylic powder with large granules, powder for scrapbooking or embossing.
Flaws:
- the pleasure is not cheap (salon procedure)
- vulnerability, instability (home manicure)
- not suitable for daily wear
- difficult to remove tea and coffee stains
Velvet manicure looks very solemn and will not always be appropriate in everyday life. The fibers are quite fragile and can wear off unevenly, leaving unsightly bald spots. Not everyone likes “hairy” nails; reality does not always correspond to expectations. This mainly concerns home manicure in the hands of an amateur. If we are talking about a master with a capital letter in a trusted salon, then believe me, the velvet nail coating cannot be compared with anything. It is truly original, luxurious and sophisticated.
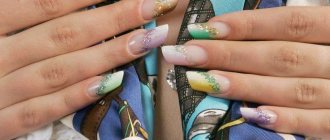
Velvet, also called cashmere or velor, the coating looks most advantageous in tandem with another coating.
The combination of several types of design looks extremely beautiful and elegant, but at the same time natural. This is because sand creates a natural velvet-velor impression, and in combination with rhinestones and decorative painting it looks noble and very aesthetically pleasing.
https://youtube.com/watch?v=https%3A
https://youtube.com/watch?v=https%3A
Velvet sand for nails, what is it?
If you can’t decide what’s best to cover your nails with, try velvet sand for nails; we’ll tell you what it is later.
Sand with a velvet effect is incredibly popular in manicure art due to its ease of application and its unusual nature. Essentially, this is a multi-colored acrylic coating crushed to a powder state, has fibers and is applied to the nails with a special brush. Used in its pure form to create a matte finish or with the addition of viscose for shimmering effects. It looks great either completely on its own or in combination with gel polishes as a decor.
Thanks to the texture of velvet sand, the master can easily create a luxurious pattern and create a three-dimensional design of unique beauty. The length of the velvet coating fibers varies and depends on the texture of the coating, which can be silk, cotton, wool, acrylic, etc.
A manicure with velvet does not have a finishing coat applied to preserve the velor, rough effect. But despite the absence of a fixative, it stays on the nails for a long time (up to a month) and does not lose its original velvety appearance.
Review of manufacturers
Artex
- shimmering powder "Glitter" . Finely ground with added glitter. The main color is white. The manufacturer recommends drying the nails again after brushing off the excess coating;
- shimmering powder "stardust" . Fine powder with glitter. Glitter creates a rich shimmer effect and can be used as part of decoration or as an independent nail coating.
Patrisa Nail
- semolina for design No. M. Multi-colored, coarsely ground, with grains of sand in yellow, blue, green and pink. Due to the size of the particles, it is suitable for creating “candied nails”;
- semolina for design No. M Grains of sand are predominantly yellow, interspersed with pink, blue and green.
IRISK
Decor “Velvet Sand”:
- №10. Small, light purple in color. Suitable for creating a velvety surface without pronounced grains;
- №11. Rich crimson color.
InGarden
Velvet sand:
- white . Used to create a three-dimensional design and takes on the tone of gel polish or gel paint;
- white with sparkles . Adds an unobtrusive shine to your manicure.
UNO, Velvet sand with shimmer
Coarse sprinkles with microscopic glitter. Due to the presence of shiny particles, after drying the sand creates a holographic effect, unobtrusively playing in the light. The manufacturer offers several colors - pink, lilac, lime.
How else can you make velvet on your nails?
The method described above is the most popular. Perhaps you could even call it a classic. But, of course, there are other methods that also deserve attention.
Velvet sand for the base
To obtain a velvety effect on nails, you can successfully use other materials. As an example, here is one very simple way to create a plain velvet manicure. Using this method, you can completely do without a top. We will need:
- white gel polish;
- rubber base;
- “marmalade” for nails (melange) of the desired color;
- transparent acrylic powder.
First, we carry out all the preliminary steps and apply gel polish. Then:
- Cover the nail surface with a rubber base (not top!). Of course, there is no need to dry it.
- Sprinkle the nail generously with melange, making sure that no bald spots remain. It is convenient to shake off excess material by simply tapping your finger.
- Without drying (!), sprinkle transparent acrylic powder on top. We do not skimp on the material - what is needed will be absorbed into the coating and will not allow the melange to crumble. We also remove excess powder by simply shaking it off.
- Dry it in a lamp, take a brush and remove the excess - done!
Varnish and top coat with velvet effect
Manicure with sand is so popular that many cosmetic product manufacturers have begun to produce special series of nail polishes with a velvet effect. Such varnishes contain particles of acrylic powder and immediately give the desired result.
The so-called velvet varnish dries in a few minutes without any lamp. It is applied in two layers - apply the first, wait 2-3 minutes, then apply the second.
Professional craftsmen practically do not use such varnishes, but if you like minimalistic design that is easy to carry out, then velvet varnish should definitely be on your shelf. In general, it is ideal for girls who like quick results without additional procedures.
Velvety nails can also be achieved using special matte finishes with the effect of velor, velvet or cashmere. But as with a special varnish, they will not be able to achieve the impressive volume that is achieved with the classic method - acrylic velvet sand.
Interesting nail design with sand
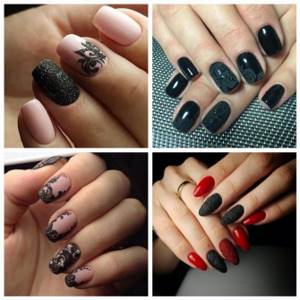
Nail design with sand has a lot of different options:
- French, including colored;
- complete nail coverage;
- use with red gel polish;
- lace made with black sprinkles;
- golden “sugar” with a nude overall background;
- wedding;
- finishing designs with colored powder;
- gradient.
French
French with sand can be made in different ways:
- Carry out a classic French design. Sprinkle 1 nail per hand completely with transparent decor, and shade the adjacent one with cuticle material.
- Choose a nude shade of gel polish as the main one. And make the “smile” with colored velvet sand. You can take 2 different shades of it and apply both to the free edge of each nail: one from the left side roller, the other from the right, so that they meet in the middle.
- Carry out a traditional French design. But on 1 nail of each hand, do a complete manicure with sprinkles. It can be white or pink, that is, combined with primary colors. Or they take a bright shade that stands out against the background of the tones of a classic French jacket.
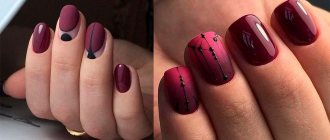
Combination with red
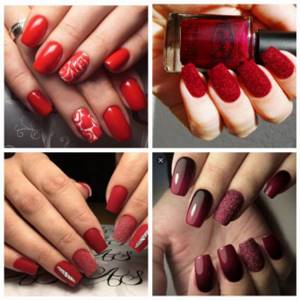
There are also many design options with red gel polish:
- Cover all nails with the main color, but on 1-2 nails use a lighter shade to create a gradient. And apply transparent velvet sand on them.
- Use purple or scarlet gel polish and the same decor. The last one on 1 nail is to lay out a wide strip in the middle, from the base to the free edge. And on the adjacent plate make two triangles - thin lines and thick ones.
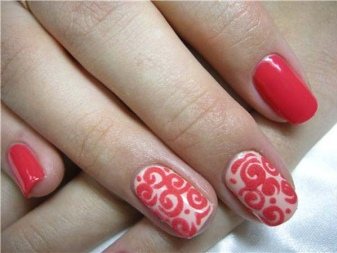
- Paint all your nails red except for the middle or ring finger. Use white or pink gel polish for it. And on the same nail, draw flames or another pattern with red sand.
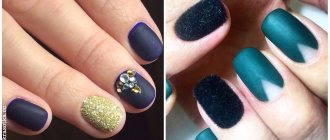
Spectacular gold
Gold decor can be used in the following ways:
- Choose yellow as the base color, but cover 2 fingernails with white gel polish or milk base. On one of the last ones, lay out the diamonds with velvet sand. On the second, draw a square and next to it print golden transfer foil so that the color of the gel polish is not hidden under the decor.
- Cover all nails with a beige flower bed. On the ring and little fingers, make wide, curvy lines with gold “sugar.” Cover the remaining space on these nails with a matte top coat. For all other fingers, use a gloss finish.
- Complete baby boomer design. But on the little finger of one hand and the ring finger of the other, the nails are completely covered with gold decor.
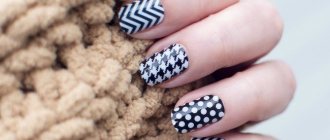
With black powder
The following designs look impressive with black powder:
- As the main one, choose any light shade of gel polish. But 1 nail is completely covered with black “sugar”. And on the next one, with the same decor, they draw an ornament in the form of branches with leaves.
- The nails of the thumb, index finger and little finger are covered with black gel polish and a glossy topcoat. For the rest, a camouflage base is used. And black “sugar” is applied on top of it, but a negative space in the form of a hole is left. The border between shades is decorated with small transparent rhinestones.
- For the nails of the thumb, index finger and little finger, choose a dark blue nail polish with a sand effect, that is, with fine shimmer, and a glossy finish. On the middle one, the plate is almost entirely covered with black “sugar”, but the hole is highlighted with rhinestones of the main shade. The ring nail is made completely velvet.
Drawing ideas
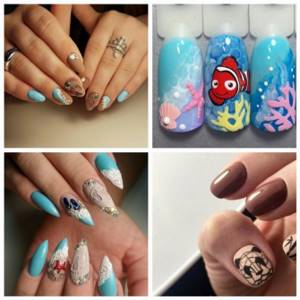
When decor first appeared, sand drawings in the form of black lace were in fashion. This is an ornament of interlacing lines, thin and thickening. It has not lost its relevance even now, but lace is also painted white on a nude background, and also fashionable images:
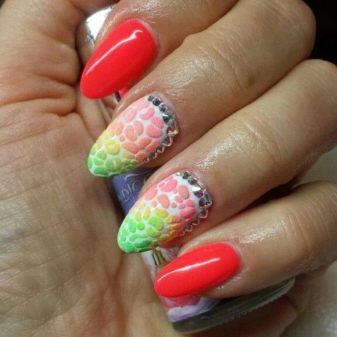
- fruits or their slices, in which some details are highlighted with “sugar”, or used for the entire design;
- butterflies, where multi-colored wings are decorated with velvet sand of different shades and rhinestones;
- furry animals (cats, foxes, bears, dogs, goats, tigers);
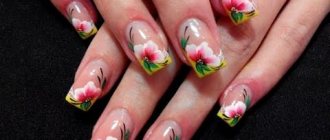
- flowers that are depicted without stems, but only petals and core;
- rosettes made with strokes that are not connected to each other;
- mittens, snowmen, snowflakes, a Christmas tree and toys for it, that is, New Year's attributes.
Images should not be small or only made with thin lines. This way the “sugar” texture can be lost.
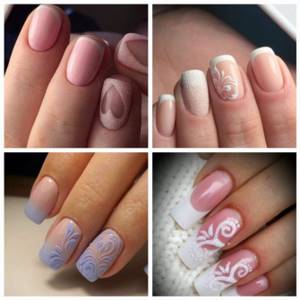
Delicate wedding manicure

A gentle manicure for the bride is:
- A combination of classic French and lunar. But a transparent topping is applied to 1-2 nails and flowers are made from gel plasticine on them.
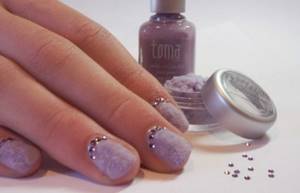
- Multi-colored design, when each nail is painted in its own tone, but only light ones are used - pale pink, peach, beige, milky, soft blue, lemon, lilac. On 2-3 fingers they are completely decorated with transparent “sugar”, and on the rest they need a pearl rub.
- Use soft lilac gel polish as the base color. On the right hand, a branched pattern is drawn with white “sugar” on the middle and ring fingers. You can choose milky as the base color. And paint the lace on 2 nails with lilac, pink or blue velvet sand. On plates with ornaments, 2-3 transparent rhinestones are used.
Design with sand ombre on gel polish
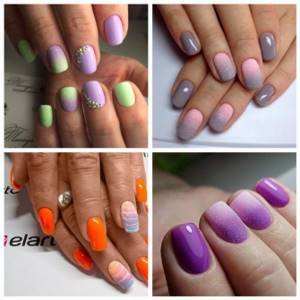
A very fashionable nail design with sand on gel polish - ombre, also known as gradient:
- With red and burgundy flower beds. They are swapped on each finger. For example, on the index nail from the base they cover it with burgundy, closer to the edge - red, on the middle one they do the opposite, etc. Then for one they use a matte top, for the next - transparent sand, for the third - a glossy finish, for the fourth - a row red rhinestones The thumbnail is also covered with “sugar”. The idea can be used with any related shades of gel polish.
- Perform ombre with light tones. Using transparent velvet sand, make 2 curls - from the base of the nail and from the end, so that they meet in the center. The pattern is made on 1-2 plates.
- Make gradient stripes on your nails. First, they are completely painted with any base color. Then wide gradient stripes are performed along the plates when manicuring short nails with sand. Or across each one for a long length, using 2 colors of sprinkles in both cases. You can make geometric shapes in the same way.
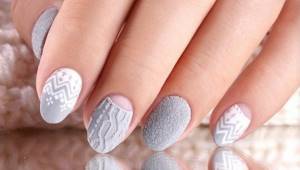
Sweater
The sweater design is called that because it is similar to knitting. It can be made in any color. But a knitted manicure looks more natural when one shade is used as the main one and for drawing out details. Convex parts can be made in the form:
- two parallel straight stripes along the nail and short squiggles running diagonally located in the space between them;
- braids made from base to end;
- curved stripes forming diamonds, and dots in the center of each of the geometric shapes.
Use transparent “sugar” or the same shade as the gel polish. You can take similar tones of both, for example, white, pink, light yellow velvet to a beige base.
Benefits of sugar manicure
Girls and women around the world increasingly prefer this type of manicure because:
in this design, nails look stylish and attract the attention of others; Using this technique, you can cover all your nails, or you can only cover individual parts of them, which will make the design even more original; the procedure does not take long and can be easily performed at home; the material used in the work is quite durable: it will stick to the nails when doing household chores and frequent contact with water; If you don’t do a sugar manicure yourself, but go to a professional, it can last about three weeks.
Nails with lunar manicure 2022 fashion ideas for the season photo
Almond-shaped long nails will look even more graceful if the main part of them is painted with one shade, and the lower arch along the nail bed is painted with a contrasting shade. The fashion for lunar manicure, popular in the middle of the last century, was introduced at one time by Dita von Teese, a famous lover of retro. In 2022, variants of this design should be made in pastel colors with a predominance of white, peach, mint, turquoise, soft pink and blue shades. You can also use special strips for nail art instead of contrasting varnish.
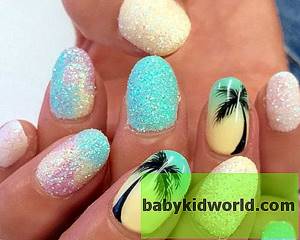
Stylish sand nail art ideas
After the long-awaited purchase, you can move on to the creative part and bring your ideas to life. A colorful collection of photos will inspire you to new experiments and unleash your imagination. Try to start with a solid color, because sandy nail designs look perfect with light and delicate shades of white, pink and peach. Sugar nail art also looks very impressive in black. If you want to choose bright, variegated tones like blue, green or red, you should keep in mind that such contrast is not always beneficial for a textured manicure. To make the sand nail design look new, you can apply a top coat, and the nail art will look very mysterious and alluring. The photo shows several variations of the original manicure.
Sugar nail design is not limited to just a monotonous finish. To create patterns, you can use sand varnishes of various shades
Try, for example, coloring each finger in a different tone or focusing on two nails by making. You can very successfully combine a sand coating of the same shade with or without glitter
In addition, sugar polish can complement the patterns and pictures of regular nail designs. Look at the photo and choose the right nail art for yourself.
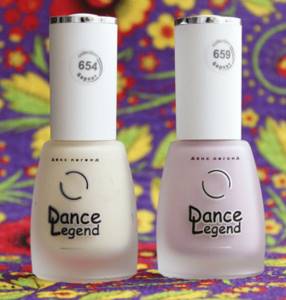
Ease of use makes sand nail polishes accessible to girls with different skill levels. Thanks to its original and attractive appearance, sugar manicure is becoming increasingly popular, and manufacturers are expanding their product range every year. In the final video, beauty blogger VashaNedasha will show you 2 luxurious shades of sandy Sahara Crystal nail polishes from. Experiment and always remain beautiful!
Well-groomed hands are the main calling card of every woman. To make an original manicure, special decorative jewelry can be used, but recently material such as velvet sand has become in demand.
Nails with French 2022 fashion ideas for the season photo
The classic French 2022 is a natural nail color and a white-painted tip. Now French is not limited to this combination. Anyone can take the place of white. Strict colors are suitable for the office: black, red, dark blue. For the holiday - brighter, golden, silver. The design of the nail tip can also be changed. It is no longer just painted, but decorated in an artistic way - drawing, modeling. The French jacket can be made up of any two matching colors that a woman desires.
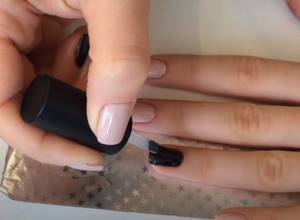
Instructions for creating a velvet manicure with your own hands step by step
- Be sure to remove any remaining manicure and adjust the shape of the nail if necessary.
- Cover the nail with a layer of base polish. If desired, it can be transparent, match the tone of the sand, or even contrast with it. But it is better to use colorless.
- After the first layer has completely dried, you can apply the next layer. It is best if it matches the tone of the velvet sand, but the contrast looks interesting. Especially if a pattern will be created on the coating.
- As soon as the second layer is applied, you must immediately sprinkle the surface with sand.
The varnish should not have time to dry, otherwise the design simply will not stick. Don't paint all your nails at once. It is better to work with each finger separately.When applying the coating, hold your finger over the sand box to retain any loose material.
- Afterwards, you need to wait until the surface of the sand-coated nail dries.
This is the most important and difficult stage, since it is quite difficult to understand it exactly. The manicure will take at least 15 minutes to dry, and it is advisable for the hands to remain at rest so that the integrity of the coating is not compromised. - Once your nails are dry, you need to sweep away the excess sand. To do this, use a special hard manicure brush.
- At the end, the finished manicure can be coated with a fixative, but the texture of the coating may be damaged due to this. Therefore, this is not recommended.
The video instructions will tell you more about how to make velvet nails at home.
Technology of applying velvet sand to nails: step-by-step instructions
The technology for applying velvet sand to nails may differ slightly depending on whether decor is used on the entire plate or on part of it. In the first case, the step-by-step instructions look like this:
- A standard hygienic manicure is performed, including processing the cuticles, shaping the nails, filing the surfaces with a buffer, and wiping with a degreaser.
- Then the base is applied, dried, painted in 2 layers with gel polish and both are polymerized.
- After removing the stickiness from the flower bed, a finishing agent is applied to the nail, which is not yet dried.
- Using a spatula, pour velvet sand onto it, trying to ensure that its layer is even.
- The finger is lowered with the tip down and lightly tapped on it so that the excess decor falls onto the placed napkin.
- Then it needs to be placed in a drying lamp.
- The remaining excess decor is removed with a brush, passing it over the surfaces several times.
Using nail polish when making designs, geometry, that is, partially filling the plate with decor should be done a little differently:
- It is better to create images and lines not with gel polish, but with gel paint. Then you won't have to apply an extra layer of topcoat.
- When the design is ready, velvet sand is poured onto the nail with a spatula. You can do this several times.
- The lowered finger should be tapped in the area above the nail. This will help you get rid of excess decorative powder.
- The coating is polymerized in a lamp. It is better to hold your finger there a little longer than usual to secure the decor more securely.
- Brush over the nails to shake off excess “sugar.” Only the non-adherent particles will fall off.
Watch the video on how to do a manicure using the velvet sand technique:
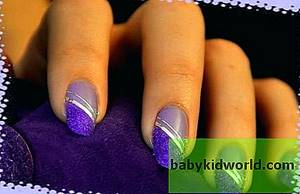
Regular gradient
To make a gradient with velvet sand, the following steps are required:
- The ombre technique is performed using gel polishes. That is, they apply stripes of selected shades end to end and make the border more blurred using a comb brush. You can also use a foam sponge or air puffing. And to make the shades more saturated, apply a second layer of gel polishes after drying the first. And they are also mixed at the border.
- After polymerization of the finished color coating with a clinser, the stickiness is removed and the top is used. There is no need to dry it yet.
- Colorless velvet sprinkles are poured onto the wet finish in a thick layer. A spatula is used for this.
- You need to wait a minute for the decor to bond more securely with the finish. You need to lower your hand with your fingertips down and tap them without touching the nail, after which the excess “sugar” will fall into the placed jar.
- Now it's time to put your finger into the lamp. After polymerization, which should be extended for half a minute, the nails should be brushed.
Ombre colored sand in the picture
You can use nail polish on gel polish using the gradient technique differently than in previous cases if you make a drawing:
- They do a hygienic manicure and color coating as usual, but without a finishing agent.
- Make a drawing with gel paint so that it consists of separate lines and occupies the entire nail.
- Take the first pigment and sprinkle it on the top third of the plate, shaking off the excess by tapping it with your finger.
- “Sugar” of a different color is poured onto the middle part, but so that it goes to the border of the previous shade.
- The excess also needs to be shaken off, as in the previous case.
- For the last third of the nail, use the third tone of velvet sand as in step 4.
- For richer shades, you can repeat steps 3-6.
- After a short pause, during which the decor “settles down,” the coating is polymerized.
- Nails are treated with a brush.
In this video you will learn what velvet sand is and how to work with it:
French manicure technique
A “sugar” jacket will require a little more time and effort than a continuous decorative coating:
- It is done in the traditional way, that is, the prepared nails are painted with a base, a “smile” is painted with white or another chosen gel polish.
- The coating must be polymerized.
- “Smile” is coated with topcoat, it is not dried.
- Decorative sand is poured onto the tips of the nails and the excess is shaken off.
- The hand is placed in the lamp.
- After polymerization, excess “sugar” is removed with a brush.
- Apply the finish to areas of the nails without sand and dry.
To avoid accidentally falling outside the “smile” line when using topcoat at the 3rd stage, you can stick stencils on your nails.
Sweater design
The technique of knitted manicure with “sugar” is also simple, but requires imagination:
- Apply gel polish as usual, but preferably with a matte finish.
- Apply the knitted ornament with a top coat, do not dry it (for volume, you can use 2 layers, but then the first one is polymerized).
- Sprinkle “sugar” on the nail.
- They wait a minute for the decor to settle down.
- Shake off excess by tapping on the lowered finger.
- Dry the coating.
- Fan it with a brush to remove any excess decor.
- The ends are filed.
Velvet manicure options
There are a huge number of options for decorating nails with velvet sand, for example:
Winter patterns - will help attract the attention of others and delight you with bright colors; Sand together with red varnish - even the most modest girl can become a cancer beauty. This manicure uses red gel polish, and by decorating your nails with sand, the manicure will become unusually bright;
Sand with colored varnish
Do you like to attract people's attention and please yourself with bright colors? Then this manicure option is definitely for you. Using colored varnish in combination with sand, it will turn out very beautiful;
Manicure for a wedding - masters often receive requests for drawings of flowers and various patterns (using white varnish). All this can be sprinkled with sand, thereby easily emphasizing some patterns.
There is an opinion that such a manicure is completely inconvenient in everyday life, but believe me, this is not the case. And if you correctly follow all the step-by-step application steps, it will last for a very long time.
A stylish, stunning designer manicure of your nails with sand will delight you and those around you.
You can remove his sand manicure in the same way as any other - with a regular liquid that removes gel polish.
Good luck and beauty to you, dear women!
Preparing nails and applying “Velvet” decor. Watch video instructions:
Learn how to properly do “Velvet Design” nails from the following video:
Secrets and tips for the perfect “Velvet” manicure. Find out from this useful video:
Subtleties of work
Making a nail design with “sand” is quite simple, but there are subtleties of the work, taking into account which you can create the perfect manicure.
- It applies best to varnish with a matte texture.
- If you want to draw patterns with velvet sand, it is best to use gel paints because they do not smear. This way your drawing will turn out neat and beautiful.
- Gel paint should not be too thick. If it has this consistency, then add a little gel polish of a suitable shade to it.
- You need to dry “Velvet Sand” in a UV lamp, taking into account the characteristics of the material. Dark, rich colors usually take longer to dry in the lamp. You also need to take into account the size of the grains.
Taking into account all these features of the work, you can create the perfect manicure that will look elegant and sophisticated. “Velvet” goes well with any style, the main thing is to choose the right design.
How to do a manicure
Before you make velvet sand on your nails, you need to decide which technique is closer to you. You can make a continuous pattern for the entire (or all) fingers, or decorate only some parts of the nail plate (say, draw abstract lines on them).
1 method
Step-by-step instructions for velvet manicure:
- Clean your nails from old polish and, if necessary, give them the desired shape;
- After this, apply the first coat of varnish. The base can be any color, but it is advisable to use transparent. A contrasting color in relation to the sand also looks good;
- Next, apply a layer of varnish again, and before it dries, sprinkle it generously with sand. Now we have to wait. The main disadvantage of this manicure at home is that it is difficult to understand whether the nail is dry or not. We recommend waiting at least 10 minutes in a warm room and about 15 in a cool room;
- After this, use a stiff manicure brush to sweep away individual grains from your finger and shape the pattern;
- If necessary, the sand can be coated with Shellac on top, so it will last longer, but will become less structural.
Of course, the manicure will be more durable if you use gel polish, but in this case you simply need an ultraviolet lamp. With its use, the technology changes a little.
Photo - How to make velvet sand on your hands
Method 2
Clean the nail and paint it with the base color. After that, draw any pattern, such as a flower. Sprinkle this pattern thoroughly with sand; if necessary, you can lightly press the grains with a bamboo stick, but then you may lose the volume of the pattern.
After applying velvet sand to your nail, you need to place your finger under the warm rays for a couple of minutes to let the polish dry. After this, shake off the remnants of the textured decoration from the surface of the plate; apply a couple of drops of fixative gel on top of the sand. If you cannot do a manicure with liquid stones, then this is the best option to replace this style.
Many reviews claim that when worn carefully, velvet sand hardly suffers, only if you buy a white product, as in the photo, it becomes a slightly darker shade on the nails.
Tips for creating a stylish manicure:
- To create a classic look with a little twist, make a traditional French manicure on your nails and decorate the tips of the plates with white sand. With this design, silver rhinestones would also come in handy;
- When working with sand, do not skimp on it. Sprinkle a large amount of product onto your fingers;
- When applying, you need to lightly press the powder, this way it will fix better;
- Experiment. Draw uneven lines, combine two or more shades.
The average cost of sand on the Internet is from 50 rubles per 5 grams. The Amy brand, which is a professional nail art product, is very popular.
Nails with kamifubuki 2022 fashion ideas for the season photo
Kamifubuki on nails is the hot trend of the season! One of the fashion trends that will gain popularity in 2022 is a manicure with kamifubuki. Coming to us from distant Japan, this design is particularly impressive and simple at the same time. The exotic name hides ordinary confetti, albeit of small diameter. For manicure, confetti of several colors and different sizes is usually used at the same time. Kamifubuki are placed on a plain surface using tweezers and secured with a top layer. As a result of such simple actions, a real masterpiece is obtained. Kamifubuki is good because it gives you the opportunity to show creativity and create a truly original manicure. Confetti fits perfectly on both light and dark surfaces, and on a transparent coating you get a great example of a manicure in the “negative space” style. You can use them on each nail, or highlight accent ones – it’s up to you. There are also many options for arrangement: ordered, chaotic, at a distance, close to each other, or even overlapping each other.
Peculiarities
It has become fashionable to decorate nails with soft sand and a matte top. The result is a gorgeous plush surface. Sand manicure looks luxurious and original. It is created using a special powder called “velvet sand”.
There are several types of flock. It can give your nails the look of velor, corduroy, cashmere, satin or suede. After final processing, a matte finish may be obtained. The color of the sand depends on the base gel, when mixed with which the powder acquires its color. Interaction with varnish does not affect the texture of sand.
Sand manicure is great for natural and artificial nails. Any type of varnish is suitable. A plush manicure looks voluminous even without applying a top coat. Any design created using gel can be decorated with velvet or acrylic powder.
How to apply velvet sand at home yourself
You can do this easily and quickly yourself. It is enough to stock up on the necessary equipment. And yet, let's look together at all the stages of application when creating this manicure:
Step-by-step technology for velvet nail design:
- We prepare our hands for the work ahead. It is advisable to make a bath for your hands, then carefully remove the cuticle and rough skin, then smooth out the nail plate using a buff;
- We treat each nail with a primer in order to degrease and allow the gel polish to firmly fix;
- Apply the base coat and dry it in a lamp;
- Now we move on to applying the colored gel, which is taken as a basis;
- We cover the nail with top coat and apply our velvet coating (any of your choice);
- Dry it again in the lamp and remove excess fluff.
This easy process will help you create an unusual velvet manicure design. The time to create it varies from one to two hours, depending on your skills. The average time to wear such beauty on your hands is no more than two weeks.
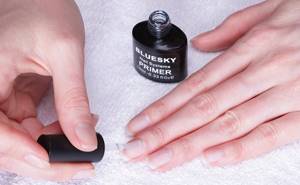
Primer treatment of nails
Subtleties of application
Overall, applying granulated sugar to the surface of your nails is not that difficult. If you know how to do a manicure, then you won’t have any problems with this. You don't even need any additional tools. However, an ultraviolet lamp will help you make the process of creating this exquisite manicure easier. It will help your nails dry faster.
But make sure that it is coarsely ground and of very high quality. However, before doing a manicure using such a substitute, test it. Apply it to a small area of the nail plate and secure with topcoat.
Sand can also be used to create interesting designs by decorating your nails with subtle patterns. It will adhere very well to gel polish and will not spread over the surface of painted nails. If you make a mistake and spoil something, the small problem can be quickly corrected with the help of a special cleaning liquid.
To make a textured sand manicure, you can either apply it over already painted nails, or prepare a special mixture. To create it you will need to mix gel polish with sand. Ideally, for this you need to choose a gel of a pastel or other light shade. This way the finished manicure will be as close as possible to what you see in the pictures.
Keep your nails in the lamp for as long as necessary for the coating to set. After this, do not touch your nails for another half hour. This way you will be sure that the surface will not be damaged.
Let's look at another way to create a beautiful manicure using velvet sand. The technology is simple, the main thing is to do everything step by step.
First of all, you need to prepare your nails. Here the process is practically no different from preparing nails for a simple gel manicure. They need to be carefully filed, adjusting the shape, and then degreased. Next, you need to apply a base layer to the surface of the nail plate. After it comes the main shade. Ideally, it should match the color of velvet sand or differ from it by only a few shades.
Immediately spread colored sand over the surface in a thin layer. Once you have covered the entire nail or created the design you want, wait for them to dry. At room temperature it all dries for twenty minutes. During this time you don't need to do anything, just rest and wait. You can consolidate the result by covering your nails with a special finish.
If you did something wrong during the process, you can correct visible imperfections using a special brush. Use it to clean the surface of your fingers beyond the edge of the nail plate. If you have a little free time, then you can easily speed up the drying process of your nails using a UV lamp. In this case, you will need less than five minutes.
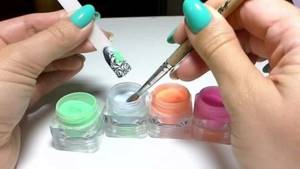
Materials for applying sand to gel polish
To apply sand to gel polish, all you need is:
- A plastic spatula used to scoop and apply decor to nails. It can be replaced with a pusher.
- A hand brush, which is used to fan the fingertips after the sand has polymerized. Instead, you can use a hard fan brush.
- All equipment for manicure and coating. These are orange sticks, a file, a buff, cuticle nippers, lint-free degreasing wipes, a primer, a base, gel polish, top coat, and a drying lamp.
Of course, for a manicure with a sand effect you need the decor itself.